Advertisement
Available languages
Available languages
Quick Links
Advertisement

Subscribe to Our Youtube Channel
Related Manuals for Gigabyte MB Series


Summary of Contents for Gigabyte MB Series
- Page 2 FCC 聲明 FCC Complicance Statement / For Users in the USA This equipment has been tested and found to comply with the limits for a Class B digital device, pursuant to Part 15 of FCC Rules. These rules are designed to provide reasonable protection against harmful interference when the equipment is operated in a residential installation.
- Page 3 Preface / 前言 Thank you for purchasing and adopting the SB Series as your favorite computer product. To assure the safe application of this product, please carefully read the following: 感謝您採購與愛用 MB 系列電腦產品。為確保您能安全地使用本產品,請您仔細閱讀以下說明: Please strictly follow the labeled warnings and instructions given. 請務必遵守產品中的標示警告及指示。...
- Page 4 以”*”所標示的規格與實際產品有差異時,以實際出貨產品為準。 Other Product Specifications / 其他產品規格 Micro ATX chassis / Micro ATX 電腦外殼 Micro ATX main board of GIGABYTE / 技嘉之 Micro ATX 主機板 Power Supply / 電源供應器 DVD-ROM / CD-ROM / Optical Device Drives / DVD-ROM / CD-ROM /(選購)...
- Page 5 Chassis / 電腦機殼 Dimension= 350(D)mm x 195(W)mm x 370(H)mm 外觀尺寸= 350(D)mm x 195(W)mm x 370(H)mm This chassis is made with material complied with UL specification. There are two 5.25” and four 3.5” drive bays. This chassis complies with corresponding EMC and safety regulations.
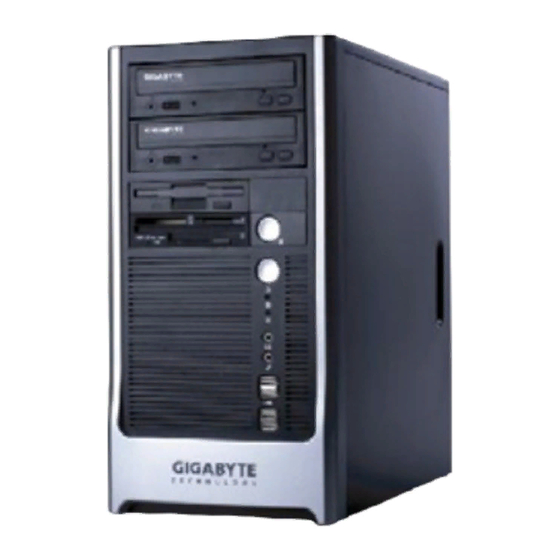
- Page 6 IV. Front and Rear Panel Components / 前後面板的裝置 ➃ ➀ ➄ ➁ ➂ Front & Rear Panel Components / 前後面板圖 1. DVD-ROM (Option) / 光碟機(選購) 4. AC Inlet / 電源接頭 2. Floppy Disc (Option) / 軟碟機(選購) 5. Voltage Switch / 電壓開關 3.
- Page 7 Installing the System / 系統設備安裝 1. Remove the screws of both side covers of the chassis, push backward to dismount the covers. 將機殼後方側板的螺絲卸下,並將兩片側板向後推出。 2. Remove 3 screws of the disc drive chassis and dismount chassis. 卸下磁碟機支架上的 3 顆螺絲,並取出磁碟機支架。...
- Page 8 3. Memory / 記憶體 There are fixing grooves on both sides / 兩側有固定凹槽 Make sure the direction of the foolproof groove must be the same as that of the memory slot on the motherboard. The hooks must be fixed into the grooves before the installation is considered complete.
- Page 9 (( ( Put HDD into the Put FDD into the Align the screws at disc driver chassis disc driver chassis the screw holes 將硬碟機放入磁碟機支架中 將軟碟機放入磁碟機支架中 鎖上螺絲 Note: Bay are for FDD. Bay are for HDD. 注意: 、 槽專供軟碟機使用。 、 槽專供硬碟機使用。 4-2.
- Page 10 4-3. Take out the IDE / FDD bus cables bundled in the accessory kit. Connect the black connector to the hard disk drive and floppy disk drive / option devices, and to the corresponding locations in the motherboard. Align the first pin of the red cable to Pin 1 labeled on the hard disk and floppy disk / option devices, also to Pin 1 labeled on the corresponding locations in the motherboard.
- Page 11 4-4. Connect the connector of the power supply to the power supply socket of the hard disk drive and floppy disk drive / option device. When you finished, align the disc drive chassis back with screws. Follow above note. 請將電源供應器上的電源接頭連接到硬碟及軟碟機/選購光碟機上的電源插座。當您完成後, 請將磁碟機支架以螺絲鎖回原處。注意事項同前。...
- Page 12 5-2. After CPU is secured tightly onto the CPU socket, release the transversal lever and attach it to the CPU socket The CPU fan must be tightly attached on the CPU to maximize the effect of heat dispersion. Connect fan power connector to CPU FAN on the motherboard.
Need help?
Do you have a question about the MB Series and is the answer not in the manual?
Questions and answers