Advertisement
G-SPEED eS INSTALLATION GUIDE - Windows
G-SPEED™ eS
Windows
Installation Guide
G-Technology Inc.
Tel: (310) 449-4599
Fax: (310) 449-4670
support@g-technology.com
P/N GSPEED eS v1.1PC
TABLE OF CONTENTS
1.
(Pg 4)
2.
3.
4.
5.
6.
7.
8.
(Pg 6)
9.
SETTING UP G-SPEED eS USING THE WEB GUI
10.
CONFIGURING TWO G-SPEED eS UNITS IN
RAID 5 MODE
(Pg 16)
11.
WHAT TO DO IN THE EVENT OF A DISK
DRIVE FAILURE
(Pg 19)
12.
TECHNICAL SUPPORT/LIMITED WARRANTY
APPENDIX A - DETAILED INFORMATION ON USING THE WEB GUI
APPENDIX B - EXPLANATION OF RAID LEVELS
APPENDIX C - NOTES
APPENDIX D - FORMATTING G-SPEED USING DISK MANAGEMENT
(Pg 5)
(Pg 6)
(Pg 12)
(Pg 20)
Page 1
Advertisement

Related Manuals for G-Technology G-SPEED eS


Summary of Contents for G-Technology G-SPEED eS
-
Page 1: Table Of Contents
G-SPEED eS OVERVIEW (Pg 5) OPTIONAL G-TECH PCIe RAID CONTOLLER OVERVIEW G-SPEED eS AUDIBLE ALARMS (Pg 6) SETTING UP G-SPEED eS WITH THE G-TECH PCIe RAID CONTROLLER (Pg 6) SETTING UP G-SPEED eS USING THE WEB GUI (Pg 12) CONFIGURING TWO G-SPEED eS UNITS IN... - Page 2 G-SPEED eS INSTALLATION GUIDE - Windows Page 2...
- Page 3 G-SPEED eS INSTALLATION GUIDE - Windows Page 3...
-
Page 4: Introduction
In the unlikely event that you need to provides RAID 0, 1, 5, 10 and JBOD functionality with return G-SPEED eS to us for any reason, you must use the greater than 2TB support in Windows 32bit environments. -
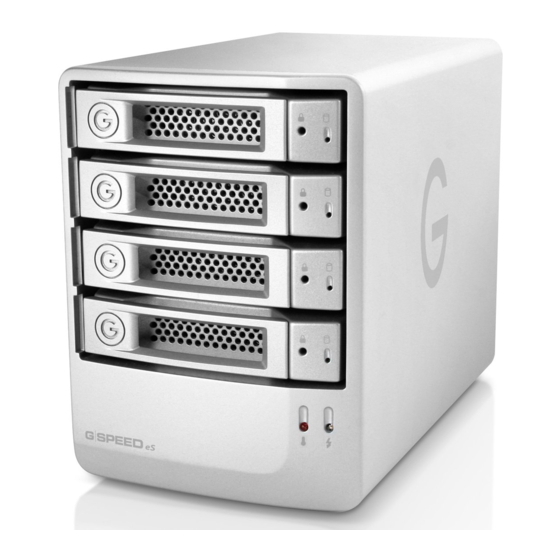
Page 5: G-Speed Es Overview
Temperature/Fan RPM G-SPEED eS systems Warning LED G-SPEED eS is also compatible with third-party Windows port multiplier aware eSATA host adapters. Refer to your host adapter documentation to set up G-SPEED eS with Remo vable these boards. 3 GB/sec eSATA... -
Page 6: G-Speed Es Audible Alarms
G-SPEED eS INSTALLATION GUIDE - Windows 7. G-SPEED eS AUDIBLE ALARMS 8. SETTING UP G-SPEED eS WITH THE G-TECH PCIe 7.1 The G-SPEED eS enclosure is equipped with an audible RAID CONTROLLER alarm that sounds when: Connecting G-SPEED to your workstation and configuring your system takes just a few steps as outlined below. - Page 7 Close this window. closest to motherboard) on the G-Tech RAID controller as shown below. Attach the power cord to the back of G-SPEED eS and connect the other end to AC power. Power on G-SPEED eS. c. When the system boots the “Found New Hardware Wizard”...
- Page 8 <Next>. ROM drive containing the G-Tech Product CD. Continue to “\Manuals-Drivers\G-SPEED eS\PC\GSeS Driver Win- v1.0\” Select the folder for your operating system and click <OK>. g. Select “G-SPEED eS RAID Controller and click <Next>. e. Click <Have Disk>. Page 8...
- Page 9 G-SPEED eS INSTALLATION GUIDE - Windows h. When the Windows Logo warning screen appears j. A new “Found New hardware Wizard” will open for the click <Continue Anyway>. “G-Tech RCM device.” Click <Next>. k. As before, click on “Don’t search. I will choose the The RAID controller driver will install and the Wizard driver to install.”...
- Page 10 G-SPEED eS INSTALLATION GUIDE - Windows Select “G-SPEED es RAID Controller” and click <Next>. 2. Update the G-SPEED eS Controller firmware a. Insert the G-Tech Product CD into the CD-ROM / DVD drive. When the disk loads a welcome screen should appear.
- Page 11 Remove the G-Tech Product CD. d. Select “rr231.xpm.22c” and click <Open>. h. Restart your workstation. 3. Installing the G-SPEED eS Web GUI. a. Insert the G-Tech Product CD. When the disk loads a welcome screen should appear. Click on the <Manuals / Drivers>...
- Page 12 . The Web GU I is ready to be e launched and configure your G-SPEE ED eS. NOTE: For easy access to o the G-SPEED eS W Web GUI save th e web address in y your favorites Page e 12...
- Page 13 Note: Se ee appendix A.4. 5 for instructions s on changing the password. Note: T The G-SPEED eS is s shipped initialize d as a RAID 0 arra formatt ed for Mac OSX. T This configuration needs to be delete...
- Page 14 9.2 C Configuring th he RAID level of G-SPEED e 3. Click the <O OK> button to p proceed. he G-SPEED eS S/G-Tech RAID controller comb bination can be onfigured in RA AID 0, 1, 5, 10 and JBOD. (Se...
- Page 15 R RAID 1, 5, 10 or JBO OD mode by than 2TB (2048GB). e G-SPEED eS RA AID Controller selecting the e appropriate settin ng in the “Array Ty ype” pull-down. overcomes this ba...
- Page 16 GUI are e loaded. 2. Attach both h G-SPEED eS u units to the G-T Tech RAID . Click the <Cr reate> button and the arra ay will begin t...
- Page 17 The “C Create Array” window will appear. WARN NING: This will dele ete any data stored on G-SPEED eS. 6. C Click the <OK> > button to dele ete the array. 7. R Repeat the pr rocedure for G GS Disk 1_1.
- Page 18 ED eS is now ready to be f formatted for u with your o perating system m. See Appen ndix D for detai iled instructions on using Dis sk Managemen nt to format G-SPEED eS S for Windows X Page e 18...
- Page 19 NOTE: If G G-SPEED eS was co onfigured in a prot tected RAID mode (RAID 1, 5 5 or 10), a drive f failure does not re esult in data loss.
- Page 20 Warranty 6. O Once the rebuil ld is complete, G-SPEED eS is s back to service is availa able to the purc chaser by obta ining a Return Normal and pr...
- Page 21 G-SPEED eS 1. Name: A Array name (as shown in GUI only). web GUI. G G-SPEED eS is configured an nd monitored from this pa age. (See Appe endix A.1 for de etails) 2. Type: Di splays RAID lev vel of array.
- Page 22 G-SPEED eS S from the controlle Write-t through: Dat a written to t the array is always passed directly y to the disks.
- Page 23 G-SPE EED eS INSTA ALLATION G UIDE - Windo .1 Array Type e: select the RA AID level for new w array .2 Array Nam me: This is the name that wi ill be displayed d in the MAIN pa age of the GUI.
- Page 24 G-SPE EED eS INSTA ALLATION G UIDE - Windo 9. Lo ocation: Show ws the location o of disks attache ed to the ntroller. ocation: “Contr roller#/Port#/ /Drive#” (This page left inte entionally blan 10. Mo odel: Displays s the drive mo odel and serial number of sks currently at...
- Page 25 G-SPE EED eS INSTA ALLATION G UIDE - Windo o ws pendix A.4: S ettings Auto Rebuild Enables or r disables the auto-rebuild feature. en enabled, a critical RAID 5 5 or RAID 1 array will aut tomatically reb build when a n new drive is inserted.
- Page 26 50% of which data identical data is total available security is p to (4) G-SPEED eS storage units can be attached written to multiple capacity paramount o the G-Tech RAID controller for up to 16TB of drives capacity and over 600 MB/sec of p erformance.
- Page 27 G-SPE EED eS INSTA ALLATION G UIDE - Windo APPEN DIX D: Forma atting G-SPEED D eS using W indows XP . The “Initializ e Wizard” will a appear. Click < <Next> and Disk Ma anagement accept all the e default values 1.
- Page 28 “Perform a quick form at” and then click <Next>. he Wizard will complete and bring you back to t e Main isk Management screen. The G-SPEED eS will format in ust a few seconds and be ready to use! Pag g...
Need help?
Do you have a question about the G-SPEED eS and is the answer not in the manual?
Questions and answers