Advertisement
Table of Contents
- 1 Table of Contents
- 2 Safety and Installation Guidelines
- 3 Brewer Technical Data for Installation
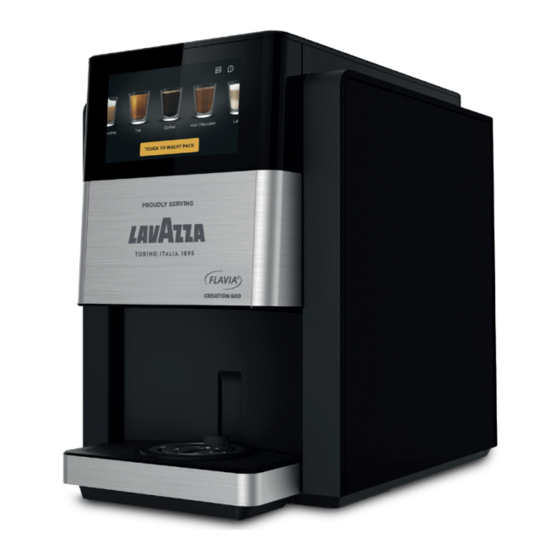
- 4 Introducing the FLAVIA C600 System
- 5 FLAVIA C600 Brewer Layout
- 6 Setting up Your Brewer
- 7 Selecting Compatible Cups to Use
- 8 Preparing a Coffee, Tea, or Hot Chocolate
- 9 Preparing a Cappuccino, Latte, Mocha or Flat White
- 10 Daily Care
- 11 Weekly Care General Cleaning
- 12 Longer Term Care
- 13 Troubleshooting
- Download this manual
Advertisement
Table of Contents

Subscribe to Our Youtube Channel
Related Manuals for LAVAZZA FLAVIA CREATION 600


Summary of Contents for LAVAZZA FLAVIA CREATION 600
- Page 1 FLAVIA ® CREATION 600 U S ER G UI D E USER GUIDE | 1 70-41-3487-0A...
-
Page 3: Table Of Contents
ENGLISH TABLE OF CONTENTS Safety and installation guidelines Brewer technical data for installation Introducing the FLAVIA C600 system FLAVIA C600 brewer layout Setting up your brewer Selecting compatible cups to use Preparing a coffee, tea, or hot chocolate Preparing a cappuccino, latte, mocha or flat white 21 Daily care Weekly care general cleaning Longer term care... -
Page 4: Safety And Installation Guidelines
SAFETY AND INSTALLATION GUIDELINES SAFETY NOTICE This document contains important safety instructions. Please ensure to read and keep this document in a safe place. GENERAL USE In order to prevent harm or injury to those using the brewer or to any other persons and/or property, please be sure to read and keep the following safety instructions. - Page 5 CREATION 600 is designed to prevent taste and allergen transfer between drinks, in the event spillage occurs, please ensure to promptly follow the cleaning instructions in this guide. • The brewer contains an internal barcode reader to read the Freshpacks and provide a great consumer experience. Do not look directly into the barcode reader to avoid harm to the eyes.
- Page 6 SAFETY AND INSTALLATION GUIDELINES CONT. ELECTRICAL SUPPLY AND CORD • Never do anything that might cause damage to the cord or plug (such as modifying, bending, stretching, twisting, or placing hot or heavy objects on them). If the brewer is used when the cord or plug are damaged, electrical short circuit or fire may result.
- Page 7 • Water to be cold drinking water and sodium-free. Sodium-free water is especially important in buildings using sodium-softened water. • Install in accordance with local plumbing regulations. • Jointing compound should not be used in the water supply to the brewer, as this will affect the drink flavor.
- Page 8 If you wish to return this appliance, please contact your account manager to coordinate removal of this appliance. For further instruction on correct disposal, your account manager should contact their Lavazza Professional representative.
-
Page 9: Brewer Technical Data For Installation
BREWER TECHNICAL DATA FOR INSTALLATION HEIGHT 435 mm (17.1”) WIDTH 308 mm (12.1”) DEPTH 511 mm (20.1”) A gap of 76 mm (3”) is required behind INSTALLED DISTANCE the brewer for plumbing, electrical connection and access peripheral FROM WALL connections. OUT OF BOX WEIGHT 14.5 kg (32.0 lb) WEIGHT WITH FULL WATER TANKS... -
Page 10: Introducing The Flavia C600 System
BREWER TECHNICAL DATA FOR INSTALLATION CONT. Ensure that the brewer is placed on a stable level surface capable of safely supporting the weight noted above. ELECTRICAL SUPPLY FOR INSTALLATION It is important to have a power supply ready for an efficient brewer installation. - Page 11 • FLAVIA® • FLAVIA® REFILL CREATION 600 • Module • Brewer Finally, one brewer for everyone • 14 types of hot beverages, including coffees, teas, lattes. • Plumbed in or jug fill when paired with FLAVIA REFILL. • 7” high-resolution touch screen with interactive content. •...
-
Page 12: Flavia C600 Brewer Layout
FLAVIA C600 BREWER LAYOUT 7” High-resolution touch screen Freshpack door Freshpack bin / Freshpack funnel* Cup height sensors Automatic cup stand Drip tray * Features dependant upon individual brewer configuration. This brewer is designed for use with all WHITE nozzle Freshpacks. Please ensure to use this brewer with FLAVIA Freshpacks that have a barcode on both sides of the pack. - Page 13 SETTING UP YOUR BREWER (If you are also installing the optional modules, see page 10, please refer to user guide supplied with those products before setting up brewer). (Fig1) (Fig2) (Fig3) (Fig4) Switch off the water supply, connect the in-line water filter, then connect the brewer to the water line as illustrated (Fig1).
- Page 14 FLUSHING THE BREWER On first set up of the brewer or if the hot tanks have been drained and the machine needs to be re-primed, water will need to be flushed through internal workings. After switching on the brewer at install, please refer to the on-screen instructions in order to do a flush.
-
Page 15: Setting Up Your Brewer
SETTING UP YOUR BREWER CONT. BIN FUNNEL Per the “FLAVIA C600 BREWER LAYOUT” section, the brewer can be fitted with an external Freshpack funnel that directs used Freshpacks into a larger waste bin located externally, beneath the brewer’s installed surface or cabinet. This will require a hole to be professionally cut into the cabinet top or installed surface. - Page 16 To access the Operator menu, please use the default password 3333. Brewer settings can be changed here. ENERGY SAVING MODE The FLAVIA C600 is designed to be highly energy-efficient. In order to conserve even more energy, the brewer is configured to switch into standby mode after 4 hours (or 240 min) of inactivity.
-
Page 17: Selecting Compatible Cups To Use
SELECTING COMPATIBLE CUPS TO USE A new feature implemented into this brewer is the automatic cup stand, allowing cups of many sizes to be used. Most 12 oz cups (375 ml) and some travel mugs will be compatible with the FLAVIA C600 brewer. The brewer can also be used without the drip tray if a user prefers to use a travel mug or a larger vessel. - Page 18 OTHER FACTORS TO CONSIDER There are a few other factors to consider when selecting a cup to use with the brewer: • Hexagonal shape or faceted cups may cause the cup detection system not to operate. • Be aware that the brewer will adjust the cup stand height automatically during the brewing process to minimise cleaning required.
-
Page 19: Preparing A Coffee, Tea, Or Hot Chocolate
PREPARING A COFFEE, TEA, OR HOT CHOCOLATE The clever design of the FLAVIA C600 allows multiple ways of brewing a drink, using its new barcode scanning technology. Users can either select their favorite drink from the drinks carousel on the home screen, or use the quick “TOUCH TO INSERT PACK” option, which then recommends preparation for best taste experience. - Page 20 The brewer will open the Freshpack door and the on-screen instructions will ask for the appropriate Freshpack. Once inserted, follow the on-screen instructions. If the incorrect Freshpack is inserted, the brewer will ask whether to continue, see compatible options for the inserted Freshpack, or go back to the home screen.
-
Page 21: Preparing A Cappuccino, Latte, Mocha Or Flat White
PREPARING A CAPPUCCINO, LATTE, MOCHA OR FLAT WHITE With the FLAVIA C600, you can offer even more drink variety to your co-workers and guests. This new system can now not only prepare cappuccinos, lattes, mochas and flat whites using the Real Milk Froth Freshpack and our Single-Pack Indulgence Freshpacks, but can also serve delicious drinks using a variety of liquid milk and non-dairy options. - Page 22 If liquid milk and Single-Pack Indulgence / Real Milk Froth Freshpacks are available to users, the on-screen instructions will ask for the preferred brewing method and will help the user prepare the drink with either method. If the liquid milk option is selected, the milk will be frothed in the cup.
-
Page 23: Daily Care
DAILY CARE EMPTYING AND CLEANING THE DRIP TRAY The drip tray is a 3-piece design with the lower part used to collect spillages or overflows with a spout to make emptying it easy. If the drip tray is full, spillages will leak from the highlighted area in the next section. - Page 24 RE-ASSEMBLING THE CUP STAND In order to prevent permanent damage to the cup stand when dropped, it has been designed to come apart and can be re-assembled by following the below steps: Engage each tooth at a time Align all three Press and ring and squeeze the inner ring to corresponding teeth...
- Page 25 DAILY CARE CONT. EMPTYING THE FRESHPACK BIN If the brewer is used with an internal Freshpack bin rather than the funnel, it should be emptied and cleaned when full. Follow instructions on the screen or below to empty the bin once the maximum number of allowable packs has been vended.
- Page 26 If you are interested in joining our recycling program, please let your account manager know. CLEANING THE BARCODE SCANNER On the rare occurrence that the barcode scanner becomes dirty and doesn’t scan Freshpacks, it will need to be cleaned. To test whether the barcode is being read, press “TOUCH TO INSERT PACK”.
-
Page 27: Weekly Care General Cleaning
WEEKLY CARE GENERAL CLEANING Use a clean damp cloth to wipe the outside surfaces and exposed areas inside. Do not use strong detergents or abrasive products as they may damage or tarnish the finish of the brewer. If spillage occurs, please perform this cleaning method immediately to prevent potential product taste cross contamination or allergen transfer. - Page 28 Once the Freshpack door is in a horizontal position, it should be parallel to the counter. Pull the door out towards you while keeping it parallel to the counter to release it from the brewer. Wash in warm soapy water and rinse thoroughly. Wipe the sides of the area where door was within the brewer.
-
Page 29: Longer Term Care
LONGER TERM CARE CHANGING A FILTER The brewer comes fitted with a required internal particle filter that your beverage distributor can access through the top of the brewer. In addition, the brewer must also be used with an in-line water filter to prevent the brewer from being damaged over time. - Page 30 SOFTWARE UPDATES Newer software versions will become available occasionally for the FLAVIA C600, offering improvements or updates to the brewer. To ensure your brewer is updated with the latest software we will call you to arrange a convenient date and time for one of our technicians to visit and make the update.
- Page 31 LONGER TERM CARE CONT. DRAINING THE COLD TANK Remove the drip tray and Freshpack bin in order to uncover the drain plug location. Look for the drain plug to the right side of the brewer, where it would typically be covered by the Freshpack bin. Remove drain plug by pulling the red plug cover to the left to dislodge the cover.
-
Page 32: Troubleshooting
TROUBLESHOOTING The design of the FLAVIA C600 brewer makes it very unlikely that anything will go wrong. However, if errors do occur, you can quickly resolve many of them yourself, as noted in the chart below. On-screen animations and instructions will help. PROBLEM REASON SOLUTION... - Page 33 Mug or cup does Mug or cup is too tall The drip tray can be removed not fit to accommodate larger mugs and cups (Ref. page 19) Freshpack not There is no barcode on Examine the inserted recognised the pack Freshpack to ensure the barcode is printed correctly Barcode on Freshpack...
- Page 34 TROUBLESHOOTING CONT. Cup stand will The cup height Check that the sides of the not adjust to the sensors are dirty or brewer around the cup are not correct height blocked dirty or have condensation. If so, clean the areas to remove any dirt or condensation.
- Page 35 NOTES AND CUP STAND GUIDE USER GUIDE | 35...
- Page 36 ENJOY MAN Y DELICIOUS MOMENTS WITH YOU R FL AVIA C6 0 0 Lavazza Professional UK Limited Armstrong Rd, Basingstoke RG24 8NU, UK. TEL: 0870 600 20 30 CREATION 600 lavazzapro.co.uk 70-03-3396-03A...
Need help?
Do you have a question about the FLAVIA CREATION 600 and is the answer not in the manual?
Questions and answers
I was able to use Bright Tea Iced Tea with my Flavia C500 but when I try to use the same packs in Flavia C600 it says wrong pack type not configured for cold packs. Does this mean the iced tea and iced coffee packs do not work in the Flavia C600?
Yes, iced tea and iced coffee packs work in the Flavia C600, but only with the Chill Module attached. The C600 alone cannot make cold drinks.
This answer is automatically generated
My refill system will nit work
Troubleshooting steps for the Lavazza CREATION 600 refill system include:
1. “Check pack bin” message:
- Ensure the Freshpack bin is fully and properly inserted.
- Follow on-screen instructions.
2. “Please wait while the tank fills up” message:
- Wait up to 20 seconds as the internal cold water tank fills.
- If the message persists, check that the water supply is turned on and the delivery pipe is not kinked.
3. “Please check that the water is turned on, then press ‘Retry’” message:
- Confirm the water supply is on.
- Check the delivery pipe for kinks.
- Press the “Retry” button.
4. “Please wait while the water heats up” message:
- Normal during heating.
- If it lasts more than 20 minutes, switch off the brewer and contact your beverage distributor.
5. “Prime the hot water system” message:
- Indicates the hot water system needs priming (specific steps not provided in the context).
This answer is automatically generated
Can you replace the Freshpack bin? Ours has a leak and is creating a mess each day and I didn't see this as a replacement part online. Thank you!
Yes, the Freshpack bin for the LAVAZZA FLAVIA CREATION 600 can be replaced. The user guide mentions replacing the Freshpack bin and drip tray during maintenance.
This answer is automatically generated
I need instructions on how to use the Flavia c600 for a customer
c600 error 1003
"Error 351" "valve disconnected" any solution? Cant find anything on this or parts anywhere
ERROR 383 What that error mean and how I can fix it?