Advertisement
Quick Links
Advertisement

Related Manuals for Alarm.Com ADC-CSVR126


Summary of Contents for Alarm.Com ADC-CSVR126
- Page 1 Stream Video Recorder Installation Guide ADC-CSVR126...
-
Page 3: Pre-Installation Checklist
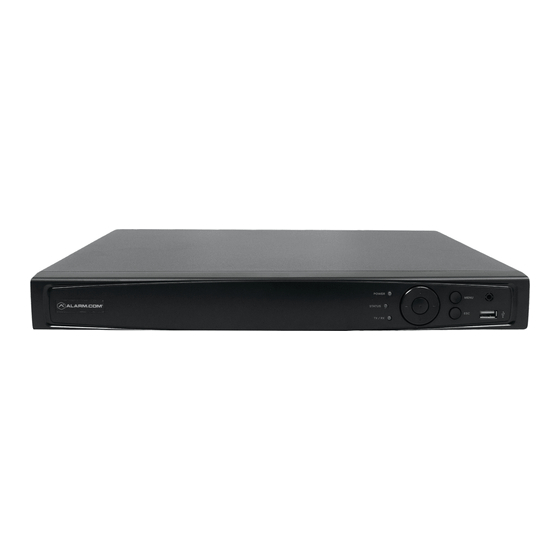
A computer or mobile device with Internet access • Dedicated network switch (recommended) • An Alarm.com customer account with a service package that supports the CSVR126 • Login and password for the Alarm.com account to which you will add the CSVR126... - Page 4 Overview CSVR126 front ❶ Power LED ❷ Status LED ❶ ❸ Network LED ❷ (Tx/Rx) ❸ ❹ ❹ USB port ❺ ❻ ❼ ❺ HDMI port CSVR126 back ❻ LAN port ❼ Power switch ❽ VGA port POWER ❾ USB 3.0 port Power input ❽...
- Page 5 Commercial PoE camera CSVR126 Commercial PoE camera Alarm.com recommends using our commercial-grade PoE cameras with the CSVR126. The CSVR126 should be connected to the same network switch as the cameras. While use of Wi-Fi video cameras with the CSVR126 is supported, a PoE connection is recommended for best results.
-
Page 6: Led Guide
LED guide Power LED Network (Tx/Rx) LED Solid green Blinking green Device powered on Active intranet connection Not illuminated Not illuminated Device powered off No active intranet connection Status LED Blinking red Device active Not illuminated Device idle... - Page 7 Customer Website a) Using a web browser, enter the following URL: www.alarm.com/addcamera. You will need the customer’s username and password to log in to the Customer Website. b) Select the CSVR126 from the video device list or enter its MAC address to begin adding the camera.
- Page 8 Follow the on-screen instructions to finish adding the CSVR126. Mobile App Installation Wizard a) Log in to the Alarm.com Mobile App. You will need the customer’s username and password to log in. b) Tap the navigation menu icon ( c) Tap +Add Device >...
- Page 9 C onnect a computer mouse (wireless or wired) using one of the USB ports on the CSVR126. ❸ W hen prompted, enter the password you created for the device during the Alarm.com setup process. Main Menu options Live View Select different live view camera layout options and rotate camera feeds.
- Page 10 Exporting recorded video locally Note: Exporting locally requires a third-party storage device. ❶ P lug in the third-party storage device to the USB 3.0 port on the CSVR126. ❷ Log in to the local interface (if password protected) ❸ C lick the Menu button ( ❹...
-
Page 11: Powering Down The Device
❾ S elect the folder on the third-party storage device to export the footage to Choose the file format. In Video For… click to select MP4 or AVI. Click Export Do not remove the third-party storage device until all footage has been exported. Check the progress by clicking the Export Status button ( Powering down the device •... -
Page 12: Troubleshooting
If issues persist, reset the device to factory defaults by navigating to the Settings option ( ) on the display. Warning: Resetting the device to factory defaults may cause a loss of recorded video footage. Questions? Visit answers.alarm.com or contact your service provider. - Page 13 NOTE: This equipment has been tested and found to comply with the limits for a Class B digital device, pursuant to part 15 of the FCC Rules. These limits are designed to provide reasonable protection against harmful interference in a residential installation. This equipment generates, uses and can radiate radio frequency energy and, if not installed and used in accordance with the instructions, may cause harmful interference to radio communications.
- Page 14 Notes...
- Page 16 8281 Greensboro Drive Suite 100 © 2020 Alarm.com. All rights reserved. Tysons, VA 22102 200709 | Made in China...
Need help?
Do you have a question about the ADC-CSVR126 and is the answer not in the manual?
Questions and answers