
Subscribe to Our Youtube Channel
Related Manuals for CFM ECO-FLO


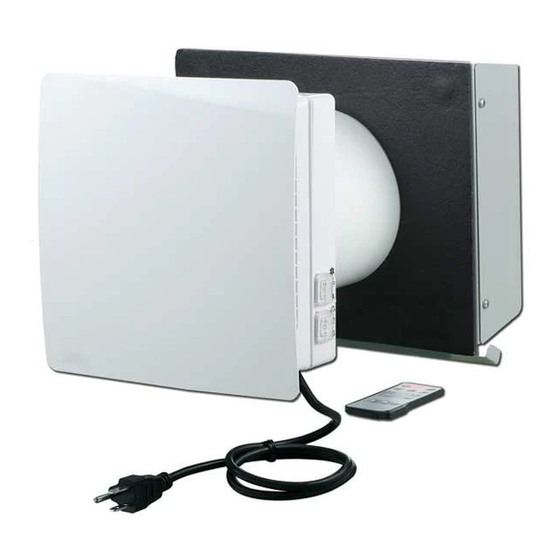
Summary of Contents for CFM ECO-FLO
- Page 1 Installation & Maintenance ECO-FLO ENERGY RECOVERY VENTILATOR READ AND SAVE THESE INSTRUCTIONS FOR FUTURE REFERENCE...
-
Page 2: Safety Instructions
SAFETY INSTRUCTIONS NOTICE The ECO-FLO Energy Recovery Ventilator is not explosion proof and should not be used when a potentially explosive situation exists. WARNING TO REDUCE THE RISK OF FIRE, ELECTRIC SHOCK, INJURY TO PERSONS, PLEASE READ THESE INSTRUCTIONS CAREFULLY Disconnect the ventilator from power mains prior to any installation or maintenance operations. - Page 3 ECO-FLO ENERGY RECOVERY VENTILATOR The ECO-FLO energy recovery ventilator is designed for through-the-wall mounting. The telescopic design enables its installation in walls with various thickness (4.75” to 11.81”). The delivery set includes: • Indoor assembly of ventilator – 1 • Cardboard mounting plate – 1 •...
-
Page 4: Operation Modes
ECO-FLO ENERGY RECOVERY VENTILATOR The ventilator is rated for continuous operation. OPERATION MODES 1. Natural Airflow • Shutter is open; fan does not run. • Air flows freely through ventilator and is purified by filters. 2. Supply Mode • Ventilator continuously draws in fresh air from outside. -
Page 5: Installation
INSTALLATION WARNING Disconnect the ventilator from power mains prior to any installation operations. Working on or near energized equipment could result in death or serious injury. CAUTION The ventilator must not be installed in sites where the air duct may be clogged by blinds, curtains, drapes, etc. - Page 6 INSTALLATION 3. Remove the cover of the mounting plate to access the control board (Figure 3), which is necessary for connection to power mains and ventilators in series. For details, see wiring diagrams on pages 8 - 9. Carefully remove the cover of the mounting plate, avoiding damage to the connecting cables.
- Page 7 INSTALLATION 8. Mark the fastening holes for the exterior-mounted hood and drill holes for the wall anchors (Figure 9). For convenience of marking, use the back part of the exterior-mounted hood. 9. Insert the large wall anchors into the holes. 10.
-
Page 8: Wiring Diagrams
WIRING DIAGRAMS WARNING Make sure to disconnect the ventilator from power mains prior to installation. Only qualified person(s) should work on electrical equipment. Working on or near energized equipment could result in death or serious injury. CAUTION The rated electrical parameters of the ventilator are given on the manufacturer’s label. - Page 9 WIRING DIAGRAMS CONNECTION OF VENTILATORS IN SERIES When ventilators are connected in series, all connected ventilators are controlled with the first ventilator and a remote control. To connect ventilators in series, connect the control terminals with a cable as shown in the diagram below. Connect the second ventilator with the third ventilator in the same way, etc.
-
Page 10: Ventilator Control
VENTILATOR CONTROLS The ventilator is operated with either the remote control or the buttons on the ventilator casing. The buttons on the ventilator casing have limited functionality: only the medium and high speeds can be activated; only three of the four modes of operation may be set. The remote control has wider control capabilities. -
Page 11: Recommended Maintenance
RECOMMENDED MAINTENANCE WARNING Disconnect the ventilator from power mains prior to any maintenance operations. Working on or near energized equipment could result in death or serious injury. Maintenance of the ventilator means regular cleaning of its surfaces of dust, and cleaning or replacing its filters. -
Page 12: Troubleshooting
- Clean or replace the filters, and clean the fan and ERV core according the Recommended Maintenance section (page 11) in this manual. 7. If fan fails to start, please contact Seller. ACCEPTANCE CERTIFICATE The ECO-FLO fan has been duly certified as serviceable. Manufactured on (date): Date of sale: Sold by:...
Need help?
Do you have a question about the ECO-FLO and is the answer not in the manual?
Questions and answers