Table of Contents
Advertisement
Quick Links
Advertisement
Table of Contents

Related Manuals for OmniSistem EA-3040


Summary of Contents for OmniSistem EA-3040
- Page 1 LED ROLLER LED ROLLER Manual 2009‐08‐01 ...
- Page 2 INCLUDED IN BOX: 1 x EA‐3040 USER MANUAL UNPACKING INSTRUCTIONS UPON RECEIVING THE UNIT, UNPACK CARTON AND VERIFY THAT ALL PARTS HAVE BEEN RECEIVED IN GOOD CONDITION. IF THERE IS ANY SIGN OF DAMAGE TO THE CARTON OR UNIT DUE TO SHIPPING OR MISHANDLING, NOTIFY THE SHIPPER IMMEDIATELY. KEEP ORIGINAL PACKING MATERIALS IN THE EVENT THE UNIT MUST BE RETURNED FOR ANY REASON. ALL FIXTURES MUST BE RETURNED IN THEIR ORIGINAL PACKAGING. IF ANY ACCESSORY IS MISSING THAT SHOULD HAVE BEEN RECEIVED WITH THE UNIT, NOTIFY OMNISISTEM IMMEDIATELY WITHIN 3 DAYS OF RECEIVING THE ITEM. IF NOTIFICATION IS NOT RECEIVED WITHIN 3 DAYS, UNIT IS CONSIDERED TO HAVE BEEN RECEIVED WITH ALL COMPONENTS AND WITHOUT DAMAGES. CONTACT US OFFICE: OMNISISTEM LIGHTS & EFFECTS 6403 SOUTH 208th STREET KENT, WA 98032 TEL: 253‐395‐9500 ...
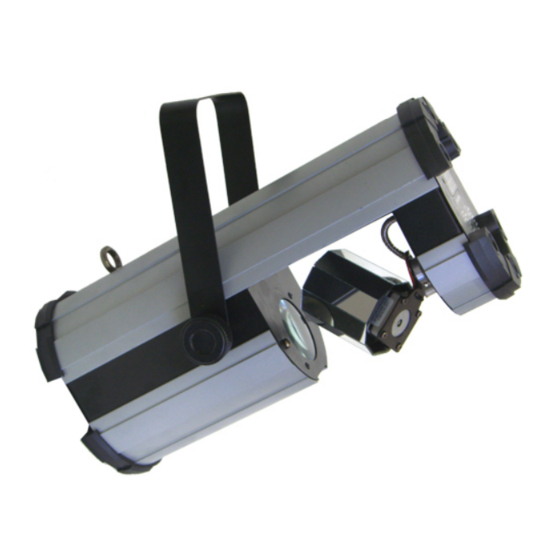
- Page 3 FEATURES CODE: EA‐3040 POWER: 100V‐240V AC, 50/60Hz POWER CONSUMPTION: 25W LED SIZE: 5mm LED POWER: 0.08W LED COUNT: 48 (24 red, 12 green, 12 blue) AMBIENT TEMPERATURE: 23° F ‐ 113° F ( ‐5° C ‐ 45° C) FEATURES: PATTERN ROTATION VIA LED MATRIX 210 PATTERN COMBINATIONS ADJUSTABLE SPEED STROBE BLACKOUT CONTROL BOARD WITH 4‐DIGIT DISPLAY EXTREMELY LONG LIFETIME (100,000 hr. rating) VERY LOW POWER CONSUMPTION INCLUDES HANGING BRACKET CONTROL: ...
- Page 4 IMPORTANT SAFETY INFORMATION This unit is intended for indoor use only. Unit should be warmed up for 15 minutes before operating. For optimal effects, the system should be turned off for 25 minutes after running continuously for 3 hours. Ensure the power source is of the correct voltage for this fixture. Connect power through a direct switch circuit, NOT a dimmer or variable circuit source. Disconnect unit from power when not in use. Do not install or operate the device in harmful environment conditions. (i.e. extreme heat, cold, moisture or dust) If the unit has been exposed to extreme environmental conditions or drastic temperature fluctuations, ensure the unit is returned to room temperature before operating. Do not block fan or ventilation slots while operating unit. Do not move the device while in operation. Do not aim smoke or bubble effects near unit. Do not operate the unit during thunderstorms. Disconnect power prior to servicing or cleaning unit. Do not use solvents or abrasive cleaners to clean the unit. Use a damp cloth only. Modification(s) to the device or power cord will result in termination of the dealer/manufacturer’s warranty. Use safety cable for added security when installing the unit by the hanging bracket. Avoid direct eye contact with the light source. Do not connect this unit to a dimmer pack. ...
- Page 5 MASTER/SLAVE OPERATION On the rear of the unit you can find an XLR jack (DMX out) and an XLR plug (DMX in) used for connecting several devices. After selecting the master function on the unit you would like to control the others, this device then works as the Master Device. Set the respective Slave modes for all Slave Devices. Connect the Slave Devices via a balanced microphone lead. Connect the DMX‐OUT jack with the DMX‐IN plug of the next device. Note: The function G‐3‐ is only meant for service purposes. Please only use this function to put the unit in standby. SOUND ACTIVE / STAND ALONE MODE The LED Roller features a built‐in microphone which provides an auto sound active control. To enable this mode, disconnect the LED Roller from the controller and select the desired Master Mode. DMX CONTROL SETTINGS The LED Roller can be controller individually via your DMX controller. DMX controllers have different features and functions. Please familiarize yourself to the controller you are using prior to addressing the units. The led display board allows you to design the DMX address. For address setting press the MODE button until the display shows " A.001" and set the desired address. After having addressed all the units, they can now be controlled via your DMX controller. CHANNEL FUNCTION CH. 1 DIMMER LIGHT ON / STROBE CH. 2 ...
- Page 6 BLUE Anode N YELLOW/CYAN Ground Wire TROUBLESHOOTING If your unit does not turn on: Check the main power source is fully functional Check power cord connection on each side Check that the correct fuse has been installed and it is not blown If the unit is not responding to sound: Check that the dip switches at the rear of unit to have been set to sound activation Check sensitivity switch at the rear of the unit For additional information regarding operation of the unit or if you have a unit requiring service*, contact the OmniSistem Technical Department at 253‐395‐9500 Monday – Friday 10am ‐ 4pm PST. * All service items must be given an RA# prior to shipping to our facilities. You can acquire a RA # by calling our offices during regular business hours. All service items must be shipped with a copy of original receipt if purchased within a year and covered under our warranty policy. If the unit has been modified warranty is void. LED ROLLER Manual 2009‐08‐01 ...
Need help?
Do you have a question about the EA-3040 and is the answer not in the manual?
Questions and answers