Table of Contents
Advertisement
Quick Links
Advertisement
Table of Contents

Related Manuals for OmniSistem LeDizzy


Summary of Contents for OmniSistem LeDizzy
- Page 1 LeDizzy Manual 2009‐08‐01 ...
- Page 2 INCLUDED IN BOX: 1 x LeDizzy UNIT POWER CORD USER MANUAL UNPACKING INSTRUCTIONS UPON RECEIVING THE UNIT, UNPACK CARTON AND VERIFY THAT ALL PARTS HAVE BEEN RECEIVED IN GOOD CONDITION. IF THERE IS ANY SIGN OF DAMAGE TO THE CARTON OR UNIT DUE TO SHIPPING OR MISHANDLING, NOTIFY THE SHIPPER IMMEDIATELY. KEEP ORIGINAL PACKING MATERIALS IN THE EVENT THE UNIT MUST BE RETURNED FOR ANY REASON. ALL FIXTURES MUST BE RETURNED IN THEIR ORIGINAL PACKAGING. IF ANY ACCESSORY IS MISSING THAT SHOULD HAVE BEEN RECEIVED WITH THE UNIT, NOTIFY OMNISISTEM IMMEDIATELY WITHIN 3 DAYS OF RECEIVING THE ITEM. IF NOTIFICATION IS NOT RECEIVED WITHIN 3 DAYS, UNIT IS CONSIDERED TO HAVE BEEN RECEIVED WITH ALL COMPONENTS AND WITHOUT DAMAGES. CONTACT US OFFICE: OMNISISTEM LIGHTS & EFFECTS 6403 SOUTH 208TH STREET KENT, WA 98032 TEL: ...
- Page 3 Disconnect unit from power when not in use. Do not install or operate the device in harmful environment conditions. (i.e. extreme heat, cold, moisture or dust) If the unit has been exposed to extreme environmental conditions or drastic temperature fluctuations, ensure the unit is returned to room temperature before operating. Do not block fan or ventilation slots while operating unit. Maximum Ambient Temperature is 113° C (45° C). Do not operate unit at temperatures higher than this. Do not move the device while in operation. Do not aim smoke or bubble effects near unit. Do not operate the unit during thunderstorms. Disconnect power prior to replacing fuse, servicing or cleaning unit. Do not use solvents or abrasive cleaners to clean the unit. Use a damp cloth only. Modification(s) to the device or power cord will result in termination of the dealer/manufacturer’s warranty. Use safety cable for added security when installing the unit by the hanging bracket. Avoid direct eye contact with the light source. Do not connect this unit to a dimmer pack. The safest way to disconnect your power cord from main power is to grip cord end and detach from plug. Do not leave unit unattended while operating for extended periods of time or overnight. Contact the nearest dealer or service center for assistance with operating your unit. Unauthorized tampering can cause additional damage. All units opened by an unauthorized user will not be covered under warranty. LeDizzy Manual 2009‐08‐01 ...
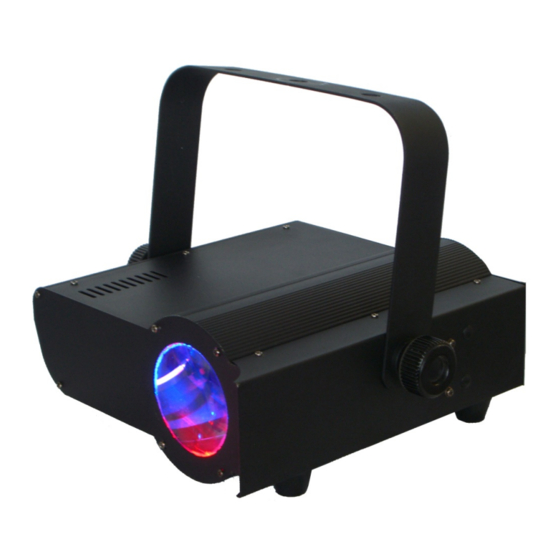
- Page 4 PRODUCT OVERVIEW 1. Power Out 5. DMX Out 2. Sensitivity Knob 6. DMX In 3. Power In / Fuse Holder 7. Dip Switches 4. Microphone 8. Ventilation Slots/Fan REPLACING THE FUSE 1. Disconnect unit from main power 2. Unscrew the fuse holder cover to access the fuse 3. Remove the fuse carefully to ensure the fuse holder is not damaged 4. Replace with a fuse of the same rating 5. Screw fuse holder cover to original position to protect the fuse LeDizzy Manual 2009‐08‐01 ...
- Page 5 1,2,3,4,5,6,7,8,9,10,11,12 SOUND ACTIVATED 10, 11 1,2,3,4,5,6,7,8,9,12 SOUND ACTIVATED WITH STROBE EFFECT (1‐20 F.P.S.) 10, 12 1,2,3,4,5,6,7,8,9,11 AUTO COLOR CHANGING WITH SLOW STROBE 11, 12 1,2,3,4,5,6,7,8,9,10 AUTO COLOR CHANGING 12 1,2,3,4,5,6,7,8,9,10,11 AUTO COLOR CHANGING WITH STROBE (1‐20 F.P.S.) 11 1,2,3,4,5,6,7,8,9,10,12 SOUND ACTIVATED WITH AUTO COLOR CHANGING MASTER/ SLAVE FIXTURE LINKING SOUND ACTIVE MASTER/SLAVE MODEL: MASTER: DIP SWITCH 10 ON SLAVE: DIP SWITCH 1 ON AUTO MASTER SLAVE MODEL: MASTER: DIP SWITCH AS SPECIFIED IN TABLE ABOVE SLAVE: DIP SWITCH 1 ON LeDizzy Manual 2009‐08‐01 ...
- Page 6 Anode N YELLOW/CYAN Ground Wire TROUBLESHOOTING If your unit does not turn on: Check the main power source is fully functional Check power cord connection on each side Check that the correct fuse has been installed and it is not blown If the unit is not responding to sound: Check that the dip switches at the rear of unit to have been set to sound activation Check sensitivity switch at the rear of the unit For additional information regarding operation of the unit or if you have a unit to be sent in for service*, contact the OmniSistem Technical Department at 253‐395‐9500 Monday – Friday 10am ‐ 4pm PST. * All service items must be given an RA# prior to shipping to our facilities. You can acquire a RA # by calling our offices during regular business hours. All service items must be shipped with a copy of original receipt if purchased within a year and covered under our warranty policy. If the unit has been modified warranty is void. LeDizzy Manual 2009‐08‐01 ...
Need help?
Do you have a question about the LeDizzy and is the answer not in the manual?
Questions and answers