Table of Contents
Advertisement
Quick Links
Instructions for Assembly and Handling
Please read this document carefully!
Product contents
• ThinkTank Tank Module PRO PCB
• ready to use power supply cable set
• motor connectors
• proportional receiver cable set
• two cables for additional light
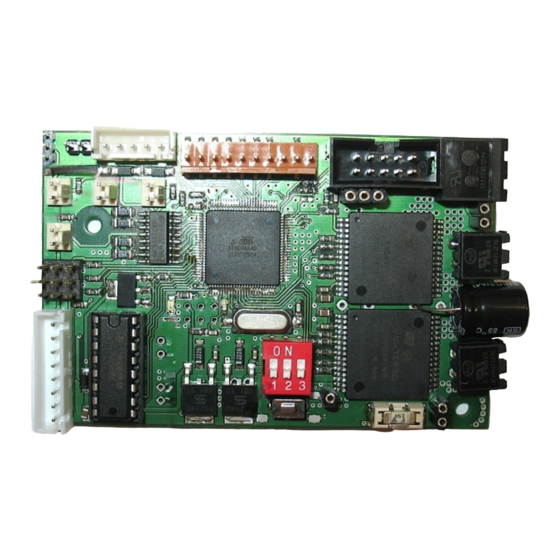
Overview of connectors
1 Power supply
2 Fuse for turret elements
3 Connector for left chain motor
4 Connector for right chain motor
5 Setup mode push button
6 DIP-switches for selecting the tank profile
7 Connector for HengLong muzzle flash, AsiaTam
recoil unit and PC Configurator
8 Connector for HengLong muzzle flash
9 Connector for turret elements
10 Connector for Tamiya recoil unit
11 Connector for proportional receiver
12 Servo motors connectors.
13 Main gun muzzle flash LED (also muzzle flash for 1
14 Brake light LED
15 Auxiliary light
16 Muzzle flash LED for 2
MG (also muzzle flash for 2
nd
17 EMNet interface for expansion boards
L Status LED
HINT: the function of all connectors is printed on the back side of the PCB!
Solder the loose ends of the power supply cable to a battery connector that fits to your battery
type. Use the included shrinking tube to insulate the soldered wires.
Warning! The use of the switch and fuse is mandatory! Fire hazard when disregarded!
Use the included plugs to connect the motors to the board. Keep the wires as short as possible.
ThinkTank Tank Module PRO
st
barrel for AA tanks)
barrel for twin barreled AA tanks)
nd
Assembly
Power supply
Chain motors
To check the correct wiring of the motors perform the following procedure:
• Jack the tank up, so that the chains can move freely.
• Attach a full charged battery to the power supply connector and switch the electronics on.
• Wait 3-4 seconds. Press and hold the pushbutton.
• The chains start to move and change their rotation direction every 3 seconds. Release the
button if both chains move forwards and the right chain runs faster than the left one. If this
constellation doesn't occur after 20 seconds, check and correct the wiring of the motors.
• Go ahead with the installation when the motors run in described manner.
Turret elements
Connect the white 8-pin turret plug to the corresponding connector.
• If using the genuine HengLong LED muzzle flash, attach it's cables (a
5-wire and a 2-wire cable) to the board.
• If using the genuine AsiaTam turret mechanics and high voltage
muzzle flash, proceed as described in the manual of the units.
• If using the genuine Tamiya(R) recoil unit, attach it to the correspon-
ding connector on the board. The white cable faces the edge of the
board.
• Servo motors are connected as shown on the picture.
• Additional light sources may be connected to the plugs 13 to 16.
They provide about 50mA each and are designed to drive one to four
LEDs.
Choosing the tank profile
The driving and function setup is determined by the position of the DIP switches. The Tank
Module ECO offers seven fixed and one user defined profile
German, WW2, plastic gearboxes
German, WW2, metal gearboxes
German, WW2, 3:1 reducted gearbox
US, WW2, plastic gearboxes
The onboard LED shows the current status of the module
on
Short going out
Fast blinking
Slow blinking
*no connection to the sender or the transmission path between sender and receiver is disturbed.
Please check the wiring and the proper function of the RC radio and receiver. If necessary check
US, WW2, metal gearboxes
T-34
easy-to-drive tank
user defined
setup used by the ThinkTank Configurator
and PC Configurator
Status LED
Tank Module is in operational state
Stick movement detected
No valid signal from receiver*
Faulty communication with another module
Advertisement
Table of Contents

Related Manuals for ElMod ThinkTank Pro


Summary of Contents for ElMod ThinkTank Pro
- Page 1 ThinkTank Tank Module PRO To check the correct wiring of the motors perform the following procedure: • Jack the tank up, so that the chains can move freely. Instructions for Assembly and Handling • Attach a full charged battery to the power supply connector and switch the electronics on. Please read this document carefully! •...
- Page 2 Ne convient pas pour des enfants de moins de 14 ans. Niet geschikt voor kinderen onder de 14 jaar. è Rotate turret right Auxiliary MG ElMod Thomas Kusch, M. Sc. & Jürgen K. Huber GbR ç Rotate turret left Main light on/off Millotstraße 15/1 ...
Need help?
Do you have a question about the ThinkTank Pro and is the answer not in the manual?
Questions and answers