Table of Contents
Advertisement
Quick Links
Advertisement
Table of Contents

Subscribe to Our Youtube Channel
Related Manuals for AC Infinity SMART OUTLET


Summary of Contents for AC Infinity SMART OUTLET
- Page 1 SMART OUTLET ENVIROMENTAL CONTROLLED USER MANUAL...
- Page 3 WELCOME Thank you for choosing AC Infinity. We are committed to product quality and friendly customer service. If you have any questions or suggestions, please don’t hesitate to contact us. Visit www.acinfinity.com and click contact for our contact information. EMAIL LOCATION support@acinfinity.com...
- Page 4 MANUAL CODE SOT2107X1 PRODUCT MODEL UPC-A CONTROLLER 75 CTR75A 819137022508 CONTROLLER 76 CTR76A 819137021525...
-
Page 5: Table Of Contents
Page 8 Programming ................. Page 11 Other Settings ................Page 23 Download the App ................. Page 24 Add a Device ................. Page 25 Programming................Page 27 Settings................... Page 37 Other AC Infinity Products ............. Page 38 Warranty ..................Page 39... -
Page 6: Key Features
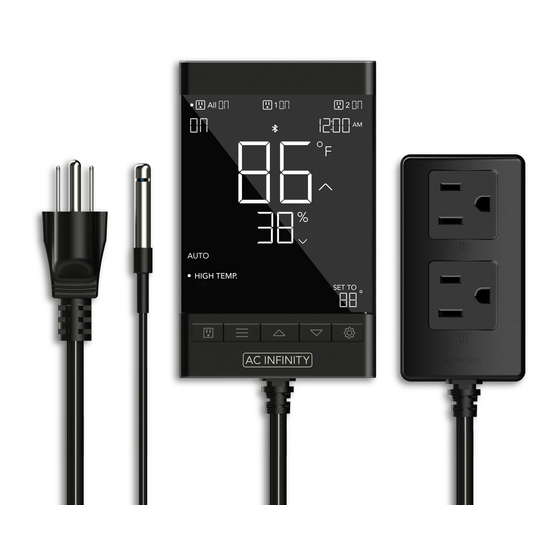
KEY FEATURES ACTIVE MONITORING SENSOR PROBE SMART CONTROLLER LED display shows key data Corded probe made of Features automation controls like outlet power status, stainless steel to ensure that power devices based on temperature, humidity, trends, precise temperature and temperature, humidity, timers, clock, and countdowns. -
Page 7: Product Contents
PRODUCT CONTENTS WALL HANG SENSOR WALL-HANG WIRE CABLE TIE CONTROLLER PROBE WOOD SCREWS MOUNT (x1) (x1) (x2) (x1) (x1) DESKTOP SENSOR WALL-HANG WIRE CABLE TIE CONTROLLER PROBE WOOD SCREWS MOUNT (x1) (x1) (x2) (x1) (x1) -
Page 8: Powering And Setup
POWERING AND SETUP STEP 1 Plug the sensor probe into the 3.5mm port located at the bottom side of your controller. STEP 2 Insert the power plug into a wall outlet to power your controller. - Page 9 POWERING AND SETUP STEP 3 Position the corded sensor probe and secure it by using the included zip ties and tie mounts. STEP 4 Locate a spot free of obstruction and secure the anchor into your wall. Twist the wood screw into the anchor.
- Page 10 POWERING AND SETUP STEP 5 Hang your controller by the screw using the hole located on its backside. STEP 6 Plug your device (not included) into one of the two sockets to power it with your controller.
-
Page 11: Programming
PROGRAMMING CONTROLLER 76 TIMER TO 1. MODE BUTTON Cycles through each of the controller’s mode: OFF, ON, AUTO (4 triggers), TIMER TO ON, TIMER TO OFF, CYCLE (On and Off), and SCHEDULE (On and Off). 2. UP/DOWN BUTTONS Adjusts the value of your current mode. The up button increases and down button decreases the setting. - Page 12 PROGRAMMING 5. PROBE TEMPERATURE Current temperature the probe is detecting. Displays “--“ if no probe is plugged in. Includes a trend indicator that signals a rise, fall or no change in temperature within the last hour. 6. PROBE HUMIDITY Current humidity the probe is detecting. Displays “--“ if no probe is plugged in. Includes a trend indicator that signals a rise, fall or no change in humidity within the last hour.
- Page 13 PROGRAMMING CONTROLLER 75 TIMER TO 1. POWER BUTTON Cycles through each of the controller’s mode: OFF, ON, AUTO (4 triggers), TIMER TO ON, TIMER TO OFF, CYCLE (On and Off), and SCHEDULE (On and Off). 2. MODE BUTTON Cycles through each of the controller’s mode: OFF, ON, AUTO (4 triggers), TIMER TO ON, TIMER TO OFF, CYCLE (On and Off), and SCHEDULE (On and Off).
- Page 14 PROGRAMMING 5. OUTLET STATUS Displays the outlet controller’s power status, indicating whether or not electricity is being fed to your device. ON will display if your devices are being powered and OFF will display if your devices are not being powered. 6.
- Page 15 PROGRAMMING (BOTH CONTROLLERS) CONTROLLER MODES Pressing the mode button will cycle through the controller’s available programming modes: OFF, ON, AUTO (4 triggers), TIMER TO ON, TIMER TO OFF, CYCLE (On and Off), and SCHEDULE (On and Off). OFF MODE Your device will remain off regardless of temperature, humidity, or time-based triggers.
- Page 16 PROGRAMMING AUTO MODE (HIGH TEMPERATURE TRIGGER) Pressing the up or down button sets the high temperature trigger. Your device will turn on if the probe’s reading meets or exceeds this threshold. If the probe’s reading falls below this trigger point, your device will turn off.
- Page 17 PROGRAMMING AUTO MODE (HIGH HUMIDITY TRIGGER) Pressing the up or down button sets the high humidity trigger. Your device will turn on if the probe’s reading meets or exceeds this threshold. If the probe’s reading falls below this trigger point, your device will turn off.
- Page 18 PROGRAMMING TIMER TO ON MODE TIMER TO Pressing the up or down button sets a countdown time. During the countdown, your device will be set to OFF. Once the timer ends, your device will trigger to turn on. The countdown will begin if no buttons are pressed for 5 seconds.
- Page 19 PROGRAMMING CYCLE MODE (ON AND OFF) CYCLE Sets an ON duration and an OFF duration for your device to cycle through continuously. Press the up or down button to set a countdown for your device to turn on. Then press the mode button and use the up or down button to set a countdown for your device to turn off.
- Page 20 PROGRAMMING SCHEDULE MODE (ON AND OFF) SCHEDULE Sets an ON clock-time and an OFF clock-time schedule for your device to follow daily. Press the up or down button to set a clock time for your device to turn on. Then press the mode button and use the up or down button to set a clock time for your device to turn off.
- Page 21 PROGRAMMING CONTROLLER SETTINGS Pressing the setting button will cycle through the controller’s available settings: DISPLAY, °F/ °C, CLOCK, CALIB. T°, CALIB. H%, BUFFER T°, and BUFFER H%. DISPLAY SETTING Adjusts the display brightness and auto-dimming. Press DISPLAY the up or down button to cycle through levels 1, 2, 3, A2 and A3;...
- Page 22 PROGRAMMING CLOCK CLOCK SETTING Adjusts the current clock time. Press the up or down button to increase or decrease the time. Once you cycle through 12:00 each time, the units will automatically change to AM or PM. The clock time is located at the lower left corner of the display.
- Page 23 PROGRAMMING BUFFER TEMPERATURE SETTING Sets a gap from your set temperature trigger to prevent BUFF. T° your device from shutting off too quickly. Press the up or down button to cycle through buffer range from 0°F to 8°F (or 0°C to 4°C). In high temperature triggers, your device will turn on, only turning off when the temperature falls below your buffer setting.
- Page 24 This icon will display when you lock the controller. The icon will flash and beep if you attempt to adjust the controller while it is still locked. BLUETOOTH STATUS This icon will display when your device is connected to the AC Infinity App.
-
Page 25: Other Settings
OTHER SETTINGS CONTROLLER LOCK Holding the setting button will lock the controller in your cur- rent mode. While your controller is locked, no parameters may HOLD + be adjusted, nor will you be able to switch modes. Holding the setting button again will unlock the controller. HIDE SCREEN Lock the controller so no settings can be adjusted. -
Page 26: Download The App
Store by searching “AC Infinity”. to pair your controller with the app. QUICK TIP FOR EASY ACCESS Open the smart phone camera and scan the QR code below to download the AC Infinity app. Please visit our website at www.acinfinity.com... -
Page 27: Add A Device
ADD A DEVICE SETUP AND PAIRING Power your device on before pairing your device with the app. Refer to pages 8-10 for more information regarding controller setup. Tap on the “+” tab to To launch the app, tap on add your smart device. the "SMART OUTLETS"... - Page 28 ADD A DEVICE Once the app displays the pairing success Your controller will appear in your smart device screen, tap the DONE button to finish the with a unique ID. pairing process. This may take a few seconds to complete. B-B000B DONE Please note: when pairing the app around multiple controllers, move your mobile device closer to your desired controller.
-
Page 29: App Programming
APP PROGRAMMING APP PROGRAMMING 1. MODE BUTTON 2. TEMPERATURE/HUMIDITY 3. SETTINGS Dropdown displays all available Toggles between current tempera- Adjusts app settings including Device controller modes: OFF, ON, AUTO, ture and humidity readings. Name, Temperature Display, Device TIMER TO ON, TIMER TO OFF, Brightness, Buffers, and Calibrations. - Page 30 APP PROGRAMMING CONTROLS TAB Contains all controller modes including the OFF, ON, AUTO, TIMER TO ON, TIMER TO OFF, CYCLE and SCHEDULE modes. Tap the paired device to enter the Controls tab, Tap the menu button to access the controller where you can adjust the controller modes.
- Page 31 APP PROGRAMMING CONTROLS TAB The control wheel displays the temperature/humidity, current settings, and time. Use the wheel hands, (+/-) stepper, or sliders Use the toggle switch to activate or deactivate to set your parameters. any climate triggers.
- Page 32 APP PROGRAMMING ADVANCE PROGRAMMING Creates automated activations, alarms, and push notifications. The adjustable modes in each program include those listed in controls tab. Once an advance program completes its programming (i.e. scheduling), the app will no longer override the controller's onboard settings.
- Page 33 APP PROGRAMMING ADVANCE PROGRAMMING - AUTOMATION Each automation can support one mode at a time. To automate multiple modes, you must create additional programs, except for TIMER TO ON and TIMER TO OFF in auto- mation. The app will override the controller while an automation is active. Tap the (+) button to create an automation program.
- Page 34 APP PROGRAMMING ADVANCE PROGRAMMING - ALARMS Alarms will tell your controller to beep whenever your outlet switches on or off as a result of the mode(s) you select in the program. Choose between PARAMETERS, AUTO, TIMER TO ON, TIMER TO OFF, CYCLE and SCHEDULE modes. Alarm programming will also have a climate points setting in which the alarm will go off when temperature and humidity hits a high or low point.
- Page 35 APP PROGRAMMING ADVANCE PROGRAMMING - NOTIFICATIONS Notification programs will send push notifications to your mobile device whenever your fan switches on or off as a result of the mode(s) you select in the program. Choose between PARAMETERS, AUTO, TIMER TO ON, TIMER TO OFF, CYCLE and SCHEDULE modes.
- Page 36 APP PROGRAMMING DATA TAB Logs and stores all temperature and humidity information. Readings are displayed in fluctuation charts and bar graphs and can be viewed in hours, days, weeks, months, and years. Data can be exported as a spreadsheet and sent to other devices by tapping EXPORT CSV DATA.
- Page 37 APP PROGRAMMING DATA TAB The fluctuation charts and bar graphs allow you to see trends in temperature and humidity and enable you to make the necessary adjustments to your space. Tap on any point in the charts and graphs to see detailed information on the picket. Bar Graphs - This readout displays how often a detected temperature or humidity point occurs over a given timespan.
- Page 38 APP PROGRAMMING HISTORY LOG Logs all advance programming notifications and controller activity. Entries can be filtered by controller functions and programming including triggers, timers, cycles, schedules, automation, alarms, and notifications. Swipe up and down to scroll through the history Tap SHOW FILTERS to reveal activity options. log.
-
Page 39: App Settings
APP SETTINGS SETTINGS Tap the gear icon to access the settings. Sets all controller-related parameters including Device Name, Temperature Display, Screen Brightness, Buffers, and Calibrations. Tap CONFIRM to save your settings. Tapping CANCEL will leave the settings menu without saving changes. Tapping DELETE DEVICE will unpair your controller from the app. - Page 40 APP SETTINGS DEVICE NAME Supports a maximum of 20 characters. TEMPERATURE DISPLAY Toggles between Celsius and Fahrenheit scales. DEVICE BRIGHTNESS Sets the controller screen brightness using three standard levels [1, 2, and 3] and two auto- dimming levels [A2 and A3]. BUFFER TEMPERATURE AND HUMIDITY Sets a gap from your set temperature or humidity trigger to prevent your device from shutting off too quickly.
- Page 41 AC INFINITY PRODUCTS Seedling Mats The SUNCORE series is a line of seedling mat designed to improve germination success and accelerate your seeds’ growth process by emitting steady heat. Each mat is lined with an innovative far-infrared film that provides even heating distribution.
-
Page 42: Warranty
WARRANTY This warranty program is our commitment to you, the product sold by AC Infinity will be free from defects in manufacturing for a period of two years from the date of purchase. If a product is found to have a defect in material or workmanship, we will take the appropriate actions defined in this warranty to resolve any issues. - Page 44 www.acinfinity.com...
Need help?
Do you have a question about the SMART OUTLET and is the answer not in the manual?
Questions and answers