Table of Contents
Advertisement
Quick Links
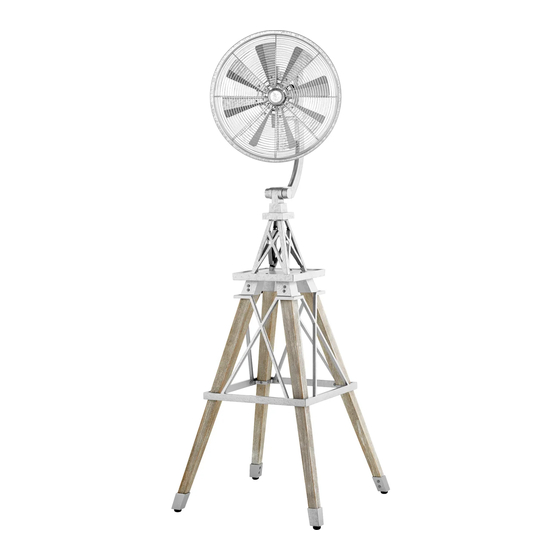
THE WINDMILL FLOOR FAN
INSTALLATION INSTRUCTIONS
Please read and save these instructions
These instructions are to be used in
the installation of the following
QUORUM INTERNATIONAL fans...
The Windmill Floor
© 2019 Quorum International. All Rights Reserved.
(Damp Location)
P.O. Box 961008 • Fort Worth, TX 76161 • (817) 626-5483 • FAX (817) 626-5540
I0274-01/29
Advertisement
Table of Contents

Related Manuals for Quorum The Windmill Floor Fan


Summary of Contents for Quorum The Windmill Floor Fan
- Page 1 These instructions are to be used in the installation of the following QUORUM INTERNATIONAL fans... The Windmill Floor © 2019 Quorum International. All Rights Reserved. (Damp Location) P.O. Box 961008 • Fort Worth, TX 76161 • (817) 626-5483 • FAX (817) 626-5540 I0274-01/29...
-
Page 2: Warranty & Service
Complete and mail the enclosed (RGA) prior to returning the defective box and packaging. Quorum will not bear warranty card within 10 days to ensure unit or part. Call (817) 626-5483 - responsibility for any shipping damage. -
Page 3: Safety Rules
If warranty replacement or repair is ever necessary the fan should be returned in original packaging. 1. A floor fan assembly (a) IF YOU FIND THAT PARTS ARE MISSING. CONTACT YOUR DEALER FOR REPLACEMENT, OR CALL QUORUM DIRECTLY AND WE WILL MAIL REPLACEMENTS TO YOU IMMEDIATELY. - Page 4 3. OPERATION YOUR FAN Fig. 1 1. Balance the wooden feet swivel the cusion at the end of each foot to have the fan stand well. (Figure 1) Fig. 2 2. You have now completed the assemby of your fan. Plug cord directly into the socket.
- Page 5 3. OPERATION YOUR FAN (continued) SWITCH OPERATING INSTRUCTIONS Fig. 3 WARNING: Do not manually move the fan head. Doing so will destroy the gears in the oscillating mechanism. It is recommended you test the fan before finalizing installation. Test fan speeds with the speed control on the left side of fan assembly.
- Page 6 4. MAINTENANCE YOUR FAN Warning: Please unplug or disconnect the appliance from the power supply before servicing. Periodic cleaning of your fan is the only maintenance that is needed. When cleaning, use only a soft brush or lint free cloth to avoid scratching the finish. Abrasive and/or non-abrasive cleaning agents are not required and should be avoided to prevent damage to finish.
-
Page 7: Replacing The Fuse
5. REPLACING THE FUSE SAFETY INSTRUCTION ABOUT FUSE 1. This product employs overload protection (fuse). A blown fuse indicates an overload or short-circuit situation. If the fuse blows, unplug the product from the outlet. Replace the fuse as per the user servicing instructions (follow product marking for proper fuse rating) and check the product. -
Page 8: Troubleshooting
6. TROUBLESHOOTING Warning: Please unplug or disconnect the appliance from the power supply before REPLACEMENT PARTS servicing. For replacement parts, contact your local dealer. FAN WILL NOT START 1. Check the main and branch circuit fuses or breakers. THE FAN SOUNDS NOISY 1.
Need help?
Do you have a question about the The Windmill Floor Fan and is the answer not in the manual?
Questions and answers