Table of Contents
Advertisement
Available languages
Available languages
Quick Links
D
Pediküre-Set
Gebrauchsanweisung ......2
G
Pedicure set
Instruction for Use ...........9
F
Instruments de pédicure
Mode d'emploi .............15
SMA 40
I
Set per pedicure
Instruzioni per l'uso .......22
r
Набор для педикюра
Инструкция по
применению ...................29
Service-Adresse:
Hans Dinslage GmbH, Riedlinger Str. 28
88524 Uttenweiler, GERMANY
Tel.: +49 (0) 73 74 - 91 57 66
E-mail: service@sanitas-online.de
Advertisement
Chapters
Table of Contents

Subscribe to Our Youtube Channel
Related Manuals for Sanitas SMA 40


Summary of Contents for Sanitas SMA 40
- Page 1 SMA 40 Pediküre-Set Set per pedicure Gebrauchsanweisung ..2 Instruzioni per l'uso ..22 Pedicure set Набор для педикюра Инструкция по Instruction for Use ...9 применению ....29 Instruments de pédicure Mode d'emploi .....15 Service-Adresse: Hans Dinslage GmbH, Riedlinger Str. 28 88524 Uttenweiler, GERMANY Tel.: +49 (0) 73 74 - 91 57 66...
-
Page 2: Table Of Contents
DEUTSCH Inhalt 1. Wichtige Hinweise ....2 4. Reinigung/Pflege ....7 2. Inbetriebnahme ......4 5. Batteriewechsel ......7 3. Anwendung ......4 6. Ersatz- und Verschleißteile ..7 3.1 Allgemeines ......4 7. Entsorgung ......8 3.2 Aufsätze ......5 8. Garantie ........8 Bitte lesen Sie diese Gebrauchsanweisung aufmerksam durch, bewahren Sie sie für späteren Gebrauch auf, machen Sie sie anderen Benutzern zu- gänglich und beachten Sie die Hinweise. - Page 3 prüfen Sie zu Ihrer eigenen Sicherheit ständig die Hitzeentwicklung des Gerätes. Dies gilt besonders für hitzeunempfindliche Personen. – Das Gerät ist zur Eigenanwendung, nicht für den medizinischen oder kommerziellen Gebrauch vorgesehen. – Das Gerät darf aus hygienischen Gründen nur bei einer Person angewen- det werden.
-
Page 4: Inbetriebnahme
Kinder) mit eingeschränkten physischen, sensorischen oder geistigen Fähigkeiten oder mangels Erfahrung und/oder mangels Wissen benutzt zu werden, es sei denn, sie werden durch eine für Ihre Sicherheit zuständige Person beaufsichtigt oder erhielten von ihr Anweisungen, wie das Gerät zu benutzen ist. –... -
Page 5: Aufsätze
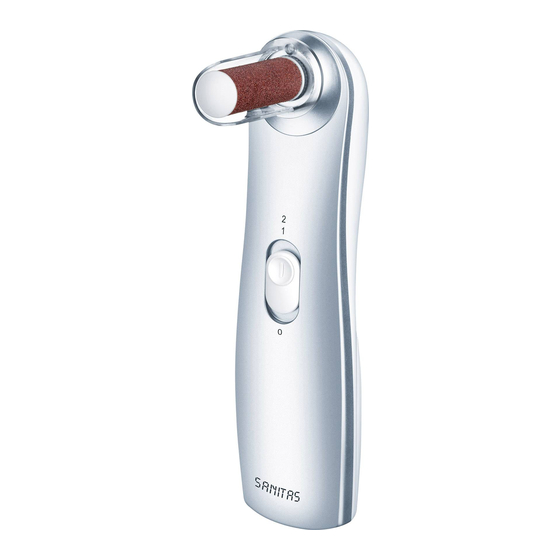
– Die Schutzkappe muss aufgesetzt werden, bevor Sie die Pediküreaufsät- ze anbringen. Haben Sie die Schutzkappe richtig angebracht, befindet sich die Magnetachse in der Mitte der Kappe. – Wählen Sie das gewünschte Aufsatzteil und setzen Sie es mit leichtem Druck auf die Achse des Gerätes. Der Aufsatz sitzt richtig, sobald ein leichtes Klicken zu hören ist. - Page 6 Folgende Aufsätze liegen Ihrem Gerät bei: 1 – Saphirscheibe Feilen und Bearbeiten der Nägel. Das Besondere an dieser Saphirscheibe ist, dass nur die innere Schleif- scheibe rotiert, die äußere Fassung jedoch fest bleibt. Dies ermöglicht ein exaktes Feilen der Nägel ohne die Gefahr, die Haut durch die schnell rotierende Scheibe zu verbrennen.
-
Page 7: Reinigung/Pflege
7 – Schutzkappe für Nagelstaub Dieser Aufsatz fängt Nagelstaub und Hautpartikel sicher auf. Arbeiten Sie beim Feilen immer von der Außenseite des Nagels zur Spitze! Kontrollieren Sie während der Behandlung die Ergebnisse regelmäßig. So- bald die Anwendung unangenehm wird, beenden Sie die Behandlung. 4. -
Page 8: Entsorgung
7. Entsorgung Bitte entsorgen Sie das Gerät gemäß der Elektro- und Elektronik Altgeräte EG-Richtlinie – WEEE (Waste Electrical and Electronic Equipment). Bei Rückfragen wenden Sie sich bitte an die für die Entsorgung zu- ständige kommunale Behörde. Die verbrauchten, vollkommen entladenen Batterien und Akkus sind über die speziell gekennzeichneten Sammelbehälter, die Sondermüllannahme- stellen oder über den Elektrohändler zu entsorgen. -
Page 9: Important Notes
ENGLISH Contents 1. Important notes ......9 4. Cleaning/care .......13 2. Preparation ......11 5. Replacing the battery ...14 3. Application......11 6. Replacement parts and wearing parts .......14 3.1 General ......11 7. Disposal ........14 3.2 Attachments ....12 Please read these instructions for use carefully and keep them for later use, be sure to make them accessible to other users and observe the informati- on they contain. - Page 10 – For reasons of hygiene, the device should only be used on one person. – The manager is not responsible for damage or injury caused by improper or incorrect use. – Ensure before use that there is no visible damage to the instrument and accessories.
-
Page 11: Preparation
– Keep batteries out of the reach of children. Children could put batteries in their mouth and swallow them. This may severely damage their health. In such cases, seek medical assistance immediately! – Always replace all batteries at the same time and use batteries of the same type. -
Page 12: Attachments
– Do not exert heavy pressure and always guide the attachments carefully over the surface to be treated. – Move the instrument under light pressure in circular movements slowly over the parts to be treated. – Note that the cutting attachments will have a reduced effect if the skin is softened or moist. -
Page 13: Cleaning/Care
3 – Sandpaper attachment, wide & coarse Quickly removes thick hard skin and large calluses on the sole of the foot and heel. This attachment is inten- ded for application on large areas. 4 – Sandpaper attachment, wide & fine Carefully removes moderately tough hard skin or small calluses on the sole of the foot and heel and smooths pre-treated areas. -
Page 14: Replacing The Battery
– Do not drop the instrument. – Make sure that no water enters the instrument. But if this should happen, do not use the instrument again until it is completely dry. – Do not use chemical detergent or scouring agents for cleaning. –... -
Page 15: Remarques Importantes
Français Sommaire 1. Remarques importantes ..15 4. Nettoyage et entretien ..20 2. Mise en service .....17 5. Changer la pile ......20 3. Application......17 6. Pièces de rechange et consommables ....20 3.1 Généralités .....17 7. Elimination ......21 3.2 Embouts ......18 Lisez attentivement ce mode d’emploi, conservez-le pour un usage ultérieur, mettez-le à... - Page 16 l’appareil. Ce conseil s’adresse surtout aux personnes insensibles à la chaleur. – L’appareil est prévu strictement pour un usage personnel et non pas pour une utilisation à fins médicales ou commerciales. – Le fabricant n‘est pas responsable des dommages causés par une utilisa- tion incorrecte ou erronée.
-
Page 17: Mise En Service
– Cette appareil n’est pas conçu pour être utilisé par des personnes (dont les enfants) présentant des capacités physiques, sensorielles ou mentales limitées, manquant d’expérience et/ou de connaissances, à moins que celles-ci soient sous la surveillance d’une personne responsa- ble de leur sécurité ou leur ayant indiqué comment utiliser l’appareil. –... -
Page 18: Embouts
– Applicare il tappo di protezione prima di inserire gli accessori pedicure. Se il tappo di protezione è stato applicato correttamente, l‘asse magneti- co si trova al centro del tappo. – Sélectionnez l‘embout voulu et logez-le sur l‘axe de l‘appareil en exerçant une légère pression. - Page 19 Les embouts suivants sont livrés votre appareil: 1 – Disque saphir Limatura e rifinitura delle unghie. La particularité de ce disque saphir vient de ce que seul le disque intérieur de ponçage tourne alors que la monture extérieure est immobile. Ceci permet de limer les ongles avec précision sans risquer de brûler la peau par la rotation rapide du disque.
-
Page 20: Nettoyage Et Entretien
7 – Embout de protection contre la poussière d‘ongles Cet embout recueille la poussière d‘ongles et les par- ticules de peau. Quand vous limez, travaillez toujours de la partie externe de l‘ongle en direction de la pointe! Au cours du traitement, vérifiez les résultats régulièrement. Dès que l‘application devient désagréable, arrêtez le traitement. -
Page 21: Elimination
7. Elimination Veuillez éliminer l’appareil conformément à la directive européenne – WEEE (Waste Electrical and Electronic Equipment) relative aux ap- pareils électriques et électroniques usagés. Pour toute question, adressez-vous aux collectivités locales responsables de l’élimination et du recyclage de ces produits. Les piles et les accus usagés et complètement déchargés doivent être mis au rebut dans des conteneurs spéciaux ou aux points de collecte réservés à... -
Page 22: Note Importanti
italiano Indice 1. Note importanti .....22 4. Pulizia/cura ......27 2. Messa in servizio ....24 5. Sostituzione delle batterie ..27 3. Uso ........24 6. Pezzi di ricambio e parti soggette a usura ....27 3.1 Cenni generali ....24 7. Smaltimento ......28 3.2 Accessori intercambiabili 25 La preghiamo di leggere attentamente le presenti istruzioni per l‘uso, rispet- tando le avvertenze riportate. - Page 23 – L‘uso previsto per l‘appareccdhio è unicamente privato, e non medico o commerciale. – Per motivi igienici l’apparecchio può essere utilizzato da una sola persona. – Il produttore non risponde di eventuali danni causati da un utilizzo non conforme o errato. –...
-
Page 24: Messa In Servizio
abbiano ricevuto da questa persona le istruzioni necessarie per l’uso dell’apparecchio. – Non utilizzare l‘apparecchio su punti sensibili o irritati della pelle. – Sorvegliare i bambini per evitare che giochino con l’apparecchio. – Prestare attenzione affinché le batterie non giungano in mano ai bambini. I bambini potrebbero metterle in bocca e ingerirle, causando anche seri danni alla salute. -
Page 25: Accessori Intercambiabili
– Accendere l‘apparecchio, spingendo verso l‘alto l‘interruttore a scorri- mento una volta (livello di velocità 1) o due volte (livello di velocità 2). – Gli accessori per limare e levigare, rivestiti in zaffiro, durano molto a lungo e sono praticamente a prova di usura. Gli accessori in carta abrasiva si distinguono invece per l‘estrema efficacia. - Page 26 2 – Fresa cilindrica Levigatura di superfici di unghie dei piedi molto in- durite nonché lisciatura grossolana delle stesse. A tal proposito applicare la fresa cilindrica in posizione orizzontale rispetto alla superficie dell‘unghia e rimuo- vere lo strato di unghia desiderato effettuando lenti movimenti circolari.
-
Page 27: Pulizia/Cura
Per limare l‘unghia, procedere sempre dall‘esterno verso la punta. Controllare regolarmente i risultati durante il trattamento. Non appena il trat- tamento comincia a recare fastidio, interromperlo. 4. Pulizia/cura – Pulire l‘apparecchio con un panno leggermente umido. Nel caso di forte sporcizia è... -
Page 28: Smaltimento
7. Smaltimento Smaltire l‘apparecchio secondo la direttiva europea sui rifiuti di appa- recchiature elettriche ed elettroniche (RAEE). In caso di dubbi, rivolgersi agli enti comunali responsabili in materia di smaltimento. Le batterie e le pile completamente esaurite e scariche devono essere smal- tite negli appositi contenitori, nei punti di smaltimento per rifiuti speciali o tramite le rivendite di materiale elettrico. -
Page 29: Важная Информация
РУССКИЙ Содержание 1. Важная информация ..29 6. Запасные детали и детали, подверженные быстрому 2. Ввод в эксплуатацию ..31 износу........35 3. Применение ......32 7. Утилизация ......35 3.1 Общие сведения ...32 8. Гарантия ......36 3.2 Насадки ......33 4. Очистка и уход ....34 5. - Page 30 более длительные паузы. Для обеспечения Вашей собственной безопасности постоянно контролируйте нагрев аппарата. Это особо касается лиц, не чувствительных к высокой температуре. – Прибор предназначен только для индивидуального пользования, а не для медицинского или коммерческого применения. – По гигиеническим причинам прибором может пользоваться только один...
-
Page 31: Ввод В Эксплуатацию
минут, чтобы двигатель не перегревался. – При использовании прибора руки должны быть сухими. – Данный прибор не предназначен для использования лицами (в т. ч. детьми) с ограниченными физическими, сенсорными или умственными способностями или с недостатком опыта и/или знаний, за исключением случаев, когда они находятся под постоянным присмотром... -
Page 32: Применение
3. Применение 3.1 Общие сведения – Данный прибор предназначен исключительно для обработки стоп и пальцев ног (педикюр). – Прежде чем устанавливать насадки для педикюра, необходимо надеть защитный колпачок. Если колпачок установлен правильно, магнитная ось находится по центру колпачка. – Выберите нужную насадку и наденьте ее с небольшим усилием на... -
Page 33: Насадки
3.2 Насадки Т. к. в объем поставки входят профессиональные насадки, мы просим обращаться с ними предельно осторожно, ведь при неправильном использовании Вы можете получить травмы. Особенно при большой скорости вращения настоятельно рекомендуется осторожное обращение. К аппарату прилагаются следующие насадки: 1 – Сапфировый диск Подпиливание... -
Page 34: Очистка И Уход
5 – Узкая насадка с покрытием из крупнозернистой наждачной бумаги Обработка и укорачивание ногтей, стачивание сильных утолщений на ногтях и точное удаление толстого стоя ороговевшей кожи. 6 – Узкая насадка с покрытием из тонкозернистой наждачной бумаги Заключительная обработка и подпиливание ногтей, стачивание... -
Page 35: Замена Батареек
– Ни в коем случае не погружайте прибор в воду или другие жидкости. 5. Замена батареек Если вложенные батарейки разрядились, их нужно заменить. Для замены батареек следуйте инструкциям в главе «Ввод в эксплуатацию». 6. Запасные детали и детали, подверженные быстрому износу Запасная... -
Page 36: Гарантия
8. Гарантия Мы предоставляем гарантию на дефекты материалов и изготовления на срок 12 месяцев со дня продажи через розничную сеть. Гарантия не распространяется: - на случаи ущерба, вызванного неправильным использованием - на быстроизнашивающиеся части (насадки, аккумуляторы) - на дефекты, о которых покупатель знал в момент покупки - на...
Need help?
Do you have a question about the SMA 40 and is the answer not in the manual?
Questions and answers