Pliant MICROCOM 900XR Operating Manual
Hide thumbs
Also See for MICROCOM 900XR:
- Operating manual (25 pages) ,
- Quick start manual (2 pages) ,
- Operating manual (20 pages)
Table of Contents
Advertisement
Quick Links
COPYRIGHT © 2021 Pliant Technologies, LLC. All rights reserved. Pliant
Technologies, LLC. All other trademarks are property of their respective owners.
Document Reference: D0000564_C
Pliant Technologies, LLC
205 Technology Parkway
Auburn, Alabama 36830 USA
O P E R AT I N G M A N U A L
®
, MicroCom
Phone +1.334.321.1160
Toll-Free 1.844.475.4268 or 1.844.4PLIANT
Fax +1.334.321.1162
™
, and the Pliant "P" are trademarks of Pliant
www.plianttechnologies.com
Advertisement
Table of Contents

Related Manuals for Pliant MICROCOM 900XR


Summary of Contents for Pliant MICROCOM 900XR
- Page 1 O P E R AT I N G M A N U A L COPYRIGHT © 2021 Pliant Technologies, LLC. All rights reserved. Pliant ® , MicroCom ™ , and the Pliant “P” are trademarks of Pliant Technologies, LLC. All other trademarks are property of their respective owners.
-
Page 2: Table Of Contents
CONTENTS Introduction .............................1 What’s Included with MicroCom 900XR? ....................2 Controls ..............................3 Display Indicators ............................3 Setup ................................4 Battery ..............................5 Operation ..............................6 Menu Settings ............................7 Device Specifications ..........................9 Product Care and Maintenance ......................10 Product Support ............................10 License Information..........................11 Pliant Warranty Statement ........................12... -
Page 3: Introduction
In order to get the most out of your new MicroCom 900XR, please take a few moments to read this manual completely so that you better understand the operation of this product. This document applies to models PMC-900XR and PMC-900XR-AN*. -
Page 4: What's Included With Microcom 900Xr
• PAC-MC-SFTCASE: MicroCom Soft Travel Case • PBT-XRC-55: MicroCom XR 5+5 Drop-In BeltPack and Battery Charger • PHS-SB11LE-DMG: SmartBoom® LITE Single Ear Pliant headset with Dual Mini connector for MicroCom • PHS-SB110E-DMG: SmartBoom PRO Single Ear Pliant headset with Dual Mini connector for MicroCom •... -
Page 5: Controls
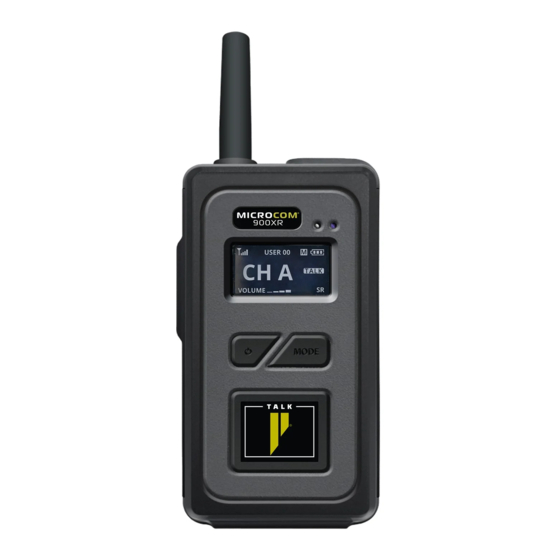
CONTROLS Antenna 2-Way Push-to-Talk (PTT) Button LEDs OLED Screen Volume +/– Buttons Power Button Mode and Channel Button Talk Button USB Charger Connection Headset and 2-Way Radio Connection DISPLAY INDICATORS Master Pack Indicator User ID Battery Life Signal Strength Lock Indicator Talk Indicator Active Channel Mode Indicator... -
Page 6: Setup
SETUP Attach the beltpack antenna. It is reverse threaded; screw counter-clockwise. 2. Connect a headset to the beltpack. Press firmly to make sure the headset connector is seated properly. 3. Power on. Press and hold the POWER button for two (2) seconds until the screen turns on. 4. -
Page 7: Battery
• When using “S” IDs, the last full-duplex ID (“09”) cannot be used in the Roam Mode. c. Access the roaming menu. Select one of the roaming menu options listed below for each beltpack. • Auto – Allows the beltpack to automatically log in to the Master or Submaster depending on the environment and the beltpack’s proximity to either. -
Page 8: Operation
Each separate MicroCom system should use the same Group and Security Code for all beltpacks in that system. Pliant recommends that systems operating in proximity to one another set their Groups to be at least ten (10) values apart. For example, if one system is using Group 03, another... -
Page 9: Menu Settings
MENU SETTINGS The following table lists adjustable settings and options. To adjust these settings from the beltpack menu, follow the instructions below: To access the menu, press and hold the MODE button for three (3) seconds until the screen changes to <Setting Mode>. 2. - Page 10 R E CO M M E N D E D S E T T I N G S B Y H E A D S E T The following table provides recommended MicroCom settings for several common headset models. Recommended Setting Headset Model Mic Gain SmartBoom PRO and SmartBoom LITE (PHS-SB11LE-DMG,...
-
Page 11: Device Specifications
Display OLED * Notice about Specifications: While Pliant Technologies makes every attempt to maintain the accuracy of the information contained in its product manuals, that information is subject to change without notice. Performance specifications included in this manual are design-centered specifications and are included for customer guidance and to facilitate system installation. -
Page 12: Product Care And Maintenance
Number. Obtaining a Return Material Authorization Number will ensure that your equipment is handled promptly. All shipments of Pliant products should be made via UPS, or the best available shipper, prepaid and insured. The equipment should be shipped in the original packing carton; if that is not available, use any suitable container that is rigid and of adequate size to surround the equipment with at least four inches of shock-absorbing material. -
Page 13: License Information
LICENSE INFORMATION P L I A N T T E C H N O L O G I E S M I C R O CO M FCC CO M P L I A N C E S TAT E M E N T 00004394 (FCCID: YJH-GM-900MSS) 00004445 (FCCID: YJH-GM-24G) This equipment has been tested and found to comply with the limits for a Class B digital device,... -
Page 14: Pliant Warranty Statement
All headsets and accessories (including Pliant-branded batteries) carry a one-year warranty. The sole obligation of Pliant Technologies, LLC during the warranty period is to provide, without charge, parts and labor necessary to remedy covered defects appearing in products returned prepaid to Pliant Technologies, LLC. - Page 15 PA R T S L I M I T E D WA R R A N T Y Replacement parts for Pliant Technologies, LLC products are warranted to be free from defects in materials and workmanship for 120 days from the date of sale to the end user.
Need help?
Do you have a question about the MICROCOM 900XR and is the answer not in the manual?
Questions and answers