Table of Contents
Advertisement
Quick Links
Advertisement
Table of Contents

Related Manuals for Hytera HP6 0X


Summary of Contents for Hytera HP6 0X
- Page 1 User Manual HP 6 0 X DIGITAL PORTABLE RADIO...
- Page 2 Preface Welcome to the world of Hytera and thank you for purchasing this product. This manual includes a description of the functions and step-by-step procedures for use. To avoid bodily injury or property loss caused by incorrect operation, please carefully read the Safety Information Booklet before use.
- Page 3 Copyright Information Hytera is the trademark or registered trademark of Hytera Communications Corporation Limited (the Company) in the People's Republic of China (PRC) and/or other countries or areas. The Company retains the ownership of its trademarks and product names. All other trademarks and/or product names that may be used in this manual are properties of their respective owners.
- Page 4 Operation is subject to the following two conditions: This device may not cause harmful interference. This device must accept any interference received, including interference that may cause undesired operation. Note: Changes or modifications to this unit not expressly approved by the party responsible for compliance could void the user's authority to operate the equipment.
- Page 5 Contact your local dealer for the product's optional accessories. ISEDC Statement The device has been tested and complies with SAR limits, users can obtain Canadian information on RF exposure and compliance. Après examen de ce matériel aux conformité aux limites DAS et/ou aux limites d’intensité de champ RF, les utilisateurs peuvent sur l’exposition aux radiofréquences et la conformité...
-
Page 6: Table Of Contents
Contents User Manual Contents 1. Packing List ..............................4 2. Product Overview ............................5 2.1 Product Layout ............................5 2.2 Programmable Keys ..........................6 3. Before Use ..............................7 3.1 Charging the Battery ..........................7 3.2 Attaching the Belt Clip ..........................7 3.3 Attaching the Antenna .......................... - Page 7 Contents User Manual 7.1 Basic Settings ............................15 7.2 Audio Settings ............................15 7.3 Security Settings ........................... 16 7.3.1 Encrypt ............................16 7.3.2 Man Down ..........................16 7.3.3 Lone Worker ..........................17 7.4 Scan ..............................17 7.5 Positioning ............................17 7.5.1 Voice w/Location .........................
- Page 8 Documentation Conventions User Manual Documentation Conventions Icon Conventions Icon Description Indicates references that can further describe the related topics. Indicates situations that could cause data loss or equipment damage. Indicates situations that could cause major personal injury or even death. Notation Conventions Item Description...
-
Page 9: Packing List
Packing List User Manual 1. Packing List Please unpack carefully and check that you have received the following items. If any item is missing or damaged, contact your dealer. Item Quantity (PCS) Item Quantity (PCS) Radio Antenna Battery Belt Clip Charger Strap Power Adapter... -
Page 10: Product Overview
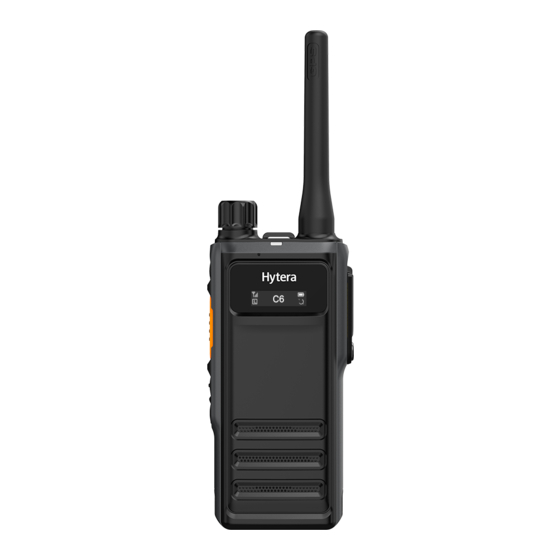
Product Overview User Manual 2. Product Overview 2.1 Product Layout Part Name Part Name On-Off Key Antenna Push-to-Talk (PTT) Key Microphone Side Key 1 (SK1) Battery Latch Side Key 2 (SK2) Strap Hole Smart Knob Accessory Connector OLED Display Belt Clip Speaker Battery LED Indicator... -
Page 11: Programmable Keys
Product Overview User Manual 2.2 Programmable Keys For enhanced convenience, you can request your dealer to program SK1 and SK2 as shortcuts to radio features. For details, consult your dealer. -
Page 12: Before Use
Before Use User Manual 3. Before Use 3.1 Charging the Battery Use the approved charger to charge the battery. Read the Safety Information Booklet before charging. The remaining lithium-ion battery power is limited to 30% pursuant to the new lithium battery shipment ... -
Page 13: Attaching The Antenna
Before Use User Manual 3.3 Attaching the Antenna Do not hold the radio by the antenna and swing it. This may affect the antenna performance and shorten the life span of the antenna. 3.4 Attaching the Battery Use the approved battery to avoid the risk of explosion. ... - Page 14 Before Use User Manual Loosen the screw on the accessory connector cover, and then remove the cover. Insert the audio accessory plug into the accessory connector. Tighten the screw on the audio accessory plug.
-
Page 15: Basic Operations
Basic Operations User Manual 4. Basic Operations 4.1 Turning On or Off the Radio To turn on or off the radio, press and hold 4.2 Adjusting the Volume To increase or decrease the volume, rotate the Smart knob clockwise or counter-clockwise. 4.3 Selecting a Zone A zone is a group... -
Page 16: Status Indications
Status Indications User Manual 5. Status Indications 5.1 OLED Icons 5.1.1 Basic Status Icon Radio Status The radio detects no signal. The number of bars indicates the signal strength. The radio is in emergency mode. The radio is scanning. The radio stays on an active channel. The radio stays on Priority Channel 1. - Page 17 Status Indications User Manual LED Indicator Radio Status Glows green The radio is receiving. Glows red The radio is transmitting. Flashes orange slowly The radio is scanning or roaming. Flashes orange rapidly The radio is operating in emergency mode. Call hang time: No voice is being transmitted or received during a call. Within such Glows orange a period, you can press and hold the PTT key to speak.
-
Page 18: Call Services
Call Services User Manual 6. Call Services When you are speaking during a call, keep the microphone about 2.5 cm to 5 cm away from your mouth. This ensures optimal voice quality on the receiving radio. 6.1 Group Call A group call is a call from an individual user in a group to all the other members in the group. 6.1.1 Initiating a Group Call Through Preset Contact Press and then rotate the Smart knob to select the digital channel preset with a group contact, and then press and... -
Page 19: Receiving A Private Call
Call Services User Manual 6.2.2 Receiving a Private Call You can answer a private call without any operation. 6.2.3 Ending a Private Call A private call ends when the call hang time expires. 6.3 All Call An all call is a call from an individual user to all the other users on the current digital channel. 6.3.1 Initiating an All Call Through Preset Contact Press and then rotate the Smart knob to select the digital channel preset with the all call contact, and then press and... -
Page 20: Supplementary Features
Supplementary Features User Manual 7. Supplementary Features 7.1 Basic Settings Feature Description Operation Press the preprogrammed Power This feature allows you to set the TX power Power Level Level Adjust key to adjust the level of the radio to high or low. power level. -
Page 21: Security Settings
Supplementary Features User Manual Option Description Operation voice through the audio accessory, the radio uses the external switch the microphone audio microphone. option. Press the preprogrammed Only Internal The radio uses only the internal microphone and speaker. SPK Set Switch key to The radio uses only the microphone and speaker of the audio switch the speaker audio Only External... -
Page 22: Lone Worker
Supplementary Features User Manual 7.3.3 Lone Worker The Lone Worker feature allows the radio to automatically send an emergency alarm to your companion or the control center in either of the following scenarios: You do not operate the radio within the preset time. ... -
Page 23: Gps Report
Supplementary Features User Manual 7.5.2 GPS Report The GPS Report feature allows the radio to report its location information to the control center. You can report the location information in either of the following ways: Press the preprogrammed GPS Report key. ... -
Page 24: Switching The Bt Audio Output
Supplementary Features User Manual 7.6.3 Switching the BT Audio Output With a BT device connected, you can press the preprogrammed BT Audio Switch key to switch the audio output device between BT earpieces and the radio. 7.7 One Touch Call The One Touch Call feature allows you to quickly initiate a preset service by pressing the preprogrammed One Touch Call key. -
Page 25: Auto Priority Interrupt
Supplementary Features User Manual 7.9.2 Auto Priority Interrupt Auto Priority Interrupt includes Emergency Priority Interrupt, Call Back Priority Interrupt, Message Priority Interrupt, Radio Disable Priority Interrupt, and All Call Priority Interrupt. With this feature enabled by your dealer, you can interrupt an ongoing call in one of the following ways: Press and hold the PTT key. -
Page 26: Initiating An Emergency Call
Supplementary Features User Manual 7.10.1 Initiating an Emergency Call Press the preprogrammed Emergency On key to initiate an emergency call to the preset contact. If the Alarm w/Call To Follow feature is enabled by your dealer, you can speak into the microphone without pressing and holding the PTT key. -
Page 27: Emergency Erase Data
Supplementary Features User Manual 7.12 Emergency Erase Data The Emergency Erase Data feature allows the radio to erase encrypted data in case of emergency, so as to prevent unauthorized access. When erasing the data, the radio stops voice and data services and returns to the home screen. If this feature is enabled by your dealer, the encrypted data can be erased in the following cases: Press SK1 and then the PTT key (within 1.5s) for two times, and then press SK1 again. -
Page 28: Troubleshooting
Troubleshooting User Manual 8. Troubleshooting Phenomena Analysis Solution The battery may be installed improperly. Remove and reattach the battery. The battery power may have run out. Recharge or replace the battery. The radio cannot be turned The battery may suffer from poor contact caused by dirtied or damaged Clean the battery contacts. - Page 29 Troubleshooting User Manual Phenomena Analysis Solution The LCD does not display The LCD may fail to function Restart the radio. any information. temporarily. The GPS cannot locate your The radio may be at an unfavorable Move to an open and flat area, and try position.
-
Page 30: Care And Cleaning
Care and Cleaning User Manual 9. Care and Cleaning To guarantee optimum performance as well as a long service life of the product, please follow the tips below. 9.1 Product Care Do not pierce or scrape the product. Keep the product away from substances that can corrode the circuitry. ... -
Page 31: Optional Accessories
Optional Accessories User Manual 10. Optional Accessories Use the accessories approved by the Company only. Otherwise, we will not be liable for any loss or damage arising out of the use of unauthorized accessories. Contact your local dealer for the optional accessories used with the product. -
Page 32: Abbreviations
Abbreviations User Manual 11. Abbreviations Abbreviation Full Name Global Positioning System Light-emitting Diode OLED Organic Light-emitting Diode Push-to-Talk Side Key... - Page 33 Hytera Communications Corporation Limited. 2020 Hytera Communications Corporation Limited. All Rights Reserved. Address: Hytera Tower, Hi-Tech Industrial Park North, 9108# Beihuan Road, Nanshan District, Shenzhen, People's Republic of China Postcode: 518057 http:// www.hytera.com...
Need help?
Do you have a question about the HP6 0X and is the answer not in the manual?
Questions and answers