
Related Manuals for General RL-20G


Summary of Contents for General RL-20G
- Page 1 RL- 20 G R O T A R Y L A S E R L E V E L Product Code: GRL20GSTDKT MANUAL GRADE TILT ALARM I N S T R U C T I O N M A N U A L...
-
Page 2: Laser Safety
Laser Safety Read the following safety instructions before attempting to operate this tool. Keep these instructions in a safe place or store in the carry pouch for future reference. WARNING! SAVE ALL WARNINGS & INSTRUCTIONS FOR FUTURE REFERENCE. Read and understand all instructions. Use the tool only with the Do not position the tool near a reflective •... -
Page 3: Item Checklist
General RL-RC20G General RL-D7H RL-20G remote control detector & clamp INCHES Laser glasses Laser target 2x AA Alkaline 9V Alkaline (green) (green) batteries (remote) battery (detector) Mains power Rechargeable Hard carry case adaptor / indoor charger battery pack RL-20G KIT... -
Page 4: Using The Laser
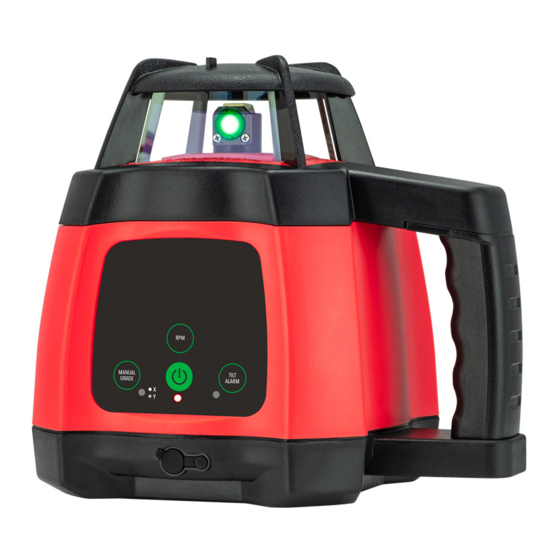
Using the Laser Protective lighthouse Rotating laser port Control panel MANUAL GRADE TILT ALARM Rechargeable battery charging port 5/8” x 11 tripod thread FRONT OVERVIEW Rechargeable battery charging port 5/8” x 11 thread for horizontal operational on a tripod Battery thumb screw BASE OVERVIEW... -
Page 5: Control Panel
Using the Laser (continued) Speed control button Power button Manual grade mode button Tilt alarm button Tilt alarm indicator X/Y axis indicator (manual grade mode) Power indicator CONTROL PANEL P O W E R S UP PLY Indoor charger • The indoor charger is for indoor use only. Rechargeable battery pack •... - Page 6 Using the Laser (continued) Charging the rechargeable battery pack • Insert the charger into one of the two charging ports. The charging ports are located underneath the control panel (Fig.1) and on the battery pack. Progress will be shown by the power indicator display on the charger as following: Red (flashing) = Charger and battery are not MANUAL...
- Page 7 Using the Laser (continued) O P E R AT I O N Tilt alarm • Once the laser level has been levelled off the tilt Powering on alarm can be enabled by pressing the tilt alarm • Press the power button once and the laser level will button.
-
Page 8: Using The Remote Control
Using the Remote Control Manual grade mode button Grade adjustment Grade adjustment MANUAL (manual mode) button GRADE (manual mode) button Speed control button Sleep mode button FRONT OVERVIEW R E M OT E CO N T RO L O P ERATIO N Power supply •... -
Page 9: Using The Detector
Using the Detector Laser sensor LCD display screen Direction indicators Power button Screen backlight button Speaker on / off button Detection mode button FRONT OVERVIEW Speaker LCD display screen Staff clamp mounting point Battery compartment BACK OVERVIEW... -
Page 10: Lcd Screen Overview
Using the Detector (continued) Arrow indicator Detection mode Centre alignment Brightness indicator Arrow indicator Battery indicator Speaker indicator LCD SCREEN OVERVIEW P OW E R S UPP LY MOU N T I N G TO T H E STAF F C L AMP •... - Page 11 Using the Detector (continued) DE T E CTOR O PE R AT I ON • Power the detector on by pressing the power button. The LCD screen will turn on and the speaker will emit a small tone to indicate the detector is operating.
-
Page 12: Calibration Check
Mounting to a Construction Tripod NOT INCLUDED • Place the laser level onto the tripod with the A construction tripod (flat, domed or lighthouse facing upwards and mount the male elevating) can be purchased from your 5/8” thread into the base until firm. Do not over nearest measurement tool dealer. -
Page 13: Troubleshooting
Trouble Shooting ERROR CAUSE & SOLUTION Check the batteries. They may be in the wrong way or need replacing. • Laser does not turn on Check the battery compartment for signs of damage and ensure that the • compartment is clean and that the battery terminals are not bent. Check the batteries. -
Page 14: Warranty
Warranty This tool comes with a standard 3 year warranty. Extend the warranty of your laser level to 7 years by registering online. See website for terms and conditions. www.spoton.com.au/warranty-information All Spot-on measurement tools are carefully checked and tested to our precise quality assurance standards. We offer a warranty in accordance with the following conditions: 1. -
Page 15: Specifications
Warranty (continued) 7 YEAR EXTENDED WARRANTY PERIOD 5. Failure to register your product online and/or 1. The extended warranty is available on selected submission of a valid invoice/receipt will void tools only. the warranty extension. 2. You may extend the warranty period for your 6. - Page 16 Spot-on Laser & Tool Company Spot-on Laser & Tool Company reserves the right to make changes to specifications and product descriptions at any time. © Spot-on Laser & Tool Company. 2021. Printed in China.
Need help?
Do you have a question about the RL-20G and is the answer not in the manual?
Questions and answers