
Subscribe to Our Youtube Channel
Related Manuals for Holman QuikDial CO6004


Summary of Contents for Holman QuikDial CO6004
- Page 1 User Guide www.holmanindustries.com.au CO6004 Manual 2021 v4.indd 1 CO6004 Manual 2021 v4.indd 1 24/9/21 3:59 pm 24/9/21 3:59 pm...
-
Page 2: Table Of Contents
Contents Overview Main Components Additional Functions Specifications Setup Battery Installation Setup Process Zone Set Clock Start Time How Long (Watering Duration) How Often (Watering Interval) Operation Automatic Watering Manual Watering Maintenance Cold Weather Batteries PRODUCT CODE: CO6004 Our QuikDial Tap Timers have a simple and intuitive setup system... -
Page 3: Main Components
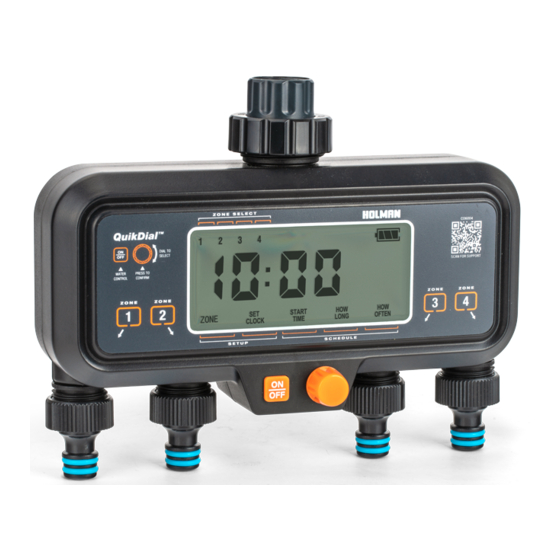
Overview Main Components 1. ZONE 1 outlet 6. Tap connection locking nut 2. ZONE 2 outlet 7. Display 3. ZONE 3 outlet 8. ON/OFF 4. ZONE 4 outlet 9. Main dial ® Each outlet is 20mm BSP 10. Battery compartment: with 12mm snap‑on ®... -
Page 4: Additional Functions
Overview (continued) Additional Functions ® Inactivity on your QuikDial Tap Timer controls for 6 seconds will return to the default system mode displaying the current time Á Removing the AA batteries will reset all clock and schedule settings ® To reset your QuikDial Tap Timer, remove the batteries and twist the main dial until the display is completely blank Á... -
Page 5: Setup
Setup Battery Installation 1. Install 2× 1.5v AA ® After installing the batteries, alkaline batteries into your the display will flash and QuikDial Tap Timer, as your QuikDial will make indicated in the battery clicking noises as part compartment [a] of the start‑up phase ®... -
Page 6: Zone
Setup (continued) Zone ® This process is to select 3. Press the main dial to toggle ZONE 1 ON or OFF as desired which zones will be watered as part of your schedule ® When a zone is turned OFF, the zone number [d] 1. - Page 7 Setup (continued) Zone (continued) 5. Press the main dial to ® Alternatively, to go back and toggle the zone ON change your zone settings, or OFF as desired turn the dial another step and repeat steps 3-7 6. Repeat steps 4-5 the remaining zones ®...
-
Page 8: Set Clock
Setup (continued) Set Clock ® This process is to set 3. Turn the main dial to adjust the system clock for the hour to the current time your QuikDial 4. Press the main dial to ® Your QuikDial system confirm the current hour. time is always in 24‑hour The current minute will format (military time) -
Page 9: Start Time
Setup (continued) Start Time ® This process is to set the 2. Press the main dial. The START TIME for watering START TIME hour [c] of your active zones will begin flashing ® This START TIME is applied to all zones, but is only active on the zones that have been toggled ON in the previous instructions... -
Page 10: How Long (Watering Duration)
Setup (continued) Start Time (continued) ® START TIME in the main 6. Press the main dial to confirm the minute menu [d] will flash again, to indicate it has been set [e] How Long (Watering Duration) ® This process is to set the watering duration of your active zones ®... -
Page 11: How Often (Watering Interval)
Setup (continued) How Long (continued) ® HOW LONG in the 3. Turn the main dial to adjust duration as desired main menu [d] will flash again, to indicate the 4. Press the main dial to duration has been set [e] confirm the duration How Often (Watering Interval) ®... - Page 12 Setup (continued) How Long (continued) 2. Press the main dial. The ® Hourly watering intervals interval [c] will begin flashing are available in 1, 2, 3, 6 or 12 hours ® To go back to setting the interval in DAYS [e], keep turning the dial beyond 12 hours.
-
Page 13: Operation
Operation Automatic Watering 1. For automatic watering, 3. When the current interval ensure ZONE, SET CLOCK, time [b] lapses, the START TIME, HOW LONG zones will start watering and HOW OFTEN have all in sequential order been set correctly as per ®... -
Page 14: Manual Watering
Operation (continued) Manual Watering 1. For manual (instant) 4. Once watering, the remaining watering, press ON/OFF time [e] will also flash to indicate it is adjustable 2. The zone selector [a] will flash. Twist the main 5. Turn the main dial to adjust dial to select a zone the watering time as desired ®... -
Page 15: Maintenance
QuikDial Á Do not mix old and new batteries Á Do not use rechargeable batteries The Holman website has a host of additional information on features. Head to support.holmanindustries.com.au for more tips, tricks and support content. - Page 16 Keep up to date to with relevant product information and special offers available through our newsletter. www.holmanindustries.com.au/product-registration/ Copyright © 2021 Holman Industries CO6004 Manual 2021 v4.indd 16 CO6004 Manual 2021 v4.indd 16...
Need help?
Do you have a question about the QuikDial CO6004 and is the answer not in the manual?
Questions and answers