Table of Contents
Advertisement
Quick Links
CHW8PD Wedge Camera
Installation Guide
© Seon Design Inc. | March 2016 | All rights reserved.
www.seon.com Part Number: 700-1054 R003
*700-1054*
Installation Kit Contents
•
1 CHW8PD HD camera, with local video out adaptor cable
•
3 #10 3/4" Phillips screws
•
1 security key
•
1 Installation Guide
•
1 Drilling template
1. Choose Camera Location
1.
Determine the location for mounting the camera. Select a flat
location to minimize possible moisture leakage into the vehicle.
INSTALL TIP: Seal the camera mounting holes
For outdoor installations, if a flat surface is not available, carefully seal
the mounting holes under the base of the camera after installation. Do
NOT apply silicone or other sealants around the base of the camera.
Cameras must be installed with the cabling running inside the wall
panels.
2.
Use the supplied drilling guide template to mark the cable (7/8")
and screw (5/32") holes on the panel.
3.
Use a step-bit to drill the cable hole, and regular bits for the screw
holes.
4.
Connect the extension cable's RJ-45 connector to a HX16 POE
HD CAM port.
5.
Thread the camera extension cable from the DVR to the camera
location through the panel cable hole.
2. Connect the Camera
1.
Connect the camera cable and extension cable RJ45 connectors.
2.
Thread the connector caps together.
3. Open the Camera
1.
Using the security key supplied with the camera, loosen the
captive screws on the housing.
2.
Lift the housing off of the base.
4. Install the Camera
INSTALL TIP: Camera PCB and Wiring
While installing the camera, do not impact the printed circuit board or
wiring inside the camera with screws or screwdriver bits.
Damage to the camera can occur.
Use the three #10×3/4" mounting screws supplied with the camera to
attach the camera to a wall or ceiling.
The mounting gaskets on the camera base seal the screw and cable
holes when mounted on a flat surface.
INSTALL TIP: Allow Camera Ventilation
The camera is designed to vent for proper operation. Do NOT apply
silicone or other sealants around the base of the camera.
5. View Camera Output
1.
Power on the DVR and camera.
2.
Connect the supplied local video out adaptor cable's 3.5mm audio
plug to the camera's Local Video Out socket. See the image in
section 3.
3.
Connect the local video out cable's RCA end to a video monitor to
see the camera's line of view while adjusting the camera's rotation,
pan, and tilt positions.
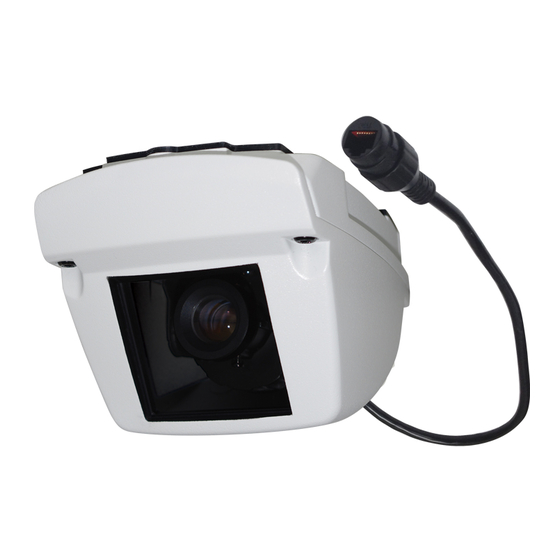
Camera housing
Captive housing
screws
Camera lens
Local Video Out
Base
Mounting gaskets
Base
#10x3/4"
mounting
screws
Advertisement
Table of Contents

Related Manuals for SEON CHW8PD


Summary of Contents for SEON CHW8PD
- Page 1 Installation Guide Camera housing Captive housing screws Camera lens Local Video Out © Seon Design Inc. | March 2016 | All rights reserved. www.seon.com Part Number: 700-1054 R003 *700-1054* Base Installation Kit Contents • 1 CHW8PD HD camera, with local video out adaptor cable 4.
- Page 2 INSTALL TIP: Do not adjust any other screws Camera sealing gasket The CHW8PD camera has been factory adjusted for lens position. Sliding back the gimbal may result in the camera seeing parts of the housing. Base...
Need help?
Do you have a question about the CHW8PD and is the answer not in the manual?
Questions and answers