Advertisement
Available languages
Available languages
Quick Links
Advertisement

Related Manuals for Canvas Duncan 168-0099-8


Summary of Contents for Canvas Duncan 168-0099-8
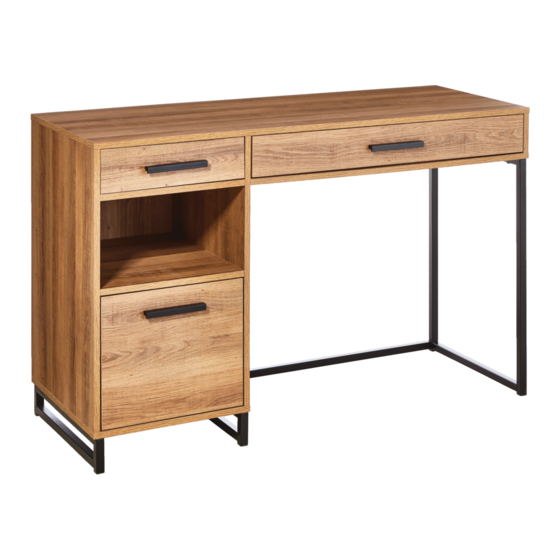
- Page 1 DUNCAN DESK PRODUCT NO. 168-0099-8 ASSEMBLY INSTRUCTIONS HAVING TROUBLE? TOLL-FREE:...
- Page 2 From on-trend furniture pieces to holiday décor and all your outdoor living essentials, CANVAS™ makes it easy to refresh your space your unique style and the way you live every day. We would love to hear from you and welcome your thoughtful feedback.
-
Page 3: Table Of Contents
TABLE OF CONTENTS Warning & Safety Parts List Before You Begin Assembly Step-by-step Guide Technical Data Troubleshooting Caring for Your Item Warranty TOOLS REQUIRED NOTE: Do not over drill/ Be aware of over-drilling. No. 2 Cross-head Screwdriver 2 people Tip Shown Actual Size... -
Page 4: Warning & Safety
WARNING & SAFETY Warning & Safety WARNING - Serious injury can occur if unit tips over. Place heavy items on lower shelves and as far back as possible. Maximum weight capacity is 123 lb 7 oz (56 kg), evenly distributed. Serious injuries can occur from unit tipping over. -
Page 5: Parts List
PARTS LIST ITEM DESCRIPTION THUMBNAIL QUANTITY Fixed shelf Rail Gable left Divider Left bottom Right bottom Gable right Left back panel Right back panel Connecting pipe Right leg Left leg DUNCAN DESK... - Page 6 PARTS LIST ITEM DESCRIPTION THUMBNAIL QUANTITY Upper drawer side left Upper drawer side right Upper right drawer back Upper right drawer bottom rail Upper right drawer bottom Upper right drawer front Upper left drawer back Upper left drawer bottom Upper left drawer front Lower drawer side left Lower drawer side right Lower drawer back...
- Page 7 EXPLODED PARTS DUNCAN DESK...
- Page 8 HARDWARE LIST ITEM DESCRIPTION THUMBNAIL QUANTITY Ø7.8 x 30 mm Wood dowel Cam bolt (Large) Cam lock (Large) Screws Ø3.5 x 12 mm Left glide Right glide Screws Ø5 x 50 mm Bracket Screws Ø4 x 14 mm Washer Drawer connector (small) Screws Ø3.5 x 12 mm Screws Ø4.7 x 12.5 mm Screws Ø3.8 x 35 mm...
- Page 9 HARDWARE LIST ITEM DESCRIPTION THUMBNAIL QUANTITY M4 x 22 mm Bolt Handle Plastic file hanger Cam bolt (Small) Cam lock (Small) M6 x 30 mm Bolt Hex wrench M6 x 35 mm Bolt Back button Screws Ø3 x 16 mm Small washers Anti-tip restraints Wall plugs...
-
Page 10: Before You Begin Assembly
BEFORE YOU BEGIN ASSEMBLY MAKE SURE ALL PARTS ARE PRESENT ASSEMBLE IN A CLEARED AREA REMOVE PACKAGING MATERIALS READ EACH STEP CAREFULLY DUNCAN DESK... -
Page 11: Step-By-Step Guide
STEP-BY-STEP GUIDE STEP 1 Insert 4 wood dowels into the edge of the fixed shelf . Insert 2 wood dowels into the edge of the rail DUNCAN DESK... - Page 12 STEP-BY-STEP GUIDE STEP 2 Insert 4 wood dowels and 3 cam bolts into the gable left . Align 2 left glides with the holes on the gable left , then secure with 6 screws . Make sure the first hole you align is correct. Note: These are Left Glides.
- Page 13 STEP-BY-STEP GUIDE STEP 3 Insert 3 cam locks into fixed shelf and rail and attach them to gable left . Tighten and lock the 3 cam locks Note: Make sure cams are fully tightened and unit is stable before step 4 160°~185°...
- Page 14 STEP-BY-STEP GUIDE STEP 4 Insert 4 wood dowels and 3 cam bolts into the divider . Align 2 right glides with the holes on the divider , then secure with 6 screws Make sure the first hole you align is correct. Note: These are Right Glides.
- Page 15 STEP-BY-STEP GUIDE STEP 5 Insert 3 cam locks into the holes on fixed shelf and rail . Attach the divider . Tighten and lock the 3 cam locks Note: Make sure cams are fully tightened and unit is stable before step 6. 160°~185°...
- Page 16 STEP-BY-STEP GUIDE STEP 6 Align the dowels on gable left and gable right with the holes on the left bottom , then attach them with 4 screws DUNCAN DESK...
- Page 17 STEP-BY-STEP GUIDE STEP 7 Insert 2 cam bolts into the divider . Align 1 left glide with the holes on the divider , then secure with 3 screws . Make sure the first hole you align is correct. DUNCAN DESK...
- Page 18 STEP-BY-STEP GUIDE STEP 8 Insert 2 wood dowels into the edge of the right bottom . Align 2 brackets with the holes on the right bottom and attach with 2 screws DUNCAN DESK...
- Page 19 STEP-BY-STEP GUIDE STEP 9 Insert 2 cam locks into the right bottom . Attach to the divider Tighten and lock the 2 cam locks . Fasten 2 brackets into the divider with 2 screws Note: Make sure cams are fully tightened and unit is stable before step 10.
- Page 20 STEP-BY-STEP GUIDE STEP 10 Insert 4 wood dowels into the large holes on the edge of gable right Align 1 right drawer glide with the holes on the gable right , then secure with 3 screws . Make sure the first hole you align is correct. DUNCAN DESK...
- Page 21 STEP-BY-STEP GUIDE STEP 11 Align the dowels on the gable right with the holes on the right bottom Attach them with 2 screws DUNCAN DESK...
- Page 22 STEP-BY-STEP GUIDE STEP 12 Attach right leg and left leg with connecting pipe using 2 bolts . Tighten with hex wrench NOTE: Do not tighten screws all the way until you have assembled the desk. Once assembly is complete, tighten each screw. DUNCAN DESK...
- Page 23 STEP-BY-STEP GUIDE STEP 13 Attach right leg and left leg with the base of the desk case using 12 bolts and 12 washers . Tighten with hex wrench NOTE: Do not tighten screws all the way until you have assembled the desk. Once assembly is complete, tighten each screw.
- Page 24 STEP-BY-STEP GUIDE STEP 14 Insert left back panel and right back panel into the grooves in the back of the desk case. DUNCAN DESK...
- Page 25 STEP-BY-STEP GUIDE STEP 15 Insert 6 cam bolts into the smaller holes on the underside of top DUNCAN DESK...
- Page 26 STEP-BY-STEP GUIDE STEP 16 Insert 6 cam locks along the top of the assembled case. Align the top with the holes on gable left and gable right and insert. Tighten and lock the 6 cam locks Note: Make sure cams are fully tightened and unit is stable before step 17.
- Page 27 STEP-BY-STEP GUIDE STEP 17 Insert 8 back buttons into the left back panel and right back panel with 8 screws Note: Ensure screws are inserted at the correct angle. ° DUNCAN DESK...
- Page 28 STEP-BY-STEP GUIDE STEP 18 Align 1 left glide with the holes on the upper drawer side left . Secure with 3 screws . Align 1 right glide with the holes on the upper drawer side right , then secure with 3 screws Repeat the step twice on two pieces DUNCAN DESK...
- Page 29 STEP-BY-STEP GUIDE STEP 19 Attach upper drawer side left and upper drawer side right with upper right drawer back and upper right drawer bottom rail with 5 screws . Insert small drawer connector into the upper drawer side left and upper drawer side right with 4 screws DUNCAN DESK...
- Page 30 STEP-BY-STEP GUIDE STEP 20 Insert upper right drawer bottom into the upper right drawer frame. Insert 1 cam bolt into the upper right drawer front DUNCAN DESK...
- Page 31 STEP-BY-STEP GUIDE STEP 21 Insert handle into the upper right drawer front with 2 bolts . Use 1 cam lock to attach upper right drawer front with upper right drawer bottom rail . Secure small drawer connector to the upper right drawer front with 2 screws Note: Make sure cams are fully tightened and...
- Page 32 STEP-BY-STEP GUIDE STEP 22 Attach upper drawer side left and upper drawer side right with upper left drawer back with 4 screws . Insert small drawer connector into the upper drawer side left and upper drawer side right with 2 screws DUNCAN DESK...
- Page 33 STEP-BY-STEP GUIDE STEP 23 Insert small drawer bottom into the upper left drawer frame. DUNCAN DESK...
- Page 34 STEP-BY-STEP GUIDE STEP 24 Insert handle into the upper left drawer front with 2 bolts . Secure small drawer connector to the upper left drawer front with 2 screws DUNCAN DESK...
- Page 35 STEP-BY-STEP GUIDE STEP 25 Align 1 left glide with the holes on the lower drawer side left , then secure with 3 screws . Align 1 right glide with the holes on the lower drawer side right . Secure with 3 screws DUNCAN DESK...
- Page 36 STEP-BY-STEP GUIDE STEP 26 Attach lower drawer side left and lower drawer side right with lower drawer back with 4 screws . Insert large drawer connector into lower drawer side left and lower drawer side right with 4 screws DUNCAN DESK...
- Page 37 STEP-BY-STEP GUIDE STEP 27 Insert upper left drawer bottom into the lower left drawer frame. DUNCAN DESK...
- Page 38 STEP-BY-STEP GUIDE STEP 28 Insert handle into lower drawer front with 2 bolts . Secure large drawer connector to lower drawer front with 4 screws . Attach plastic file hanger to lower drawer side left and lower drawer side right DUNCAN DESK...
- Page 39 STEP-BY-STEP GUIDE STEP 29 Insert the 3 drawers into the desk. Adjust the drawer connectors if necessary to adjust the fit. DUNCAN DESK...
- Page 40 STEP-BY-STEP GUIDE STEP 30 Fasten two anti-tip restraints to the back of top , using two screws and two flat washers Insert two wall plugs into your wall. Fasten the two anti-tip restraints to the wall using two small washers and two screws DUNCAN DESK...
-
Page 41: Technical Data
TECHNICAL DATA 18" (45.7 cm) " 47 1/4 (120 cm) 30" (76.2 cm) SPECIFICATIONS ASSEMBLED DIMENSIONS (W x D x H) 47 1/4 x 18 x 30" 120 x 45.7 x 76.2 cm ASSEMBLED WEIGHT 63 lb 2 oz 28.6 kg DESK SURFACE MAXIMUM WEIGHT CAPACITY 99 lb 3 oz 45 kg... -
Page 42: Troubleshooting
ASSEMBLY TROUBLESHOOTING HAVING TROUBLE? LET US HELP YOU! TOLL-FREE: BEFORE RETURNING CALL US, YOUR PRODUCT WE CAN HELP CARING FOR YOUR ITEM Always keep children under close supervision while they are using or around this product. Never leave children unattended. This product is intended for domestic indoor use only. -
Page 43: Warranty
WARRANTY INFORMATION PRODUCT NO. 168-0099-8 DUNCAN DESK... - Page 45 BUREAU DUNCAN D’ARTICLE : 168-0099-8 INSTRUCTIONS D’ASSEMBLAGE VOUS RENCONTREZ DES PROBLÈMES? NUMÉRO SANS FRAIS : IMPORTANT: Veuillez lire attentivement ce guide avant de procéder à l’assemblage de ce produit. Conservez ce guide aux fins de consultation ultérieure.
- Page 46 Canadiens et de leur style de vie. Qu’il s’agisse de meubles tendance, de décorations pour les fêtes ou pour le plein air, CANVAS vous permet de rafraîchir facilement votre espace pour qu’il reflète votre style unique et votre mode de vie.
- Page 47 TABLE DES MATIÈRES Avertissement et sécurité Liste des pièces Avant de commencer l’assemblage Guide étape par étape Données techniques Dépannage Prendre soin de votre article Garantie AVERTISSEMENT! VEUILLEZ LIRE LES CONSIGNES DE SÉCURITÉ SUIVANTES AVANT D’ASSEMBLER ET D’UTILISER L’ARTICLE AFIN DE RÉDUIRE LE RISQUE DE BLESSURES GRAVES. •...
- Page 48 AVERTISSEMENT ET SÉCURITÉ Avertissement et sécurité AVERTISSEMENT – Des blessures graves peuvent survenir si l’appareil bascule. Placez les articles lourds sur les tablettes inférieures et aussi loin au fond que possible. Réparti de façon homogène, le poids maximal est de 123,2 lb (56 kg). Des blessures graves peuvent survenir en cas de basculement du meuble.
- Page 49 LISTE DES PIÈCES ARTICLE DESCRIPTION ILLUSTRATION QUANTITÉ Tablette fixe Rail Panneau gauche Diviseur Panneau inférieur gauche Panneau inférieur droit Panneau droit Panneau arrière gauche Panneau arrière droit Dessus Traverse Patte droite Patte gauche BUREAU DUNCAN...
- Page 50 LISTE DES PIÈCES ARTICLE DESCRIPTION ILLUSTRATION QUANTITÉ Côté gauche du tiroir supérieur Côté droit du tiroir supérieur Derrière du tiroir supérieur droit Rail inférieur du tiroir supérieur droit Fond du tiroir supérieur droit Devanture du tiroir supérieur droit Derrière du tiroir supérieur gauche Fond du tiroir supérieur gauche...
- Page 51 VUE ÉCLATÉE BUREAU DUNCAN...
- Page 52 LISTE DE LA QUINCAILLERIE ARTICLE DESCRIPTION ILLUSTRATION QUANTITÉ Goujon de bois Ø7,8 x 30 mm Goujon à came (grand) Came (grande) Vis Ø3,5 x 12 mm Glissière gauche Glissière droite Vis Ø5 x 50 mm Support Vis Ø4 x 14 mm Rondelle Connecteur de tiroir (petit) Vis Ø3,5 x 12 mm...
- Page 53 LISTE DE LA QUINCAILLERIE ARTICLE DESCRIPTION ILLUSTRATION QUANTITÉ Boulon M4 x 22 mm Poignée Support de dossier Goujon à came (petit) Came (petite) Boulon M6 x 30 mm Clé hexagonale Boulon M6 x 35 mm Fixation arrière Vis Ø3 x 16 mm Petite rondelle Bande anti-basculement Cheville d’ancrage...
- Page 54 Remettez les matériaux d’emballage dans la boîte. Ne les jetez pas avant d’avoir terminé l’assemblage. LISEZ ATTENTIVEMENT CHAQUE ÉTAPE Assurez-vous de bien comprendre chaque étape. Ou si vous avez des questions, contactez le service à la clientèle CANVAS au 1 888 660-6684 (sans frais). BUREAU DUNCAN...
- Page 55 GUIDE ÉTAPE PAR ÉTAPE ÉTAPE 1 Insérez 4 goujons de bois dans le bord de la tablette fixe . Insérez 2 goujons de bois dans le bord de la tablette fixe BUREAU DUNCAN...
- Page 56 GUIDE ÉTAPE PAR ÉTAPE ÉTAPE 2 Insérez 4 goujons de bois et 3 goujons à came dans le panneau gauche Alignez 2 glissières gauches avec les trous sur le panneau gauche , puis fixez-les au moyen de 6 vis . Assurez-vous que le premier trou que vous alignez est le bon trou.
- Page 57 GUIDE ÉTAPE PAR ÉTAPE ÉTAPE 3 Insérez 3 cames dans la tablette fixe et le rail et fixez-les au panneau gauche . Serrez et verrouillez les 3 cames Remarque : Assurez-vous que les cames sont complètement serrées et que le meuble est stable avant de procéder à...
- Page 58 GUIDE ÉTAPE PAR ÉTAPE ÉTAPE 4 Insérez 4 goujons de bois et 3 goujons à came B dans le diviseur . Alignez 2 glissières droites avec les trous du diviseur 4, puis fixez-les au moyen de 6 . Assurez-vous que le premier trou que vous alignez est le bon trou. Remarque : Ce sont les glissières droites.
- Page 59 GUIDE ÉTAPE PAR ÉTAPE ÉTAPE 5 Insérez 3 cames dans les trous de la tablette fixe et du rail . Fixez le diviseur . Serrez et verrouillez les 3 cames Remarque : Assurez-vous que les cames sont complètement serrées et que le meuble est stable avant de procéder à...
- Page 60 GUIDE ÉTAPE PAR ÉTAPE ÉTAPE6 Alignez les goujons sur le panneau gauche et le panneau droit avec les trous sur le fond gauche , puis fixez les panneaux au moyen de 4 vis BUREAU DUNCAN...
- Page 61 GUIDE ÉTAPE PAR ÉTAPE ÉTAPE 7 Insérez 2 goujons à came dans le diviseur . Alignez 1 glissière gauche avec les trous sur le diviseur , puis fixez-la au moyen de 3 vis . Assurez-vous que le premier trou que vous alignez est le bon trou. BUREAU DUNCAN...
- Page 62 GUIDE ÉTAPE PAR ÉTAPE ÉTAPE 8 Insérez 2 goujons de bois dans le bord du fond droit . Alignez les deux supports avec les trous sur le fond droit , puis fixez-les au moyen de 2 BUREAU DUNCAN...
- Page 63 GUIDE ÉTAPE PAR ÉTAPE ÉTAPE 9 Insérez 2 cames dans le fond droit . Fixez ce dernier au diviseur Serrez et verrouillez les 2 cames . Fixez 2 supports dans le diviseur moyen de 2 vis Remarque : Assurez-vous que les cames sont complètement serrées et que le meuble est stable avant de procéder à...
- Page 64 GUIDE ÉTAPE PAR ÉTAPE ÉTAPE 10 Insérez 4 goujons de bois dans les grands trous sur le bord du panneau droit . Alignez 1 glissière gauche avec les trous sur le panneau droit , puis fixez-la au moyen de 3 vis .
- Page 65 GUIDE ÉTAPE PAR ÉTAPE ÉTAPE 11 Alignez les goujons du panneau droit avec les trous sur le fond droit Fixez le tout avec 2 vis BUREAU DUNCAN...
- Page 66 GUIDE ÉTAPE PAR ÉTAPE ÉTAPE 12 Fixez la patte droite et la patte gauche avec la traverse au moyen de 2 boulons . Serrez le tout à l’aide de la clé hexagonale REMARQUE: Ne serrez pas les vis à fond avant d’avoir assemblé...
- Page 67 GUIDE ÉTAPE PAR ÉTAPE ÉTAPE 13 Fixez la patte droite et la patte gauche avec la base du boîtier de bureau au moyen de 12 boulons et 12 rondelles . Serrez le tout à l’aide de la clé hexagonale REMARQUE: Ne serrez pas les vis à...
- Page 68 GUIDE ÉTAPE PAR ÉTAPE ÉTAPE 14 Insérez le panneau arrière gauche et le panneau arrière droit dans les rainures à l’arrière du boîtier de bureau. BUREAU DUNCAN...
- Page 69 GUIDE ÉTAPE PAR ÉTAPE ÉTAPE 15 Insérez 6 goujons à came dans les plus petits trous sous le dessus BUREAU DUNCAN...
- Page 70 GUIDE ÉTAPE PAR ÉTAPE ÉTAPE 16 Insérez 6 cames le long du haut du boîtier assemblé. Alignez le dessus avec les trous sur le panneau gauche et le panneau droit , puis insérez les goujons à came du dessus. Serrez et verrouillez les 6 cames Remarque : Assurez-vous que les cames sont complètement serrées et que le meuble est stable avant de procéder à...
- Page 71 GUIDE ÉTAPE PAR ÉTAPE ÉTAPE 17 Insérez 8 fixations arrière dans le panneau arrière gauche et le panneau arrière droit au moyen de 8 vis Remarque : Assurez-vous que les vis sont insérées au bon angle. ° BUREAU DUNCAN...
- Page 72 GUIDE ÉTAPE PAR ÉTAPE ÉTAPE 18 Alignez 1 glissière gauche avec les trous sur le côté gauche du tiroir supérieur. Fixez la glissière au moyen de 3 vis . Alignez 1 glissière droite avec les trous sur le côté droit du tiroir supérieur, puis fixez-la au moyen de 3 vis Répétez l’étape deux...
- Page 73 GUIDE ÉTAPE PAR ÉTAPE ÉTAPE 19 Fixez le côté gauche , le côté droit et le rail inférieur du tiroir supérieur au derrière du tiroir supérieur au moyen de 5 vis . Fixez les petits connecteurs dans le côté gauche et le côté...
- Page 74 GUIDE ÉTAPE PAR ÉTAPE ÉTAPE 20 Insérez le fond du tiroir supérieur droit dans le cadre du tiroir supérieur droit. Insérez 1 goujon à came dans le devanture du tiroir supérieur droit. BUREAU DUNCAN...
- Page 75 GUIDE ÉTAPE PAR ÉTAPE ÉTAPE 21 Fixez la poignée à la devanture du tiroir supérieur droit au moyen de 2 boulons . Utilisez 1 came pour fixer la devanture du tiroir supérieur droit avec le rail inférieur du tiroir supérieur droit. Fixez les petits connecteurs de tiroir à...
- Page 76 GUIDE ÉTAPE PAR ÉTAPE ÉTAPE 22 Fixez le côté gauche et le côté droit du tiroir supérieur au derrière du tiroir supérieur au moyen de 4 vis . Fixez les petits connecteurs dans le côté gauche et le côté droit du tiroir supérieur au moyen de 2 vis BUREAU DUNCAN...
- Page 77 GUIDE ÉTAPE PAR ÉTAPE ÉTAPE 23 Insérez le fond de tiroir dans le cadre du tiroir supérieur gauche. BUREAU DUNCAN...
- Page 78 GUIDE ÉTAPE PAR ÉTAPE ÉTAPE 24 Fixez la poignée à la devanture du tiroir supérieur gauche au moyen de 2 boulons . Fixez les petits connecteurs de tiroir à la devanture tiroir supérieur gauche au moyen de 2 vis BUREAU DUNCAN...
- Page 79 GUIDE ÉTAPE PAR ÉTAPE ÉTAPE 25 Aligner 1 glissière gauche avec les trous sur le côté gauche du tiroir inférieur, puis fixez-la au moyen de 3 vis . Alignez 1 glissière droite avec les trous sur le côté droit du tiroir inférieur. Fixez-la au moyen de 3 vis BUREAU DUNCAN...
- Page 80 GUIDE ÉTAPE PAR ÉTAPE ÉTAPE 26 Fixez le côté gauche et le côté droit du tiroir inférieur avec le derrière du tiroir inférieur au moyen de 4 vis . Fixez les grands connecteurs dans le côté gauche et le côté droit du tiroir inférieur au moyen de 4 BUREAU DUNCAN...
- Page 81 GUIDE ÉTAPE PAR ÉTAPE ÉTAPE 27 Insérez le fond du tiroir inférieur gauche dans le cadre du tiroir inférieur. BUREAU DUNCAN...
- Page 82 GUIDE ÉTAPE PAR ÉTAPE ÉTAPE 28 Fixez la poignée à la devanture du tiroir inférieur au moyen de 2 boulons . Fixez le grand connecteur de tiroir à la devanture du tiroir inférieur au moyen de 4 vis . Fixez les supports de dossier en plastique au côté...
- Page 83 GUIDE ÉTAPE PAR ÉTAPE ÉTAPE 29 Insérez les 3 tiroirs dans le bureau. Ajustez les connecteurs de tiroir si nécessaire. BUREAU DUNCAN...
- Page 84 GUIDE ÉTAPE PAR ÉTAPE ÉTAPE 30 Fixez deux bandes anti-basculement à l’arrière du dessus au moyen de deux vis et deux rondelles plates Insérez deux chevilles dans votre mur. Fixez les deux bandes anti-basculement au mur au moyen de deux petites rondelles et deux vis BUREAU DUNCAN...
- Page 85 TECHNICAL DATA 18 po (45,7 cm) 47 1/4 po (120 cm) 30 po (76,2 cm) FICHE TECHNIQUE DIMENSION DE L’ARTICLE (larg. x P. x H.) 47 1/4 x 18 x 30 po 120 x 45,7 x 76,2 cm POIDS DE L’ARTICLE 63 lb 2 oz 28,6 kg CAPACITÉ...
- Page 86 RÉSOUDRE LES PROBLÈMES DE L’ASSEMBLAGE VOUS RENCONTREZ DES PROBLÈMES? LAISSEZ-NOUS VOUS AIDER! ARRÊT NUMÉRO SANS FRAIS: 1 888 670-6684 AVANT DE RETOURNER APPELEZ-NOUS, Si vous avez des questions concernant votre produit ou avez VOTRE ARTICLE NOUS POUVONS besoin d’une assistance au titre de la garantie, veuillez appeler VOUS AIDER notre service d’assistance à...
- Page 87 GARANTIE GARANTIE LIMITÉE DE 1 AN* Cet article CANVAS comprend une garantie d’un (1) an contre les défauts de fabrication et de matériaux. Distribution Trifeuil consent à remplacer l’article défectueux lorsqu’il est retourné par l’acheteur original, accompagné de la preuve d’achat, au cours de la période de garantie convenue.
- Page 88 I N S P I R É PAR LE C A N A D A...
Need help?
Do you have a question about the Duncan 168-0099-8 and is the answer not in the manual?
Questions and answers
How can I buy some spare parts? I'm missing some items