IKEA SMAKSAK Manual
Hide thumbs
Also See for SMAKSAK:
- Manual (76 pages) ,
- User manual (36 pages) ,
- Installation instructions (4 pages)
Table of Contents
Advertisement
Quick Links
Advertisement
Table of Contents

Related Manuals for IKEA SMAKSAK


Summary of Contents for IKEA SMAKSAK
- Page 1 SMAKSAK...
- Page 2 ENGLISH For the IKEA appointed Authorized Service Centre, please refer to www.IKEA.com and select your local store for phone numbers and opening times.
- Page 3 ENGLISH...
-
Page 4: Table Of Contents
Before first use Energy efficiency Daily use Environmental concerns Clock functions IKEA GUARANTEE Using the accessories Subject to change without notice. Safety information Before the installation and use of the appliance, carefully read the supplied instructions. The manufacturer is not responsible if an incorrect installation and use causes injuries and damage. - Page 5 ENGLISH WARNING: Keep children and pets away from the appliance • when it operates or when it cools down. Accessible parts become hot during use. If the appliance has a child safety device, it should be • activated. Children shall not carry out cleaning and user maintenance •...
-
Page 6: Safety Instructions
ENGLISH Safety instructions Installation Ventilation opening 560x20 mm Warning! Only a qualified person minimum size. Open‐ must install this appliance. ing placed on the bot‐ tom rear side • Remove all the packaging. • Do not install or use a damaged Mounting screws 2x25 mm appliance. - Page 7 ENGLISH • The electrical installation must have an – do not put water directly into the hot isolation device which lets you disconnect appliance. the appliance from the mains at all poles. – do not keep moist dishes and food in The isolation device must have a contact the appliance after you finish the opening width of minimum 3 mm.
-
Page 8: Installation
ENGLISH Internal lighting • Use original spare parts only. Warning! Risk of electric shock. Disposal Warning! Risk of injury or • Concerning the lamp(s) inside this suffocation. product and spare part lamps sold separately: These lamps are intended to • Disconnect the appliance from the mains withstand extreme physical conditions in supply. -
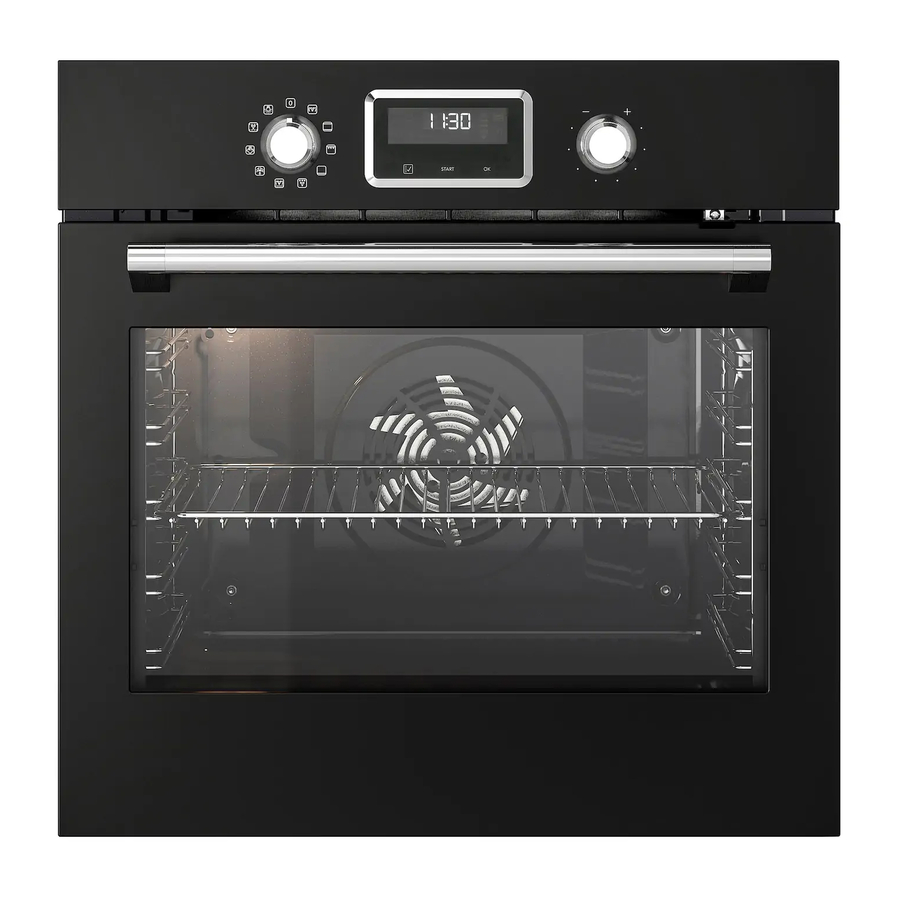
Page 9: Product Description
ENGLISH Product description General overview Control panel Knob for the heating functions Display Control knob Heating element Lamp Cavity embossment Shelf support, removable Rating plate Shelf positions Accessories • Grill- / Roasting pan x 1 To bake and roast or as pan to collect fat. •... -
Page 10: Before First Use
ENGLISH Display A. Timer / Temperature B. Heat-up and residual heat indicator C. Core temperature sensor (selected models only) D. Door lock (selected models only) E. Hours / minutes F. Demo mode (selected models only) G. Clock functions Before first use Using the Mechanical child lock Warning! Refer to Safety chapters. -
Page 11: Daily Use
ENGLISH Warning! Be careful not to scratch the control panel. Daily use Warning! Refer to Safety Heating Application chapters. function Heating functions To bake pizza. To make inten‐ sive browning and a crispy bottom. Heating Application Bread and function Pizza Bak‐ The oven is off. - Page 12 ENGLISH Setting the function: Direct Steam Heating Application This function increases humidity during function cooking. This function is designed to save energy during cooking. Warning! Risk of burns and For the cooking instructions damage to the appliance. Eco Fan refer to "Hints and tips" chap‐ Cooking Released humidity can cause burns.
-
Page 13: Clock Functions
ENGLISH Heat-up indicator the temperature in the oven increases, and disappear when it decreases. When the oven function operates, the bars in the display appear one by one when Clock functions Clock functions table Setting and changing the time After the first connection to the mains, wait Clock function Application until the display shows... -
Page 14: Using The Accessories
ENGLISH Setting the END function At the set END time the signal sounds for 2 minutes. and time setting flash in the 1. Set a heating function. Press display. The oven turns off. confirm. 5. Press any button to stop the signal. 2. - Page 15 ENGLISH Push the shelf between the guide bars of the Small indentation at the top shelf support and make sure that the feet increase safety. The indentations point down. are also anti-tip devices. The high rim around the shelf prevents cookware from slipping of the shelf.
-
Page 16: Additional Functions
ENGLISH Additional functions Using the Child Lock Temperature (°C) Switch-off time (h) When the Child Lock is on the oven cannot 120 - 195 be turned on accidentally. 200 - 245 1. Ensure the knob for the oven functions is in the off position. - Page 17 ENGLISH If you use two baking trays at the same time, Initially, monitor the performance when you keep one empty level between them. cook. Find the best settings (heat setting, cooking time, etc.) for your cookware, Cooking meat and fish recipes and quantities when you use this Use a deep pan for very fatty food to prevent appliance.
- Page 18 ENGLISH Food Accessories Temperature Shelf posi‐ Time (min) (°C) tion Fish fillet, 0.3 kg pizza pan on wire shelf 25 - 30 Poached meat, baking tray or dripping 35 - 45 0.25 kg Shashlik, 0.5 kg baking tray or dripping 25 - 30 Cookies, 16 baking tray or dripping...
- Page 19 ENGLISH Accessories Size Picture Pizza pan, dark, non-reflec‐ 28 cm diameter tive Baking dish, dark, non-re‐ 26 cm diameter flective Ramekins, ceramic 8 cm diameter, 5 cm height Flan base tin, dark, non-re‐ 28 cm diameter flective Information for test institutes Tests according to IEC 60350-1.
- Page 20 ENGLISH Food Function Accesso‐ Shelf Temper‐ Time (min) Comments ries posi‐ ature tion (°C) Apple pie Forced Air Wire shelf 2 70 - 90 Use 2 tins (20 cm Cooking diameter), diago‐ nally shifted. Fatless‐ Convention‐ Wire shelf 2 40 - 50 Use a cake mould ponge al (Top and...
-
Page 21: Care And Cleaning
For additional cooking tables please refer to cavity. the Recipe Book which you can find on the website www.ikea.com. To find the proper Care and cleaning Cleaning the cavity embossment Warning! Refer to Safety chapters. - Page 22 ENGLISH 2. Lift and turn the levers fully on both 2. Pull the rear end of the shelf support hinges. away from the side wall and remove it. Install the removed accessories in the 3. Close the oven door halfway to the first opposite sequence.
- Page 23 ENGLISH one. Start from the top panel. Make sure the glass slides out of the supports completely. 8. Clean the glass panels with water and soap. Dry the glass panels carefully. Do not clean the glass panels in the dishwasher. When the cleaning is completed, install the glass panels, the door trim and the oven door, close the levers on the both hinges.
-
Page 24: Troubleshooting
ENGLISH 5. Replace the oven light bulb with a 40 W, 6. Install the glass cover. 230 V (50 Hz), 350 °C heat resistant oven light bulb (connection type: G9). Troubleshooting Warning! Refer to Safety chapters. What to do if... Problem Possible cause Remedy... -
Page 25: Technical Data
ENGLISH Problem Possible cause Remedy There is no good cooking You did not fill the cavity em‐ Refer to "Activating the func‐ performance using the func‐ bossment with water. tion: Direct Steam". tion: Direct Steam. The water in the cavity em‐ The temperature is too low. -
Page 26: Energy Efficiency
50 - 60 Hz Number of functions Energy efficiency Product Information and Product Information Sheet Supplier's name IKEA Model identification SMAKSAK Energy Efficiency Index 81.2 Energy efficiency class Energy consumption with a standard load, convention‐ 0.93 kWh/cycle al mode Energy consumption with a standard load, fan-forced 0.69 kWh/cycle... -
Page 27: Environmental Concerns
ENGLISH Keep breaks between baking as short as warm. The residual heat indicator or possible when you prepare few dishes at one temperature appears on the display. time. Cooking with the lamp off Cooking with fan Turn off the lamp during cooking. Turn it on When possible, use the cooking functions only when you need it. - Page 28 ENGLISH...
-
Page 29: Ikea Guarantee
Replaced parts become the property of IKEA. original parts have been used. What will IKEA do to correct the problem? • Repairs caused by installation which is faulty or not according to specification. IKEA appointed Service Provider will examine •... - Page 30 IKEA appliance in the dedicated IKEA documentation carefully before contacting kitchen furniture; • ask for clarification on functions of IKEA appliances. To ensure that we provide you with the best assistance, please read carefully the Assembly Instructions and/or the User Manual before contacting us.
- Page 32 21552 © Inter IKEA Systems B.V. 2021 AA-2284533-1...
Need help?
Do you have a question about the SMAKSAK and is the answer not in the manual?
Questions and answers