Advertisement
Quick Links
X2SR User Manual 2020-12-05
1 Reading tips
1.1 Recommendations
1.2 Download Kamoer Remote App
1.3 Get the tutorial
2 product description
2.1 Introduction
2.2 Feature highlights
2.3 Application occasion
2.4 Unpacking preparation
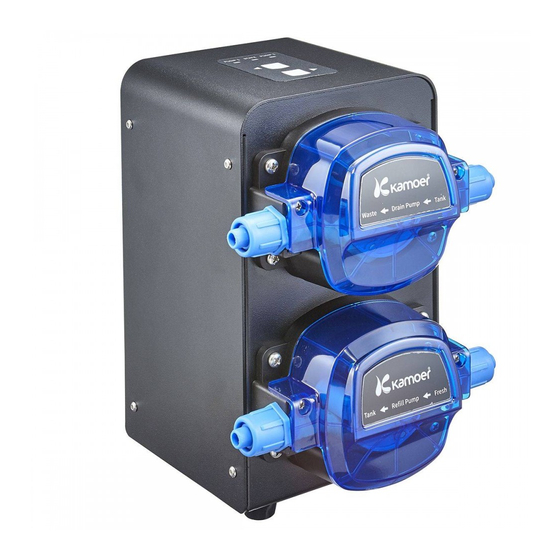
2.5 Part Name
2.6 Pipeline connection diagram
2.7 Status indicator description
3 App use
3.1 App connection device
3.1.1 Connect the device to the online
3.2 App home page overview
3.3 Home Status Information
3.4 Change water manually
3.4.1 Automatic water change
3.5 Container
3.6 Settings
3.7 Calibration
4 Appendix
4.1 Technical Parameters
4.2 After-sales warranty information
5 update record
1 Reading tips
1.1 Recommendations
Kamoer provides users with the following documents:
1. 《X2SR User Manual》
2. 《X2SR Quick Start Guide》
1.2 Download Kamoer Remote App
1. Scan the QR code to download the application corresponding to the following icon.
Advertisement

Related Manuals for Kamoer X2SR


Summary of Contents for Kamoer X2SR
- Page 1 4.2 After-sales warranty information 5 update record 1 Reading tips 1.1 Recommendations Kamoer provides users with the following documents: 1. 《X2SR User Manual》 2. 《X2SR Quick Start Guide》 1.2 Download Kamoer Remote App 1. Scan the QR code to download the application corresponding to the following icon.
- Page 2 1. Apple users enter the App Store, and Android users enter Tencent App Store, search for "kamoer remote", and find the application download with the corresponding icon. Kamoer Remote App supports Android 4.4 and above systems, and supports iOS 9.1 and above systems.
-
Page 3: Feature Highlights
2 product description 2.1 Introduction X2S R is a dual-channel WiFi water change pump. The user can remotely control it through the mobile phone App. The user can use the X2S R to automatically change the water in their own sea or fresh water tanks at a fixed time and quantitatively. - Page 5 2.6 Pipeline connection diagram Click on the device on the home page of the device list to enter the X2S R status display page. On the status display page, click the information button in the upper right corner to view the water change pipeline connection diagram and sensor connection diagram...
- Page 6 Connection diagram of sensor and make-up pump...
-
Page 7: Status Indicator Description
2.7 Status indicator description The STATE on the top panel of the device is a combination of power indicator and WiFi status indicator. Status indicator (yellow) Status Description The yellow status light keeps on Connected to the cloud through the router The yellow status light is off Disconnected from router The yellow status light is on for... - Page 8 App configuration device connects to the cloud through AP network configuration mode. Open the Kamoer Remote App, after registering the App account, go to the device homepage, click the Add Device button in the upper right corner to enter the process of connecting the device to the cloud, and follow...
- Page 9 3.2 App home page overview...
- Page 10 1.Automatic water change:Status display page, here mainly presents the equipment status, including the working mode of water change, the status of each sensor, the status of the solution tank, the status of pump operation, etc. 2. Water change:Here is mainly for manual or automatic water change settings. 3.Settings:This includes functions such as device serial number viewing, device upgrade, time synchronization, speed setting, calibration, and factory reset.
- Page 11 1. Manual water change/automatic water change:The water change status display can be switched in the title bar of the water change module. 2. Liquid level sensor:The liquid level sensor that decides whether to replenish fresh water. When the water in the cylinder is low and the float is lower than the page, the automatic water replenishment will start until the page returns to the float position;...
- Page 12 7.Sea water bucket:Identify the volume of the sea water bucket and click to set the volume of the sea water bucket 8.Drain pump working status:Display the working status of the drain pump; 9.The working status of the makeup pump Shows the working status of the makeup pump 10.Piping connection diagram andsensor connection diagram View and set the status of waste water bucket and fresh sea water bucket 1Waste water bucket:The water change pump drains to the waste water bucket, which has a volume.
- Page 13 When you need to change the water manually, you can switch to the manual water change mode in the title bar of the water change module 1. Manual water change:Here to switch between manual water change and automatic water change 2.Drainage:Control the running and stopping of the drain pump, click to enter to set a running volume, and the function of automatically replenishing water after draining 3.Seawater supplement:Control the operation and stop of the seawater supplement pump, click to...
- Page 14 1.Automatic water change::Here to switch between manual water change and automatic water change 2.Cylinder volume:Set the volume of the water body of your own tank to facilitate the calculation of the water change ratio when setting the plan 3.Operation mode:The operation mode has two water change modes: edge-in and edge-out and first- out and then-in.
- Page 15 9.Start time:Planned start time 10. Water exchange volume:Planned water exchange volume 11.End time:The planned end time calculated based on the start time and the water change volume 12.Save the plan: Save the water change plan Quick add plan Quick plan can quickly add multiple plans at once 1.Add a quick plan:Click Add to enter the quick plan adding interface 2.Start time:Set the start time period of the quick plan 3.End time::Set the end time period of the quick plan...
- Page 16 3.5 Container The user of the container module records the changes of the user's water supply bucket and waste water bucket to help users understand the status of the water supply bucket and waste water bucket; a.Container module; b. Waste water bucket:The water volume of the waste water bucket. When the volume of the waste water bucket is greater than 90%, the waste water bucket will have a color alarm that the waste water bucket is full;...
- Page 17 5. Time setting:If the scheduled time of the device operation is not accurate, you can synchronize the time here 6.Connect to the smart controller:Set the device to connect to the Kamoer smart controller, this function is temporarily not supported 7.Speed setting: Perform flow rate calibration here 8.Restore factory settings: Click to restore factory settings...
- Page 18 Rate Setting -> Flow Calibration. Calibration requires a measuring cylinder to be used to weigh the calibration results. Note: During calibration, do not use the water in the tank for calibration. Using the water in the tank for calibration may cause the water level in the tank to drop. X2S R will automatically add fresh water to the tank.
-
Page 19: Technical Parameters
The water change correction needs to be calibrated for each pump first in the flow rate calibration Enter the water change correction process through Settings -> Flow Rate Setting -> Change Water Correction, and complete the correction according to the App prompt process 4 Appendix 4.1 Technical Parameters Dimensions (length x width x height) 168x177x223mm (including pump head) - Page 20 (such as pH electrode, ORP electrode, etc.); 11)The warranty period has expired. Kamoer, the words and icons of Kamoer are registered trademarks of Kamoer Fluid Tech (Shanghai) Co., Ltd.The company reserves the right to improve and change the appearance and technical specifications of the product without prior notice.
Need help?
Do you have a question about the X2SR and is the answer not in the manual?
Questions and answers