WAGNER Studio Pro Owner's Manual
Hide thumbs
Also See for Studio Pro:
- Manual (145 pages) ,
- Owner's manual (100 pages) ,
- Operating instructions manual (21 pages)

Related Manuals for WAGNER Studio Pro


Summary of Contents for WAGNER Studio Pro
- Page 1 Pro™ Owner‘s manual read this manual fOr cOmplete instructiOns franÇais - p. 17 espaÑOl - p. 33 wagner-group.com 1216 • Form No. 0529641C...
- Page 2 IMPORTANT SAFETY INFORMATION GROUNDING INSTRUCTIONS Read all safety information before operating the equipment. Save these instructions. This product must be grounded. In the event of an electrical short To reduce the risks of fire or explosion, electrical shock and circuit, grounding reduces the risk of electric shock by providing an the injury to persons, read and understand all instructions escape wire for the electric current.
-
Page 3: Table Of Contents
From chalk, milk and latex Do not operate light switches, engines, or similar spark producing paints to stains, urethanes and sealers, the Studio Pro was designed products in the spray area. to spray any coating to create the look you want. Get quality projects •... -
Page 4: Overview
OVERVIEW In order to set up the system, items will need to be retrieved from inside of the X-Boost Power Box. Lower the carry handle by pressing the locking tabs on either side of the handle. Open the Power Box (a). Open the air hose retainer (b) inside the cover and retrieve the air hose and handle assembly (c). -
Page 5: Controls And Functions
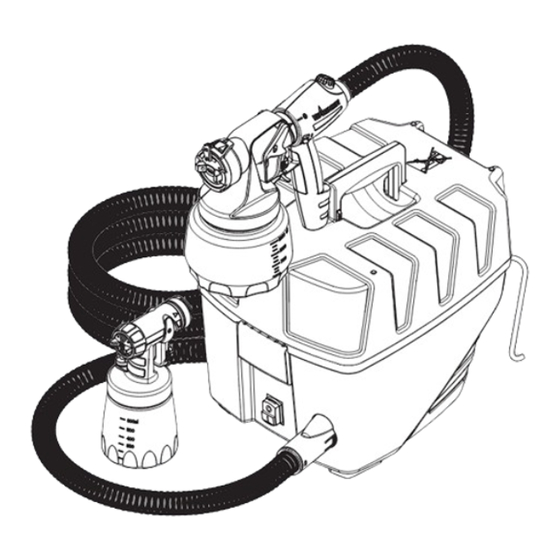
CONTROLS AND FUNCTIONS Control Finish Nozzle Handle / air hose assembly X-Boost Power Dial Air cap Material flow control Trigger ON/OFF switch ON/OFF switch Material container iSpray Nozzle X-Boost Power Box Handle Spray Spray gun holder width lever Material flow control Adjustment ring... -
Page 6: Material Preparation
MATERIAL PREPARATION Material to be sprayed may need to be strained to remove any impurities in the paint which may enter and clog the system. Impurities in the paint will give poor performance and a poor finish. Only thin the material if absolutely necessary to improve spray performance. Optimal spray performance should be acheived simply by adjusting the various controls on the unit. -
Page 7: Assembly
ASSEMBLY BEFORE YOU BEGIN NEVER point the spray gun at any part of the body. TO ASSEMBLE IMPORTANT: Make sure the power cord is unplugged. Insert the suction tube into the intake opening. Align the suction tube - a. If you are going to be spraying in a downward direction, the angled end of the suction tube should be pointing toward the front of the nozzle. -
Page 8: Power And Material Controls
POWER AND MATERIAL CONTROLS Spray performance will depend upon a number of factors: material thickness, air power, spray pattern selected, and material flow. Testing different variations of the control settings will help you achieve the desired results. See descriptions and suggested Power and Material Settings guide below to help with your project. X-BOOST™... -
Page 9: Spray Pattern Adjustment
SPRAY PATTERN ADJUSTMENT ADJUST SPRAY SHAPE The spray pattern shape is adjusted by turning the adjustment ring (iSpray) or air cap ears (Control Finish) to either the vertical, horizontal, or diagonal positions. The positions of the air cap and the corresponding spray pattern shapes are illustrated below. -
Page 10: Proper Spraying Technique
PROPER SPRAYING TECHNIQUE The item you are spraying must be properly masked in order to prevent overspray from covering woodwork, floors or other STOP furnishings. If spraying with an air-assisted spray system is new or unfamiliar to you, it is advisable to practice on a piece of scrap wood or cardboard before beginning on your intended workpiece and/or test with water. - Page 11 PROPER SPRAYING TECHNIQUE (continued) PATTERN EXAMPLES Use the images and guidelines below in order to assist you in achieving the desired spray pattern for your project. These are meant to be general starting points - you may have to slightly modify certain controls on the system in order to get the exact performance you need. During a project, periodically wipe the nozzle tip with a cloth to remove any dried paint.
-
Page 12: Cleanup
CLEANUP FLUSHING THE UNIT BEFORE YOU BEGIN When cleaning, use the appropriate cleaning solution (warm, soapy water for latex materials; mineral spirits for oil-based materials) IMPORTANT: Never clean air cap or air holes in the nozzle with sharp metal PULL objects. - Page 13 CLEANUP (continued) CLEANING THE NOzzLE Make sure power cord is unplugged. Remove the air hose from the turbine. iSpray nozzle only - a. Remove the adjustment ring (a) carefully from the connecting nut (b). Loosen the connecting nut. b. Remove the parts as shown. Clean all parts with a cleaning brush and the appropriate cleaning solution.
-
Page 14: Reassembly
REASSEMBLY TO REASSEMBLE Insert the nozzle (1). Make sure to align the groove (a) and notch (b) and align the nozzle opening with the needle. Make sure the red nozzle seal is in place. Replace if it falls out and is undamaged. -
Page 15: Maintenance
MAINTENANCE CLEANING THE FILTER IMPORTANT: Before every use, you should inspect the air filter in the turbine to see if it is excessively dirty. If it is dirty, follow these steps to replace it. IMPORTANT: Never operate your unit without the air filter. Dirt could be sucked in and interfere with the function of the unit. -
Page 16: Troubleshooting
TROUBLESHOOTING PROBLEM CAUSE SOLUTION Problem A: Little or no material flow 1. Nozzle clogged. 1. Clean. 2. Suction tube clogged. 2. Clean. 3. Material flow setting too low. 3. Increase material flow setting. 4. Suction tube loose. 4. Remove and replace as tightly as possible. 5. -
Page 17: Parts List
Parts List • Liste de Pièces • Lista de Piezas Part No. English Français Español Qty. Nº de piéce Description Description Descripción Qte. Pieza No. Cant. ------- X-Boost® Power Box (includes item Boîte d’alimentation X-Boost Caja de alimentación X-Boost (inclut de pièce 2) (incluye le articulo 2) 0420330 Filter... - Page 18 Parts List • Liste de Pièces • Lista de Piezas isPray NozzLe • Buse de isPray • BoquiLLa de iSPRAY Part No. English Français Español Qty. Nº de piéce Description Description Descripción Qte. Pieza No. Cant. 0529014 Spray gun assembly (includes Ensemble de pistolet (inclut des Ensamblaje de pistola (incluye items 1-8)
- Page 19 Parts List • Liste de Pièces • Lista de Piezas coNtroL FiNish NozzLe • Buse de coNtroL FiNish • BoquiLLa de coNtroL FiNish Part No. English Français Español Qty. Nº de piéce Description Description Descripción Qte. Pieza No. Cant. 0529257 Control Finish Nozzle assembly Ensemble de buse de Control Ensamblaje de boquilla de...
Need help?
Do you have a question about the Studio Pro and is the answer not in the manual?
Questions and answers