SOMFY Smoove 1 RTS Quick Start Manual
Hide thumbs
Also See for Smoove 1 RTS:
- Instructions manual (68 pages) ,
- Instructions manual (76 pages) ,
- Instructions manual (72 pages)
Advertisement
Part Numbers:
Smoove 1
#1811533
Smoove 4
#1811748
Introduction
Smoove 1 RTS
Smoove
1 & 4 RTS
®
The Smoove 1 RTS controls a single group of window coverings.
The Smoove 4 RTS controls up to four different groups of window coverings.
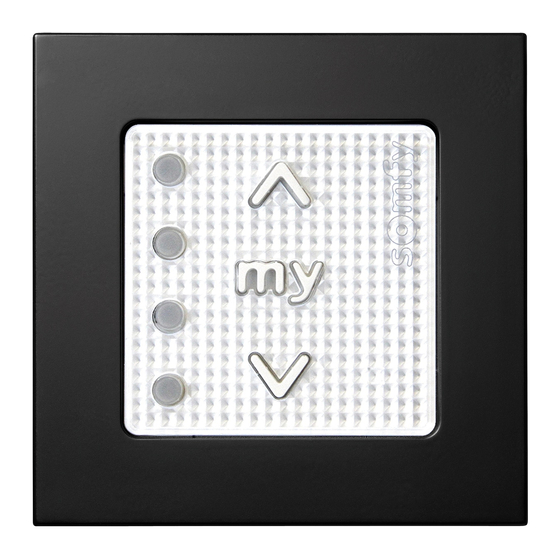
A. Button (raise, switch on, open, tilt)
"my"
B.
button (stop, go to favorite position)
C. Button (lower, switch off, close, tilt)
D. Channel selection indicators
E. Programming (PROG) button
(On backside of both models)
Continued On Next Page
Smoove 4 RTS
Advertisement
Table of Contents

Related Manuals for SOMFY Smoove 1 RTS


Summary of Contents for SOMFY Smoove 1 RTS
- Page 1 1 & 4 RTS Part Numbers: ® Smoove 1 #1811533 The Smoove 1 RTS controls a single group of window coverings. Smoove 4 The Smoove 4 RTS controls up to four different groups of window coverings. #1811748 Introduction Smoove 1 RTS Smoove 4 RTS A.
- Page 2 Installation A. Mounting frame B. Smoove frame C. Smoove 1 or 4 (4 is shown) Install on a clean, flat interior wall within 35 feet of window coverings. 1. Install the mounting frame using provided, countersunk screws in corners of plate to the wall. 2.
- Page 3 Operation for Smoove 1 A. Button (raise, switch on, open, tilt) “my” button (stop, go to favorite position) C. Button (lower, switch off, close, tilt) D. Channel selection indicator E. Programming (PROG) button (On backside of faceplate) Pairing a Smoove 1 to a window covering •...
- Page 4 Operation for Smoove 4 The Smoove 4 operates four different groups of window coverings. As you pair your Smoove 4 to each window covering controller, you also build each grouping. A. Button (raise, switch on, open, tilt) “my” button (stop, go to favorite position) C.
- Page 5 Battery Replacement 1. Unclip the frame by using a small flat head screwdriver to open (against the small groove shown in image 1) 2. Remove old battery then insert a new CR 2430 3 V battery, (+) side up. 3. Replace the frame and Module onto the mounting frame by pressing back to original position.
Need help?
Do you have a question about the Smoove 1 RTS and is the answer not in the manual?
Questions and answers