
Subscribe to Our Youtube Channel
Related Manuals for StarLab GuardOne


Summary of Contents for StarLab GuardOne
- Page 1 This is your GuardOne ® user manual. USER MANUAL · BEDIENUNGSANLEITUNG MODE D‘EMPLOI ISTRUZIONI PER L‘USO · INSTRUCCIONES DE MANE JO Passionate for science.
-
Page 2: Certificate
EC Declaration of Conformity STARLAB GuardOne® Workstation for process protection S8040-0000: LFGO32SL (Laminar Flow GuardOne 32 inch) S8040-0001: LFGO48SL (Laminar Flow GuardOne 48 inch) S8040-1000: DAGO32SL (Dead Air GuardOne 32 inch) S8040-1001: DAGO48SL (Dead Air GuardOne 48 inch) meets the requirements of the following directives:... -
Page 3: Table Of Contents
User Manual ____________________________________________________________________________________ 3 – 53 Bedienungsanleitung ________________________________________________________________________ 55 – 105 Instruction initiale ___________________________________________________________________________ 107 – 157 Istruzioni d‘uso ______________________________________________________________________________159 – 209 Certificate ________________________________________________________________________________________________________ Overview of the GuardOne® Workstation ___________________________________________________________________________________ 1.1 Setup und Function ___________________________________________________________________________________________ 1.2 Scope of Delivery_____________________________________________________________________________________________ Safety __________________________________________________________________________________________________________________ 2.1 Explanation of Safety Symbols __________________________________________________________________________________ 2.2 Intended Use _______________________________________________________________________________________________ 2.3 Safety Installations ___________________________________________________________________________________________ 2.4 Responsibilities of the Operator _________________________________________________________________________________ 2.5... -
Page 4: Overview Of The Guardone® Workstation
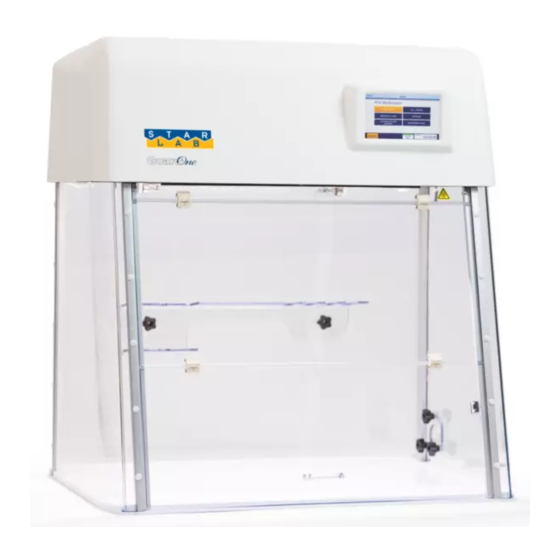
Overview of the GuardOne Workstation ® Setup and Function Setup Fig. 1: GuardOne® Workstation Top housing unit Back panel B PC (Polycarbonate) glass chamber Base plate Top housing with pre-installed pre-filter and HEPA filter Pre-installed front door with two folding segments Plastic rivets Multifunctional shelf Side panel Touchscreen display with graphical user interface Models There are two different kinds of models of the GuardOne® Workstation, a Dead Air and a Laminar Flow model. Each of them you can order in two sizes. The two sizes of the GuardOne® Workstation are: › 3 2“: In this size, the GuardOne® Workstation has one UV lamp and, assuming it is the Laminar Flow model, one pre- and one HEPA filter. › 4 8“: In this size, the GuardOne® Workstation has two UV lamps and, assuming it is the Laminar Flow model, two blower motors, two pre- and two HEPA filters. The dimensions can be found Chapter 10 “Specifications”. Dead Air ›... - Page 5 In this operating manual, all functions with regards to the pre- and HEPA filter as well as the UV lamp are described. If you have a Dead Air model, you can ignore the instructions for operating, replacing, maintaining and troubleshooting the filters. This operating manual provides the instructions for the Laminar Flow, size 32“ with one HEPA and prefilter and one UV lamp. If you have a model Laminar Flow or Dead Air of size 48“, follow the instructions for installation and maintenance of HEPA filters, UV lamps and pre-filters twice to install and replace the lamps and filters. Function The GuardOne® Workstation is a containment equipment using air filtration technology and UV irradiation to create a working environment in which the risk of cross-contamination under standard laboratory working conditions is minimized. To achieve this, the GuardOne® Workstation uses the following components: › Create a clean air environment Combination of low-noise blower motor, standard HEPA filter and pre-filter. › Decontamination and sterilization of the working area UV light with a fixed wavelength of 254 nm. Starlab Service Hotline For further information, contact your local Starlab service or your local Starlab sales representative on www.starlabgroup.com. GuardOne · Manual · 5 ®...
-
Page 6: Scope Of Delivery
Back plate The back plate is made from 6-mm clear polycarbonate glass, with overlap between the segments to eliminate potential exposure to harmful shortwave UV irradiation during UV 254 decontamination. Multifunctional shelf The multi-functional shelf is mounted on the PC back panel of the glass chamber indoors. It is used to set up samples and to store pipettes or other additional tools. You can also store samples there that need to be decontaminated because the shelf is within the irradiation area of the UV lamp. Base panel The base panel is made of a polypropylene blend that reflects UV light, just like the front, side and back panels do. Front door The front panel is made from 6-mm clear polycarbonate glass with overlap between the segments to eliminate potential exposure to harmful shortwave UV irradiation during UV 254 decontamination. The front door can be opened in two steps. › T he opening of the lowest segment facilitates the user´s work process at the GuardOne® Workstation. › F urther opening the middle segment makes it easier for the user to clean and maintain the PC glass chamber from the inside. It is not recommended to completely open both segments for the work process, as a clean air environment cannot be guaranteed other- wise. The front door is additionally equipped with a magnetic switch, which registers when the front door is open. In the case of an open front door, the UV light source is automatically switched off. The same applies to the airflow: When closing the front door, the blower automatically stops. 6 · GuardOne 6 · GuardOne · Manual · Manual ® ®... - Page 7 › UV light bulb holder in the back underneath the HEPA filter - The GuardOne® Workstation uses UV light with a fixed wavelength of 254 nm for decontamination and sterilization of the working area. - D epending on the model, one or two UV lamps marked with a serial number are included. The UV lamps must be installed in the bulb holders after the assembly of the glass chamber and the top housing unit. - The bulb holder for the UV lamp protrudes a few centimetres from the top housing unit. - The life time of the UV lamps is 9000 hours. › LED light panel in the front underneath the HEPA filter - The LED light panel is pre-installed. - D epending on the photosensitivity of the samples, you can switch the LED light on and off and change the settings for LED brightness or the LED colour between normal white and red. › Touchscreen display with graphical user interface on the front - T he operating unit is located on the front side. The GuardOne® Workstation is operated via a touchscreen display with the graphical user interface. - T he display with the graphical user interface can be used to set the settings for the airflow, the LED and UV light. The display also provides information about the manufacturer and health of the GuardOne® Workstation. › Main power switch, main power connection and USB connection at the back - T he main power switch and connection as well as a USB connection are located on the back. The latter can be used for installing software updates. › Recess in the roof to keep the front door open to clean or maintain the PC glass chamber - When the front door is folded up, the handle can be placed in the recess to prevent slipping. › Plastic rivets, thumbscrews and two cables in a separate bag - For assembly, plastic rivets, thumbscrews and two cables are included. GuardOne ·...
-
Page 8: Safety
This combination of symbol and signal word indicates potential dangers to the environment. Safety instructions in procedures Safety instructions can refer to specific, individual instructions. Embedded in the procedure, such safety instructions do not interrupt the flow of reading when performing the action. The signal words described above will be used. For example: Loosen the screw. CAUTION! Risk of entrapment on the panel! Close the panel carefully. Tighten the screw. Safety labelling at the GuardOne Workstation ® WARNING! Danger due to illegible labeling! Over time, stickers and signs can soil so that dangers cannot be detected and necessary operating instructions cannot be followed. As a result, there is a risk of injury. - Always keep safety, warning and operating instructions in a legible condition. - Renew damaged stickers and signs immediately. UV-C irradiation Danger due to UV-C irradiation! UV-C irradiation from the biocidal UV lamp is harmful to eyes and skin. › Avoid eye and skin exposure to unshielded radiation. -
Page 9: Intended Use
Intended Use The GuardOne® Workstation is to be used only for the intended use described herein. The GuardOne® Workstation is a containment equip- ment using air filtration technology and UV irradiation to create a working environment which minimizes the risk of cross-contamination under standard laboratory working conditions. The GuardOne® Workstation exclusively serves for process protection. The compliance with all instructions in this operating manual is part of the inteded use. Any use beyond the intended is considered as misuse. All country-specific safety requirements for operating electrical equipment in the laboratory must be observed. WARNING! Risk of misuse! Misuse of the GuardOne® Workstation can lead to dangerous situations for persons and property. - O nly install Starlab spare parts and wear parts in the GuardOne® Workstation. The installation of spare parts and wear parts not authorized by Starlab results in malfunction of the GuardOne® Workstation, contamination of the work environment, and damage to the sample material. - U se the GuardOne® Workstation exclusively within the specified conditions of use which are supplied in the specifications (Chapter 10 “Specifications”). WARNING! Danger due to property protection only! The GuardOne® Workstation exclusively serves for process protection. There is no personal protection included. - Do not use pathogens within the GuardOne® Workstation. Safety Installations Main power switch The main power switch is also designed as an emergency stop switch. It is located at the rear of the top housing unit in the upper right corner. Turning the main switch to position „0“, results in the airflow and UV decontamination stopping immediately. The GuardOne® Workstation is switched off. Electrical elements, such as the display, are de-energized. Safety contact on the front door To ensure that access to the inside is only possible with the UV lamp switched off, the lower segment of the front door is equipped with safety contacts. At the same time, the safety contacts prevent the airflow from blowing when the front door is closed. The UV decontamination of... -
Page 10: Personnel Requirements
Personnel Only persons who can be expected to perform their work reliably are allowed to perform the installation, operation and maintenance of the GuardOne® Workstation. Persons whose reactivity is impaired, for example by drugs, alcohol or medications, are not allowed to install, op- erate or maintain the GuardOne® Workstation. Observe the age and job-specific regulations that apply at the installation site when selecting the personnel. There is no distinction between installation, operation and maintenance personnel. Suitable staff is allowed to complete all tasks after a briefing by the operator. Only use staff with a training in laboratory tasks for performing tasks with the GuardOne® Workstation. Usually, this is a laboratory specialist. As such, the personnel is educated in his field of activity and knows the relevant standards and provisions. Due to their professional training and work experience, the personnel can execute work along the biological and chemical process chain in the field of process, production and biotechnology. The personnel can recognize possible dangers independently and avoid them. The personnel considers the regulations in health and environmental protection, occupational safety and quality assurance. The personnel is responsible for the following tasks: › S etting up the GuardOne® Workstation for the first time › A ssembling the GuardOne® Workstation (Chapter 4 “Assembly”) › E stablishing and checking the operational readiness of the GuardOne® Workstation › P erforming a function test › C ommissioning › C hanging the factory settings › O perating the graphical user interface ›... - Page 11 - I n case of accidental contact with ethanol, immediately initiate first aid measures: - Take off contaminated clothing immediately. - Inhalation: Provide for fresh air. In case of complaints, consult a doctor. - Skin contact: Wash off the ethanol with soap and plenty of water. In case of complaints, consult a doctor. - E ye contact: Rinse the eyes immediately with water. If possible, remove inserted contact lenses and continue to rinse with water. Consult a doctor. - Ingestion: Consult a doctor immediately. WARNING! Risk of fire due to objects with high heat development! W orking with open flames or objects with high heat development in the GuardOne® Workstation can cause serious injuries and property damage. - Do not smoke in the working area of the GuardOne® Workstation. Avoid handling open light, fire and ignition sources of all kinds. - T ake the following measures in case of fire outbreak: - Switch off the main power of the GuardOne® Workstation. Unplug the cable connector. - If there is no danger to your own health, save persons from the danger zone. If necessary, initiate first aid measures. - Alert fire and/or rescue services. - I f there is no danger to your own health, contain or extinguish the fire using adequate equipment. Continue the fire-fighting until the arrival of the fire services.
- Page 12 Property damage to plastic materials during prolonged irradiation! Some types of plastic, such as pipette tips, can become brittle when exposed to prolonged irradiation. - Do not place plastic containers that are not UV stable in the GuardOne® Workstation during prolonged exposure to UV light. NOTICE! Broken screws due to misposition! I f inserted out of position, screws can break out. This can cause damage to the top housing and the glass chamber of the GuardOne® Workstation. A decontaminated work environment can no longer be guaranteed. - Carefully insert the screws into the aligned holes during installation. - F ollow the instructions in this operating manual. Install the PC glass chamber and the top housing of the GuardOne® Workstation carefully. Dangers to the environment ENVIRONMENT! Dangers to the environment due to incorrect handling of environmentally hazardous substances! Incorrect handling and disposal of environmentally hazardous substances can cause significant damage to the environment. - Always observe the instructions for handling environmentally hazardous substances and their disposal below. - I f environmentally hazardous substances escape into the environment accidentally, take appropriate measures immediately.
-
Page 13: Behaviour In Case Of Emergency
Behaviour in case of accidents Preventive measures › A lways be prepared for accidents! › K eep first aid facilities (first aid kit, blankets etc.) in working order and ready at hand. › M ake sure that the staff is familiar with accident reporting, first aid and rescue facilities. › K eep access routes free for rescue vehicles. Measures in case of accidents › S witch the main power of the GuardOne® Workstation off (Chapter 4.6 “Complete Installation”). › I f there is no danger to your own health, save persons from the danger zone. › I f necessary, initiate first aid measures. › A lert fire and/or rescue services. › I nform the person in charge at the location. › K eep access routes free for rescue vehicles. ›... -
Page 14: Transport, Packing And Storage
2 x side panels › 1 x multifunctional shelf › 1 or 2x UV lamps (with serial number on package) › 1 x bag with two power cords (IEC 60320 C13/C14-type with earth contact) › 1 x bag with plastic rivets Transport inspection Check the delivery upon receipt for completeness and transport damage. In case of externally visible transport damage, proceed as follows: › D o not accept the delivery or accept only with reservation. › N ote the extent of damage on the transport documents. › I nitiate the complaint. Claim for any damages as soon as they are recog- In case of incompleteness or damage contact your local nized. Claims for damages can only Starlab sales representative immediately. Contact details be made within 15 working days after purchase of can be found “Starlab Service Hotline” or the back page. the GuardOne® Workstation. 14 · GuardOne · Manual ®... -
Page 15: Handling Of Packaging Material
ENVIRONMENT! Danger to the environment due to incorrect disposal! P ackaging materials are valuable raw materials. Sensibly processed and recycled, they can be used again in many cases. Dangers for the environment can arise from incorrect disposal of packaging materials. - Dispose of packaging materials in an environmentally friendly manner. - Observe the locally applicable disposal regulations. If necessary, commission a specialist company with the disposal. - Dispose of the pallet in an environmentally friendly way or store dry until reuse. Storage Requirements for the storage location Choose the storage location considering the following aspects: › D o not store the GuardOne® Workstation outdoors. › S tore dry and dust-free. › D o not expose to aggressive media. › P rotect from sunlight. › P ermissible storage temperature: -5 – +55 °C › P ermissible humidity: 10 – 95 % Requirements for the storage Store the GuardOne® Workstation under the following conditions:... -
Page 16: Assembly
T he installation site is dry and frost-free. - A minimum relative humidity of 40% is guaranteed. - A minimum room temperature of + 15 °C and a maximum room temperature of + 40 °C is guaranteed. › T he GuardOne® Workstation is not exposed to direct sunlight. › T he GuardOne® Workstation must be set up in a place that can easily be kept clean and dust free. Preparing the installation › T he GuardOne® Workstation is delivered only partly assembled to reduce transport volume by almost 50%. › T he final assembly can be performed directly at the chosen installation site. › T he assembly will take no longer than 15 minutes and does not require any special knowledge or any kind of tools. › C omponents of the GuardOne® Workstation are heavy. It is recommended to have a second person available for assistance. In case of doubt, contact your local Starlab service or sales contact for assistance. Watch our video to GuardOne ® https://www.starlab.click/guardone-assembling 16 · GuardOne · Manual ®... -
Page 17: Installing The Pc Back Panel
Installing the PC left side panel 1. T ake the PC left side panel (without cable duct, no. 1a) and insert it into the groove of the base plate. Make sure that the bottom holes in the PC left side panel are aligned with the holes in the base plate. 2. M ake sure that the PC back panel slides fully into the groove of the aluminium profile on the PC left side panel. Make sure that the holes in the aluminium profile and the PC back panel are aligned. 3. U se five of the plastic rivets (EVA01) to fix the PC back panel to the aluminium profile of the left side panel. Push the rivets into the aligned holes. 4. U se three of the plastic rivets (EVA02) to fix the PC left side panel to the base plate. Push the rivets into the aligned holes. The left side panel is installed. Fig. 6: Fix the PC back panel with plastic rivets GuardOne · Manual · 17 ®... - Page 18 F ix the PC shelf (no. 4) to the PC back panel using the two black screw assemblies provided. P osition the PC shelf at the back panel on the inside of the PC glass chamber of the GuardOne® Workstation. NOTICE! Property damage due to too high rotational torques! Fig. 8: Fix the PC shelf to the back panel T urn the two black screws into the designated holes on the PC shelf and the back panel by hand. I f necessary, you can provide additional support to the back panel with one hand from the outside. T he PC shelf is installed at the back panel on the inside of the glass chamber of the GuardOne® Workstation. 18 · GuardOne · Manual ®...
-
Page 19: Installing The Pc Front Door
Fig. 9: Insert the front door between the side panels 2. U se five of the plastic rivets (EVA01) to fix the PC left side panel to the aluminium profile of the front door assembly. Push the rivets into the aligned holes. T o avoid any deformation, you can provide additional support to the aluminium profile with one hand from the inside. 3. U se another five of the plastic rivets (EVA01) to fix the PC right side panel to the aluminium profile of the front door assembly. Proceed exactly as in the assembly of the PC left side panel to the front door detailed in step 2. The front door is installed between the side panels. Fig. 10: Fix the front door with plastic rivets GuardOne · Manual · 19 ®... -
Page 20: Installing The Top Housing
Installing the Top Housing Preconditions: › T he back and side panels are installed at the base plate. › T he front door is installed between the side panels. › T he top housing is the heaviest part of the GuardOne® Workstation. For safety reasons, have a second person available for assistance. NOTICE! Property damage due to placement on a hard base! T he bulb holder for the UV lamp protrudes a few centimeters from the top housing unit. If you place the unit flat on a hard base, the bulb holder may be pressed in and can be damaged. Fig. 11: Assembled PC glass chamber - D o not store the top housing unit unpacked on a hard base. - A fter unpacking the top housing unit, lift it immediately with the help of a second person onto the preinstalled PC glass chamber. -
Page 21: Installing The Uv Lamp
Fig. 16: Connecting the magnetic safety switch Installing the UV Lamp Preconditions: › R emove the packaging of the UV lamp. On the packaging there is a sticker with the serial number of the UV lamp. You will need this serial number during the function test in Chapter 4.6 “Complete Installation”. 1. O pen the front door fully, using the recess on the top housing to safely secure it in position. I nsert the new UV lamp from below into the lamp sockets. Lock the Fig. 17: Rotate the UV lamp UV lamp by rotating it by approx. 90° in anticlockwise direction. As soon as the bulb has been locked, you will hear a clicking sound. 3. I n the 48” version you install two UV lamps side-by-side repeating the action detailed in step 2. 4. Close the front door carefully. GuardOne · Manual · 21 ®... -
Page 22: Complete Installation
Completing the assembly I nsert the power cord (IEC 60320 C13/C14-type with earth con- tact) into the socket located at the back of the top housing. NOTICE! Property damage due to increased voltage! M ake sure that the local strength of current conforms to the power rating of the GuardOne® Workstation. 3. Connect the power cord to the power supply. T o switch the GuardOne® Workstation ON (I) or OFF (0), use the main power switch located above the socket. Turn the main power switch to ON. A fter switching the GuardOne® Workstation to ON, the touchpad with the graphical user interface at the front of the top housing will Fig. 18: Plug the power cord in the appropriate socket show the Standby screen. T he GuardOne® Workstation is now ready for performing a function test. Performing a function test The function test shows if UV lamp, LED lights and HEPA filter are working. - Page 23 W hen you turn on the airflow, the motor needs about ten seconds until the airflow starts to blow. When you turn off the airflow, it stops as soon as the front door is closed. Testing the LED light › Y ou are in the Airflow & Light menu. To switch on the LED light, use the LED light switch (1). Your selection is applied immediately. 2. T o select an LED light colour, press LED colour (2). Select the desired colour, normal white or red, by pressing the + and - button (3). Your selection is applied immediately. Fig. 23: LED light I f the LED lights are not working, please contact your local Starlab sales representative. 3. A fter you have made sure that the LED lights are working, switch off the LED light using the LED light switch (1). T o return to the Home menu, either use Back or Home in the navigation bar. GuardOne · Manual · 23 ®...
- Page 24 › T o start the UV decontamination, switch the UV lamp On using Fig. 24.1: UV 254 Decon the UV Status switch (1). › T o stop the UV decontamination, switch the UV lamp Off using the UV Status switch again. W ith correct setting and installation, the UV lamp emits a light blue light. I f the UV lamp is not working, make sure that the magnetic switch connector is securely plugged into the port. If the UV light is still not working, contact your local Starlab sales representative. LED light switches off automatically after UV light is switched on. 9. A fter you have made sure that the UV lamp is working, switch the UV lamp off by using the UV Status switch 10. P ress Home to return to the Home menu. After a successful function test, you can now change the pre-set parameter. 24 · GuardOne · Manual ®...
-
Page 25: Putting Into Service
C hange any value by pressing the value (2) and adjust it with the + and - button (3). 3. To save your changes, use Save Settings (4). To exit the page, use Back or Home. E xiting the page without using Save Settings will discard all changes Fig. 25: Adjusting date and time you have made! Adjusting the default operation parameters Press Settings on the Home menu. T he Quick Start button on the Home menu will start the GuardOne® Workstation with default values for blower speed and LED light. The factory settings for the Quick Start are 50 % blower speed and LED lights off. 2. P ress Quick Start Settings to open the setup page for changing the factory settings. 3. C hange any value by pressing onto the corresponding buttons (1) Fig. 26: Quick Start and adjust the settings using the + and - button (2). -
Page 26: Operation
- Only use sockets with proper electrical grounding. Get to Know the Graphical User Interface The GuardOne® Workstation is equipped with a graphical user interface which is operated via a touchscreen. Precondition: › T he main power switch is turned to ON. Get to know the Standby menu The Standby page is shown: › i mmediately after switching on the GuardOne® Workstation. › a fter exiting the Home page using the Standby button in the navigation bar. The Standby page informs you about the currently installed software version (1). In addition, if in use, the lab timer (2) will display the remaining time till the alarm will sound. Exit the Standby page: Press Tap to unlock (3) in the navigation bar. You are now on the Home page. Fig. 27: Standby page Get to know the Home menu The Home page offers access to the main functions of the GuardOne®... -
Page 27: Operating The Display Area
Adjusting the Lab timer T he lab timer is working independent of any other function of the GuardOne® Workstation. You can switch the GuardOne® Workstation into standby mode without affecting the lab timer. T o use the lab timer, press the Lab timer symbol in the right corner of the navigation bar of any page. The Lab timer page opens. To set the lab timer, press the buttons for hour, minute and second (1). Enter the desired time values using the + and - button (2). Press Start/Pause (3) to start or pause the timer. A fter the set time has elapsed, an alarm will be sounded. The alarm will stop automatically after approx. 5 seconds. Press End + Reset (4) to stop and reset the timer to 00:00:00. Fig. 29: Adjusting the lab timer To exit the page, use Back or Home. Operating the Display Area Quick Start and Quick Stop When Quick Start is pressed, the GuardOne® Workstation will start working using pre-set parameters for blower speed and LED lights (factory settings). The factory settings are: › Blower speed is 50 %, Laminar Flow Model required. › LED light is turned off. - Page 28 4. Apply the selection using Apply Settings (3). Your selection is applied immediately. To exit the page, use Back or Home. E xiting the page without using Apply Settings will discard all changes you have made! Operating the LED light To switch on/off the LED light, press the LED Light switch (1). Your selection is applied immediately. To select an LED light colour, press LED Colour (2). S elect the desired colour. You can choose between normal white (default) and red (3) by pressing the + and - button Your selection is applied immediately. Fig. 33: Operate LED light and colour 4. To exit the page, use Back or Home. 28 · GuardOne 28 · GuardOne · Manual · Manual ® ®...
- Page 29 The life time of the HEPA filter is 600 days. 1. Press UV bulb & Filter lifetime. T he remaining life times of the HEPA filter (1) and the UV bulb (2) are displayed. To exit the page, use Back or Home. Fig. 34: Information about UV bulb and Filter lifetime Instrument Info By pressing Instrument Info, you can view information about the current software version and the blower hours. Press Instrument Info. The current software version (1) and the blower hours (2) are di splayed. To exit the page, use Back or Home. Fig. 35: Instrument Info GuardOne GuardOne · Manual · 29 · Manual · 29 ® ®...
- Page 30 15200 Sarcina lutea 26400 Serratia marcescens 6160 Shigella paradysenteriae 3200 Spirillum rubrum 6160 Staphylococcus albus 5720 Staphylococcus aureus 6600 Streptococcus hemolyticus 5500 Streptococcus lactis 8800 Streptococcus viridans 3800 30 · GuardOne 30 · GuardOne · Manual · Manual ® ®...
- Page 31 44000 Recommended minimum exposure time Required Microwatt (µW) Protoza in minutes in 1 m distance by a UV-C seconds/cm² power of 48 μW/cm² Chlorella vulgaris (algae) 22000 Nematode eggs 9200 Paramecium 200000 GuardOne GuardOne · Manual · 31 · Manual · 31 ® ®...
- Page 32 By pressing UV 254 Decon, you can activate the UV decontamination mode. To automatically stop the UV decontamination after a pre-set time, you can use the timer function. NOTICE! Property damage to plastic materials from prolonged irradiation! Some types of plastic, such as pipette tips, can become brittle when exposed to prolonged irradiation. - Do not place plastic containers that are not UV stable into the GuardOne® Workstation. Operating the UV lamp 1. T o start the UV decontamination, switch the UV status (1) to T o stop the UV decontamination, switch the UV status (1) to The UV lamp cannot be switched on while the front door is open. T he UV lamp is switched off automatically as soon as the front door is being opened. Closing the front door again will not restart the decontamination procedure. Fig. 36: UV 254 Decon T he Info Expiration Time UV Light Source (2) gives you information about the remaining life time of the UV lamp. 2. To exit the page, use Back or Home. 32 · GuardOne · Manual ®...
- Page 33 Operating the UV timer › T he timer can only be used before the UV lamp has been switched on. The UV timer is not mandatory for using UV irradiation. Switch the UV Status to (1). To set the timer, press the hour, minute or second buttons (2). 3. Select the desired values (3) using the + and - button Fig. 37: UV Timer The desired decontamination time has been set. 4. To start the UV decontamination, switch the UV status (1) to T he UV lamp is switched off automatically after the preset time has elapsed. If you do not set the timer, UV decontamination will run indefinitely. T he UV lamp and timer will be switched off automatically as soon as the front door is being opened. Closing the front door again will not restart the decontamination procedure. A n acoustic signal will sound as soon as the pre-set time has elapsed. To exit the page, use Back or Home. GuardOne · Manual · 33 ®...
- Page 34 The factory settings are: › B lower speed is 50 %. › L ED light is turned off. Adjusting the Airflow preference Press Quick Start Settings. Press the percentage value (1). Select the desired airflow rate (2) using the + and - button You can choose between 0, 50, 80 and 100 % airflow rate. Fig. 39: Adjust the Airflow preference S electing an airflow rate of 0 % will switch off the blower. To switch it on again, either select an airflow rate above 0% or use the Quick Start function on the Home page Chapter 6.2 “Operating the Display Area”. Apply the selection using Save (3). To exit the page, use Back or Home. E xiting the page without using Save will discard all changes you have made! 34 · GuardOne · Manual ®...
- Page 35 To select an LED light colour, press LED Colour (2). S elect the desired colour by pressing the + and - button (3). You can choose between normal white (default) and red. Apply the selection using Save (4). Fig. 40: Setting LED light and colour preference To exit the page, use Back or Home. E xiting the page without using Save will discard all changes you have made! LED Brightness By pressing LED Brightness, you can adjust the brightness of the LED light within the GuardOne® Workstation. Press LED Brightness. Press onto the percentage value (1). Select the desired brightness rate (2) using the + and - button Y ou can choose from 10 % until 100 % LED brightness in 5 % increments. Fig. 41: Adjust the LED Brightness The selected LED brightness will be applied to all available LED colours. Apply the selection using Save (3). To exit the page, use Back or Home. E xiting the page without using Save will discard all changes you have made! Screen Brightness By pressing Screen Brightness, you can adjust the brightness of the screen of the graphical user interface.
- Page 36 Restricted function due to the installation of a non-original UV lamp! When using any other UV lamp than the original Starlab UV lamp, the proper function of the UV decontamination cannot be guaranteed. - Only use an original Starlab UV lamp designed for the GuardOne® Workstation. - In case of any questions, contact your local Starlab service or sales representative. For ordering information, visit the website or use the contact information “Starlab Service Hotline” or the back page. The UV light life time counter must only be reset after the replacement of the current old UV light with a new UV light. F or information on replacing the UV light and activating the automatic life time surveillance for the UV light, refer to Chapter 7.2 “Maintenance”. Set Backpressure NOTICE! Limited effectiveness of the air filtration due to adjusting the HEPA filter airflow alarm threshold! A djusting the threshold for the HEPA filter blockage alarm will change the effectiveness of the air filtration. Changing the factory settings may affect optimal performance of the GuardOne® Workstation. - I f you have the feeling that the alarm settings should be changed, contact a Starlab service technician or your local Starlab sales representative. 36 · GuardOne · Manual ®...
- Page 37 Reset When Reset is pressed, the GuardOne® Workstation is reset to the factory settings. A ny changes made to screen brightness, LED brightness, quick start settings, time and date adjustment and backpressure adjustment are lost. After restoring the factory settings you will also have to calibrate the touchscreen. 1. Press Reset. Fig. 43: Reset the GuardOne® Workstation 2. Confirm by pressing Reset (1). The GuardOne® Workstation turns off. 3. T o calibrate the touchscreen, press onto the crosses that will subse- quently appear in the four corners of the touchscreen with a pencil. The workstation has been reset to factory settings. T o change the factory settings see Chapter 5 “Putting into service”. GuardOne · Manual · 37 ®...
-
Page 38: Cleaning And Maintenance
Contamination indications NOTICE! Contamination of the pre-filter due to contamination of the air! D ue to the contamination of the air, the pre-filter can become dirty. A sterile working environment inside the GuardOne® Work- station is no longer guaranteed. - To ensure optimal function of the pre-filter, it is recommended to visually inspect the pre-filter in regular intervals. - It must be changed as soon as it visibly dirty, latest after a period of 6 months. NOTICE! Contamination of the inside area of the GuardOne Workstation due to bacterial contamination! ® D ue to contamination of the work area, a repeated operation without cleaning the work area can lead to contamination or destruction of the sample material and falsification of the results. - It is necessary to clean the inside area and the work surface after each use. Property damage NOTICE! - Page 39 Restricted function due to the installation of a non-original filter! When using any other filter than the original Starlab HEPA filter, the proper function of the air filtration cannot be guaranteed. - Only use original Starlab HEPA filters designed for the GuardOne® Workstation. - In case of any questions, contact your local Starlab service or sales contact. For ordering information, visit the website or use the contact information “Starlab Service Hotline” or the back page. Removing the used HEPA filter 1. S witch off the GuardOne® Workstation by using the main power switch on the back of the housing. O pen the front door of the top housing until the guiding rails on its left and right side lock and keep the door open. Fig. 46: Open the front door of the top housing 3. U nlock the HEPA filter housing which is fixed with two black screws on its left and right side between the HEPA filter housing and the walls of the top housing.
- Page 40 If secured tightly, the isolation foam on top and bottom of the filter will now prevent any airflow leakage. 8. C lose the housing front door. To do so, first unlock the two lifting helps on the right and the left side by slightly lifting the front door on both sides upwards. 9. Switch on the power. T he front door is equipped with a safety switch that automatically interrupts the power. If the touchscreen does not work after switching on the power, ensure that the front door is fully closed. Activating the automatic life time surveillance 1. To get to the Home page, press Tap to unlock. Press Settings. Press Replace HEPA Filter. E nter the 10-digit serial number (1) shown on the front of the filter labels. Fig. 50: Activate the automatic life time surveillance Press Enter (2) to finish the installation procedure. The GuardOne® Workstation is now ready to be used. The remaining life time of the HEPA filter is 600 days. 40 · GuardOne · Manual ®...
- Page 41 Restricted function due to the installation of non-original UV lamp! When using any other UV lamp than the original Starlab UV lamp, the proper function of the UV decontamination cannot be guaranteed. - Only use original Starlab UV lamp designed for the GuardOne® Workstation. - In case of any questions, contact your local Starlab service or sales contact. For ordering information, visit the website or use the contact information “Starlab Service Hotline” or the back page. Removing the used UV lamp 1. S witch off the GuardOne® Workstation by using the main power switch on the back of the housing. O pen the front door fully, using the recess on the roof of the top housing to safely secure it in this position. CAUTION! Risk of burns due to the heat of the UV lamp during decontamination! UV lamps can heat up during operation.
- Page 42 The GuardOne® is equipped with a battery permitting device data storage when the device is switched off. Depending on the service life of the battery, this should be exchanged every 3–5 years. WARNING Data loss when removing the batterye S oftware version V2.9 and lower: Contact your local Starlab sales partners or Starlab service technician, as a software update to version V3.0 must first be performed before removing the battery to prevent the loss of the remaining service life of the UV lamp and the HEPA filter. Information on the currently installed software version is displayed on the „Standby“ screen (see figure 27). Additionally, this information is also displayed under „Instrument Info“. Removing the battery S witch off the GuardOne® workstation via the mains/power switch on the rear of the housing. O pen the lid of the upper housing part until the guiding rails to the left and right engage and keep the lid open. T he battery is located on the rear of the LCD touch screen on the lid of the upper housing part. If your GuardOne® has no opening on the rear of the touch screen, contact your local Starlab sales partner or Starlab service technician. Contact information can be found on the status screen by pressing „Starlab Service & Order Information“. Abb. 53: Opening the lid of the upper housing part P ressing the spring blade to the left releases the battery for removal.
- Page 43 I nsert a new battery (type CR1220, button cell Ø 12.5 mm, 3 V / 35 mAh). C lose the lid of the upper housing part. To do this, first unlatch the two lifting aids on the left and right housing sides by slightly lifting the lid on both sides. Switch on the mains/power supply. The lid is equipped with a safety switch that automatically dis- connects the mains/power supply. If the touch screen does not function after the mains/power supply has been switched on, Abb. 55: Releasing the battery by pressing the spring check that the lid has been closed correctly. blade on the left side of the battery to the left E nter the date and the time (see 5., „Commissioning – Adjusting the date and the time“) GuardOne · Manual · 43 ®...
-
Page 44: Cleaning And Decontamination
Cleaning interval The following intervals must be adhered to: › A fter each use of the GuardOne® Workstation, carry out the cleaning according to use. Clean the workstation with a recommended cleaning agent. Depending on the intended use of the GuardOne® Workstation, carry out the decontamination of the PC glass chamber by the UV lamp. › I n case of a visible contamination, carry out appropriate cleaning. › T o ensure the optimal function of the pre-filter, it is recommended to visually inspect the pre-filter in regular intervals. Exchange it as soon as it is visibly dirty, latest after a period of 6 months. Cleaning the outside area of the GuardOne Workstation ® Preconditions: › T he recommended cleaning intervals have been observed. › T he GuardOne® Workstation is switched off or disconnected from the power supply. 1. Use a lint-free cleaning tissue to dust off the outer glass chamber of the GuardOne® Workstation. If necessary, gently wipe the outside of the glass chamber with a mild detergent. - Page 45 Cleaning the inside area and glass chamber of the GuardOne Workstation ® CAUTION! Health damage due to UV irradiation! Long-term exposure to UV light results in damage to health. - For safety reasons, the UV lamp cannot be switched on while the front door is open. - F or safety reasons, the UV lamp is switched off automatically as soon as the front door is being opened. Closing the door again does not restart the decontamination procedure. NOTICE! Complete decontamination impossible due to permanent draught! Due to the permanent draught in the glass chamber, a decontamination of 100 % by irradiation by the UV lamps is not possible. - Follow the recommendations in this operating manual. - Further information regarding the decontamination of the GuardOne® Workstations can be found on the Starlab homepage. Wet cleaning Preconditions: ›...
-
Page 46: Troubleshooting
CAUTION! Health damage due to insufficient decontamination when returning device! A n insufficient decontamination when returning the device to Starlab can constitute a health risk to any person handling the GuardOne® Workstation. - If a device is returned to Starlab, a decontamination certificate must be sent along with it. - Everything that is sent back must be cleaned first. - The return must be registered with Starlab. Contact your local Starlab sales representative for further information. Contact details can be found by pressing Starlab Service & Order Information on the Status page. NOTICE! Property damage due to unauthorized repair of the GuardOne Workstation! ® I ndependent repairs of the GuardOne® Workstation with an error status without the assistance of a Starlab service technician can lead to property damage. - I n case of an error status, contact your local Starlab sales representative. Contact details can be found by pressing Starlab Service & Order Information on the Status page. A fault is visually indicated by the colouring of the corresponding field. - Green colour for an OK status. - Orange colour for an Alert status. -
Page 47: Alerts
- T o order a new UV lamp, contact your local Starlab sales represen- tative. Contact details may be found by pressing Starlab Service & Order Information on the Status page. › HEPA filter life time end (Alert 3) - H EPA filter life time end means that the HEPA filter has reached its final life time of 600 days and must be replaced to ensure the functionality of the GuardOne® Workstation. › HEPA filter blocked (Alert 4) - H EPA filter blocked means that the GuardOne® Workstation has registered an impaired airflow that is usually caused by a blocked HEPA filter. - T he HEPA filter must be replaced, irrespective of any remaining filter life time. - I t is necessary to replace the HEPA filter immediately. Continuing the operation is not recommended. - Contact your Starlab service technician for further assistance. › HEPA filter critical age (Alert 5) - H EPA filter critical age means that the HEPA filter is close to the end of its life time of 600 days but has not reached it yet. 10 % of... -
Page 48: Errors
Errors NOTICE! Property damage due to ignoring error messages! I n the event of an error message, any further use of the GuardOne® Workstation may result in material damage to the device and the sample material. - Contact your Starlab service technician for further assistance. - Contact details may be found by pressing Starlab Service & Order Information on the status page. Status errors inform about property damage that prevents the continued operation of the GuardOne® Workstation until repair by a Starlab service technician. › Blower breakdown (Error 1) - B lower breakdown means that the GuardOne® Workstation has detected a malfunction of the blower motor. › Backpressure sensor failure occurred (Error 2) - B ackpressure Sensor failure occurred means that the GuardOne® Workstation has detected a malfunction of the airflow control. Fig. 58: Errors › CPU memory block failure occurred (Error 3) - C PU memory block failure occurred means that the GuardOne®... - Page 49 Behaviour in case of a malfunctioning engine If you hear abnormal engine running noise over a long period of time, there may be a malfunction of the engine. 1. Turn the main power switch to OFF. 2. Wait a few minutes before turning the GuardOne® Workstation on again. 3. Turn the main power switch to ON. I f the noise of the engine persists, contact your local Starlab sales representative or Starlab service technician. For contact details, press Starlab Service & Order Information on the status page. Behaviour in case of a malfunctioning door switch If the door switch is defective, the UV light can no longer be switched on. In addition, the airflow works even when the front door is closed. Contact your local Starlab sales representative or Starlab service technician for further assistance. For contact details, press Starlab Service & Order Information on the status page. Behaviour in case of a power failure Turn the main power switch to ON. Continue with your application. You do not have to reset previous settings. Previous settings are retained in the event of a power failure. Behaviour in case of a malfunctioning LED light In case of a malfunctioning LED light bar, faults will not be displayed on the control display.
-
Page 50: Disposal
Disposal There is a warranty of two years on the GuardOne® Workstation. Disassembly and disposal is the responsibility of the operator. T he life expectancy of the GuardOne® Workstation, excluding consumables, is at least five years, depending on the frequency of use and environmental conditions. Unless there is a return or disposal agreement, lead in disassembled components to recycling: › S crap metals. › G ive plastic elements for recycling. › D ispose of other components sorted according to material quality. Disposal of the UV lamps Defective UV lamps are hazardous waste. They contain quicksilver and cannot be recycled. Contact your in-house or local waste management system representative for assistance or further information. In the event of disposing of the product, please observe the applicable legal regulations. Information on the disposal of electrical and electronic devices in the European Community: The disposal of electrical devices is regulated within the European Community by national regulations based on EU Directive 2012/19/EU pertaining to waste electrical and electronic equipment (WEEE). In accordance with this, any devices delivered after 13/08/2005 on a business-to-business basis, which includes this product, may no longer be disposed of in household waste. To document this they have been marked with the following identification: Because disposal regulations may differ from country to country within the EU, please contact your local distributor for information. -
Page 51: Measurements And Weight
Weight Laminar Flow Dead Air Specifications Value Unit External dimensions and weight 48“ Length 1220 Width Height Weight Laminar Flow Dead Air Specifications Value Unit Internal dimensions 48“ Length 1200 Width Height GuardOne GuardOne · Manual · 51 · Manual · 51 ® ®... -
Page 52: Power Requirements
Fig. 59: Product model label The product model label contains the following information: › O rder number › S erial number › V oltage › F requency › P ower output › F use › C E marking › W EEE label: Do not dispose with household waste. 52 · GuardOne 52 · GuardOne · Manual · Manual ® ®... - Page 53 Operation Cleaning liquids ..........42 Safety indications ..........26 Cleaning the inside area and glass chamber Operator of the GuardOne® Workstation ......43 Obligations ............9 Cleaning the outside area Overview..............4 of the GuardOne® Workstation ......42 Cleaning the touchscreen ......... 42 Cleaning and maintenance Packaging material ..........15 Safety indications ..........38 Packing ..............14 Coarse filter ............6, 38 PC glass chamber ...........4, 6, 20 Personal protective equipment ......10 Personnel Dead Air ..............
- Page 54 54 · GuardOne · Bedienungsanleitung ®...
-
Page 55: Bedienungsanleitung
User Manual ____________________________________________________________________________________ 3 – 53 Bedienungsanleitung ________________________________________________________________________ 55 – 105 Instruction initiale ___________________________________________________________________________ 107 – 157 Istruzioni d‘uso ______________________________________________________________________________159 – 209 Zertifikat _________________________________________________________________________________________________________ Übersicht über die GuardOne -Werkbank ___________________________________________________________________ ® 1.1 Aufbau und Funktion _________________________________________________________________________________________ 1.2 Lieferumfang _______________________________________________________________________________________________ ________________________________________________________________________________________________ Sicherheit 2.1 Erklärung der Sicherheitssymbole _______________________________________________________________________________ 2.2 Bestimmungsgemäßer Gebrauch _______________________________________________________________________________ 2.3 Sicherheitseinrichtungen _____________________________________________________________________________________ 2.4... -
Page 56: Übersicht Über Die Guardone
Übersicht über die GuardOne -Werkbank ® Aufbau und Funktion Aufbau Abb. 1: GuardOne®-Werkbank Gehäuseoberteil Rückwand B Polycarbonat-Glaskammer (PC-Glaskammer) Bodenplatte Gehäuseoberteil mit vormontiertem Vorfilter und HEPA-Filter Vormontierte aufklappbare Frontplatte mit zwei Klappen Kunststoffniete Multifunktionsregal Seitenwand Touchscreen-Display mit grafischer Benutzeroberfläche Modelle Zwei verschiedene Modelle der GuardOne®-Werkbank sind erhältlich: ein „Dead Air“-Modell und ein „Laminar Flow“-Modell. Jedes kann in zwei verschiedenen Größen bestellt werden. Die beiden Größen der GuardOne®-Werkbank sind: › 3 2“: GuardOne®-Werkbänke dieser Größe verfügen über eine UV-Lampe und, wenn es sich um das „Laminar Flow“-Modell handelt, einen Vorfilter und einen HEPA-Filter. › 4 8“: GuardOne®-Werkbänke dieser Größe verfügen über zwei UV-Lampen und, wenn es sich um das „Laminar Flow“-Modell handelt, zwei Gebläsemotoren, zwei Vorfilter und zwei HEPA-Filter. Die Abmessungen sind Kapitel 10 „Spezifikationen“ zu entnehmen. Dead Air ›... - Page 57 In dieser Bedienungsanleitung werden alle Funktionen beschrieben, die den Vorfilter, den HEPA-Filter und die UV-Lampe betreffen. Wenn Sie ein „Dead Air“-Modell besitzen, können Sie die Anweisungen zur Bedienung, zum Austausch, zur In- standhaltung und zur Behebung von Fehlern der Filter ignorieren. In dieser Anleitung wird der Umgang mit dem „Laminar Flow“-Modell der Größe 32“ mit einem HEPA-Filter, einem Vorfilter und einer UV-Lampe beschrieben. Wenn Sie ein „Laminar Flow“- oder „Dead Air“-Modell der Größe 48“ besitzen, führen Sie die Anweisungen zur Montage und Instandhaltung der HEPA-Filter, UV-Lampen und Vorfilter zweimal durch. Funktion Bei der GuardOne®-Werkbank handelt es sich um ein Containment-Gerät, in dem mithilfe von Luftfilterung und UV-Strahlung eine Arbeits- umgebung geschaffen wird, in welcher das Risiko von Kreuzkontaminationen unter standardmäßigen Laborbedingungen minimiert wird. Zu diesem Zweck ist die GuardOne®-Werkbank mit folgenden Komponenten ausgestattet: › Erzeugen einer Reinluft-Umgebung Kombination aus geräuscharmem Gebläsemotor, Standard-HEPA-Filter und Vorfilter. › Dekontamination und Sterilisation des Arbeitsbereichs UV-Licht mit einer festen Wellenlänge von 254 nm. Starlab-Service-Hotline Um weitere Informationen zu erhalten, besuchen Sie www.starlabgroup.com und wenden Sie sich an Ihren Starlab-Service- oder Vertriebspartner vor Ort. GuardOne · Bedienungsanleitung · 57 ®...
-
Page 58: Lieferumfang
Aufklappbare Frontplatte Multifunktionsregal Seitenwände Die aufklappbare Frontplatte, die Rückwand und die Seitenwände bestehen aus transparentem, 6 mm dickem Polycarbonatglas (PC-Glas), wobei sich die einzelnen Teile überlappen, um ein Austreten gefährlicher kurzwelliger UV-Strahlung während der UV-254-Dekontamination zu verhindern. Die rechte Seitenwand verfügt zusätzlich über eine Kabeldurchführung, durch die Kabel von außen ins Innere der PC-Glaskammer geführt werden können. Auch hier kann keine UV-Strahlung austreten, da die Kabeldurchführung mit einer separaten Abdeckung aus PC-Glas ausgestattet ist. Rückwand Die Rückwand besteht aus transparentem, 6 mm dickem Polycarbonatglas, wobei sich die einzelnen Teile überlappen, um ein Austreten gefährlicher kurzwelliger UV-Strahlung während der UV-254-Dekontamination zu verhindern. Multifunktionsregal Das Multifunktionsregal ist im Inneren der Glaskammer an die PC-Rückwand montiert. Es wird verwendet, um Proben abzustellen und Pipetten und weiteres Zubehör zu lagern. Da sich das Multifunktionsregal innerhalb des Strahlungsbereichs der UV-Lampe befindet, können hier auch Proben abgestellt werden, die dekontaminiert werden sollen. Bodenplatte Die Bodenplatte besteht aus einer Polypropylen-Mischung, die ebenso wie die aufklappbare Frontplatte und die Seiten- und Rückwände UV-Licht reflektiert. Aufklappbare Frontplatte Die aufklappbare Frontplatte besteht aus transparentem, 6 mm dickem Polycarbonatglas, wobei sich die einzelnen Teile überlappen, um ein Austreten gefährlicher kurzwelliger UV-Strahlung während der UV-254-Dekontamination zu verhindern. Die aufklappbare Frontplatte kann in zwei Schritten geöffnet werden. › D as Öffnen des untersten Teils ermöglicht es dem Anwender, Arbeiten im Innenraum der GuardOne®-Werkbank durchzuführen. › D as zusätzliche Öffnen des mittleren Teils erleichtert dem Anwender die Reinigung und Instandhaltung der PC-Glaskammer von innen. Ein vollständiges Öffnen der aufklappbaren Frontplatte zum Arbeiten wird nicht empfohlen, da so keine Reinluft-Umgebung garantiert werden kann. Außerdem ist die aufklappbare Frontplatte mit einem Magnetschalter ausgestattet, der registriert, wenn die aufklappbare Frontplatte geöffnet ist. Wenn die aufklappbare Frontplatte geöffnet wird, wird die UV-Lichtquelle automatisch ausgeschaltet. Dasselbe gilt für den Luftstrom: Beim Schließen der aufklappbaren Frontplatte wird das Gebläse automatisch ausgeschaltet. 58 · GuardOne · Bedienungsanleitung ®... - Page 59 Halterung für UV-Lampe im hinteren Teil unter dem HEPA-Filter - Zur Dekontamination und Sterilisation des Arbeitsbereichs nutzt die GuardOne®-Werkbank UV-Licht mit einer festen Wellenlänge von 254 nm. - J e nach Modell sind im Lieferumfang entweder eine oder zwei UV-Lampen mit Seriennummer enthalten. Die UV-Lampen müssen nach der Montage der Glaskammer und des Gehäuseoberteils in den Halterungen für die UV-Lampen befestigt werden. - Die Halterung für die UV-Lampe ragt einige Zentimeter aus dem Gehäuseoberteil heraus. - Die Lebensdauer der UV-Lampen beträgt 9000 Stunden. › LED-Lampe im vorderen Teil unter dem HEPA-Filter - Die LED-Lampe ist vormontiert. - J e nach Photosensitivität der Proben können Sie die LED-Lampe ein- oder ausschalten, die Helligkeitseinstellungen für die LEDs ändern oder die LED-Farbe zwischen normalem Rot und Weiß umschalten. › Touchscreen-Display mit grafischer Benutzeroberfläche an der Vorderseite - D ie Bedieneinheit befindet sich an der Vorderseite. Die GuardOne®-Werkbank wird über ein Touchscreen-Display mit grafischer Benutzerober- fläche bedient. - Ü ber das Display mit der grafischen Benutzeroberfläche können die Einstellungen für den Luftstrom, die LEDs und das UV-Licht vorgenommen werden. Am Display werden auch Informationen zum Hersteller und zum Zustand der GuardOne®-Werkbank angezeigt. › Netzschalter, Netzanschluss und USB-Anschluss an der Rückseite - N etzschalter, Netzanschluss und ein USB-Anschluss befinden sich an der Rückseite. Letzterer ist für die Installation von Software-Updates vorgesehen. › Aussparung in der oberen Abdeckung, um die aufklappbare Frontplatte während der Reinigung oder Instandhaltung der PC-Glaskammer offen zu halten - W enn die aufklappbare Frontplatte hochgeklappt wird, kann der Griff in die Aussparung geschoben werden, um ein versehentliches Schließen zu verhindern. › Kunststoffniete, Griffschrauben und zwei Kabel in separatem Beutel - Kunststoffniete, Griffschrauben und zwei Kabel für die Montage sind im Lieferumfang enthalten.
-
Page 60: Sicherheit
UMWELT! und problemlosen Diese Kombination aus Symbol und Signalwort weist auf potenzielle Umweltrisiken hin. Betrieb hervorgehoben. Sicherheitshinweise in Beschreibungen von Arbeitsabläufen Sicherheitshinweise können sich auf spezifische Einzelanweisungen beziehen. Solche Sicherheitshinweise sind in die Beschreibung des Arbeitsablaufs integriert und stören nicht den Lesefluss bei der Durchführung der Arbeiten. Hierfür werden die oben erläuterten Signalwörter verwendet. Beispiel: Lösen Sie die Schraube. VORSICHT! Klemmgefahr! Schließen Sie die Klappe vorsichtig. Ziehen Sie die Schraube an. Sicherheitsetiketten an der GuardOne -Werkbank ® WARNUNG! Gefahr durch unlesbare Beschilderung! Aufkleber und Schilder können mit der Zeit verschmutzen, so dass Gefahren unerkannt bleiben und erforderliche Anweisungen nicht befolgt werden können. Dies führt zu Verletzungsgefahr. - Darauf achten, dass Sicherheits-, Warn- und Bedienungshinweise stets lesbar bleiben. - Beschädigte Aufkleber und Schilder sofort ersetzen. UV-C-Strahlung Gefahr durch UV-C-Strahlung! Die UV-C-Strahlung der antibakteriellen UV-Lampe schädigt Augen und Haut. › Ungeschützte Bestrahlung von Augen und Haut vermeiden. › U V-Lampe nur in einem geschlossenen Raum wie der GuardOne®-Werkbank verwenden, der den Anwender vor der auftretenden Strahlung schützt. -
Page 61: Bestimmungsgemäßer Gebrauch
Bestimmungsgemäßer Gebrauch Die GuardOne®-Werkbank darf nur für die in dieser Bedienungsanleitung beschriebenen Zwecke verwendet werden. Bei der GuardOne®- Werkbank handelt es sich um ein Containment-Gerät, in dem mithilfe von Luftfilterung und UV-Strahlung eine Arbeitsumgebung geschaffen wird, in welcher das Risiko von Kreuzkontaminationen unter standardmäßigen Laborbedingungen minimiert wird. Die GuardOne®-Werkbank dient ausschließlich dem Prozessschutz. Der bestimmungsgemäße Gebrauch setzt die Befolgung sämtlicher in dieser Bedienungsanleitung enthaltenen Anweisungen voraus. Jeglicher Gebrauch, der über den bestimmungsgemäßen Gebrauch hinausgeht, gilt als Fehlgebrauch. Sämtliche landesspezifischen Sicherheitsanforderungen für den Betrieb von elektrischen Geräten im Labor sind einzuhalten. WARNUNG! Gefahr des Fehlgebrauchs! Ein Fehlgebrauch der GuardOne®-Werkbank kann zu Personengefährdung und Sachschäden führen. - N ur Ersatz- und Verschleißteile von Starlab in der GuardOne®-Werkbank montieren. Die Montage von nicht von Starlab auto- risierten Ersatz- und Verschleißteilen führt zu Fehlfunktionen der GuardOne®-Werkbank, Kontamination der Arbeitsumgebung und Beschädigung des Probenmaterials. - D ie GuardOne®-Werkbank ausschließlich unter den in den Spezifikationen (Kapitel 10 „Spezifikationen“) angegebenen Bedingungen verwenden. WARNUNG! Gefahr durch ausschließlichen Schutz von Gegenständen! Die GuardOne®-Werkbank dient ausschließlich dem Probenschutz. Sie bietet keinen Schutz für Personen. - Keine Pathogene in der GuardOne®-Werkbank verwenden. Sicherheitseinrichtungen Netzschalter Der Netzschalter ist auch als Not-Aus-Schalter ausgelegt. Er befindet sich in der oberen rechten Ecke des Gehäuseoberteils. Wenn der Netz- schalter auf die Position „0“ gestellt wird, werden der Luftstrom und die UV-Dekontamination sofort gestoppt. Die GuardOne®-Werkbank wird ausgeschaltet. Elektrisch betriebene Elemente wie das Display werden spannungsfrei geschaltet. Sicherheitskontakt an der aufklappbaren Frontplatte Damit der Zugang zum Innenraum wirklich nur möglich ist, wenn die UV-Lampe ausgeschaltet ist, verfügt die untere Klappe der aufklappba-... -
Page 62: Anforderungen An Das Personal
Personal Nur Personen, von denen zu erwarten ist, dass sie ihre Arbeit zuverlässig ausführen, dürfen die GuardOne®-Werkbank montieren, bedienen und instand halten. Personen, deren Reaktionsfähigkeit eingeschränkt ist, z. B. durch Drogen, Alkohol oder Medikamente, dürfen die GuardOne®- Werkbank nicht montieren, bedienen oder instand halten. Bei der Auswahl des Personals sind die am Aufstellungsort geltenden alters- und tätigkeitsspezifischen Vorschriften zu beachten. Es wird nicht unterschieden zwischen Montage-, Bedien- und Instandhaltungspersonal. In Frage kommendes Personal darf nach einer Ein- weisung durch den Betreiber alle dieser Tätigkeiten ausführen. Für Arbeiten mit der GuardOne®-Werkbank sollte nur in Labortätigkeiten ge- schultes Personal eingesetzt werden. Normalerweise ist dies eine Laborfachkraft. Diese Personen sind in ihrem jeweiligen Tätigkeitsbereich ausgebildet und mit den relevanten Normen und Bestimmungen vertraut. Aufgrund ihrer Ausbildung und Erfahrung in ihrem Tätigkeitsbe- reich können diese Personen Arbeiten innerhalb der biologischen und chemischen Prozesskette in den Bereichen Prozess-, Produktions- und Biotechnologie ausführen. Diese Personen können potenzielle Gefahren eigenständig erkennen und vermeiden. Diese Personen halten die Gesundheits-, Umweltschutz-, Arbeitssicherheits- und Qualitätssicherungsvorschriften ein. Das Personal ist verantwortlich für Folgendes: › E rsteinrichtung der GuardOne®-Werkbank › M ontage der GuardOne®-Werkbank (siehe Kapitel 4 „Montage“) › H erstellen und Prüfen der Betriebsbereitschaft der GuardOne®-Werkbank › D urchführen eines Funktionstests › I nbetriebnahme › Ä ndern der Werkseinstellungen › B edienen der grafischen Benutzeroberfläche ›... - Page 63 Gefahren für Personen GEFAHR! Lebensgefahr durch elektrischen Strom! B ei Kontakt mit spannungsführenden Teilen besteht Lebensgefahr durch Stromschlag. Eine Beschädigung der Isolierung oder einzelner Komponenten kann lebensgefährlich sein. - Bei Beschädigung der Isolierung sofort die Spannungsversorgung abschalten und für Reparatur sorgen. - Vor Durchführung jeglicher Reinigungsarbeiten den Netzschalter ausschalten. WARNUNG! Verletzungsgefahr durch hochenergetische UV-Strahlung! Die UV-Lampe sendet hochenergetische UV-Strahlung aus. Längere Bestrahlung mit UV-Licht schädigt die Gesundheit. - Ungeschützte Bestrahlung von Augen und Haut vermeiden. - U V-Lampe nur in einem geschlossenen Raum wie der GuardOne®-Werkbank verwenden, der den Anwender vor der auftretenden Strahlung schützt. - Nach Abschluss der Dekontamination der GuardOne®-Werkbank die UV-Strahlung ausschalten. - Bei einer Störung der UV-Lampe unverzüglich einen Starlab-Service-Techniker informieren. WARNUNG! Verletzungsgefahr durch Kontakt mit Alkohol (Ethanol)! Ethanol ist ein Augenreizstoff. Alkoholdämpfe können Benommenheit und Schläfrigkeit verursachen. - Vor dem Arbeiten mit Ethanol den Netzschalter ausschalten. - B eim Arbeiten mit Ethanol für ausreichende Belüftung sorgen. Wenn Sie sich müde oder benommen fühlen, begeben Sie sich sofort an die frische Luft. - Vor einem längeren Aufenthalt in dem betroffenen Bereich den Arbeitsbereich lüften.
- Page 64 Beschädigung von Kunststoffgegenständen bei längerer Bestrahlung! E inige Kunststoffarten, wie sie zum Beispiel für Pipettenspitzen verwendet werden, können brüchig werden, wenn sie für längere Zeit UV-Licht ausgesetzt sind. - Keine nicht UV-beständigen Behälter aus Kunststoff für längere Zeit dem UV-Licht in der GuardOne®-Werkbank aussetzen. ACHTUNG! Herausbrechen von Schrauben durch falsche Positionierung! W enn die Bohrungen nicht korrekt aufeinander ausgerichtet sind, können Schrauben herausbrechen. Dies kann zur Beschä- digung des Gehäuseoberteils und der Glaskammer der GuardOne®-Werkbank führen. Eine kontaminationsfreie Arbeitsumge- bung kann nicht mehr garantiert werden. - Die Schrauben während der Montage vorsichtig in die korrekt ausgerichteten Bohrungen einsetzen. - D ie Anweisungen in dieser Bedienungsanleitung befolgen. Die PC-Glaskammer und das Gehäuseoberteil der GuardOne®- Werkbank vorsichtig montieren. Gefahren für die Umwelt UMWELT! Umweltgefährdung aufgrund unsachgemäßer Handhabung umweltgefährdender Stoffe! Die unsachgemäße Handhabung und Entsorgung umweltgefährdender Stoffe kann zu erheblichen Umweltschäden führen. - Immer die nachfolgenden Anweisungen zur Handhabung und Entsorgung umweltgefährdender Stoffe befolgen. - W enn umweltgefährdende Stoffe versehentlich in die Umwelt gelangen, sofort angemessene Abhilfemaßnahmen ergreifen. In Zweifelsfällen die zuständige Stelle über den Schaden informieren und nach angemessenen Abhilfemaßnahmen fragen. Folgende umweltgefährdende Stoffe werden verwendet: Reinigungsflüssigkeiten...
-
Page 65: Verhalten Im Notfall
Verhalten bei Unfällen Vorsichtsmaßnahmen › S eien Sie immer auf Unfälle vorbereitet! › H alten Sie Erste-Hilfe-Ausrüstung (Erste-Hilfe-Kasten, Decken usw.) stets einsatzbereit und griffbereit. › S tellen Sie sicher, dass das Personal mit dem Melden von Unfällen und der Erste-Hilfe- und Rettungsausrüstung vertraut ist. › H alten Sie die Zufahrtswege für Rettungsfahrzeuge frei. Maßnahmen bei Unfällen › S chalten Sie den Netzschalter der GuardOne®-Werkbank aus (Kapitel 4.6 „Abschließende Arbeiten“). › H olen Sie Personen aus der Gefahrenzone, sofern Sie sich dadurch nicht selbst in Gefahr bringen. › E rgreifen Sie Erste-Hilfe-Maßnahmen, falls erforderlich. › R ufen Sie die Feuerwehr und/oder den Rettungsdienst. › I nformieren Sie den Verantwortlichen vor Ort. › H alten Sie die Zufahrtswege für Rettungsfahrzeuge frei. › W eisen Sie die Rettungsfahrzeuge ein. -
Page 66: Transport, Verpackung Und Lagerung
Transport, Verpackung und Lagerung Sicherheit während Transport, Verpackung und Lagerung Sicherheitshinweise WARNUNG! Verletzungsgefahr durch schwere Lasten! Beim Anheben und Abstellen des Pakets können Gegenstände herunterfallen. Dies kann zu schweren Verletzungen führen. - Beachten Sie die Maße und das Gewicht der GuardOne®-Werkbank. - D ie Komponenten der GuardOne®-Werkbank sind schwer. Heben Sie sie nur mithilfe einer zweiten Person oder geeigneter Ausrüstung an. ACHTUNG! Beschädigung der UV-Lampe durch Anstoßen des Pakets! Durch Stöße gegen das Paket kann die UV-Lampe beschädigt werden. - Das Paket vorsichtig transportieren. - Bei Schäden sofort den örtlichen Starlab-Vertriebspartner informieren. ACHTUNG! Sachschaden durch Abstellen auf harter Oberfläche! D ie Halterung für die UV-Lampe ragt einige Zentimeter aus dem Gehäuseoberteil heraus. Wenn die Einheit flach auf einer harten... -
Page 67: Umgang Mit Verpackungsmaterial
Firmeninterner Transport WARNUNG! Verletzungsgefahr durch schwere Lasten! Beim Anheben und Abstellen des Pakets können Gegenstände herunterfallen. Dies kann zu schweren Verletzungen führen. - Beachten Sie die Maße und das Gewicht der GuardOne®-Werkbank. - D ie Komponenten der GuardOne®-Werkbank sind schwer. Heben Sie sie nur mithilfe einer zweiten Person oder geeigneter Ausrüstung an. Mithilfe einer zweiten Person können Sie die GuardOne®-Werkbank an einen anderen Ort transportieren, ohne sie zu demontieren. Umgang mit Verpackungsmaterial Verpackungsmaterial Die GuardOne®-Werkbank wird vom Hersteller für die Lieferung transportsicher verpackt. Die Lieferung kann durch einen Paketdienst oder firmeninternen Transport direkt an den Empfänger erfolgen. Zum Schutz vor Beschädigung und Kontamination während des Transports wird die GuardOne®-Werkbank in einem einzigen Pappkarton geliefert, wobei einzelne Teile zusätzlich in Schutzfolie eingewickelt sind. Entsorgung Beachten Sie bei der Entsorgung des Verpackungsmaterials die geltenden gesetzlichen Bestimmungen und örtlichen Vorschriften. UMWELT! Umweltgefährdung aufgrund unsachgemäßer Entsorgung! V erpackungsmaterialien sind wertvolle Rohmaterialien. Korrekt verarbeitet und recycelt, können sie oftmals wiederverwendet werden. Die unsachgemäße Entsorgung von Verpackungsmaterialien kann zu Umweltgefährdung führen. - Entsorgen Sie Verpackungsmaterialien auf umweltfreundliche Weise. - Beachten Sie die geltenden Entsorgungsvorschriften. Falls erforderlich, beauftragen Sie ein spezialisiertes Entsorgungsunternehmen. - E ntsorgen Sie die Palette auf umweltfreundliche Weise oder bewahren Sie sie an einem trockenen Ort auf, bis sie wieder benötigt wird. Lagerung Anforderungen hinsichtlich des Lagerortes Berücksichtigen Sie bei der Auswahl des Lagerortes Folgendes:... -
Page 68: Montage
D ie GuardOne®-Werkbank darf keiner direkten Sonneneinstrahlung ausgesetzt sein. › D er Aufstellungsort der GuardOne®-Werkbank muss leicht zu reinigen und staubfrei zu halten sein. Vorbereiten der Montage › D ie GuardOne®-Werkbank wird nur teilmontiert geliefert, da sich das Volumen so um fast 50 % reduzieren lässt. › D ie Endmontage kann direkt am gewählten Aufstellungsort erfolgen. › D ie Montage nimmt nicht mehr als 15 Minuten in Anspruch. Es sind keine besonderen Kenntnisse und keine Werkzeuge erforderlich. › D ie Komponenten der GuardOne®-Werkbank sind schwer. Es wird empfohlen, sich durch eine zweite Person helfen zu lassen. Bei Fragen wenden Sie sich bitte an Ihren Starlab-Service-oder Vertriebspartner vor Ort. Sehen Sie sich unser Video zur Montage der GuardOne -Werkbank an: ® https://www.starlab.click/guardone-assembling 68 · GuardOne · Bedienungsanleitung ®... -
Page 69: Montieren Der Pc-Rückwand
Montieren der PC-Seitenwände und des Multifunktionsregals Montieren der linken PC-Seitenwand 1. N ehmen Sie die linke PC-Seitenwand (ohne Kabeldurchführung, Nr. 1a) und setzen Sie sie in die Nut in der Bodenplatte ein. Achten Sie darauf, dass die unteren Bohrungen in der linken PC-Seitenwand auf die Bohrungen in der Bodenplatte ausgerichtet sind. 2. V ergewissern Sie sich, dass die PC-Rückwand vollständig in die Nut im Alumi- niumprofil an der linken PC-Seitenwand hineingleitet. Achten Sie darauf, dass die Bohrungen im Aluminiumprofil auf die Bohrungen in der PC-Rückwand ausgerichtet sind. B efestigen Sie die PC-Rückwand mit fünf der Kunststoffniete (EVA01) am Alu- miniumprofil der linken Seitenwand. Drücken Sie die Niete in die aufeinander ausgerichteten Bohrungen. B efestigen Sie die linke PC-Seitenwand mit drei der Kunststoffniete (EVA02) an der Bodenplatte. Drücken Sie die Niete in die aufeinander ausgerichteten Bohrungen. Die linke Seitenwand ist nun montiert. Abb. 6: Befestigen der PC-Rückwand mit Kunststoffnieten GuardOne · Bedienungsanleitung · 69 ®... - Page 70 Montieren des PC-Regals an die Rückwand B efestigen Sie das PC-Regal (Nr. 4) mit den beiden mitgelieferten schwarzen Schrauben an der PC-Rückwand. P ositionieren Sie das PC-Regal in der PC-Glaskammer an der Rückwand der GuardOne®-Werkbank. ACHTUNG! Sachschaden durch zu hohes Drehmoment! S chrauben Sie die zwei schwarzen Schrauben per Hand in die dafür vorgesehenen Bohrungen in das PC-Regal und der Abb. 8: Befestigen des PC-Regals an der Rückwand Rückwand ein. F alls erforderlich, können Sie die Rückwand von außen mit einer Hand abstützen. D as PC-Regal ist nun in der Glaskammer an der Rückwand der GuardOne®-Werkbank montiert. 70 · GuardOne · Bedienungsanleitung ®...
-
Page 71: Montieren Der Aufklappbaren Pc-Frontplatte
Achten Sie darauf, dass die Bohrungen in den Aluminiumprofilen auf beiden Seiten auf die Bohrungen in den PC-Seitenwänden ausgerich- tet sind. Abb. 9: Einsetzen der aufklappbaren Frontplatte zwischen den Seitenwänden B efestigen Sie die linke PC-Seitenwand mit fünf der Kunststoffniete (EVA01) am Aluminiumprofil der aufklappbaren Frontplatte. Drücken Sie die Niete in die aufeinander ausgerichteten Bohrungen. U m Verformung zu vermeiden, können Sie das Aluminiumprofil mit einer Hand von innen abstützen. B efestigen Sie die rechte PC-Seitenwand ebenfalls mit fünf der Kunst- stoffniete (EVA01) am Aluminiumprofil der aufklappbaren Front- platte. Gehen Sie genauso vor, wie bei der in Schritt 2 beschriebenen Montage der linken Seitenwand an die aufklappbare Frontplatte. Die aufklappbare Frontplatte wird zwischen den Seitenwänden montiert. Abb. 10: Befestigen der aufklappbaren Front- platte mit Kunststoffnieten GuardOne · Bedienungsanleitung · 71 ®... -
Page 72: Montieren Des Gehäuseoberteils
Montieren des Gehäuseoberteils Voraussetzungen: › D ie Rückwand und die Seitenwände sind an die Bodenplatte montiert. › D ie aufklappbare Frontplatte ist zwischen den Seitenwänden montiert. › D as Gehäuseoberteil ist das schwerste Teil der GuardOne®-Werkbank. Holen Sie sich aus Sicherheitsgründen eine zweite Person zu Hilfe. ACHTUNG! Sachschaden durch Abstellen auf harter Oberfläche! D ie Halterung für die UV-Lampe ragt einige Zentimeter aus dem Gehäuseoberteil heraus. Wenn die Einheit flach auf einer harten Ober- Abb. 11: Montierte PC-Glaskammer fläche abgestellt wird, können die Halterungen für die UV-Lampen eingedrückt und beschädigt werden. - S tellen Sie das Gehäuseoberteil nicht unverpackt auf einer harten Oberfläche ab. - H eben Sie das Gehäuseoberteil sofort nach dem Auspacken mithilfe einer zweiten Person auf die vormontierte PC-Glaskammer. Anheben und Befestigen des Gehäuseoberteils auf der PC-Glas-... -
Page 73: Montieren Der Uv-Lampe
Abb. 16: Anschließen des Magnetsicherheits- D er Magnetsicherheitsschalter zwischen dem Gehäuseoberteil und schalters der PC-Glaskammer ist nun angeschlossen. Montieren der UV-Lampe Voraussetzungen: › E ntfernen Sie die Verpackung der UV-Lampe. Auf der Verpackung befindet sich ein Aufkleber mit der Seriennummer der UV-Lampe. Sie benötigen diese Seriennummer für den Funktionstest in Kapi- tel 4.6 „Abschließende Arbeiten“. 1. Ö ffnen Sie die aufklappbare Frontplatte vollständig und sichern Sie sie Abb. 17: Drehen der UV-Lampe in der Aussparung in der oberen Abdeckung des Gehäuseoberteils. S etzen Sie die neue UV-Lampe von unten in die Fassung ein. Verrie- geln Sie die UV-Lampe, indem Sie sie ca. 90° gegen den Uhrzeigersinn drehen. Die Lampe muss hörbar einrasten. 3. I n der 48“-Version montieren Sie zwei UV-Lampen nebeneinander, indem Sie die in Schritt 2 beschriebenen Handlungen wiederholen. 4. Schließen Sie die aufklappbare Frontplatte vorsichtig. GuardOne · Bedienungsanleitung · 73 ®... -
Page 74: Abschließende Arbeiten
Abschließende Arbeiten Abschließen der Montage S tecken Sie das Netzkabel (IEC 60320 Typ C13/C14 mit Erdkon- takt) in den Anschluss an der Rückseite des Gehäuseoberteils. ACHTUNG! Sachschaden durch erhöhte Spannung! S tellen Sie sicher, dass die Stromstärke vor Ort der für die GuardOne®-Werkbank angegebenen Stromstärke entspricht. 3. Schließen Sie das Netzkabel an die Stromversorgung an. U m die GuardOne®-Werkbank einzuschalten (I) oder auszuschal- ten (0), verwenden Sie den Netzschalter über dem Anschluss. Schalten Sie das Gerät am Netzschalter EIN. N ach dem Einschalten der GuardOne®-Werkbank wird auf dem Touchscreen mit der grafischen Benutzeroberfläche an der Vorder- Abb. 18: Anschluss des Netzkabels seite des Gehäuseoberteils der Standby-Bildschirm angezeigt. D ie GuardOne®-Werkbank ist nun bereit für einen Funktionstest. Durchführen eines Funktionstests Mit dem Funktionstest wird überprüft, ob die UV-Lampe, die LED-Lampe und der HEPA-Filter funktionieren. Voraussetzung: ›... - Page 75 Prüfen der LED-Lampe › S ie befinden sich im Menü „Airflow & Light“. U m die LED-Lampe einzuschalten, stellen Sie den Schalter „LED Light“ (1) auf Ihre Auswahl wird sofort angewendet. 2. U m eine LED-Farbe auszuwählen, drücken Sie auf die LED-Farbe (2). Wählen Sie die gewünschte Farbe aus (normales Weiß („Normal White“) oder Rot („Red“)), indem Sie auf die Schaltfläche „+“ oder Abb. 23: LED-Lampe „-“ (3) drücken. Ihre Auswahl wird sofort angewendet. W enn die LED-Lampe nicht funktioniert, wenden Sie sich bitte an Ihren Starlab-Vertriebspartner vor Ort. 3. W enn Sie sich vergewissert haben, dass die LED-Lampe funktioniert, schalten Sie die LED-Lampe mit dem Schalter „LED Light“ (1) aus. U m ins Menü „Home“ zurückzukehren, drücken Sie in der Naviga- tionsleiste entweder auf „Back“ oder auf „Home“. GuardOne · Bedienungsanleitung · 75 ®...
- Page 76 Abb. 24.1: Seite „UV Decon“ › U m die UV-Dekontamination zu starten, schalten Sie die UV-Lampe mit dem Schalter „UV Status“ (1) ein ( › U m die UV-Dekontamination zu stoppen, schalten Sie die UV-Lampe mit dem Schalter „UV Status“ wieder aus ( W enn die UV-Lampe korrekt montiert und eingestellt ist, strahlt sie ein hellblaues Licht aus. W enn die UV-Lampe nicht funktioniert, vergewissern Sie sich, dass der Stecker des Magnetschalters fest im Anschluss sitzt. Wenn die UV-Lampe auch weiterhin nicht funktioniert, wenden Sie sich bitte an Ihren Starlab-Vertriebspartner vor Ort. D ie LED-Lampe wird automatisch ausgeschaltet, wenn die UV-Lampe eingeschaltet wird. 9. W enn Sie sich vergewissert haben, dass die UV-Lampe funktioniert, schalten Sie die UV-Lampe mit dem Schalter „UV Status“ aus ( 10. D rücken Sie auf „Home“, um ins Menü „Home“ zurückzukehren. Nach einem erfolgreichen Funktionstest können Sie die voreinge- stellten Parameter ändern. 76 · GuardOne · Bedienungsanleitung ®...
-
Page 77: Inbetriebnahme
Inbetriebnahme Voraussetzungen: › Die GuardOne®-Werkbank ist vollständig montiert. › Das Gerät ist eingeschaltet. › D ie Seriennummern des HEPA-Filters und der UV-Lampe wurden in die grafische Benutzeroberfläche eingegeben (Kapitel 4.6 „Abschließende Arbeiten“). › Der Funktionstest war erfolgreich. Anpassen von Datum und Uhrzeit D rücken Sie auf das Symbol für Datum und Uhrzeit (1) in der oberen linken Ecke der Informationsleiste einer beliebigen Seite, um die Seite „Date/Time“ zu öffnen. 2. Ä ndern Sie die Werte, indem Sie auf den Wert (2) drücken und ihn mit den Schaltflächen „+“ und „-“ (3) anpassen. 3. Um Ihre Änderungen zu speichern, drücken Sie auf „Save Settings“ (4). Um die Seite zu verlassen, drücken Sie auf „Back“ oder „Home“. Abb. 25: Anpassen von Datum und Uhrzeit W enn Sie die Seite verlassen, ohne Ihre Änderungen zu speichern, werden alle von Ihnen vorgenommen Änderungen verworfen! Anpassen der Standard-Betriebsparameter Drücken Sie im Menü „Home“ auf „Settings“. -
Page 78: Bedienung
- Schließen Sie die Einheit nur an Spannungsquellen an, die den Angaben zur Spannungsversorgung auf dem Typenschild der Einheit entsprechen. - Verwenden Sie nur ordnungsgemäß geerdete Steckdosen. Bekanntmachen mit der grafischen Benutzeroberfläche Die GuardOne®-Werkbank ist mit einer grafischen Benutzeroberfläche ausgestattet, die über einen Touchscreen bedient wird. Voraussetzung: › D as Gerät ist eingeschaltet. Bekanntmachen mit dem Standby-Menü Die Seite „Standby“ wird angezeigt: › d irekt nach dem Einschalten der GuardOne®-Werkbank. › n ach dem Verlassen des Home-Bildschirms über die Schaltfläche „Standby“ in der Navigationsleiste. Auf der Seite „Standby“ werden Informationen zur aktuell installierten Software- Version angezeigt (1). Wenn der Lab-Timer (2) verwendet wird, wird außerdem die verbleibende Zeit bis zum Ertönen des Alarms angezeigt. Verlassen der Seite „Standby“: Drücken Sie in der Navigationsleiste auf „Tap to unlock“ (3). Sie befinden sich nun auf dem Home-Bildschirm. Abb. 27: Seite „Standby“... -
Page 79: Bedienung Des Anzeigebereichs
Anpassen des Lab-Timers D er Lab-Timer funktioniert unabhängig von jeder anderen Funktion der GuardOne®-Werkbank. Sie können die GuardOne®-Werkbank ohne Auswirkungen auf den Lab-Timer in den Standby-Modus schalten. U m den Lab-Timer zu verwenden, drücken Sie in der rechten Ecke der Navigationsleiste auf einer beliebigen Seite auf das Symbol für den Lab-Timer. Die Seite „Lab Timer“ wird geöffnet. U m den Lab-Timer einzustellen, drücken Sie auf die Schaltflächen für die Stunden, Minuten und Sekunden (1). S tellen Sie mit den Schaltflächen „+“ und „-“ (2) die ge- wünschten Zeitwerte ein. U m den Timer zu starten oder anzuhalten, drücken Sie auf „Start/ Pause“ (3). W enn die eingestellte Alarmzeit abgelaufen ist, ertönt ein Alarm. Der Alarm verstummt automatisch nach ca. 5 Sekunden. Abb. 29: Anpassen des Lab-Timers U m den Timer zu stoppen und auf 00:00:00 zurückzusetzen, drücken Sie auf „End + Reset“ (4). Um die Seite zu verlassen, drücken Sie auf „Back“ oder „Home“. Bedienung des Anzeigebereichs Optionen „Quick Start“ und „Quick Stop“... - Page 80 I m Feld „Expiration HEPA Filter“ (4) wird die verbleibende Le- bensdauer des HEPA-Filters angezeigt. 4. Übernehmen Sie die Auswahl mit „Apply Setting“ (3). Ihre Auswahl wird sofort angewendet. Um die Seite zu verlassen, drücken Sie auf „Back“ oder „Home“. W enn Sie die Seite verlassen, ohne auf „Apply Setting“ zu drücken, werden alle von Ihnen vorgenommen Änderungen verworfen! Bedienung der LED-Lampe U m die LED-Lampe ein-/auszuschalten, drücken Sie auf den Schalter „LED Light“ (1). Ihre Auswahl wird sofort angewendet. Um eine LED-Farbe auszuwählen, drücken Sie auf die LED-Farbe (2). Abb. 33: Bedienung der LED-Lampe und Einstel- W ählen Sie die gewünschte Farbe aus. Sie können zwischen len der LED-Farbe normalem Weiß („Normal White“, Standardeinstellung) und Rot („Red“) wählen, indem Sie auf die Schaltfläche „+“ oder „-“ (3) drücken. Ihre Auswahl wird sofort angewendet. Um die Seite zu verlassen, drücken Sie auf „Back“ oder „Home“. 80 · GuardOne · Bedienungsanleitung ®...
- Page 81 Die Lebensdauer des HEPA-Filters beträgt 600 Tage. 1. Drücken Sie auf „UV Bulb & Filter Lifetime“. D ie verbleibende Lebensdauer des HEPA-Filters (1) und der UV-Lampe (2) werden angezeigt. Abb. 34: Informationen zur Lebensdauer der UV- Um die Seite zu verlassen, drücken Sie auf „Back“ oder „Home“. Lampe und des Filters Option „Instrument Info“ Durch Drücken auf „Instrument Info“ können Sie sich Informationen zur aktuell installierten Software-Version und zu den Betriebsstunden des Ge- bläses anzeigen lassen. Drücken Sie auf „Instrument Info“. D ie aktuell installierte Software-Version (1) und die Betriebsstunden des Gebläses (2) werden angezeigt. Abb. 35: Seite „Instrument Info“ Um die Seite zu verlassen, drücken Sie auf „Back“ oder „Home“. GuardOne · Bedienungsanleitung · 81 ®...
- Page 82 Salmonella enteritidis Salmonella sp. 10000 15200 Salmonella typhimurium Sarcina lutea 26400 Serratia marcescens 6160 Shigella paradysenteriae 3200 Spirillum rubrum 6160 Staphylococcus albus 5720 Staphylococcus aureus 6600 Streptococcus hemolyticus 5500 Streptococcus lactis 8800 Streptococcus viridans 3800 82 · GuardOne · Bedienungsanleitung ®...
- Page 83 220000 Empfohlene Mindest-Expositionszeit Erforderliche Mikrowatt- Viren in Minuten im Abstand von 1 m bei einer sekunden (µWs)/cm² UV-C-Leistung von 48 μW/cm² Bacteriophage (E. coli) 6600 Influenzavirus 6600 Tabakmosaikvirus 44000 Empfohlene Mindest-Expositionszeit Erforderliche Mikrowatt- Protozoen in Minuten im Abstand von 1 m bei einer sekunden (µWs)/cm² UV-C-Leistung von 48 μW/cm² Chlorella vulgaris (Algen) 22000 Nematodeneier 9200 Paramecium 200000 GuardOne · Bedienungsanleitung · 83 ®...
- Page 84 Beschädigung von Kunststoffgegenständen durch längere Bestrahlung! E inige Kunststoffarten, wie sie zum Beispiel für Pipettenspitzen verwendet werden, können brüchig werden, wenn sie für längere Zeit UV-Licht ausgesetzt sind. - Keine nicht UV-beständigen Behälter aus Kunststoff in die GuardOne®-Werkbank stellen. Bedienung der UV-Lampe 1. U m die UV-Dekontamination zu starten, stellen Sie den Schalter „UV Status" (1) auf U m die UV-Dekontamination zu beenden, stellen Sie den Schalter „UV Status" (1) auf D ie UV-Lampe kann nicht eingeschaltet werden, wenn die aufklappbare Frontplatte geöffnet ist. W enn die aufklappbare Frontplatte geöffnet wird, wird die UV-Lampe sofort automatisch ausgeschaltet. Durch das Schließen der aufklappbaren Abb. 36: Seite „UV Decon“ Frontplatte wird der Dekontaminationsprozess nicht neu gestartet. I m Bereich „Info Expiration Time UV Light Source“ (2) wird die verbleibende Lebensdauer der UV-Lampe angezeigt. 2. Um die Seite zu verlassen, drücken Sie auf „Back“ oder „Home“. 84 · GuardOne · Bedienungsanleitung ®...
- Page 85 Bedienung des UV-Timers › D er Timer kann nur aktiviert werden, bevor die UV-Lampe eingeschaltet wird. Der Timer ist für die UV-Bestrahlung nicht zwingend erforderlich. Stellen Sie den Schalter „UV Status“ (1) auf U m den Timer einzustellen, drücken Sie auf die Schaltflächen für die Stun- den, Minuten oder Sekunden (2). Abb. 37: UV-Timer 3. S tellen Sie mit den Schaltflächen „+“ und „-“ (3) die gewünschten Werte ein. Die gewünschte Dekontaminationszeit ist nun eingestellt. 4. Um die UV-Dekontamination zu starten, stellen Sie den Schalter „UV Status" (1) auf W enn die voreingestellte Zeit abgelaufen ist, wird die UV-Lampe automatisch ausgeschaltet. Wenn Sie den Timer nicht stellen, läuft die UV-Dekontamination unbegrenzt. W enn die aufklappbare Frontplatte geöffnet wird, werden die UV-Lampe und der Timer sofort automatisch ausgeschaltet. Durch das Schließen der aufklappbaren Frontplatte wird der Dekontaminationsprozess nicht neu gestartet. W enn die voreingestellte Zeit abgelaufen ist, ertönt ein akustisches Signal. Um die Seite zu verlassen, drücken Sie auf „Back“ oder „Home“. GuardOne · Bedienungsanleitung · 85 ®...
- Page 86 Vornehmen von persönlichen Einstellungen für den Luftstrom Drücken Sie auf „Quick Start Settings“. Drücken Sie auf den Prozentwert (1). S tellen Sie die gewünschte Stärke des Luftstroms mit den Schalt f lächen „+“ und „-“ (2) ein. Abb. 39: Vornehmen von persönlichen Einstellungen Sie können einen Luftstrom von 0, 50, 80 oder 100 % einstellen. für den Luftstrom B ei Auswahl von 0 % für den Luftstrom wird das Gebläse aus- geschaltet. Um es wieder einzuschalten, müssen Sie für den Luftstrom einen Wert über 0 % einstellen oder die Funktion „Quick Start“ auf dem Home-Bildschirm verwenden (Kapitel 6.2 „Bedienung des Anzeigebereichs“). Übernehmen Sie die Auswahl mit „Save“ (3). Um die Seite zu verlassen, drücken Sie auf „Back“ oder „Home“. W enn Sie die Seite verlassen, ohne auf „Save“ zu drücken, wer- den alle von Ihnen vorgenommen Änderungen verworfen! 86 · GuardOne · Bedienungsanleitung ®...
- Page 87 Standardeinstellung) und Rot („Red“) wählen. Abb. 40: Vornehmen von persönlichen Einstel- Übernehmen Sie die Auswahl mit „Save“ (4). lungen für die LED-Lampe und die LED-Farbe Um die Seite zu verlassen, drücken Sie auf „Back“ oder „Home“. W enn Sie die Seite verlassen, ohne auf „Save“ zu drücken, werden alle von Ihnen vorgenommen Änderungen verworfen! Option „LED Brightness“ Mit der Option „LED Brightness“ können Sie die Helligkeit der LED-Lampe in der GuardOne®-Werkbank einstellen. Drücken Sie auf „LED Brightness“. Drücken Sie auf den Prozentwert (1). W ählen Sie die gewünschte Helligkeit mit den Schaltflächen „+“ und „-“ (2). S ie können eine LED-Helligkeit von 10 % bis 100 % in 5 %-Schritten Abb. 41: Einstellen der LED-Helligkeit einstellen. D ie ausgewählte LED-Helligkeit wird auf alle verfügbaren LED-Farben angewendet.
- Page 88 - Verwenden Sie nur originale, für die GuardOne®-Werkbank konzipierte Starlab-UV-Lampen. - Bei Fragen wenden Sie sich bitte an Ihren Starlab-Service- oder Vertriebspartner vor Ort. F ür Bestellinformationen besuchen Sie bitte unsere Website oder nutzen Sie die Kontaktdaten unter „Starlab-Service-Hotline“ oder auf der Rückseite. Der Lebensdauerzähler der UV-Lampe darf nur nach Austauschen der alten UV-Lampe durch eine neue UV-Lampe zurückgesetzt werden. I nformationen zum Ersetzen der UV-Lampe und zum Aktivieren der automatischen Lebensdauerüberwachung der UV-Lampe finden Sie in Kapitel 7.2 „Instandhaltung“. Einstellen des Rückdrucks ACHTUNG! Eingeschränkte Wirksamkeit der Luftfilterung durch Veränderung der Alarmschwelle für den HEPA-Filter-Luft strom! E ine Veränderung der Schwelle für den Alarm bei Blockade des HEPA-Filters beeinflusst die Wirksamkeit der Luftfilterung. Das Verändern der Werkseinstellungen kann die Leistung der GuardOne®-Werkbank beeinträchtigen. - W enn Sie der Meinung sind, dass die Alarmeinstellungen geändert werden müssen, wenden Sie sich an einen Starlab-Service- Techniker oder an Ihren Starlab-Vertriebspartner vor Ort. 88 · GuardOne · Bedienungsanleitung ®...
- Page 89 Zurücksetzen von Einstellungen Durch Drücken auf „Reset“ wird die GuardOne®-Werkbank auf die Werks- einstellungen zurückgesetzt. J egliche an der Bildschirmhelligkeit, LED-Helligkeit, den „Quick Start“-Einstellungen, der Uhrzeit, dem Datum und dem Rückdruck vorgenommenen Änderungen gehen verloren. Nach dem Zurück- setzen auf die Werkseinstellungen muss auch der Touchscreen kalibriert werden. Abb. 43: Zurücksetzen der GuardOne®-Werkbank 1. Drücken Sie auf „Reset“. 2. Bestätigen Sie dies durch nochmaliges Drücken auf „Reset“ (1). Die GuardOne®-Werkbank wird ausgeschaltet. 3. U m den Touchscreen zu kalibrieren, drücken Sie mit einem Bleistift auf die Kreuze, die nacheinander in den vier Ecken des Touchscreens erscheinen. Die Werkbank wurde nun auf die Werkseinstellungen zurückgesetzt. I nformationen zum Ändern der Werkseinstellungen finden Sie in Kapitel 55 „Inbetriebnahme“. GuardOne · Bedienungsanleitung · 89 ®...
-
Page 90: Reinigung Und Instandhaltung
Sicherheitshinweise Kontaminationshinweise ACHTUNG! Kontamination des Vorfilters durch kontaminierte Luft! D urch die kontaminierte Luft kann auch der Vorfilter kontaminiert werden. Eine sterile Arbeitsumgebung in der GuardOne®- Werkbank ist dann nicht mehr gewährleistet. - Um die korrekte Funktion des Vorfilters zu gewährleisten, wird eine regelmäßige Sichtprüfung des Vorfilters empfohlen. - Der Vorfilter muss spätestens alle 6 Monate und bei sichtbarer Verschmutzung sofort ausgetauscht werden. ACHTUNG! Kontamination des Innenraums der GuardOne -Werkbank durch Bakterien! ® D a der Innenraum des Geräts während des Betriebs kontaminiert wird, kann die weitere Verwendung ohne vorherige Reini- gung zu Kontamination oder Zerstörung des Probenmaterials und zu verfälschten Ergebnissen führen. - Der Innenraum des Geräts und der Arbeitsbereich sind nach jeder Verwendung zu reinigen. Sachschaden ACHTUNG! Beschädigung des Gehäuseoberteils durch Abstellen von Gegenständen auf dem Gehäuseoberteil! D as Abstellen von Labormaterialien, Proben oder Flüssigkeiten auf dem Gehäuseoberteil kann zu Beschädigung führen, wenn... - Page 91 ACHTUNG! Funktionseinschränkung durch Verwendung von nicht-originalen Filtern! W enn Sie einen anderen Filter als den original Starlab-HEPA-Filter verwenden, kann die ordnungsgemäße Funktion der Luftfilte- rung nicht garantiert werden. - Verwenden Sie nur originale, für die GuardOne®-Werkbank konzipierte Starlab-HEPA-Filter. - Bei Fragen wenden Sie sich bitte an Ihren Starlab-Service- oder Vertriebspartner vor Ort. F ür Bestellinformationen besuchen Sie bitte unsere Website oder nutzen Sie die Kontaktdaten unter „Starlab-Service-Hotline“ oder auf der Rückseite. Entfernen des benutzten HEPA-Filters 1. S chalten Sie die GuardOne®-Werkbank am Netzschalter an der Rückseite des Gehäuses aus. Ö ffnen Sie die Klappe des Gehäuseoberteils, bis die Führungsschie- nen links und rechts einrasten und die Klappe offenhalten. Abb. 46: Öffnen der Klappe des Gehäuseoberteils 3. E ntriegeln Sie das Gehäuse des HEPA-Filters. Dieses ist links und rechts mit zwei schwarzen Schrauben befestigt, die sich zwischen dem Gehäuse des HEPA-Filters und den Wänden des Gehäuseober- teils befinden. E s reicht, die Schrauben lediglich ein wenig zu lösen. Ein Entfernen der Schrauben ist nicht notwendig.
- Page 92 Wenn dies der Fall ist, kann keine Luft versehentlich entweichen. 8. S chließen Sie die Klappe des Gehäuseoberteils. Entriegeln Sie hierzu zunächst die beiden Hebehilfen an der rechten und linken Gehäuse s eite, indem Sie die Klappe an beiden Seiten leicht anheben. 9. Schalten Sie die Stromversorgung ein. D ie Klappe ist mit einem Sicherheitsschalter ausgestattet, der die Stromversorgung automatisch unterbricht. Wenn der Touchscreen nach dem Einschalten der Stromversorgung nicht funktioniert, überprüfen Sie, ob die Klappe richtig geschlossen ist. Aktivieren der automatischen Lebensdauerüberwachung U m zum Home-Bildschirm zu gelangen, drücken Sie auf „Tap to unlock“. Drücken Sie auf „Settings“. Drücken Sie auf „Replace HEPA Filter“. G eben Sie die auf der Vorderseite der Filteraufkleber angegebene 10-stellige Seriennummer ein (1). Abb. 50: Aktivieren der automatischen Lebensdauer- überwachung Drücken Sie auf „Enter“ (2), um die Installation abzuschließen. Die GuardOne®-Werkbank ist nun betriebsbereit. Die verbleibende Lebensdauer des HEPA-Filters beträgt 600 Tage. 92 · GuardOne · Bedienungsanleitung ®...
- Page 93 ACHTUNG! Funktionseinschränkung durch Verwendung von nicht-originalen UV-Lampen! W enn Sie eine andere UV-Lampe als die original Starlab-UV-Lampe verwenden, kann die ordnungsgemäße Funktion der UV-Dekonta- mination nicht garantiert werden. - Verwenden Sie nur originale, für die GuardOne®-Werkbank konzipierte Starlab-UV-Lampen. - Bei Fragen wenden Sie sich bitte an Ihren Starlab-Service- oder Vertriebspartner vor Ort. F ür Bestellinformationen besuchen Sie bitte unsere Website oder nutzen Sie die Kontaktdaten unter „Starlab-Service-Hotline“ oder auf der Rückseite. Entfernen der benutzten UV-Lampe 1. S chalten Sie die GuardOne®-Werkbank am Netzschalter an der Rück- seite des Gehäuses aus. Ö ffnen Sie die aufklappbare Frontplatte vollständig und sichern Sie sie in der Aussparung in der oberen Abdeckung des Gehäuseoberteils. VORSICHT! Verbrennungsgefahr aufgrund der Hitze der UV-Lampe während der Dekontamination! UV-Lampen können während des Betriebs heiß werden. E in Berühren der UV-Lampe direkt nach der Verwendung kann zu leichten Verbrennungen bis hin zu Blasenbildung der Haut führen.
- Page 94 Austausch der Batterie Die GuardOne®-Werkbank ist mit einer Batterie ausgestatte, welche die Speicherung der Gerätedaten im ausgeschalteten Zustand ermög- licht. Je nach Lebensdauer der Batterie sollte diese alle 3-5 Jahre ausgetauscht werden. ACHTUNG Datenverlust durch entfernen der Batterie S oftware Version V2.9 und kleiner: Kontaktieren Sie Ihren StarlabB-Vertriebspartner oder Starlab Service-Techniker vor Ort da vor dem Entfernen der Batterie das Software-Update Version V3.0 durchgeführt werden muss um den Verlust der verbleibenden Lebensdauer der UV-Lampe und des HEPA-Filters zu vermeiden. A uf der Seite „Standby“ werden Informationen zur aktuell installierten Software-Version angezeigt (siehe Abbildung 27). Zusätzlich kann diese Information unter „Instrument Info“ angezeigt werden. Entfernen der Batterie S chalten Sie die GuardOne®-Werkbank am Netzschalter an der Rückseite des Gehäuses aus. Ö ffnen Sie die Klappe des Gehäuseoberteils, bis die Führungs- schienen links und rechts einrasten und die Klappe offenhalten. D ie Batterie befindet sich auf der Rückseite des LCD-Touchscreen der Klappe des Gehäuseoberteils. Sollte sich bei Ihrer GuardOne® keine Öffnung auf der Rückseite des Touchscreens befinden wenden Sie sich an Ihren Starlab- Vertriebspartner oder Starlab-Service-Techniker vor Ort. Kontakt- Abb. 53: Öffnen der Klappe des Gehäuseoberteils informationen erhalten Sie durch Drücken auf „Starlab Service &...
- Page 95 S etzten Sie eine neue Batterie (Typ CR1220, Knopfzelle Ø 12,5mm, 3V / 35mAh) ein. S chließen Sie die Klappe des Gehäuseoberteils. Entriegeln Sie hierzu zunächst die beiden Hebehilfen an der rechten und linken Gehäuseseite, indem Sie die Klappe an beiden Seiten leicht an- heben. Schalten Sie die Stromversorgung ein. Die Klappe ist mit einem Sicherheitsschalter ausgestattet, der die Stromversorgung automatisch unterbricht. Wenn der Touch- Abb. 55: Lösen der Batterie durch drücken des Feder- screen nach dem Einschalten der Stromversorgung nicht funktio- blatts auf der linken Seite der Batterie nach links niert, überprüfen Sie, ob die Klappe richtig geschlossen ist. G eben Sie Datum und Uhrzeit ein (siehe 5. Inbetriebnahme – Anpassung von Datum und Uhrzeit) GuardOne · Bedienungsanleitung · 95 ®...
-
Page 96: Reinigung Und Dekontamination
Reinigungsmittel und -tücher Verwenden Sie zum Reinigen der GuardOne®-Werkbank folgende Reinigungsmittel und Reinigungstücher: › F usselfreies Reinigungstuch › D esinfektionsmittel auf Alkoholbasis F ür die Reinigung wird eine Wischdesinfektion mit Desinfektionsmitteln auf Alkoholbasis empfohlen. Weitere Informationen finden Sie auf der Starlab-Website. Reinigungsintervall Die folgenden Intervalle müssen eingehalten werden: › F ühren Sie nach jeder Verwendung der GuardOne®-Werkbank die entsprechende Reinigungsprozedur durch. Reinigen Sie die Werk- bank mit einem empfohlenen Reinigungsmittel. Dekontaminieren Sie die PC-Glaskammer mit der UV-Lampe abhängig vom Verwen- dungszweck der GuardOne®-Werkbank. › B ei sichtbarer Kontamination angemessene Reinigungsmaßnahmen durchführen. › U m die korrekte Funktion des Vorfilters zu gewährleisten, wird eine regelmäßige Sichtprüfung des Vorfilters empfohlen. Tauschen Sie ihn spätestens alle 6 Monate und bei sichtbarer Verschmutzung sofort aus. Reinigen der Außenflächen der GuardOne -Werkbank ® Voraussetzungen: ›... - Page 97 Reinigen des Innenraums und der Glaskammer der GuardOne -Werkbank ® VORSICHT! Gesundheitsschädigung durch UV-Licht! Längere Bestrahlung mit UV-Licht schädigt die Gesundheit. - Aus Sicherheitsgründen kann die UV-Lampe nicht eingeschaltet werden, wenn die aufklappbare Frontplatte geöffnet ist. - A us Sicherheitsgründen wird die UV-Lampe sofort automatisch ausgeschaltet, wenn die aufklappbare Frontplatte geöffnet wird. Durch das Schließen der Platte wird der Dekontaminationsprozess nicht neu gestartet. ACHTUNG! Aufgrund ständigen Luftzugs ist eine vollständige Dekontamination nicht möglich! Aufgrund des ständigen Luftzugs in der Glaskammer ist eine 100%ige Dekontamination durch UV-Bestrahlung nicht möglich. - Befolgen Sie die Empfehlungen in dieser Bedienungsanleitung. - Weitere Informationen zur Dekontamination der GuardOne®-Werkbänke finden Sie auf der Starlab-Website. Nassreinigung Voraussetzungen: › D ie empfohlenen Reinigungsintervalle wurden eingehalten. › D ie GuardOne®-Werkbank ist ausgeschaltet.
-
Page 98: Problembehebung
VORSICHT! Gesundheitsschädigung durch unzureichende Dekontamination vor dem Zurücksenden des Geräts! E ine unzureichende Dekontamination vor dem Zurücksenden des Geräts an Starlab kann ein Gesundheitsrisiko für jede Person darstellen, die mit der GuardOne®-Werkbank in Kontakt kommt. - Jedem Gerät, das an Starlab zurückgesendet wird, muss eine Dekontaminationsbescheinigung beigelegt werden. - Alles, was zurückgesendet wird, muss vorher gereinigt werden. - D ie Rücksendung muss bei Starlab angemeldet werden. Wenden Sie sich bitte an Ihren Starlab-Vertriebspartner vor Ort, um weitere Informationen zu erhalten. Kontaktinformationen erhalten Sie durch Drücken auf „Starlab Service & Order Information“ auf dem Statusbildschirm. ACHTUNG! Sachschäden durch nicht autorisierte Reparatur der GuardOne -Werkbank! ® E igenständige Reparaturen an der GuardOne®-Werkbank bei Fehlermeldungen ohne Unterstützung durch einen Starlab- Service-Techniker können zu Sachschäden führen. - W enn eine Fehlermeldung auftritt, wenden Sie sich bitte an Ihren Starlab-Vertriebspartner vor Ort. Kontaktinformationen erhalten Sie durch Drücken auf „Starlab Service & Order Information“ auf dem Statusbildschirm. Ein Fehler wird visuell durch die Farbe des entsprechenden Feldes angezeigt. - Grün: Status ist OK - Orange: Warnung - Rot: Fehler Status der Werkbank (Seite „Workstation Status“) -
Page 99: Warnungen
› HEPA filter life time end („Alert 3“) - „ HEPA filter life time end“ bedeutet, dass der HEPA-Filter das Ende seiner Lebensdauer von 600 Tagen erreicht hat und ersetzt werden muss, um die ordnungsgemäße Funktion der GuardOne®-Werkbank sicherzustellen. › HEPA filter blocked („Alert 4“) - „ HEPA filter blocked“ bedeutet, dass die GuardOne®-Werkbank eine Einschränkung des Luftstroms erkannt hat, was normalerwei- se durch einen blockierten HEPA-Filter verursacht wird. - D er HEPA-Filter muss ersetzt werden, unabhängig von der verblei- benden Lebensdauer des Filters. - D er HEPA-Filter muss sofort ersetzt werden. Ein weiterer Betrieb des Geräts wird nicht empfohlen. - W enden Sie sich an einen Starlab-Service-Techniker, um Hilfe zu erhalten. › HEPA filter critical age („Alert 5“) - „... -
Page 100: Fehler
Fehler ACHTUNG! Sachschäden durch Ignorieren von Fehlermeldungen! W enn Fehlermeldungen auftreten, kann jede weitere Verwendung der GuardOne®-Werkbank zu Schäden am Gerät und am Proben- material führen. - Wenden Sie sich an einen Starlab-Service-Techniker, um Hilfe zu erhalten. - Kontaktinformationen erhalten Sie durch Drücken auf „Starlab Service & Order Information“ auf dem Statusbildschirm. Fehlermeldungen („Error“) informieren über Schäden, die den weiteren Betrieb der GuardOne®-Werkbank unmöglich machen, bis sie von einem Starlab-Service-Techniker repariert wird. › Blower breakdown („Error 1“) - „ Blower breakdown“ bedeutet, dass die GuardOne®-Werkbank eine Störung des Gebläsemotors erkannt hat. › Backpressure sensor failure occurred („Error 2“) - „ Backpressure sensor failure occurred“ bedeutet, dass die GuardOne®-Werkbank eine Störung der Luftstrom-Steuerung erkannt hat. Abb. 58: Fehler › CPU memory block failure occurred („Error 3“) - „... - Page 101 Verhalten bei einer Motorstörung Wenn über einen längeren Zeitraum hinweg ungewöhnliche Laufgeräusche des Motors auftreten, kann eine Motorstörung vorliegen. 1. Schalten Sie das Gerät am Netzschalter AUS. 2. Warten Sie ein paar Minuten, bevor Sie die GuardOne®-Werkbank wieder einschalten. 3. Schalten Sie das Gerät am Netzschalter EIN. W enn die Motorgeräusche auch weiterhin noch zu hören sind, wenden Sie sich bitte an Ihren Starlab-Vertriebspartner oder Starlab-Service- Techniker vor Ort. Kontaktinformationen erhalten Sie durch Drücken auf „Starlab Service & Order Information“ auf dem Statusbildschirm. Verhalten bei einer Störung des Schalters der aufklappbaren Frontplatte Wenn der Schalter der aufklappbaren Frontplatte defekt ist, kann die UV-Lampe nicht mehr eingeschaltet werden. Außerdem fließt der Luftstrom auch bei geschlossener aufklappbarer Frontplatte. Wenden Sie sich an Ihren Starlab-Vertriebspartner oder Starlab-Service-Techniker vor Ort, um Hilfe zu erhalten. Kontaktinformationen erhalten Sie durch Drücken auf „Starlab Service & Order Information“ auf dem Statusbildschirm. Verhalten bei Stromausfall Schalten Sie das Gerät am Netzschalter EIN. Setzen Sie Ihre Anwendung fort. Sie müssen Ihre vorherigen Einstellungen nicht erneut vornehmen. Bei einem Stromausfall werden Ihre vorherigen Einstellungen bei behalten. Verhalten bei einer Störung der LED-Lampe Bei einer Störung der LED-Lampe werden auf dem Display keine Fehler angezeigt.
-
Page 102: Entsorgung
Entsorgung Für die GuardOne®-Werkbank gilt eine Garantie und Gewährleistung von zwei Jahren. Demontage und Entsorgung liegen in der Verantwor- tung des Betreibers. D ie Lebenserwartung der GuardOne®-Werkbank, ausgenommen Verbrauchsartikel, beträgt mindestens fünf Jahre, abhängig von der Einsatzhäufigkeit und den Umgebungsbedingungen. Wenn keine Rücknahme- oder Entsorgungsvereinbarung besteht, führen Sie demontierte Komponenten dem Recycling zu: › V erschrotten Sie Metall. › G eben Sie Kunststoffelemente ins Recycling. › S ortieren und entsorgen Sie andere Komponenten nach Materialeigenschaften. Entsorgen der UV-Lampen Defekte UV-Lampen sind gefährlicher Abfall. Sie enthalten Quecksilber und können nicht recycelt werden. Wenden Sie sich an Ihren internen oder örtlichen Entsorgungsbeauftragten, um weitere Informationen zu erhalten. Beachten Sie bei der Entsorgung des Produkts die geltenden gesetzlichen Bestimmungen. Informationen zur Entsorgung von Elektro- und Elektronikgeräten in der Europäischen Gemeinschaft: Die Entsorgung von elektrischen Geräten ist in der Europäischen Gemeinschaft durch nationale Vorschriften geregelt, die auf der EU-Richt- linie 2012/19/EU über Elektro- und Elektronik-Altgeräte (WEEE) basieren. Nach dieser Richtlinie dürfen nach dem 13.08.2005 auf Business-to-Business-Basis gelieferte Geräte, wozu auch dieses Produkt gehört, nicht mehr als Haushaltsabfall entsorgt werden. Dies wird durch folgende Markierung kenntlich gemacht: Da sich die Entsorgungsvorschriften in der EU von Land zu Land unterscheiden können, wenden Sie sich bitte an Ihren Händler vor Ort, um weitere Informationen zu erhalten. Spezifikationen 10.1... -
Page 103: Abmessungen Und Gewicht
Außenmaße und Gewicht, Paket, 48“ Länge 1330 Breite Höhe Gewicht Laminar Flow Dead Air Spezifikationen Wert Einheit Außenmaße und Gewicht, 48“ Länge 1220 Breite Höhe Gewicht Laminar Flow Dead Air Spezifikationen Wert Einheit Innenmaße, 48“ Länge 1200 Breite Höhe GuardOne · Bedienungsanleitung · 103 ®... -
Page 104: 10.3 Elektrische Anforderungen
> 99,995 Geräuschpegel UV-C-Licht 254-256 10.4 Produktmodell-Aufkleber Abb. 59: Produktmodell-Aufkleber Der Produktmodell-Aufkleber enthält folgende Informationen: › B estellnummer › S eriennummer › S pannung › F requenz › A usgangsleistung › S icherung › C E-Kennzeichnung › W EEE-Kennzeichnung: Nicht als Haushaltsabfall entsorgen. 104 · GuardOne · Bedienungsanleitung ®... -
Page 105: Index
„Quick Start“ Funktion........... 79 „Quick Stop“ Funktion..........79 Option „Quick Start Settings“ ......86 Zurücksetzen von Einstellungen ...... 89 Einrichten der GuardOne®-Werkbank .....56, 74 Elektrische Anforderungen ........104 Reinigung .............. 190 Reinigen der Außenflächen Entsorgung ............67, 102 der GuardOne®-Werkbank ....... 96 Ersatzteile ..........59, 91, 93 Reinigen des Innenraums und der Glaskammer der GuardOne®-Werkbank ....... 96 Reinigen des Touchscreens ......96 Fehler Reinigungsflüssigkeiten ........96 „Backpressure sensor failure occurred“ ..100 Reinigungsintervall ........... 96 „Blower breakdown“... - Page 106 106 · GuardOne · Manuel ®...
-
Page 107: Instruction Initiale
User Manual ____________________________________________________________________________________ 3 – 53 Bedienungsanleitung ________________________________________________________________________ 55 – 105 Instruction initiale ___________________________________________________________________________ 107 – 157 Istruzioni d‘uso ______________________________________________________________________________159 – 209 Certificat _________________________________________________________________________________________________________ Aperçu de la hotte GuardOne _______________________________________________________________________________________ ® 1.1 Configuration et fonctionnement_______________________________________________________________________________ 1.2 Contenu de la livraison ______________________________________________________________________________________ Sécurité ______________________________________________________________________________________________________________ 2.1 Explication des symboles ____________________________________________________________________________________ 2.2 Domaine d'utilisation _______________________________________________________________________________________ 2.3 Installations de sécurité... -
Page 108: Aperçu De La Hotte Guardone
Aperçu de la hotte GuardOne ® Configuration et fonctionnement Configuration Fig. 1: Hotte GuardOne® Unité de boîtier supérieure Panneau arrière B Chambre en verre polycarbonate Panneau de base Boîtier supérieur avec pré-filtre et filtre HEPA Porte avant préinstallée avec deux volets rabattables Rivets en plastique Étagère multifonction Panneau latéral Écran tactile avec interface graphique utilisateur Modèles Il existe deux types différents de modèles de hotte GuardOne®, un modèle à Dead Air et un modèle à Laminar Flow. Chacun est disponible en deux tailles. Les deux tailles du de la hotte GuardOne® sont : › 3 2“ : Dans cette taille, la hotte GuardOne® dispose d'une lampe UV et, dans le cas du modèle à flux laminaire, d'un pré-filtre et d'un filtre HEPA. › 4 8“ : Dans cette taille, la hotte GuardOne® dispose de deux lampe UV et, dans le cas du modèle à flux laminaire, de deux moteurs de soufflerie, de deux pré-filtres et de deux filtres HEPA. Vous trouverez les dimensions au chapitre 10 « Spécifications ». Dead Air ›... - Page 109 Dans ce mode d'emploi, toutes les fonctions relatives au pré-filtre et au filtre HEPA ainsi qu'à la lampe UV sont décrites. Si vous avez un modèle Dead Air, vous pouvez ignorer les instructions d'utilisation, de remplacement, d'entretien et de dépannage des filtres. Ce manuel d'utilisation donne des instructions pour le Laminar Flow, taille 32“ avec un filtre HEPA, un pré-filtre et une lampe UV. Si vous avez un modèle à flux laminaire ou à air stagnant de 48", suivez les instructions pour l'installation et l'entretien des filtres HEPA, des lampes UV et des pré-filtres à la fois pour installer et remplacer les lampes et les filtres. Fonctionnement La hotte GuardOne® est un équipement de confinement utilisant la technologie de filtration de l'air et l'irradiation UV pour créer un environnement de travail dans lequel le risque de contamination croisée dans des conditions de travail de laboratoire standard est minimisé. Pour atteindre cela, la hotte GuardOne® utilise les composants suivants : › Créer une atmosphère pure Combinaison d'un moteur de soufflerie à bas bruit, d'un filtre HEPA standard et d'un pré-filtre. › Décontamination et stérilisation de la zone de travail Lampe UV à longueur d'onde fixe de 254 nm. Hotline de service Starlab Pour plus d'informations, contacter Starlab service or votre représentant local Starlab sur www.starlabgroup.com GuardOne · Manuel · 109 ®...
-
Page 110: Contenu De La Livraison
Tout comme le panneau avant et le panneau arrière, les panneaux latéraux sont en polycarbonate transparent de 6 mm d'épaisseur, avec chevauchement entre les segments pour éliminer l'exposition potentielle aux rayons UV nocifs à ondes courtes pendant la décontamination UV 254 nm. Le panneau latéral droit est en outre équipé d'une goulotte à câbles à travers laquelle les câbles peuvent être acheminés de l'extérieur vers l'intérieur de la chambre en verre polycarbonate. Les rayons UV ne peuvent pas s'échapper ici grâce au couvercle en verre polycarbonate distinct. Panneau arrière Le panneau arrière est fait de verre polycarbonate transparent de 6 mm, avec chevauchement entre les segments pour éliminer l'exposition potentielle aux rayons UV nocifs à ondes courtes pendant la décontamination aux UV 254 nm. Étagère multifonction L'étagère multifonction est montée à l'intérieur sur le panneau arrière en polycarbonate de la chambre en verre à l'intérieur. Elle sert à mettre en place les échantillons et à ranger les pipettes ou autres outils. Vous pouvez également stocker les échantillons qui doivent être décontaminés parce que le comprimé se trouve dans la zone d'irradiation de la lampe UV. Panneau de base Le panneau de base est fait d'un mélange de polypropylène réfléchissant la lumière UV, tout comme les panneaux avant, latéraux et arrière. Porte avant Le panneau avant est fait en verre polycarbonate transparent de 6 mm avec chevauchement entre les segments pour éliminer l'exposition potentielle aux rayons UV nocifs à ondes courtes pendant la décontamination aux rayons UV 254 nm. La porte avant peut être ouverte en deux étapes. › L 'ouverture du segment inférieur facilite le travail de l'opérateur sur la hotte GuardOne®. › L 'ouverture supplémentaire du segment central facilite le nettoyage et l'entretien de l'intérieur de la chambre en verre polycarbonate par l'opérateur.Il n'est pas recommandé d'ouvrir complètement le volet pour le processus de travail, car un environnement d'air propre ne peut être garanti autrement. La porte avant est en outre équipée d'un interrupteur magnétique qui enregistre l'ouverture de la porte avant. Si la porte avant est ouverte, la source de lumière UV s'éteint automatiquement. Il en va de même pour le débit d'air : lors de la fermeture de la porte avant, la soufflerie s'arrête automatiquement. 110 · GuardOne · Manuel ®... - Page 111 Les pièces de rechange doivent seule- › Filtre HEPA intégré ment être commandées au fabricant - Le filtre HEPA est situé à l'intérieur de l'unité du boîtier supérieur. Starlab. Pour plus d'information, - La durée de vie du filtre HEPA est de 600 jours. contacter votre représentant Starlab. › Contact de sécurité sous la forme d'un interrupteur magnétique à l'intérieur - Tout comme la porte d'entrée, l'unité du boîtier supérieur peut être ouverte à l'avant. - Il est équipé d'un interrupteur magnétique qui coupe automatiquement le flux d'air et l'écran tactile lorsque le volet du boîtier supérieur est ouvert. › Support d'ampoule UV à l'arrière le filtre HEPA - L a hotte GuardOne® utilise la lumière UV avec une longueur d'onde fixe de 254 nm pour la décontamination et la stérilisation de la zone de travail. - S elon le modèle, une ou deux lampes UV marquées d'un numéro de série sont incluses. Les lampes UV doivent être installées dans les douilles d'ampoule après le montage de la chambre en verre et de l'unité du boîtier supérieur. - La douille d'ampoule pour la lampe UV dépasse de quelques centimètres de l'unité du boîtier supérieur. - La durée de vie des lampes UV est de 9 000 heures. › Panneau de LED à l'avant sous le filtre HEPA - Le panneau de LED est pré-installé. - E n fonction de la photosensibilité des échantillons, vous pouvez allumer et éteindre la LED et modifier les réglages de la luminosité ou de la couleur de la LED entre blanc normal et rouge. › Écran tactile avec interface utilisateur à l'avant - L 'unité de commande se trouve sur le devant. La douille pour la lampe UV dépasse de quelques centimètres de l'unité du boîtier supérieur. - L a douille pour la lampe UV dépasse de quelques centimètres de l'unité du boîtier supérieur.L'écran fournit également des informations sur le fabricant et l'état de santé de la hotte GuardOne®.
-
Page 112: Sécurité
Consignes de sécurité dans les procédures Les consignes de sécurité peuvent se référer à des consignes spécifiques et individuelles. Intégrées dans la procédure, ces instructions de sécurité n'interrompent pas la lecture lors de l'exécution de l'action.Les mots signaux décrits ci-dessus seront utilisés. Par exemple : Desserrer la vis. ATTENTION ! Risque de se coincer dans le panneau ! Fermer prudemment le panneau ! Serrer la vis. Étiquetage de la hotte GuardOne ® AVERTISSEMENT ! Danger dû à des étiquettes illisible ! Au fil du temps, les étiquettes et les symboles peuvent se salir, de sorte que les dangers ne peuvent pas être détectés et que les instructions d'utilisation nécessaires ne peuvent pas être suivies. Il en résulte un risque de blessure. - Conserver toujours les consignes de sécurité, les avertissements et les instructions d'utilisation dans un état lisible. - Remplacer immédiatement les étiquettes et les symboles. Irradiation UV-C Danger dû à l'irradiation UV-C ! Le rayonnement UV-C de la lampe UV biocide est nocif pour les yeux et la peau. -
Page 113: Domaine D'utilisation
Domaine d'application La hotte GuardOne® doit être utilisé uniquement de la manière décrite dans ce manuel. La hotte GuardOne® est un équipement de confinement utili- sant la technologie de filtration de l'air et l'irradiation UV pour créer un environnement de travail qui minimise le risque de contamination croisée dans des conditions de travail standard en laboratoire. La hotte GuardOne® sert exclusivement à la protection des processus. Le respect de toutes les ins- tructions de ce mode d'emploi fait partie intégrante de l'utilisation prévue. Toute utilisation en-dehors du domaine est considérée comme incorrecte. Toutes les consignes de sécurité spécifiques au pays relatives à l'utilisation d'appareils électriques dans le laboratoire doivent être observées. AVERTISSEMENT ! Risque d'utilisation incorrecte ! L'utilisation incorrecte de la hotte GuardOne® peut entraîner des situations dangereuses pour les personnes et les biens. - I nstaller uniquement des pièces de rechange Starlab dans la hotte GuardOne®. L'installation de pièces de rechange et de pièces d'usure non autorisées par Starlab entraîne un dysfonctionnement de la hotte GuardOne®, une contamination de l'environnement de travail et des dommages aux échantillons. - U tiliser la hotte GuardOne® exclusivement dans les conditions d'utilisation fournies dans les spécifications (Chapitre 10 « Spécifications »). AVERTISSEMENT ! Danger dû à la protection exclusive des biens ! La hotte GuardOne® sert exclusivement à la protection des processus. Il ne comprend pas de protection individuelle. - Ne pas utiliser d'agents pathogènes dans la hotte GuardOne®. Installations de sécurité Interrupteur principal L'interrupteur principal est également conçu comme interrupteur d'arrêt d'urgence. Il est situé à l'arrière de l'unité de boîtier supérieure dans le... -
Page 114: Exigences Relatives Au Personnel
Exigences relatives au personnel Personnel Seules les personnes en mesure d'effectuer leur travail de manière fiable sont autorisées à effectuer l'installation, l'utilisation et la maintenance de la hotte GuardOne®. Les personnes dont la réactivité est altérée, par exemple par des drogues, de l'alcool ou des médicaments, ne sont pas autorisées à installer, utiliser ou entretenir la hotte GuardOne®. Lors de la sélection du personnel, observer les réglementations spécifiques à l'âge et à la profession en vigueur sur le lieu d'installation. Il n'y a pas de distinction entre le personnel d'installation, d'exploitation et de maintenance.Le personnel approprié est autorisé à accomplir toutes les tâches après avoir reçu des directives de l'opérateur. N'utilisez que du personnel formé aux tâches de laboratoire pour effectuer des tâches avec la hotte GuardOne®. En général, il s'agit d'un spécialiste de laboratoire. A ce titre, le personnel est formé dans son domaine d'activité et connaît les normes et dispositions applicables. Grâce à sa formation professionnelle et à son expérience professionnelle, le per- sonnel peut exécuter des travaux tout au long de la chaîne des processus biologiques et chimiques dans le domaine des procédés, de la pro- duction et de la biotechnologie. Le personnel est en mesure d'identifier et d'éviter les dangers éventuels de manière autonome. Le personnel tient compte de la réglementation en matière de protection de la santé et de l'environnement, de sécurité au travail et d'assurance qualité. Le personnel est responsable des tâches suivantes : ›... - Page 115 Danger mortel dû à l'électricité ! L e contact avec les pièces sous tension entraîne un risque mortel d'électrocution. Un endommagement de l'isolation ou de certains composants peut mettre la vie en danger. - En cas de dommages à l'isolation, couper immédiatement l'alimentation électrique et faire réparer l'appareil. - Avant toute opération de nettoyage, mettre l'appareil hors tension. AVERTISSEMENT ! Risque de blessure par irradiation UV à haute puissance ! La lampe UV émet un rayonnement UV haute puissance. Une exposition prolongée aux UV est nocive pour la santé. - Éviter d'exposer ses yeux non protégés. - N e l'utiliser que dans un environnement fermé qui protège les utilisateurs de l'irradiation, comme l'intérieur de la hotte GuardOne®. - Éteindre l'irradiation UV lorsque vous avez terminé la décontamination de la hotte GuardOne®. - En cas de dysfonctionnement de la lampe Starlab , contacter immédiatement le technicien de maintenance Starlab. AVERTISSEMENT ! Risque de blessure dû à l'alcool éthanol) ! L'éthanol irrite les yeux. La vapeur d'alcool peut provoquer un étourdissement ou de la somnolence. - Avant de travailler avec de l'éthanol, mettre l'appareil hors tension. - Assurer une ventilation adéquate lors du travail avec l'éthanol. Si vous vous sentez fatigué ou étourdi, respirez immédiatement de l'air frais. - Avant un séjour prolongé, ventiler la zone de travail.
- Page 116 L 'écran sur le haut du boîtier a un écran tactile. En raison de la sensibilité à la pression, il y a un risque de rayures ou de rupture. - Ne jamais utiliser jamais l'écran tactile avec des objets pointus, par exemple des stylos. - Utiliser toujours l'écran tactile avec les doigts. Appliquer seulement une pression légère. REMARQUE ! Dommages matériels aux matières plastiques lors d'irradiations prolongées ! C ertains types de plastique, comme les pointes de pipettes, peuvent devenir cassants lorsqu'ils sont exposés à une irradiation prolongée. - N e placez pas de récipients en plastique qui ne sont pas stables aux UV dans la hotte GuardOne® pendant une exposition prolongée à la lumière UV. REMARQUE ! Vis cassées à cause d'une mauvaise position ! S i elles sont insérée dans une position incorrectes, les vis peuvent se casser. Cela pourrait endommager le boîtier supérieur et la chambre vitrée de la hotte GuardOne®. Un environnement de travail décontaminé ne peut plus être garanti. - Insérer soigneusement les vis dans les trous alignés lors de l'installation. - S uivre les instructions de ce mode d'emploi. Installer soigneusement la chambre vitrée du PC et le haut du boîtier de la hotte GuardOne®.
-
Page 117: Comportement En Cas D'urgence
Mesures préventives › T oujours être préparé à un accident ! › G arder les installations de premiers soins (trousse de premiers soins, couvertures, etc.) en bon état de marche et à portée de main. › S 'assurer que le personnel est familiarisé avec les rapports d'accident, les premiers soins et les installations de sauvetage. › G arder libres les voies d'accès pour les véhicules de secours. Mesures à prendre en cas d'accident › M ettre la hotte GuardOne® hors tension (chapitre 4.6 « Installation complète »). › S 'il n'y a pas de danger pour votre propre santé, éloigner les personnes de la zone dangereuse. › A lerter les pompiers et/ou les services de secours. › I nformer la personne responsable sur le site. › G arder les voies d'accès libres pour les véhicules de secours. › I nformer les équipes de secours. Comportement en cas d'incendie Mesures préventives... -
Page 118: Transport, Emballage Et Stockage
Sécurité pendant le transport, l'emballage et le stockage Indications de sécurité AVERTISSEMENT ! Risque de blessures dues aux charges lourdes ! Pendant les opérations de levage et lors du montage, les charges peuvent tomber. Cela peut provoquer des blessures graves. - Prendre en compte les dimensions et le poids la hotte GuardOne®. - L es composants de la hotte GuardOne® Workstation sont lourds. Ne soulever qu'avec l'aide d'une deuxième personne ou d'un équipement approprié. REMARQUE ! Dommages à la lampe UV dus à des chocs sur l'emballage! En cas de chocs sur l'emballage, la lampe UV peut être endommagée. - Transporter prudemment le paquet. -
Page 119: Manipulation Des Matériaux D'emballage
Transport en intérieur AVERTISSEMENT ! Risque de blessures dues aux charges lourdes ! Pendant les opérations de levage et lors du montage, les charges peuvent tomber. Cela peut provoquer des blessures graves. - Prendre en compte les dimensions et le poids la hotte GuardOne®. - L es composants de la hotte GuardOne® sont lourds. Ne soulever qu'avec l'aide d'une deuxième personne ou d'un équipement approprié. Vous pouvez déplacer la hotte GuardOne® à un autre endroit avec l'aide d'une deuxième personne sans avoir à le démonter. Manipulation des matériaux d'emballage Matériau d'emballage En fonction du service de colis et/ou du transport interne directement au destinataire final, le fabricant livre la hotte GuardOne® dans un état sécurisé. Afin de protéger la hotte GuardOne® contre les dommages et la contamination pendant le transport, il est emballé dans un seul emballage en carton avec un film de protection supplémentaire. Mise au rebut Pour l'élimination des matériaux d'emballage, respectez les réglementations légales et locales en vigueur. ENVIRONNEMENT ! Risque pour l'environnement dû à une mise au rebut incorrecte ! L es matériaux empilables sont des matières première de qualité. Traités et recyclés de manière raisonnable, ils peuvent être réuti-... -
Page 120: Montage
- Une humidité relative minimum de 40% est garantie. - Une température ambiante de + 15 °C minimum et + 40 °C maximum est garantie. › L a hotte GuardOne® ne doit pas être exposé à la lumière directe du soleil. › L a hotte GuardOne® doit être installé dans un endroit facilement nettoyable et sans poussière. Préparation de l'installation › L a hotte GuardOne® n'est livré que partiellement monté afin de réduire le volume de transport de près de 50%. › L e montage final peut être effectué directement sur le lieu d'installation. › L e montage ne prend pas plus de 15 minutes et ne nécessite par de connaissances ou d'outils particuliers. › L es composants la hotte GuardOne® sont lourds. Il est recommandé de se faire aider d'une autre personne. En cas de doute, contactez votre service Starlab local ou votre vendeur. Regardez notre vidéo sur le montage du GuardOne ® https://www.starlab.click/guardone-assembling 120 · GuardOne · Manuel ®... -
Page 121: Installation Du Panneau Arrière En Polycarbonate
Installation du panneau latéral gauche en polycarbonate 1. P rendre le panneau latéral en polycarbonate (sans goulotte de câbles, n° 1a) et l'insérer dans la rainure de la plaque de base. S'assurer que les trous inférieurs du panneau latéral gauche en polycarbonate sont alignés avec les trous de la plaque de base. 2. S 'assurer que le panneau arrière en polycarbonate coulisse complè- tement dans la rainure du profilé en aluminium sur le panneau latéral gauche en polycarbonate. S'assurer que les trous du profilé en alumi- nium et du panneau arrière en ploycarbonate sont alignés. 3. U tiliser cinq des rivets en plastique (EVA01) pour fixer le panneau ar- rière en polycarbonate sur le profilé en aluminium du panneau latéral gauche.Presser les rivets dans les trous alignés. U tiliser trois des rivets en plastique (EVA02) pour fixer le panneau arrière en polycarbonate sur la plaque de base. Presser les rivets dans les trous alignés. Le panneau latéral gauche est installé. Fig. 6: Attacher le panneau arrière avec les rivets en plastique GuardOne · Manuel · 121 ®... - Page 122 GuardOne®. REMARQUE ! Dommages matériels dus à des couples de rotation trop élevés ! T ournez à la main les deux vis noires dans les trous prévus à cet Fig. 8: Attacher l'étagère en polycarbonate sur le panneau arrière effet sur l'étagère en polycarbonate et sur le panneau arrière. S i nécessaire, vous pouvez donner un support supplémen- taire au panneau arrière avec une main de l'extérieur. P ositionner la tablette en polycarbonate sur le panneau arrière à l'intérieur de la chambre en verre polycarbonate de la hotte GuardOne®. 122 · GuardOne · Manuel ®...
-
Page 123: Installation De La Porte Avant En Polypropylène
Fig. 9: Insérer la porte avant entre les deux panneaux latéraux 2. U tiliser cinq des rivets en plastique (EVA01) pour fixer le panneau arrière en polycarbonate sur le profilé en aluminium de la porte avant montée. Presser les rivets dans les trous alignés. P our éviter toute déformation, vous pouvez donner un appui supplé- mentaire au profilé en aluminium d'une main de l'intérieur. 3. U tiliser cinq autres rivets en plastique (EVA01) pour fixer le panneau arrière en polycarbonate sur le profilé en aluminium de la porte avant montée. Procéder exactement de la même manière que pour le montage du panneau latéral gauche du PC sur la porte avant décrite à l'étape 2. La porte avant est installée entre les panneaux latéraux. Fig. 10: Attacher la porte avant avec les rivets en plastique GuardOne · Manuel · 123 ®... -
Page 124: Installation Du Boîtier Supérieur
Installation du boîtier supérieur Conditions préalables : › L es panneaux inférieur et latéraux sont installés sur le panneau de base. › L a porte avant est installée entre les panneaux latéraux. › L e boîtier supérieur est la partie la plus lourde de la hotte GuardOne®. Pour des raisons de sécurité, faites-vous aider par une autre personne. REMARQUE ! Dommages matériels dus à l'installation sur un support L a douille d'ampoule pour la lampe UV dépasse de quelques centi- mètres de l'unité du boîtier supérieur. Si vous placez l'appareil à plat Fig. 11: Chambre en verre polycarbonate assemblée sur une base dure, la douille d'ampoule risque d'être enfoncée et d'être endommagée. Ne pas placer l'unité du boîtier supérieur déballée sur une base rigide - A près avoir déballé l'unité du boîtier supérieur, soulevez-la immé-... -
Page 125: 4.5 Installation De La Lampe Uv
4.5 Installation de la lampe UV Conditions préalables : › R etirer l'emballage de la lampe UV. Sur l'emballage se trouve un autocollant avec le numéro de série de la lampe UV. Vous aurez besoin de ce numéro de série lors du test de fonctionnement au chapitre 4.6 « Terminer l'installation ». 1. O uvrir complètement la porte avant en utilisant l'évidement du boîtier Fig. 17: Faire tourner la lampe UV supérieur pour la maintenir en position de manière sûre. I nsérer la nouvelle lampe UV par le bas dans les douilles de lampe. Verrouillez la lampe UV en la faisant tourner d'environ 90° dans le sens inverse des aiguilles d'une montre. Dès que l'ampoule est verrouillée, vous entendrez un clic. 3. D ans la version 48", vous installez deux lampes UV côte à côte en répétant l'action décrite à l'étape 2. 4. Fermer soigneusement la porte avant. GuardOne · Manuel · 125 ®... -
Page 126: Fin De L'installation
Terminer l'installation I nsérer le cordon d'alimentation (type IEC 60320 C13/C14 avec contact à la terre) dans la prise située à l'arrière du boîtier supé- rieur. REMARQUE ! Dommages matériels dus à l'augmentation de la tension S 'assurer que l'intensité locale du courant est conforme à la puis- sance nominale de la hotte GuardOne®. 3. Brancher le cordon d'alimentation à l'alimentation électrique. P our allumer (I) ou éteindre (0) la hotte GuardOne , utiliser ® l'interrupteur principal situé au-dessus de la prise. Mettre l'interrupteur principal sur MARCHE. A près avoir mis la hotte GuardOne® sur Marche, l'écran tactile avec Fig. 18: Brancher le cordon d'alimentation dans la prise l'interface utilisateur graphique à l'avant du boîtier supérieur affiche appropriée l'écran de veille. - Page 127 Test de la lampe LED › V ous êtes dans le menu Airflow & Light. Pour allumer la lampe LED, utiliser l'interrupteur de la lampe LED (1). Votre sélection s'applique immédiatement. 2. P our sélectionner une couleur de LED, appuyer sur Couleur de LED (2). Sélectionner la couleur souhaitée, blanc normal ou rouge, en appuyant sur les boutons + et - (3). Votre sélection s'applique immédiate- Fig. 23 : lampe LED ment. S i les lampes LED ne fonctionnent pas, veuillez contacter votre représentant Starlab local. 3. A près vous être assuré que les lampes LED fonctionnent, éteindre les lampes LED à l'aide de l'interrupteur de LED (1). P our revenir au menu Accueil, utiliser Retour ou Accueil dans la barre de navigation. GuardOne · Manuel · 127 ®...
- Page 128 › P our démarrer la décontamination UV, allumer la lampe UV à l'aide de Fig. 24.1UV 254 Decon l'interrupteur d'état UV (1). › P our arrêter la décontamination UV, éteindre la lampe UV, également à l'aide de l'interrupteur d'état UV S i le réglage et l'installation sont corrects, la lampe UV émet une lumière bleue claire. S i la lampe UV ne fonctionne pas, s'assurer que le connecteur du commutateur magnétique est bien branché dans le port. Si la lampe UV ne fonctionne toujours pas, contactez votre vendeur local Starlab. L a lumière LED s'éteint automatiquement après l'allumage de la lampe UV. 9. A près vous être assuré que la lampe UV fonctionne, éteignez la lampe UV en au moyen de l'interrupteur d'état UV 10. A ppuyer sur Home pour revenir à l'écran d'accueil. Après un test de fonctionnement réussi, vous pouvez maintenant modifier le paramètre préréglé. 128 · GuardOne · Manuel ®...
-
Page 129: Mise En Service
Mise en service Conditions préalables : › La hotte GuardOne® est complètement monté. › L'interrupteur principal est sur MARCHE. › L es numéros de série du filtre HEPA et de la lampe UV ont été saisis dans l'interface utilisateur graphique (chapitre 4.6 « Terminer l'installation »). › Le test de fonctionnement a réussi. Réglage de la date et de l'heure A ppuyer sur le symbole de la date et de l'heure (1) dans le coin supérieur gauche de la barre d'information d'une page quelconque pour ouvrir la page Date/Heure. 2. M odifier n'importe quelle valeur en appuyant sur la valeur (2) et la régler avec les boutons + et - ( 3. Pour enregistrer vos modifications, utilisez Sauvegarder Paramètres (4). Pour sortir de la page, utiliser Back ou Home. Fig. 25 : Réglage de la date et de l'heure Q uitter la page sans utiliser Enregistrer les paramètres supprimera... -
Page 130: Fonctionnement
C Barre de navigation 7 Infos instrument 1 Date et heure 8 Veille 2 Démarrage rapide 9 État de la hotte GuardOne® 3 Flux d'air et lampe 10 Minuterie de laboratoire 4 Ampoule UV et durée de vie du filtre 130 · GuardOne ·... -
Page 131: Utilisation De La Zone De L'écran
Réglage de la Lab timer L ab timer fonctionne indépendamment de toute autre fonction de la hotte GuardOne®. Vous pouvez mettre la hotte GuardOne® en mode veille sans affecter la minuterie du laboratoire. P our utiliser la minuterie de laboratoire, appuyer sur le symbole Lab timer dans le coin droit de la barre de navigation d'une page. La page minuterie de laboratoire s'ouvre. P our régler la minuterie de laboratoire, appuyer sur les boutons des heures, minutes et secondes (1). Entrer les valeurs de temps souhaitées à l'aide des boutons + et - 2). A ppuyer sur Start/Pause (3) pour démarrer ou mettre en pause timer U ne fois la durée réglée écoulée, une alarme retentit. L'alarme s'arrête automatiquement au bout d'environ 5 secondes. Fig. 29 : Réglage de la minuterie de laboratoire Appuyer sur End + Reset (4) pour arrêter la minuterie sur 00:00:00. Pour sortir de la page, utiliser Back ou Home. Utilisation de la zone d’affichage Quick Start et Quick Stop Quand Démarrage rapide est pressé, la hotte GuardOne® commence à fonctionner avec les paramètres prédéfinis pour la vitesse... - Page 132 L e champ Expiration Filtre HEPA (4) donne des informations sur la durée de vie restante du filtre HEPA. 4. Appliquer la sélection avec Appliquer Paramètres (3). Votre sélection s'applique immédiatement. Pour sortir de la page, utiliser Back ou Home. Q uitter la page sans utiliser Apply Settings supprimera tous les changements que vous avez effectués ! Fonctionnement de la LED Pour allumer/éteindre la LED, utiliser l'interrupteur de la LED (1). Votre sélection s'applique immédiatement. Pour sélectionner une couleur de LED, appuyer sur LED Colour (2). C hoisir la couleur voulue. Vous pouvez choisir entre blanc normal Fig. 33: Utilisation de la LED et couleur (par défaut) et rouge (3) en appuyant sur les boutons + et -. Votre sélection s'applique immédiatement. Pour sortir de la page, utiliser Back ou Home. 132 · GuardOne · Manuel ®...
- Page 133 Appuyer sur UV bulb & Filter lifetime L es durées de vie restantes du filtre HEPA (1) et de l'ampoule UV (2) sont affichées. Pour sortir de la page, utiliser Back ou Home. Fig. 34 : Informations sur l'ampoule UV et la durée de vie du filtre Instrument Info En appuyant sur Instrument Info, vous pouvez afficher des informations sur la version actuelle du logiciel et les heures de fonctionnement de la soufflerie. Appuyer sur Instrument Info. L a version actuelle du logiciel (1) et les heures de fonctionnement de la soufflerie (2) s'affiche. Pour sortir de la page, utiliser Back ou Home. Fig. 35 : Infos Instrument GuardOne · Manuel · 133 ®...
- Page 134 Salmonella enteritidis 10000 Salmonella sp. 15200 Salmonella typhimurium Sarcina lutea 26400 Serratia marcescens 6160 Shigella paradysenteriae 3200 Spirillum rubrum 6160 Staphylococcus albus 5720 Staphylococcus aureus 6600 Streptococcus hemolyticus 5500 Streptococcus lactis 8800 Streptococcus viridans 3800 134 · GuardOne · Manuel ®...
- Page 135 Bacteriophage (E. coli) 6600 Influenza 6600 Tobacco mosaic 44000 Temps d'exposition minimum recom- Microwatt (µW) requis Protoza mandé en minutes à 1 m de distance secondes / cm² avec une puissance UV-C de 48 μW/cm². Chlorella vulgaris (algae) 22000 Nematode eggs 9200 Paramecium 200000 GuardOne · Manuel · 135 ®...
- Page 136 UV 254 Decon En appuyant sur UV 254 Decon, vous pouvez activer le mode de décontamination UV. Pour arrêter automatiquement la décontamination UV après une durée prédéfinie, vous pouvez utiliser la fonction minuterie. REMARQUE ! Dommages matériels aux matières plastiques lors d'irradiations prolongées ! Certains types de plastique, comme les pointes de pipettes, peuvent devenir cassants lorsqu'ils sont exposés à une irradiation prolon gée. - N e pas placer de récipients en plastique qui ne sont pas stables aux UV dans la hotte GuardOne® pendant une exposition prolongée à la lumière UV. Utilisation de la lampe UV 1. P our débuter la décontamination UV, mettre le statut (1) sur P our arrêter la décontamination UV, mettre le statut (1) sur P our des raisons de sécurité, la lampe UV ne peut pas être allumée quand la porte avant est ouverte. L a lampe UV s'éteint automatiquement dès que la porte d'entrée est ouverte.Le fait de refermer la porte ne fait pas redémarrer la procédure de décontamination. Fig. 36 UV 254 Decon L 'Info Expiration Source UV (2) vous donne des informations sur la durée de vie restante de la lampe UV.
- Page 137 Utilisation de la minuterie UV › L a minuterie ne peut être utilisée qu'avant l'allumage de la lampe UV. Le réglage de la minuterie UV n'est pas obligatoire pour utiliser l'irradiation UV. Mettre le statut UV sur (1). Pour régler la minuterie, appuyer sur les boutons des heures, minutes ou secondes (2). Entrer les valeurs de temps souhaitées à l'aide des boutons + et - (3) Fig. 37 : Minuterie UV Le temps de décontamination souhaité a été réglé. 4. Pour débuter la décontamination UV, mettre le statut (1) sur L a lampe UV s'éteint automatiquement après l'écoulement du temps prédéfini. Si vous ne réglez pas la minuterie, la décontamination UV continue indéfiniment. L a lampe UV s'éteint automatiquement dès que la porte avant est ouverte. Le fait de refermer la porte ne fait pas redémarrer la procédure de décontamination. U n signal sonore retentit dès que le temps prédéfini est écoulé. Pour sortir de la page, utiliser Back ou Home. GuardOne · Manuel · 137 ®...
- Page 138 › V itesse de la soufflerie de 50 %. › L a LED est éteinte. Réglage de la Airflow preference Appuyer sur Settings. Appuyer sur la valeur en pourcentage (1). Sélectionner le débit d'air voulu (2) avec les boutons + et - Vous pouvez choisir un débit de 0, 50, 80 ou 100 %. Fig. 39: Réglage de la préférence de débit d'air L a sélection d'un débit d'air de 0 % coupe la soufflerie. Pour le rallumer, sélectionner un débit d'air supérieur à 0% ou utilisez la fonction de démarrage rapide sur la page d'accueil, Chapitre 6.2 « Utilisation de la zone d'affichage ». Appliquer la sélection (3) avec Save. Pour sortir de la page, utiliser Back ou Home. Q uitter la page sans utiliser Sauvegarder supprimera tous les changements que vous avez effectués ! 138 · GuardOne · Manuel ®...
- Page 139 Appliquer la sélection (4) avec Save. Fig. 40 : Réglage de la LED et de la préférence de couleur Pour sortir de la page, utiliser Back ou Home. Q uitter la page sans utiliser Sauvegarder supprimera tous les changements que vous avez effectués ! Luminosité de la LED En appuyant sur Luminosité LED, vous pouvez régler la luminosité des LED à l'intérieur de la hotte GuardOne®. Appuyer sur LED Brightness. Appuyer sur la valeur en pourcentage (1). S électionner le taux de luminosité souhaité (2) à l'aide des boutons + et - S électionner le taux de luminosité souhaité (2) à l'aide des boutons Fig. 41: Réglage de la luminosité LED + et -. Sélectionner le taux de luminosité souhaité (2) à l'aide des boutons + et -.
- Page 140 Réglage de la contre-pression REMARQUE ! Efficacité limitée de la filtration de l'air en raison du réglage du seuil d'alarme de débit d'air du filtre HEPA L e réglage du seuil de l'alarme d'obstruction du filtre HEPA modifie l'efficacité de la filtration de l'air.La modification des réglages d'usine peut affecter les performances optimales de la hotte GuardOne®. - S i vous avez l'impression que les réglages de l'alarme doivent être modifiés, contactez un technicien de maintenance Starlab ou votre représentant commercial Starlab local. 140 · GuardOne · Manuel ®...
- Page 141 Réinitialisation Lorsque vous appuyez sur Reset, la hotte GuardOne® est réinitialisé aux réglages d'usine. T outes les modifications apportées à la luminosité de l'écran, à la lumi- nosité des LED, aux réglages de démarrage rapide, au réglage de l'heure et de la date et au réglage de la contre-pression sont perdues.Après avoir rétabli les réglages d'usine, vous devrez également étalonner l'écran tactile. Fig. 43: Réinitialiser la hotte GuardOne® 1. Appuyer sur Reset. 2. Confirmer en appuyant sur Reset (1). La hotte GuardOne® s'éteint. 3. P our calibrer l'écran tactile, appuyer avec un crayon sur les croix qui apparaîtront ensuite dans les quatre coins de l'écran tactile. La hotte a été réinitialisé aux réglages d'usine. P our modifier les réglages d'usine, voir chapitre 5 « Mise en service ». GuardOne · Manuel · 141 ®...
-
Page 142: Nettoyage Et Maintenance
REMARQUE ! Contamination du pré-filtre due à la contamination de l'air E n raison de la contamination de l'air, le pré-filtre peut s'encrasser.Un environnement de travail stérile à l'intérieur de la hotte GuardOne® n'est plus garanti. - Pour assurer un fonctionnement optimal du pré-filtre, il est recommandé de l'inspecter visuellement à intervalles réguliers. - Il doit être changé dès qu'il est visiblement sale, au plus tard au bout de 6 mois. NOTICE ! Contamination de l'intérieur de la hotte GuardOne en raison d'une contamination bactérienne ! ® E n raison de la contamination de la zone de travail, une utilisation répétée sans nettoyage de la zone de travail peut entraîner la contamination ou la destruction de l'échantillon et fausser les résultats - Il est nécessaire de nettoyer l'intérieur et la surface de travail après chaque utilisation. Dommages matériels REMARQUE ! Dommages au boîtier supérieur si des objets y sont placés ! - Page 143 Fonctionnement restreint grâce à l'installation d'un filtre non d'origine ! En cas d'utilisation d'un autre filtre que le filtre Starlab HEPA d'origine, le bon fonctionnement de la filtration de l'air ne peut être garanti. - Utiliser uniquement des filtres HEPA Starlab d'origine conçus pour la hotte GuardOne®. - En cas de questions, veuillez contacter votre technicien de maintenance ou votre vendeur Starlab local. P our commander des informations, rendez-vous sur le site Web ou utilisez les informations de contact « Starlab Service Hotline » ou à l'arrière. Retirer le filtre HEPA usagé 1. É teindre la hotte GuardOne® à l'aide de l'interrupteur d'alimentation situé à l'arrière du boîtier. O uvrir la porte avant du boîtier supérieur jusqu'à ce que les rails de guidage à gauche et à droite se verrouillent et maintenir la porte Fig. 46: Ouvrir la porte avant du boîtier supérieur ouverte. 3. D éverrouiller le boîtier du filtre HEPA fixé avec deux vis noires sur ses côtés gauche et droit entre le boîtier du filtre HEPA et les parois du...
- Page 144 Si l'écran tactile ne fonctionne pas après la mise sous tension, assurez-vous que la porte avant est complètement fermée. Activation de la surveillance automatique de la durée de vie P our passer à la page d'accueil, appuyer sur Toucher pour déverrouiller. Appuyer sur Settings. Appuyer sur Replace HEPA Filter. E ntrer le numéro de série à 10 chiffres (1) figurant sur la face avant des étiquettes des filtres. Fig. 50: Activation de la surveillance automatique de la durée de vie Appuyer sur Entrée (2) pour terminer l'installation. La GuardOne® est désormais prêt à fonctionner. - La durée de vie restante du filtre HEPA est de 600 jours. 144 · GuardOne · Manuel ®...
- Page 145 Fonctionnement restreint en raison de l'installation d'une lampe UV non d'origine ! E n cas d'utilisation d'une autre lampe UV que la lampe UV Starlab originale, le bon fonctionnement de la décontamination UV ne peut être garanti. - Utiliser uniquement une lampe UV Starlab originale conçue pour la hotte GuardOne®. - En cas de questions, veuillez contacter le service après-vente Starlab local ou votre contact commercial. Pour des informations sur la commande, rendez-vous sur le site Web ou utilisez la « Starlab Service Hotline » ou à l'endos. Retrait de la lampe UV usagée 1. É teindre la hotte GuardOne® à l'aide de l'interrupteur d'alimentation situé à l'arrière du boîtier. 2. O uvrir complètement la porte avant en utilisant l'évidement du boî- tier supérieur pour la maintenir dans cette position de manière sûre. ATTENTION ! Risque de brûlures dues à la chaleur de la lampe UV pendant la décontamination Les lampes UV peuvent chauffer pendant le fonctionnement.
- Page 146 Appuyer sur Replace UV Light. 4. E ntrer le numéro de série à 10 chiffres qui figure sur l’étiquette Fig. 52 : Activation de la surveillance automatique sur l’emballage de la lampe UV. de la durée de vie 5. Appuyer sur Enter pour terminer la procédure d’installation. L a hotte GuardOne® est désormais prêt à fonctionner de nouveau. La durée de vie restante de la lampe UV est de 9 000 heures. Remplacement de la pile Le GuardOne® est équipé d‘une pile qui permet d‘enregistrer les données de l‘appareil lorsqu‘il est éteint. La pile doit être remplacée toutes les 3 à 5 ans selon sa durée de vie. ATTENTION Perte de données suite au retrait de la pile L ogiciel Version V2.9 et inférieure : Contactez votre partenaire commercial Starlab ou votre technicien de maintenance agréé...
- Page 147 12,5 mm, 3V / 35 mAh). F ermez le clapet de la partie supérieure du boîtier. Commencez par déverrouiller les deux dispositifs de levage à gauche et à droi- te du boîtier en soulevant légèrement le clapet des deux côtés. Allumez l‘alimentation électrique. Le clapet est équipé d‘un commutateur de sécurité qui interrompt automatiquement l‘alimentation électrique. Si l‘écran tactile Fig. 55 : Enlever la pile en appuyant vers la gauche la ne fonctionne pas après avoir allumé l‘alimentation électrique, lamelle de ressort située à gauche de la pile vérifiez que le clapet est bien fermé. R églez la date et l‘heure (voir 5. Mise en service – Réglage de la date et de l‘heure) GuardOne · Manuel · 147 ®...
-
Page 148: Nettoyage Et Décontamination
Observer également les intervalles de nettoyage suivants : › A près chaque utilisation de la hotte GuardOne®, effectuer le nettoyage en fonction de l'utilisation faite. Nettoyer la hotte avec un agent de nettoyage recommandé. En fonction de l'utilisation prévue de la hotte GuardOne®, procéder à la décontamination de la chambre en verre polycarbonate par la lampe UV. › E n cas de contamination visible, effectuer un nettoyage adéquat. › P our assurer un fonctionnement optimal du pré-filtre, il est recommandé de l'inspecter visuellement à intervalles réguliers. Il doit être changé dès qu'il est visiblement sale, au plus tard au bout de 6 mois. Nettoyage de l'extérieur de la hotte GuardOne ® Conditions préalables : › L es intervalles de nettoyage recommandés ont été respectés. › L a hotte GuardOne® est éteint ou débranché de l'alimentation électrique. 1. Utiliser un chiffon non pelucheux pour dépoussiérer la chambre extérieure en verre de la hotte GuardOne®. Si nécessaire, essuyez délicatement l'extérieur de la chambre en verre avec un détergent doux. - Page 149 Nettoyage de l'intérieur et de la chambre de verre de la hotte GuardOne ® ATTENTION ! Dommages à la santé dus aux UV ! Une exposition prolongée aux UV est nocive pour la santé. - Pour des raisons de sécurité, la lampe UV ne peut pas être allumée quand la porte est ouverte. - L a lampe UV s'éteint automatiquement dès que la porte d'entrée est ouverte. Le fait de refermer la porte ne fait pas redémarrer la procédure de décontamination. REMARQUE ! Décontamination complète impossible en raison d'un courant d'air permanent ! En raison du courant d'air permanent dans la chambre en verre, une décontamination à 100 % par irradiation par la lampe UV n'est pas...
-
Page 150: Dépannage
Dommages à la santé dus à une décontamination insuffisante lors du retour de l'appareil ! U ne décontamination insuffisante lors du retour de l'appareil à Starlab peut constituer un risque sanitaire pour toute personne manipulant la hotte GuardOne®. - Si un appareil est retourné à Starlab, un certificat de décontamination doit être envoyé avec. - Tout ce qui est renvoyé doit d'abord être nettoyé. - Le retour doit être enregistré auprès de Starlab. Pour plus d'information, contacter votre vendeur Starlab. Pour les coordonnées, appuyer sur Informations sur la maintenance et les commandes Starlab sur la page Statuts. REMARQUE ! Dommages matériels dus à une réparation non autorisée de la hotte GuardOne ® L es réparations indépendantes de la hotte GuardOne® avec un état d'erreur sans l'assistance d'un technicien de service Starlab peuvent entraîner des dommages matériels. - E n cas d'erreur, contacter votre vendeur Starlab local. Pour les coordonnées, appuyer sur Informations sur la maintenance et les commandes Starlab sur la page Statuts. Un défaut est signalé visuellement par la coloration du champ correspondant. - Vert pour un statut OK. -
Page 151: Alertes
- P our commander une nouvelle lampe UV, contacter votre représen- tant Starlab local. Pour les coordonnées, appuyer sur Informations sur la maintenance et les commandes Starlab sur la page Statuts. › HEPA filter life time end (Alerte 3) - « HEPA filter life time end»signifie que le filtre HEPA a atteint sa durée de vie finale de 600 jours et doit être remplacé pour assurer la fonctionnalité de la hotte GuardOne®. › HEPA filter blocked (Alerte 4) - « HEPA filter blocked» signifie que la hotte GuardOne® a enregistré un débit d'air altéré qui est habituellement causé par un filtre HEPA bloqué. - L e filtre HEPA doit être remplacé, quelle que soit la durée de vie restante du filtre. - I l est nécessaire de remplacer immédiatement le filtre HEPA immédiatement. Il est recommander d'arrêter l'utilisation. - Contactez votre technicien de maintenance Starlab pour plus d'aide. › HEPA filter critical age (Alerte 5) - «... -
Page 152: Erreurs
Erreurs REMARQUE ! Dommages matériels dus à la non prise en compte des messages d'erreur ! E n cas de message d'erreur, toute utilisation ultérieure de la hotte GuardOne® peut entraîner des dommages matériels sur l'appareil et l'échantillon. - E n cas de message d'erreur, toute utilisation ultérieure de la hotte GuardOne® peut entraîner des dommages matériels sur l'appareil et l'échantillon. - Les détails de contact peuvent être trouvés en appuyant sur Informations sur la maintenance et les commandes Starlab sur la page Status. Les erreurs d'état informent sur les dommages matériels qui arrêtent la hotte GuardOne® jusqu'à ce qu'un technicien de maintenance Starlab répare le système. › Blower breakdown (Erreur 1) - « Blower breakdown» signifie que la hotte GuardOne® a détecté un dysfonctionnement du moteur de la soufflerie. › Backpressure sensor failure occured (Erreur 2) - «... - Page 153 Comportement en cas de dysfonctionnement du moteur Si vous entendez des bruits anormaux de fonctionnement du moteur sur une longue période de temps, il peut y avoir un dysfonctionnement du moteur. 1. Mettre l’interrupteur principal sur OFF. 2. Attendez quelques minutes avant de rallumer la hotte GuardOne®. 3. Mettre l’interrupteur principal sur ON. S i le bruit du moteur persiste, contactez votre représentant Starlab local ou votre technicien de maintenance Starlab. Pour les coordonnées, appuyez sur Informations sur la maintenance et les commandes Starlab sur la page de statut. Comportement en cas de dysfonctionnement de l'interrupteur de la porte Si l'interrupteur de porte est défectueux, la lumière UV ne peut plus être allumée. De plus, le flux d'air fonctionne même lorsque la porte avant est fermée. Contactez votre représentant commercial Starlab local ou votre technicien de maintenance Starlab pour obtenir de l'aide. Pour les coordonnées, appuyez sur Informations sur la maintenance et les commandes Starlab sur la page Status. Comportement en cas de panne de courant 1. Mettre l'interrupteur principal sur ON. 2.
-
Page 154: Mise Au Rebut
Mise au rebut La hotte GuardOne® est garanti 2 ans. Le démontage et la mise au rebut sont de la responsabilité de l'opérateur. L a durée de vie de la hotte GuardOne®, hors consommables, est d'au moins cinq ans, en fonction de la fréquence d'utilisation et des conditions environnementales. À moins qu'il y ait un accord de retour ou d'élimination, le plomb dans les composants désassemblés doit être recyclé : › F erraille. › E nvoyer les éléments en plastique au recyclage. › M ettre au rebut les autres composants triés par matériaux. Mise au rebut des lampes UV Les lampes UV défectueuses constituent des déchets dangereux. Elles comportent du mercure et ne peuvent pas être recyclés. Pour obtenir de l'aide ou de plus amples renseignements, communiquez avec votre représentant du système de gestion des déchets interne ou à local. En cas de mise au rebut du produit, veuillez respecter les dispositions légales en vigueur. Informations sur l'élimination des appareils électriques et électroniques dans la Communauté européenne : L'élimination des appareils électriques est réglementée au sein de la Communauté européenne par des réglementations nationales basées... -
Page 155: Mesures Et Poids
48” Longueur 1330 Largeur Hauteur Poids Flux laminaire Air stagnant Dimensions extérieures et Spécifications Valeur Unité poids 48“ Longueur 1220 Largeur Hauteur Poids Flux laminaire Air stagnant Dimensions intérieures 48“ Spécifications Valeur Unité Longueur 1200 Largeur Hauteur GuardOne · Manuel · 155 ®... -
Page 156: 10.3 Exigences Électriques
Étiquette de modèle de produit Fig. 59: Étiquette de modèle de produit L'étiquette de modèle de produit comprend les informations suivantes : › R éférence de commande › N uméro de série › T ension › F réquence › P uissance de sortie › F usible › C ertificat d'inspection TÜV › É tiquette DEEE : Ne pas jeter avec les ordures domestiques 156 · GuardOne · Manuel ®... -
Page 157: Index
Accidents ............117 Début d’un feu ..........117 Maintenance Test de fonctionnement ........126 Panne de courant..........117 Remplacer la lampe UV ........145 Transport en intérieur...........119 Conditions d’exploitation ........154 Remplacer le filtre HEPA .........143 Transport Sécurité ..........118 Configuration de la hotte GuardOne® ..104, 126 Remplacer le pré-filtre ........142 Connexion............. 111, 126 Remplacement de la pile ........146 Connexion USB ..........111 Menu de veille ..........126, 130 Contenu de la livraison .........110 Menu principal ..........126, 130 Mesures et poids ...........145 Durée de vie de l’ampoule UV et du filtre ..133 Mise au rebut .......... - Page 158 158 · GuardOne · Manuale ®...
-
Page 159: Istruzioni D'uso
User Manual ____________________________________________________________________________________ 3 – 53 Bedienungsanleitung ________________________________________________________________________ 55 – 105 Instruction initiale ___________________________________________________________________________ 107 – 157 Istruzioni d‘uso ______________________________________________________________________________159 – 209 Certificato ________________________________________________________________________________________________________ Panoramica di GuardOne Workstation ____________________________________________________________________ ® 1.1 Configurazione e funzionamento _______________________________________________________________________________ 1.2 Dotazione ________________________________________________________________________________________________ _______________________________________________________________________________________________ Sicurezza 2.1 Spiegazione dei simboli di sicurezza ____________________________________________________________________________ 2.2 Impiego previsto ___________________________________________________________________________________________ 2.3 Dispositivi di sicurezza ______________________________________________________________________________________ 2.4 Responsabilità dell'utente... -
Page 160: Panoramica Di Guardone ® Workstation
Panoramica di GuardOne Workstation ® Configurazione e funzionamento Configurazione Fig. 1: GuardOne® Workstation Alloggiamento superiore Pannello posteriore B Camera in PC (policarbonato) Pannello della base Alloggiamento superiore con prefiltro preinstallato Sportello frontale preinstallato con due sezioni ribaltabili e filtro HEPA Rivetti in plastica Ripiano multifunzione Pannello laterale Touchscreen con interfaccia utente grafica Modelli GuardOne® Workstation è disponibile in due modelli diversi: Dead Air e Laminar Flow. Entrambi possono essere ordinati in due misure. Le due misure di GuardOne® Workstation sono: › 3 2 pollici: in questa versione, GuardOne® Workstation presenta una lampada UV e, nel caso del modello Laminar Flow, un prefiltro e un filtro HEPA; › 4 8 pollici: questa GuardOne® Workstation è dotata di due lampade UV e, nel caso del modello Laminar Flow, due motori del ventilatore, due prefiltri e due filtri HEPA. Le relative dimensioni sono riportate nel capitolo 10 “Specifiche”. Dead Air ›... - Page 161 Nelle presenti istruzioni per l'uso sono descritte tutte le funzioni dell'apparecchio relativamente al prefiltro, al filtro HEPA e alla lampada UV. Nel caso del modello Dead Air, le istruzioni sull'utilizzo, la sostituzione, la manutenzione e la risoluzione dei problemi dei filtri possono essere ignorate. Questo manuale fornisce le istruzioni per Laminar Flow nella misura da 32 pollici con un filtro HEPA, un prefiltro e una lam- pada UV. Per il modello Laminar Flow o Dead Air nella misura da 48 pollici, ripetere due volte le operazioni indicate nelle istruzioni per l'installazione e la manutenzione dei filtri HEPA, delle lampade UV e dei prefiltri per installarli e sostituirli. Funzionamento GuardOne® Workstation è un apparecchio di contenimento che si serve di un sistema di filtrazione dell'aria e di irraggiamento UV per creare un ambiente di lavoro nel quale il rischio di contaminazione crociata a condizioni di laboratorio standard sia ridotto al minimo. Per ottenere questo risultato, in GuardOne® Workstation si utilizzano i componenti indicati di seguito. › Creazione di un ambiente con aria pulita Combinazione di un motore del ventilatore silenzioso, un filtro HEPA e un prefiltro standard. › Decontaminazione e sterilizzazione dell'area di lavoro Raggi UV con una lunghezza d'onda fissa di 254 nm. Hotline di assistenza Starlab Per ulteriori informazioni, contattare il servizio di assistenza Starlab locale o il rappresentante Starlab di zona su www.starlabgroup.com GuardOne · Manuale · 161 ®...
-
Page 162: Dotazione
Proprio come il pannello frontale e posteriore, i pannelli laterali sono realizzati in policarbonato (PC) trasparente da 6 mm, con i diversi segmen- ti sovrapposti in corrispondenza delle estremità per escludere una potenziale esposizione a un irraggiamento UV a onda corta nocivo durante la decontaminazione con raggi UV a 254 nm. Il pannello laterale destro è inoltre dotato di un canale portacavi attraverso il quale i cavi possono essere convogliati dall'esterno all'interno della camera in PC. Da qui i raggi UV non possono fuoriuscire grazie alla presenza di una copertura in PC separata. Pannello posteriore Il pannello posteriore è realizzato in policarbonato trasparente da 6 mm, con i diversi segmenti sovrapposti in corrispondenza delle estremità per escludere una potenziale esposizione a un irraggiamento UV a onda corta nocivo durante la decontaminazione con raggi UV a 254 nm. Ripiano multifunzione Il ripiano multifunzione è montato sul pannello posteriore in PC all'interno della camera. È destinato alla preparazione dei campioni e alla conserva- zione delle pipette o di altri utensili. Può anche ospitare campioni che devono essere decontaminati in quanto il ripiano si trova nell'area di irraggia- mento della lampada UV. Pannello della base Il pannello della base è realizzato in una miscela di polipropilene che riflette i raggi UV, esattamente come il pannello frontale e posteriore e i pannelli laterali. Sportello frontale Il pannello frontale è realizzato in policarbonato trasparente da 6 mm, con i diversi segmenti sovrapposti in corrispondenza delle estremità per escludere una potenziale esposizione a un irraggiamento UV a onda corta nocivo durante la decontaminazione con raggi UV a 254 nm. Lo sportello frontale può essere aperto in due passaggi. › L 'apertura del segmento inferiore facilita il lavoro dell'utente nella GuardOne® Workstation. › S e si apre ulteriormente il segmento centrale dello sportello, l'utente può pulire e sottoporre a manutenzione la camera in PC dal suo interno con facilità. Si sconsiglia di aprire completamente la sezione ribaltabile durante l'esecuzione dei lavori, in quanto non sarebbe possibile garan- tire un ambiente con aria pulita. Lo sportello frontale è attrezzato inoltre con un interruttore magnetico che registra l'eventuale apertura dello sportello. Nel caso in cui lo sportello frontale sia aperto, la fonte di raggi UV viene automaticamente disattivata. Lo stesso succede con la funzione flusso d'aria: alla chiusura dello sportello, il ventilatore si spegne automaticamente. 162 · GuardOne · Manuale ®... - Page 163 › Supporto lampada UV posizionato sul retro sotto al filtro HEPA - GuardOne® Workstation si serve di una lampada UV con una lunghezza d'onda fissa di 254 nm per decontaminare e sterilizzare l'area di lavoro. - A seconda del modello, sono installate una o due lampade UV contrassegnate da un numero di serie. Le lampade UV devono essere montate nei relativi supporti in seguito all'assemblaggio della camera e dell'alloggiamento superiore. - Il supporto per la lampada UV fuoriesce di qualche centimetro dall'alloggiamento superiore. - La vita utile delle lampade UV è di 9000 ore. › Pannello LED posizionato sul lato anteriore sotto al filtro HEPA - Il pannello LED è preinstallato. - A seconda della fotosensibilità dei campioni, la luce LED può essere attivata, disattivata e regolata per quanto riguarda luminosità e colore con le opzioni bianco standard e rosso. › Touchscreen con interfaccia utente grafica sul lato anteriore - L 'unità operativa si trova sul lato anteriore. GuardOne® Workstation viene comandata tramite l'interfaccia utente del touchscreen. - I l display con l'interfaccia utente può essere utilizzata per impostare il flusso d'aria, il LED e la lampada UV. Sullo schermo si possono inoltre consultare informazioni sul produttore e sulle condizioni di GuardOne® Workstation. › Interruttore di rete principale, collegamento all'alimentazione principale e collegamento USB sul retro - L 'interruttore di rete principale, il collegamento all'alimentazione principale e il collegamento USB si trovano sul retro. La porta USB può essere utilizzata per l'installazione degli aggiornamenti software. › Cavità sul lato superiore per mantenere aperto lo sportello frontale quando si pulisce o sottopone a manutenzione la camera in PC - Dopo aver ribaltato lo sportello frontale, la maniglia può essere riposta nella cavità per impedire che questo si richiuda. › Rivetti in plastica, viti a testa zigrinata e due cavi in una busta separata - In dotazione sono compresi rivetti in plastica, viti a testa zigrinata e due cavi da installare. GuardOne · Manuale · 163...
-
Page 164: Sicurezza
Avvertenze di sicurezza nelle procedure Le avvertenze di sicurezza possono fare riferimento a singole istruzioni specifiche. Anche se integrate nella procedura, le avvertenze di sicurezza non interrompono la lettura durante lo svolgimento dell'operazione. Queste avvertenze fanno uso delle parole di avvertimento sopra descritte. Ad esempio: Allentate la vite. ATTENZIONE! Rischio di rimanere intrappolati nel pannello! Chiudere il pannello con cautela. Serrare la vite. Diciture di sicurezza su GuardOne Workstation ® AVVERTENZA! Pericolo dovuto a diciture illeggibili! Le etichette e i segnali possono sporcarsi nel tempo impedendo il rilevamento dei pericoli segnalati e l'osservanza delle necessarie istruzioni per l'uso, con il conseguente pericolo di lesioni. - Assicurarsi che le istruzioni di sicurezza, le avvertenze e le istruzioni per l'uso siano sempre leggibili. - Sostituire immediatamente le etichette e i segnali danneggiati. Irraggiamento UV-C Pericolo dovuto a irraggiamento UV-C! I raggi UV-C emessi dalle lampade UV biocide sono dannosi per gli occhi e la cute. ›... -
Page 165: Impiego Previsto
Impiego previsto GuardOne® Workstation è destinato a essere utilizzato esclusivamente per l'impiego previsto descritto di seguito. GuardOne® Workstation è un apparecchio di contenimento che si serve di un sistema di filtrazione dell'aria e di irraggiamento UV per creare un ambiente di lavoro che riduce al minimo il rischio di contaminazione crociata a condizioni di laboratorio standard. GuardOne® Workstation serve unicamente a proteggere i processi. L'impiego previsto di questo apparecchio comprende anche l'osservanza di tutte le istruzioni contenute nel presente manuale. Ogni utilizzo che esuli dall'impiego previsto è da considerarsi uso improprio. Attenersi a tutti i requisiti di sicurezza specifici del paese di riferimento in merito all'uso di apparecchiature elettriche in laboratorio. AVVERTENZA! Rischio di uso improprio! Un uso improprio di GuardOne® Workstation può portare a situazioni pericolose per le persone e le cose. - I nstallare soltanto pezzi di ricambio e parti soggette a usura di Starlab in GuardOne® Workstation. L'installazione di pezzi di ricambio e parti soggette a usura non autorizzate da Starlab comporta il malfunzionamento di GuardOne® Workstation, la contaminazione dell'ambiente di lavoro e il danneggiamento del materiale dei campioni. - U sare GuardOne® Workstation esclusivamente nel rispetto delle condizioni di utilizzo descritte nelle specifiche (capitolo 10 “Specifiche”). AVVERTENZA! Pericolo dovuto alla protezione delle sole cose! GuardOne® Workstation serve unicamente a proteggere i processi. Non è prevista alcuna protezione per le persone. - Non utilizzare agenti patogeni all'interno di GuardOne® Workstation. Dispositivi di sicurezza Interruttore di rete principale L'interruttore di rete principale è allo stesso tempo anche un interruttore di arresto d'emergenza. Si trova sul retro dell'alloggiamento... -
Page 166: Requisiti Del Personale
Solo le persone ritenute in grado di effettuare queste operazioni in modo affidabile sono autorizzate a installare, utilizzare e sottoporre a manutenzione GuardOne® Workstation. Le persone con una capacità di reagire compromessa, ad esempio da droghe, alcol o dai medicinali assunti, non sono autorizzate a installare, utilizzare o sottoporre a manutenzione GuardOne® Workstation. Per l'assunzione del personale, attenersi alle normative riguardanti l'età e la specifica attività applicabili al luogo di installazione dell'apparecchio. Non vi è distinzione tra personale di installazione, personale operativo o di manutenzione. Al personale idoneo è consentito portare a termine tutti i compiti dopo aver ricevuto istruzioni dall'utente. Per l'esecuzione di lavori su GuardOne® Workstation servirsi soltanto di personale addestrato a effettuare operazioni di laboratorio. In generale, si tratta di specialisti di laboratorio che, come tali, sono formati in questo ambito di attività e sono a conoscenza dei relativi standard e misure. Per via della sua formazione professionale ed esperienza lavorativa, il personale può eseguire lavori su tutta la catena dei processi biologici e chimici nell'ambito del trattamento, della produzione e della biotec- nologia. Il personale è in grado di riconoscere autonomamente i possibili rischi e di evitarli. Il personale si attiene alle normative sulla tutela della salute e dell'ambiente, sulla sicurezza sul lavoro e sulla garanzia di qualità. Il personale è responsabile dei seguenti compiti: › c onfigurare GuardOne® Workstation per la prima volta › a ssemblare GuardOne® Workstation (capitolo 4 “Montaggio” a pagina 166) › d eterminare e verificare lo stato di operatività di GuardOne® Workstation › e seguire un test di funzionamento › e ffettuare la messa in servizio › m odificare le impostazioni di fabbrica › u tilizzare l'interfaccia utente grafica ›... - Page 167 - Inalazione: respirare aria fresca. In caso di disturbi, consultare un medico. - Contatto con la cute: sciacquare via l'etanolo con sapone e abbondante acqua. In caso di disturbi, consultare un medico. - C ontatto con gli occhi: sciacquare immediatamente gli occhi con acqua. Se si indossano lenti a contatto, toglierle se possibile e continuare a sciacquare gli occhi con acqua. Consultare un medico. - Ingestione: consultare immediatamente un medico. AVVERTENZA! Pericolo di incendio a causa di oggetti che emettono molto calore! L avorare con fiamme libere o oggetti che emettono molto calore in GuardOne® Workstation può causare lesioni gravi e danni alle cose. - N on fumare nell'area di lavoro di GuardOne® Workstation. Evitare di maneggiare fonti di luce e fiamme libere e sorgenti di ignizione di qualsiasi genere. - N el caso si sviluppi un incendio, adottare le misure riportate di seguito. - Disattivare l'alimentazione principale di GuardOne® Workstation. Scollegare il connettore del cavo. - Se non esiste alcun pericolo per la propria salute, soccorrere le altre persone portandole fuori dalla zona di pericolo. Se necessario, avviare le misure di primo soccorso.
- Page 168 Pericoli per l'ambiente AMBIENTE! Pericolo per l'ambiente a causa di una manipolazione errata di sostanze pericolose per l'ambiente! Una manipolazione e uno smaltimento errati di sostanze nocive per l'ambiente possono causare un danno considerevole all'am biente. - Attenersi sempre alle istruzioni per l'uso e lo smaltimento di sostanze pericolose per l'ambiente riportate di seguito. - S e sostanze pericolose per l'ambiente fuoriescono accidentalmente e si diffondono nell'ambiente, adottare immediatamente le opportune misure. Nel dubbio, informare del danno l'autorità responsabile e chiedere quali azioni si devono compiere per contrastarlo. Si utilizzano le sostanze pericolose per l'ambiente indicate di seguito. Detergenti I detergenti a base di solventi contengono sostanze tossiche. Non devono diffondersi nell'ambiente. Lo smaltimento deve essere effettuato da uno specialista dello smaltimento ed è responsabilità dell'utente di GuardOne® Workstation. Lampade UV Le lampade UV difettose sono un rifiuto pericoloso. Contengono mercurio e non possono essere riciclate. Per assistenza o ulteriori informa- zioni, rivolgersi al responsabile del vostro sistema di gestione dei rifiuti interno o locale. 168 · GuardOne · Manuale ®...
-
Page 169: Comportamento In Caso Di Emergenza
Comportamento in caso di incidenti Misure preventive › E ssere sempre preparati per gli incidenti! › T enere tutto il necessario per il primo soccorso (kit di pronto soccorso, coperte, ecc.) in buono stato e a portata di mano. › A ssicurarsi che lo staff abbia dimestichezza con le relazioni sugli incidenti, il primo soccorso e l'equipaggiamento di pronto soccorso. › M antenere libere le vie di accesso per consentire il passaggio dei veicoli di soccorso. Misure in caso di incidenti › D isattivare l'alimentazione di GuardOne® Workstation (capitolo 4.6 “Installazione completa”). › S e non esiste alcun pericolo per la propria salute, soccorrere le altre persone portandole fuori dalla zona di pericolo. › S e necessario, avviare le misure di primo soccorso. › A llertare i vigili del fuoco e/o i servizi di soccorso. › I nformare il responsabile del luogo. › M antenere libere le vie di accesso per consentire il passaggio dei veicoli di soccorso. ›... -
Page 170: Trasporto, Imballaggio E Conservazione
Sicurezza durante il trasporto, l'imballaggio e la conservazione Indicazioni di sicurezza AVVERTENZA! Pericolo di lesioni a causa di carichi pesanti! Durante le operazioni di sollevamento e di imballaggio, vi è il rischio di caduta del carico, con conseguenti possibili lesioni gravi. - Considerare le dimensioni e il peso di GuardOne® Workstation. - I componenti di GuardOne® Workstation sono pesanti. Sollevare la stazione di lavoro soltanto con l'aiuto di un'altra persona o di un'apparecchiatura adatta. AVVISO! Danni alla lampada UV a causa di urti all'imballaggio! Gli urti all'imballaggio possono danneggiare la lampada UV. - Trasportare il pacco con cautela. - In caso si debba segnalare dei danni, contattare immediatamente il rappresentante Starlab di zona. -
Page 171: Gestione Del Materiale Di Imballaggio
Trasporto interno AVVERTENZA! Pericolo di lesioni a causa di carichi pesanti! Durante le operazioni di sollevamento e di imballaggio, vi è il rischio di caduta del carico, con conseguenti possibili lesioni gravi. - Considerare le dimensioni e il peso di GuardOne® Workstation. - I componenti di GuardOne® Workstation sono pesanti. Sollevare la stazione di lavoro soltanto con l'aiuto di un'altra persona o di un'apparecchiatura adatta. Potete portare GuardOne® Workstation in un altro luogo con l'aiuto di un'altra persona senza doverlo smontare. Gestione del materiale di imballaggio Materiale di imballaggio A seconda del tipo di trasporto, con servizio di inoltro pacchi e/o trasporto dell'azienda direttamente al destinatario finale, il produttore conse- gna GuardOne® Workstation in condizioni sicure. Per proteggere la stazione di lavoro dai danni e dalla contaminazione durante il trasporto, GuardOne® Workstation è imballato in una sola scatola di cartone, con i singoli pezzi avvolti in una pellicola protettiva. Smaltimento Per lo smaltimento dell'imballaggio, rispettare le disposizioni legali e locali applicabili. AMBIENTE! Pericolo per l'ambiente a causa di uno smaltimento errato! I materiali di imballaggio sono preziose materie prime. Processati e riciclati giudiziosamente, in molti casi possono essere... -
Page 172: Montaggio
I l luogo di installazione è asciutto e privo di brina. - È garantita un'umidità relativa minima del 40%. - È garantita una temperatura ambiente minima di + 15 °C e una temperatura ambiente massima di + 40 °C. › G uardOne® Workstation non è esposta alla luce solare diretta. › G uardOne® Workstation deve essere installata in un luogo facile da pulire e privo di polvere. Predisposizione dell'installazione › G uardOne® Workstation viene fornita parzialmente montata per ridurre il volume di trasporto del 50% circa. › I l montaggio finale può essere effettuato direttamente sul luogo di installazione scelto. › I l montaggio non richiederà più di 15 minuti; non sono necessarie conoscenze specifiche o utensili di alcun tipo. › I componenti di GuardOne® Workstation sono pesanti. Si consiglia di avvalersi di un'altra persona che possa assistere con il montaggio. In caso di dubbi, contattare il servizio di assistenza Starlab o il rappresentante delle vendite di zona per ricevere assistenza. Guardate il nostro video sul montaggio di GuardOne ® https://www.starlab.click/guardone-assembling 172 · GuardOne · Manuale ®... -
Page 173: Installazione Del Pannello Posteriore In Pc
Installazione del pannello laterale in PC sinistro 1. P ortare il pannello laterale in PC sinistro (senza canale portacavi, n. 1a) e inserirlo nella scanalatura della piastra di base. Assicurarsi che i fori del pannello laterale in PC sinistro siano allineati ai fori della piastra di base. 2. A ssicurarsi che il pannello posteriore scorra nella scanalatura fino all'arresto del profilo in alluminio sul pannello laterale sinistro. Controllare che i fori del profilo in alluminio e del pannello posteriore siano allineati. 3. U tilizzare cinque rivetti in plastica (EVA01) per fissare il pannello posteriore al profilo in alluminio del pannello laterale sinistro. Spingere i rivetti dentro ai fori allineati. 4. U tilizzare tre rivetti in plastica (EVA02) per fissare il pannello laterale sinistro alla piastra di base. Spingere i rivetti dentro ai fori allineati. Il pannello latera- le sinistro è installato. Fig. 6: Fissaggio del pannello posteriore in PC con i rivetti in plastica GuardOne · Manuale · 173 ®... - Page 174 P osizionare il ripiano in PC sul pannello posteriore all'interno della camera in PC di GuardOne® Workstation. AVVISO! Danni alle cose a causa di una forza rotativa troppo elevata! Fig. 8: Fissaggio del ripiano in PC sul pannel- I nserire le due viti nere negli appositi fori del ripiano e del pannello posteriore girandole manualmente. lo posteriore A ll'occorrenza, per un maggiore supporto, premere con una mano dall'esterno sul pannello posteriore. I l ripiano in PC è ora installato sul pannello posteriore all'interno della camera in PC di GuardOne® Workstation. 174 · GuardOne · Manuale ®...
-
Page 175: Installazione Dello Sportello Frontale In Pc
Fig. 9: Inserimento dello sportello frontale tra i pannelli laterali 2. U tilizzare cinque rivetti in plastica (EVA01) per fissare il pannello laterale sinistro al profilo in alluminio dell'unità sportello frontale. Spingere i rivetti dentro ai fori allineati. P er evitare deformazioni, garantire un maggiore supporto premendo con una mano dall'interno sul profilo in alluminio. 3. U tilizzare altri cinque rivetti in plastica (EVA01) per fissare il pannel- lo laterale destro al profilo in alluminio dell'unità sportello frontale. Procedere esattamente come per il montaggio del pannello laterale sinistro allo sportello frontale descritto nel passaggio 2. Lo sportello frontale è installato tra i pannelli laterali. Fig. 10: Fissaggio dello sportello frontale con i rivetti in plastica GuardOne · Manuale · 175 ®... -
Page 176: Installazione Dell'alloggiamento Superiore
Installazione dell'alloggiamento superiore Prerequisiti › I l pannello posteriore e i pannelli laterali sono installati sul pannello della base. › L o sportello frontale è installato tra i pannelli laterali. › L 'alloggiamento superiore è la parte più pesante di GuardOne® Workstation. Per motivi di sicurezza, richiedere la disponibilità di un'altra persona nel caso sia necessaria assistenza. AVVISO! Danni alle cose dovuti al posizionamento su una base Fig. 11: Camera in PC assemblata dura! I l supporto per la lampada UV fuoriesce di qualche centimetro dall'alloggiamento superiore. Se si posiziona l'unità in orizzontale su una base dura, il supporto della lampada può venirne schiacciato e danneggiato. - N on conservare l'alloggiamento superiore ancora imballato su una base dura. -
Page 177: Installazione Della Lampada Uv
L 'interruttore magnetico di sicurezza tra l'alloggiamento superiore e la camera in PC è ora collegato. Installazione della lampada UV Prerequisiti › T ogliere la lampada UV dall'imballaggio. Sull'imballaggio è apposta un'etichetta con il numero di serie della lampada UV. Questo numero di serie sarà richiesto durante il test di funzionamento descritto nel capitolo 4.6 “Installazione completa”. 1. A prire completamente lo sportello frontale, utilizzando la cavità sull'alloggiamento superiore per fissarlo in posizione in sicurezza. Fig. 17: Rotazione della lampada UV I nserire la nuova lampada UV da sotto nell'apposito portalampada. Bloccare la lampada UV girandola di circa 90° in senso antiorario. Bloccandola, si potrà udire un click. 3. N ella versione da 48 pollici, installare le due lampade UV una accanto all'altra ripetendo l'operazione descritta nel passaggio 2. 4. Chiudere con cautela lo sportello frontale. GuardOne · Manuale · 177 ®... -
Page 178: Installazione Completa
Completamento del montaggio I nserire il cavo dell'alimentazione (IEC 60320 tipo C13/C14 con contatto di terra) nella presa sul retro dell'alloggiamento superiore. AVVISO! Danni alle cose dovute a una tensione superiore! A ssicurarsi che l'intensità della corrente del posto sia conforme alla potenza nominale di GuardOne® Workstation. 3. Collegare il cavo elettrico all'alimentazione. P er accendere (I) o spegnere (0), GuardOne® Workstation, servirsi dell'interruttore di rete principale situato sopra alla presa. Portare l'interruttore di rete principale su ON. D opo aver acceso GuardOne® Workstation, sul touchpad con interfaccia utente sul lato anteriore dell'alloggiamento superiore Fig. 18: Inserire il cavo elettrico nella relativa presa comparirà la schermata di standby. G uardOne® Workstation è ora pronta a eseguire un test di funzionamento. Esecuzione di un test di funzionamento Il test di funzionamento indica se la lampada UV, la luce LED e il filtro HEPA sono funzionanti. - Page 179 Test della luce LED › C i si trova nel menu "Airflow & Light". Per accendere la luce LED, usare l'apposito selettore con l'opzione (1). Quanto selezionato sarà applicato immediatamente. 2. P er selezionare un colore per la luce LED, premere "LED colour" (2). Selezionare il colore desiderato, bianco standard o rosso, premendo il pulsante + e - (3). Fig. 23: Luce LED Quanto selezionato sarà applicato immediatamente. S e i LED non funzionano, contattare il rappresentante Starlab di zona. 3. D opo essersi assicurati che i LED funzionino, spegnere la luce LED usando l'apposito selettore con l'opzione (1). P er ritornare al menu "Home" usare "Back" o "Home" nella barra di navigazione. GuardOne · Manuale · 179 ®...
- Page 180 › P er avviare la decontaminazione UV, accendere la lampada UV usando Fig. 24.1: UV 254 Decon il selettore "UV Status" con l'opzione (1). › P er arrestare la decontaminazione UV, spegnere la lampada UV usando ancora una volta il selettore "UV Status" con l'opzione C on impostazioni e installazione corrette, la lampada UV emette una luce azzurra. S e la lampada UV non funziona, assicurarsi che il connettore dell'interruttore magnetico sia ben inserito nella presa. Se la lampada UV continua a non funzionare, contattare il rappresentante Starlab di zona. L a luce LED si spegne automaticamente una volta che i raggi UV vengono attivati. 9. D opo essersi accertati del funzionamento della lampada UV, spegnerla usando il selettore "UV Status" con l'opzione 10. P remere "Home" per ritornare al menu "Home". Dopo aver concluso con successo il test di funzionamento, è possibile cambiare il parametro predefinito. 180 · GuardOne · Manuale ®...
-
Page 181: Messa In Servizio
C ambiare i valori premendo il numero (2) e regolandolo con il pulsante + e - (3). 3. Per salvare le modifiche, usare "Save Settings" (4). Fig. 25: Regolazione di data e ora Per uscire dalla pagina, usare "Back" o "Home". U scire dalla pagina senza premere su "Save Settings" annullerà tutte le modifiche effettuate! Regolazione dei parametri operativi predefiniti Premere "Settings" nel menu "Home". I l pulsante "Quick Start" nel menu "Home" avvierà GuardOne® Work- station con i valori predefiniti per la velocità del ventilatore o la luce LED. Le impostazioni di fabbrica di "Quick Start" sono il 50 % per la velocità del ventilatore e luci LED disattivate. 2. P remere "Quick Start Settings" per aprire la pagina di configurazione Fig. 26: Quick Start e modificare le impostazioni di fabbrica. 3. C ambiare i valori premendo i pulsanti corrispondenti (1) e regolan- doli con il pulsante + e - (2). -
Page 182: Funzionamento
6 Settings C Barra di navigazione 7 Instrument Info 1 Data e ora 8 Standby 2 Quick Start 9 Stato di GuardOne® Workstation 3 Airflow & Light 10 Lab Timer 4 UV bulb & Filter Lifetime 182 · GuardOne · Manuale... -
Page 183: Utilizzo Dell'area Di Visualizzazione
Regolazione di "Lab timer" I l timer di laboratorio funziona indipendentemente da qualsiasi altra funzione di GuardOne® Workstation. GuardOne® Workstation può essere messa in modalità standby senza influire sul timer di laboratorio. P er usare il timer di laboratorio, premere il suo simbolo nell'angolo destro della barra di navigazione di qualsiasi schermata. La schermata "Lab Timer" si apre. P er impostare il timer di laboratorio, premere i pulsanti per le ore, i minuti e i secondi (1). Immettere i valori desiderati con il pulsante + e - (2). Premere "Start/Pause" (3) per avviare o interrompere il timer. U na volta scaduto il tempo impostato, sarà emesso un allarme acu- stico. L'allarme si arresterà automaticamente dopo circa 5 secondi. Fig. 29: Regolazione del timer di laboratorio P remere "End + Reset" (4) per arrestare e riportare il timer a 00:00:00. Per uscire dalla pagina, usare "Back" o "Home". Utilizzo dell'area di visualizzazione Quick Start e Quick Stop Quando si preme "Quick Start", GuardOne® Workstation inizierà a funzionare con i parametri predefiniti per la velocità del ventilatore e le luci... - Page 184 I l campo "Expiration HEPA Filter" (4) fornisce informazioni sulla durata utile rimanente del filtro HEPA. 4. Applicare quanto selezionato con "Apply Settings" (3). Quanto selezionato sarà applicato immediatamente. Per uscire dalla pagina, usare "Back" o "Home". U scire dalla pagina senza premere su "Apply Settings" annullerà tutte le modifiche effettuate! Uso della luce LED Per accendere/spegnere la luce LED, premere l'apposito selettore (1) per selezionare l'opzione Quanto selezionato sarà applicato immediatamente. 2. Per selezionare un colore per la luce LED, premere "LED Colour" (2). S elezionare il colore desiderato. Si può scegliere tra bianco stan- Fig. 33: Comando della luce LED e del colore dard (predefinito) e rosso (3) premendo il pulsante + e - Quanto selezionato sarà applicato immediatamente. 4. Per uscire dalla pagina, usare "Back" o "Home". 184 · GuardOne · Manuale ®...
- Page 185 UV Bulb & Filter Lifetime Premendo "UV bulb & Filter lifetime" si possono consultare le informazioni sulla durata utile rimanente della lampada UV e del filtro HEPA. La vita utile della lampada UV è di 9000 ore. La vita utile del filtro HEPA è di 600 giorni. 1. Premere "UV bulb & Filter lifetime". V errà visualizzata la durata rimanente del filtro HEPA (1) e della lampada UV (2). Per uscire dalla pagina, usare "Back" o "Home". Fig. 34: Informazioni sulla durata della lampada UV e del filtro Instrument Info Premendo "Instrument Info" si possono consultare informazioni sulla versione software attuale e sulle ore del ventilatore. Premere "Instrument Info". Compaiono la versione software attuale (1) e le ore del ventilatore (2). Per uscire dalla pagina, usare "Back" o "Home". Fig. 35: Informazioni sull'apparecchio GuardOne · Manuale · 185 ®...
- Page 186 7600 Salmonella sp. 10000 Salmonella typhimurium 15200 Sarcina lutea 26400 Serratia marcescens 6160 Shigella paradysenteriae 3200 Spirillum rubrum 6160 Staphylococcus albus 5720 Staphylococcus aureus 6600 Streptococcus hemolyticus 5500 Streptococcus lactis 8800 Streptococcus viridans 3800 186 · GuardOne · Manuale ®...
- Page 187 Influenza 6600 Mosaico del tabacco 44000 Tempo di esposizione minimo raccoman- Microwatt (µW) per secondo/cm² Protozoi dato in minuti a una distanza di 1 m e richiesti una potenza UV-C di 48 μW/cm² Chlorella vulgaris (alga) 22000 Uova di nematodi 9200 Paramecium 200000 GuardOne · Manuale · 187 ®...
- Page 188 Danni alle cose realizzate in materiale plastico a causa di irraggiamento prolungato! Alcuni tipi di plastica, come ad esempio i puntali per pipetta, possono sbriciolarsi a causa di un irraggiamento prolungato. - Non porre contenitori in plastica non resistenti agli UV in GuardOne® Workstation. Uso della lampada UV 1. P er avviare la decontaminazione UV, portare il selettore dello stato UV (1) su P er arrestare la decontaminazione UV, portare il selettore dello stato UV (1) su La lampada UV non può essere accesa se lo sportello frontale è aperto. L a lampada UV viene spenta automaticamente non appena si apre lo sportello frontale. Chiudendo nuovamente lo sportello, la procedura di decontaminazione non si riavvierà. " Expiration Time UV Light Source" (2) fornisce informazioni sulla Fig. 36: UV 254 Decon durata utile rimanente della lampada UV. 2. Per uscire dalla pagina, usare "Back" o "Home". 188 · GuardOne · Manuale ®...
- Page 189 Uso del timer UV › I l timer può essere utilizzato soltanto prima dell'accensione della lampada UV. R egolare il timer UV non è assolutamente necessario per l'uso della funzione di irraggiamento UV. Portare il selettore "UV Status" su (1). Per impostare il timer, premere i pulsanti per le ore, i minuti e i secondi (2). Fig. 37: Timer UV Selezionare i valori desiderati (3) con il pulsante + e - Il tempo di decontaminazione desiderato è stato impostato. 4. Per avviare la decontaminazione UV, portare il selettore dello stato UV (1) su L a lampada UV viene automaticamente spenta allo scadere del tempo preimpostato. Se non si imposta il timer, la decontaminazione UV funzionerà indefinitamente. L a lampada UV e il timer verranno spenti automaticamente non appena si apre lo sportello frontale. Chiudendo nuovamente lo sportello, la procedura di decontaminazione non si riavvierà. U n segnale acustico verrà emesso allo scadere del tempo preimpostato. Per uscire dalla pagina, usare "Back" o "Home". GuardOne · Manuale · 189 ®...
- Page 190 Regolazione delle preferenze per il flusso d'aria Premere "Quick Start Settings". Premere il valore percentuale (1). S elezionare la velocità del flusso d'aria desiderata (2) usando i pulsanti + e - Le opzioni per la velocità del flusso d'aria sono 0, 50, 80 e 100 %. Fig. 39: Regolazione delle preferenze per il flusso d'aria L a selezione di una velocità del flusso d'aria pari allo 0 % comporterà lo spegnimento del ventilatore. Per riaccenderlo, selezionare una velocità superiore allo 0 % o usare la funzione "Quick Start" sulla schermata "Home" come descritto nel capitolo 6.2 “Utilizzo dell'area di visualizzazione”. Applicare quanto selezionato (3) con "Save". Per uscire dalla pagina, usare "Back" o "Home". U scire dalla pagina senza premere su "Save" annullerà tutte le modifiche effettuate! 190 · GuardOne · Manuale ®...
- Page 191 Applicare quanto selezionato (4) con "Save". Fig. 40: Impostazione delle preferenze per la luce LED e il colore Per uscire dalla pagina, usare "Back" o "Home". U scire dalla pagina senza premere su "Save" annullerà tutte le modifiche effettuate! Luminosità della luce LED Premendo "LED Brightness" è possibile impostare la luminosità della luce LED in GuardOne® Workstation. Premere "LED Brightness". Premere il valore percentuale (1). S elezionare la percentuale di luminosità desiderata (2) usando i pulsanti + e - L a luminosità dei LED può essere impostata dal 10 % al 100 % in Fig. 41: Regolazione della luminosità LED incrementi del 5 %. La luminosità selezionata sarà applicata a tutti i colori disponibili. Applicare quanto selezionato (3) con "Save".
- Page 192 Il contatore della durata utile della lampada UV deve essere resettato soltanto dopo aver sostituito la vecchia lampada UV con una nuova. P er informazioni sulla sostituzione della lampada UV e sull'attivazione del monitoraggio automatico della durata utile della lampada fare riferimento al capitolo 7.2 "Manutenzione". Impostazione della contropressione AVVISO! Efficacia limitata del sistema di filtrazione dell'aria a causa della modifica della soglia di allarme del filtro HEPA! U na modifica della soglia di allarme di blocco del filtro HEPA avrà un effetto sull'efficacia del sistema di filtrazione dell'aria. La modifica delle impostazioni di fabbrica può influire sulle prestazioni altrimenti ottimali di GuardOne® Workstation. - S e si ritiene che le impostazioni di allarme debbano essere cambiate, contattate un tecnico di manutenzione Starlab o il rappresen- tante delle vendite Starlab di zona. 192 · GuardOne · Manuale ®...
- Page 193 Reset Quando si preme "Reset", GuardOne® Workstation viene riportato alle impostazioni di fabbrica. V errà persa qualsiasi modifica fatta alla luminosità dello schermo, la luminosità della luce LED, le impostazioni Quick Start, ogni regola- zione della data e ora e della contropressione. Dopo aver ripristinato le impostazioni di fabbrica, si dovrà calibrare il touchscreen. 1. Premere "Reset". Fig. 43: Reset di GuardOne® Workstation 2. Confermare premendo "Reset" (1). GuardOne® Workstation si spegne. 3. P er calibrare il touchscreen, premere sulle croci che saranno visua- lizzate una dopo l'altra nei quattro angoli dello schermo con una penna. La stazione di lavoro è stata resettata alle impostazioni di fabbrica. P er modificare le impostazioni di fabbrica consultare il capitolo "Messa in servizio". GuardOne · Manuale · 193 ®...
-
Page 194: Pulizia E Manutenzione
Indicazioni sulla contaminazione AVVISO! Contaminazione del prefiltro a causa della contaminazione dell'aria! A causa della contaminazione dell'aria, il prefiltro può sporcarsi. Un ambiente di lavoro sterile all'interno di GuardOne® Workstation non può pertanto essere garantito. - Per garantire un funzionamento ottimale del prefiltro, si consiglia di ispezionarlo visivamente a intervalli regolari. - Deve essere sostituito non appena diventa visibilmente sporco, al più tardi dopo 6 mesi. AVVISO! Contaminazione dell'interno di GuardOne Workstation dovuta a contaminazione batterica! ® A causa della contaminazione dell'area di lavoro, un utilizzo continuato dell'apparecchio senza provvedere alla pulizia dell'area stessa può portare alla contaminazione o alla distruzione dei campioni e alla falsificazione dei risultati. - È necessario pulire l'area interna della superficie di lavoro dopo ogni utilizzo. Danni alle cose AVVISO! Danno dell'alloggiamento superiore causato da oggetti posti al di sopra! S e si appoggiano materiali di laboratorio, campioni o liquidi sulla superficie dell'alloggiamento superiore, si possono verificare dei danni nel caso in cui questi entrino nel prefiltro e nel filtro HEPA. - Page 195 Funzionamento limitato a causa dell'installazione di un filtro non originale! S e si utilizza qualsiasi altro filtro al posto del filtro HEPA Starlab originale, non è possibile garantire il corretto funzionamento del sistema di filtrazione dell'aria. - Usare soltanto filtri HEPA Starlab originali progettati per GuardOne® Workstation. - Per qualsiasi domanda, contattare il servizio di assistenza o il rappresentante delle vendite Starlab di zona. P er informazioni per l'ordine, visitare il sito internet o servirsi dei contatti riportati in "Hotline di assistenza Starlab" o sul retro. Rimozione del filtro HEPA usato 1. S pegnere GuardOne® Workstation con l'interruttore di rete sul retro dell'alloggiamento. A prire lo sportello frontale dell'alloggiamento superiore finché le gui- Fig. 46: Apertura dello sportello frontale de sulla sinistra e sulla destra non si bloccano lasciando lo sportello dell'alloggiamento superiore aperto. 3. S bloccare l'alloggiamento del filtro HEPA fissato con due viti nere sul lato sinistro e destro tra l'alloggiamento del filtro e le pareti dell'al- loggiamento superiore.
- Page 196 C hiudere lo sportello frontale dell'alloggiamento. Per far questo, sbloccare per prima cosa i due ausili di sollevamento sul lato sinistro e destro sollevando leggermente lo sportello frontale su entrambi i lati. 9. Attivare l'alimentazione. L o sportello frontale è attrezzato con un interruttore di sicurezza che interrompe automaticamente l'alimentazione elettrica. Se il touchscreen non funziona dopo aver attivato l'alimentazione, verificare che lo sportello frontale sia ben chiuso. Attivazione del monitoraggio automatico della durata utile P er raggiungere la schermata "Home", premere "Tap to unlock". Premere "Settings". Premere "Replace HEPA Filter". I mmettere il numero di serie da 10 cifre (1) indicato sul davanti delle etichette del filtro. Fig. 50: Attivazione del monitoraggio automatico della durata utile Premere "Enter" (2) per concludere la procedura di installazione. GuardOne® Workstation è ora pronta per essere usata. La durata utile rimanente del filtro HEPA è di 600 giorni. 196 · GuardOne · Manuale ®...
- Page 197 Funzionamento limitato a causa dell'installazione di una lampada UV non originale! S e si utilizza qualsiasi altra lampada UV al posto della lampada UV Starlab originale, non è possibile garantire il corretto funzionamen- to del sistema di decontaminazione UV. - Usare soltanto una lampada UV Starlab originale progettata per GuardOne® Workstation. - Per qualsiasi domanda, contattare il servizio di assistenza o il rappresentante delle vendite Starlab di zona. Per informazioni per l'ordine, visitare il sito internet o servirsi dei contatti riportati in "Hotline di assistenza Starlab" o sul retro. Rimozione della lampada UV usata 1. S pegnere GuardOne® Workstation con l'interruttore di rete sul retro dell'alloggiamento. 2. A prire completamente lo sportello frontale, utilizzando la cavità sulla sommità dell'alloggiamento superiore per fissarlo in posizione in sicurezza. ATTENZIONE! Rischio di ustioni a causa del calore emesso dalla lampada UV durante la decontaminazione! Le lampade UV possono surriscaldarsi durante l'uso.
- Page 198 GuardOne® è dotato di una batteria che consente di salvare i dati dell‘apparecchio mentre questo è spento. A seconda della sua vita utile, la batteria deve essere sostituita ogni 3-5 anni. AVVERTENZA PERDITA DEI DATI A CAUSA DELLA RIMOZIONE DELLA BATTERIA V ersione software V2.9 e precedenti: contattare il rappresentante Starlab o il tecnico di manutenzione Starlab di zona, poiché pri- ma di rimuovere la batteria è necessario eseguire l‘aggiornamento del software versione V3.0 al fine di evitare che la lampada UV e il filtro HEPA non siano più utilizzabili. A lla pagina „Standby“ sono riportate informazioni sulla versione software attualmente installata (vedere fig. 27). Queste informazioni sono consultabili anche sotto „Instrument Info“. Retrait de la pile S pegnere la stazione di lavoro GuardOne® con l‘interruttore di rete sul retro dell‘alloggiamento. A prire la ribalta dell‘alloggiamento superiore finché le guide a sinistra e a destra non scattano in posizione mantenendo aperta la ribalta. L a batteria si trova sul retro del touchscreen a cristalli liquidi della ribalta dell‘alloggiamento superiore. Nel caso non sia presente alcun vano batteria sul retro del touch- screen del proprio GuardOne®, contattare il rappresentante Starlab o il tecnico di manutenzione Starlab di zona. I dati di contatto sono Fig. 53: Apertura della ribalta dell‘alloggiamento superiore disponibili premendo su „Starlab Service & Order Information“...
- Page 199 Inserimento della batteria I nserire una nuova batteria (tipo CR1220, batteria a bottone Ø 12,5 mm, 3 V / 35 mAh). C hiudere la ribalta dell‘alloggiamento superiore. Per farlo, sbloc- care per prima cosa i due ausili di sollevamento sul lato destro e sinistro dell‘apparecchio, sollevando leggermente la ribalda su entrambi i lati. Attivare l‘alimentazione. La ribalta è dotata di un interruttore di sicurezza che interrompe automaticamente l‘alimentazione. Se in seguito all‘attivazione Fig. 55: Sblocco della batteria spingendo verso sinistra dell‘alimentazione il touchscreen non funziona, verificare che la la molla a lamina sulla sinistra della batteria ribalta sia stata chiusa correttamente. I nserire data e ora (vedere 5. Messa in servizio – Regolazione di data e ora) GuardOne · Manuale · 199 ®...
-
Page 200: Pulizia E Decontaminazione
Intervalli di pulizia Rispettare gli intervalli indicati di seguito. › O gni volta dopo aver utilizzato GuardOne® Workstation, effettuare la pulizia in base all'uso fatto. Pulire la stazione di lavoro con uno dei detergenti raccomandati. A seconda dell'impiego previsto di GuardOne® Workstation, eseguire la decontaminazione della camera in PC tramite la lampada UV. › I n caso di contaminazione visibile, effettuare una pulizia adeguata. › P er garantire un funzionamento ottimale del prefiltro, si consiglia di ispezionarlo visivamente a intervalli regolari. Sostituirlo non appena diventa visibilmente sporco, al più tardi dopo 6 mesi. Pulizia della superficie esterna di GuardOne Workstation ® Prerequisiti › G li intervalli di pulizia raccomandati devono essere rispettati. › G uardOne® Workstation è spento o scollegato dall'alimentazione elettrica. 1. Usare un panno per la pulizia privo di pelucchi per spolverare l'esterno della camera di GuardOne® Workstation. Se necessario, passare delicatamente un panno imbevuto di un detergente blando sulla superficie esterna della camera. Pulizia del touchscreen Prerequisiti ›... - Page 201 Pulizia della superficie interna e della camera di GuardOne Workstation ® ATTENZIONE! Danni alla salute a causa dell'irraggiamento UV! Un'esposizione prolungata ai raggi UV provoca danni alla salute. - Per ragioni di sicurezza, la lampada UV non può essere accesa se lo sportello frontale è aperto. - P er ragioni di sicurezza, la lampada UV viene spenta automaticamente non appena si apre lo sportello frontale. Chiudendo nuovamente lo sportello, la procedura di decontaminazione non si riavvia. AVVISO! Decontaminazione completa impossibile a causa della costante corrente d'aria! A causa della costante corrente d'aria nella camera, non è possibile ottenere una decontaminazione al 100 % per irraggiamento delle lampade UV. - Attenersi alle raccomandazioni contenute nel presente manuale. - Ulteriori informazioni sulla decontaminazione di GuardOne® Workstation sono riportate sulla home page di Starlab.
-
Page 202: Risoluzione Dei Problemi
Danni alla salute a causa di una decontaminazione insufficiente alla restituzione dell'apparecchio! U na decontaminazione insufficiente alla restituzione dell'apparecchio a Starlab può costituire un rischio per la salute per chiunque maneggi GuardOne® Workstation. - Se restituito a Starlab, l'apparecchio deve essere accompagnato da un certificato di decontaminazione. - Qualsiasi elemento inviato al produttore deve essere prima pulito. - Il reso deve essere comunicato a Starlab. Per ulteriori informazioni, contattare il rappresentante Starlab di zona. I dati di contatto sono riportati sulla schermata di stato raggiungibile premendo "Starlab Service & Order Information". AVVISO! Danni alle cose a causa di una riparazione non autorizzata di GuardOne Workstation! ® R iparazioni autonome di GuardOne® Workstation con uno stato di errore senza l'assistenza di un tecnico di manutenzione Starlab possono causare danni alle cose. - I n caso di uno stato di errore, contattare il rappresentante Starlab di zona. I dati di contatto sono riportati sulla schermata di stato raggiungibile premendo "Starlab Service & Order Information". Un'anomalia viene indicata visivamente dal colore del campo corrispondente. -
Page 203: Allerte
- P er ordinare una nuova lampada UV, contattare il rappresentante Starlab di zona. I dati di contatto sono riportati sulla schermata di stato raggiungibile premendo "Starlab Service & Order Information". › HEPA filter life time end (Alert 3) - " HEPA filter life time end" significa che il filtro HEPA è giunto al termine della sua vita utile di 600 giorni e deve essere sostituito per garantire la funzionalità di GuardOne® Workstation. › HEPA filter blocked (Alert 4) - " HEPA filter blocked" significa che GuardOne® Workstation ha rilevato un flusso d'aria limitato, solitamente causato da un filtro HEPA bloccato. - I l filtro HEPA deve essere sostituito, indipendentemente dal fatto che la sua durata utile non sia ancora arrivata al termine. - È necessario sostituire il filtro HEPA immediatamente. È sconsigliato continuare a utilizzarlo. - Contattare il tecnico di manutenzione Starlab per assistenza. › HEPA filter critical age (Alert 5) - " HEPA filter critical age" significa che il filtro HEPA non è ancora giunto al termine della sua vita utile di 600 giorni però è prossimo... -
Page 204: Errori
Errori AVVISO! Danni alle cose se si ignorano i messaggi di errore! I n caso di messaggi di errore, continuare a utilizzare GuardOne® Workstation può causare danni materiali all'apparecchio e ai campioni. - Contattare il tecnico di manutenzione Starlab per assistenza. - I dati di contatto sono riportati sulla schermata di stato raggiungibile premendo "Starlab Service & Order Information". Gli errori di stato forniscono informazioni sui danni alle cose che com- promettono il funzionamento di GuardOne® Workstation fino alla riparazione da parte di un tecnico di manutenzione Starlab. › Blower breakdown (Error 1) - " Blower breakdown" significa che GuardOne® Workstation ha rilevato un malfunzionamento del motore del ventilatore. › Backpressure sensor failure occurred (Error 2) - " Backpressure Sensor failure occurred" significa che GuardOne® Workstation ha rilevato un malfunzionamento del controllo del Fig. 58: Errori flusso d'aria. - Page 205 Comportamento in caso di malfunzionamento del motore Se il motore produce un rumore insolito durante il funzionamento per un lungo periodo di tempo, potrebbe aver subìto un guasto. 1. Portare l’interruttore di rete principale su OFF. 2. Attendere qualche minuto prima di riaccendere GuardOne® Workstation. 3. Portare l’interruttore di rete principale su ON. S e il rumore del motore persiste, contattare il rappresentante Starlab di zona o il tecnico di manutenzione Starlab. Per i dati di contatto, premere “Starlab Service & Order Information” sulla schermata di stato. Comportamento in caso di malfunzionamento dell'interruttore dello sportello Se l'interruttore dello sportello è difettoso, la lampada UV non può più essere accesa. Inoltre, il flusso d'aria funziona anche quando lo spor- tello frontale è chiuso. Contattare il rappresentante Starlab di zona o il tecnico di manutenzione Starlab per assistenza. Per i dati di contatto, premere “Starlab Service & Order Information” sulla schermata di stato. Comportamento in caso di interruzione dell'alimentazione Portare l'interruttore di rete principale su ON. Continuare con l'applicazione. Non è necessario resettare le impostazioni precedenti. In caso di un'interruzione dell'alimentazione, le impostazioni precedenti vengono mantenute. Comportamento in caso di malfunzionamento della luce LED In caso di malfunzionamento della barra LED, le anomalie non saranno visualizzate sul display di controllo.
-
Page 206: Smaltimento
Smaltimento Esiste una garanzia di due anni su GuardOne® Workstation. È responsabilità dell'utente provvedere allo smontaggio e allo smaltimento dell'apparecchio. L a vita utile prevista di GuardOne® Workstation, consumabili esclusi, è di almeno cinque anni, a seconda della frequenza di utilizzo e delle condizioni ambientali. Salvo che non esista un accordo di restituzione o smaltimento, inviare al riciclaggio i seguenti componenti disassemblati: › r ottami metallici; › r iciclare gli elementi in plastica; › s maltire gli altri componenti differenziandoli in base al tipo di materiale. Smaltimento delle lampade UV Le lampade UV difettose sono un rifiuto pericoloso. Contengono mercurio e non possono essere riciclate. Per assistenza o ulteriori informazioni, contattare il responsabile del vostro sistema di gestione dei rifiuti interno o locale. Nel caso si smaltisca il prodotto, osservare le disposizioni legali applicabili. Informazioni sullo smaltimento delle apparecchiature elettriche ed elettroniche nella Comunità Europea: All'interno della Comunità Europea, lo smaltimento delle apparecchiature elettriche è regolato da normative nazionali basate sulla direttiva UE 2012/19/UE relativa ai rifiuti di apparecchiature elettriche ed elettroniche (RAEE). In base a questa direttiva, ogni apparecchio fornito dopo il 13/08/2005 in ambito business-to-business, nel quale rientra questo prodotto, non può più essere smaltito assieme ai rifiuti domestici. Per segnalare questa disposizione, questi apparecchi sono stati contrassegnati con il seguente simbolo: Poiché i regolamenti sullo smaltimento possono differire da un paese all'altro all'interno dell'UE, contattare il proprio distributore locale per informazioni in merito. -
Page 207: Misure E Peso
48" Lunghezza 1330 Larghezza Altezza Peso Laminar Flow Dead Air Dimensioni esterne e Specifiche Valore Unità peso 48" Lunghezza 1220 Larghezza Altezza Peso Laminar Flow Dead Air Dimensioni interne 48" Specifiche Valore Unità Lunghezza 1200 Larghezza Altezza GuardOne · Manuale · 207 ®... -
Page 208: 10.3 Requisiti Dell'alimentazione
Etichetta del modello del prodotto Fig. 59: Etichetta del modello del prodotto L'etichetta del modello del prodotto contiene le seguenti informazioni: › c odice d'ordine › n umero di serie › v oltaggio › f requenza › p otenza in uscita › f usibile › c ertificato ispezione TÜV › s imbolo RAEE: non smaltire con i rifiuti domestici. 208 · GuardOne · Manuale ®... -
Page 209: Indice Analitico
Stato dispositivo di controllo ......202 Ispezione Scoppio di incendio ........169 Consegna............170 Condizioni operative ..........206 Trasporto ............170 Configurazione di Sicurezza GuardOne® Workstation ...... 160, 178 Avvertenze ............164 Conservazione ............. 171 Laminar Flow ............160 Dispositivi ............165 Condizioni............206 Luce LED ........ 163, 179, 184, 205 Pericoli per le persone ........167 Luogo ............... - Page 210 210 · GuardOne · Manual ®...
- Page 211 GuardOne · Manual · 211 ®...
- Page 212 Starlab International GmbH Neuer Höltigbaum 38 22143 Hamburg Germany T: +49 (0)40 675 99 39 0 F: +49 (0)40 675 99 39 20 info@starlab.de www.starlabgroup.com Starlab (UK), Ltd 5 Tanners Drive Milton Keynes MK14 5BU United Kingdom T: +44 (0)1908 283800 F: +44 (0)1908 283802 infoline@starlab.co.uk...
Need help?
Do you have a question about the GuardOne and is the answer not in the manual?
Questions and answers