Table of Contents
Advertisement
Quick Links
Advertisement
Table of Contents

Related Manuals for Canon PIXMA Q T 1 0 8 5 1 V 0 1


Summary of Contents for Canon PIXMA Q T 1 0 8 5 1 V 0 1
-
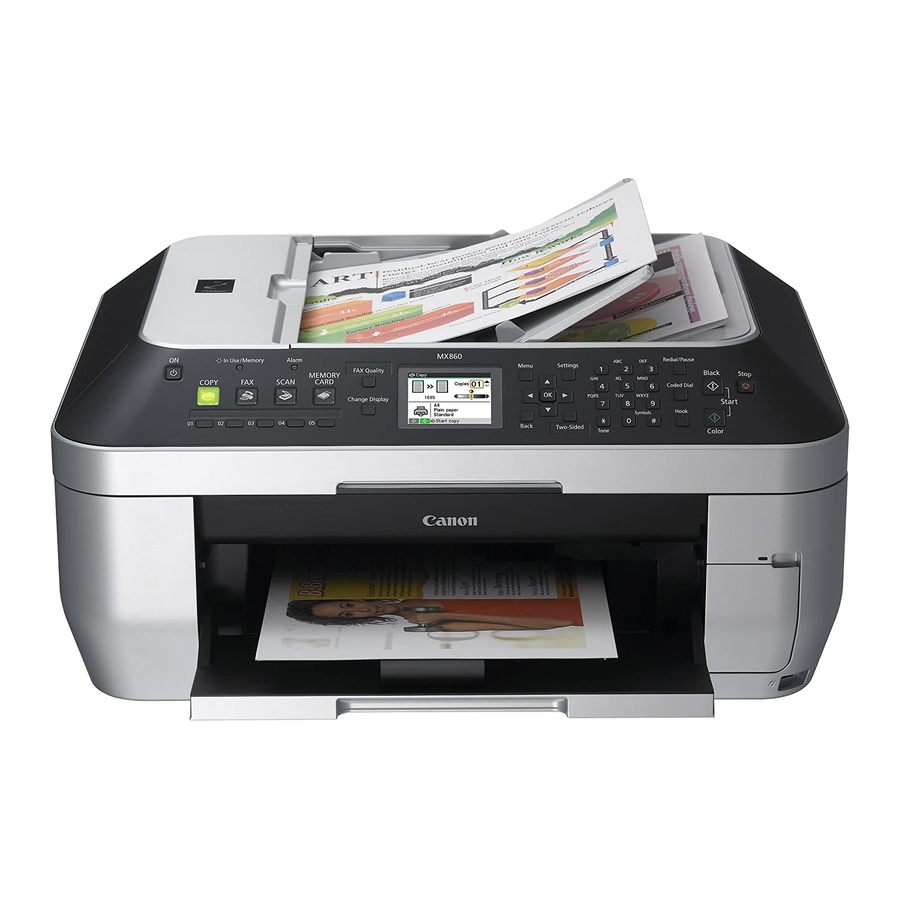
Page 1: Getting Started
Getting Started Mac Users office all-in-one series Q T 1 0 8 5 1 V 0 1... -
Page 3: Table Of Contents
Contents Getting Started Overview | 4 Prepare Your MX860 | 4 Before Starting Unpack and Set Up Set Up the Hardware | 8 Install the Print Head Install the Ink Tanks | 10 Load Paper | 11 Align the Print Head | 12 Set Up to Receive Faxes | 14... -
Page 4: Getting Started Overview
Network Name (also called SSID): ____________________________ Network Password (if applicable): ____________________________ You can also retrieve your network name and password by using the Canon PIXMA Wireless Setup Assistant, or by following the procedures available for download from the Canon support webpage (www.usa.canon.com/downloadlibrary). -
Page 5: Unpack And Set Up
CD NOT SHOWN: ink tanks documentation If any parts are missing, contact Canon (see back cover for contact data). Remove all packing materials Remove all tape from the outside of the MX860. Open the paper output tray. Lift the scanning unit until the support slides into place. - Page 6 Lift the document cover and remove any packing material. Close the document cover. Connect the phone line for fax setup If you do not plan to fax from your MX860, proceed to step 5. Connect the phone cord from the MX860 to the wall. in from wall jack Make sure you connect the phone cable into the port...
- Page 7 Power up Press the ON button to turn on the MX860. Your MX860 will make sounds as it powers up. This is normal. Select language Use the ▲ and ▼ button on the operation panel to select a language for the display, then press OK.
-
Page 8: Set Up The Hardware
Set Up the Hardware Install the Print Head With the power on, open the paper output tray paper output tray Lift the scanning unit until the support slides into place print head holder scanning unit support Raise the print head lock lever print head lock lever print head lock lever Avoid touching the contact points in the print head holder. - Page 9 Unpackage the print head When handling the print head, hold it only on the sides. Do not touch the tank seats or contact points. Remove the protective orange cap Insert the print head into the print head holder Tilt the print head forward and place it gently into position. Do not try to force it.
-
Page 10: Install The Ink Tanks
Install the Ink Tanks Unwrap the first ink tank Pull the orange tape off to remove the protective wrap. Remove protective cap Hold the ink tank as shown, and twist the cap off. Do not grip the tank with force or hold the tank on the sides to avoid squeezing ink from the tank. -
Page 11: Load Paper
Close the cover The printer will perform initial start up maintenance. Wait until the “Load plain paper” screen displays before continuing setup. Press the button Load Paper Remove the cassette Load plain paper with the printing side down Paper should fit between the adjustable paper guides. -
Page 12: Align The Print Head
Insert at least 3 sheets of plain paper (the minimum needed for the next action). The cassette is for plain paper only. Slide the guides to match the paper size (A slight space between the paper guide and the paper stack is acceptable.) Confirm paper stack does not exceed the limit Slide the cassette back in until it clicks into place... - Page 13 Yes to print the first alignment pattern, then press OK. Select Yes again, then OK. Select Look at the first printout less noticeable more noticeable Select best pattern Use the ◄►▲▼ buttons to enter the number of the pattern that has the least noticeable vertical or horizontal streaks for columns A to G, then press the OK button.
-
Page 14: Set Up To Receive Faxes
Look at the third printout Repeat step 3 for columns a to j. Press to complete print head alignment The Standby screen will display when print head alignment is complete. Set Up to Receive Faxes If you are not using your MX860 as a fax, go to "Set Up the Software" on page 15. -
Page 15: Set Up Your Fax Sender Information
Set Up Your Fax Sender Information For details on sender information, refer to "Specifying the Basic Settings for the Machine" in the on-screen manual: Basic Guide. Go to "Set Up the Software" on page 15. Set Up the Software Install the Software Connect the USB cable to your computer Connect the other end to your MX860 prepare... - Page 16 Insert the Setup disc Setup Double-click the icon on your screen If the CD-ROM folder does not open automatically, double- click the CANON_IJ icon on the desktop. Enter your administrator password If you do not know your administrator name or password, click , then follow the on-screen instructions.
- Page 17 If you plan to connect to a network but select USB connection by mistake you will need to reinstall the software. Connecting with a USB Cable After your computer restarts, the Canon IJ Network Tool dialog appears. Select USB connection Only select USB connection if you plan to connect the MX860 directly to a single computer and not to a network.
-
Page 18: Connect To Your Network (Optional)
Connect to Your Network (optional) Choose Your Network Type wireless network with a single access point Wi-Fi router Go to page 19. The MX860 can not be used over a wireless network and a wired network at the same time. To connect additional computers to the MX860, go to "Connecting Additional Computers"... -
Page 19: Wireless Networks With A Single Access Point
"Set the Network Connection Type" on page 28 for details. multiple access points (example: Airport Extreme and Airport Express) Select LAN connection On the Canon IJ Network Tool dialog, select LAN connection, then click OK. Wi-Fi router Wi-Fi router Select printer to use Setup in the pop-up menu. - Page 20 Select your wireless network Select the network name you wrote down in step 1. If your network requires a password, enter it. Connect. Click The network password is case sensitive. Complete the network setup When the Setup Completion dialog appears: Disconnect the USB cable and place the MX860 where it will be used.
- Page 21 If the connection results are less than “Good,” move the MX860 to Remeasurement a new location, then click performance test. Add the Printer (OS X v10.5.x) The Printer Browser window will open automatically. Select the printer More Printers. Click Select MX860 series.
- Page 22 MX860 series. Add. Click Select the Scanner The Canon IJ Network Scanner Selector dialog opens. Select scanner From the pop-up menu, select Canon MX860 series In the Network Device List pane, select the MAC address of the MX860. There should be only one device listed unless you have more than one MX860 series device connected to your network.
-
Page 23: Wireless Networks With Multiple Airport Access Points
Once your MX860 is connected to your network, the USB cable is no longer needed. wired network connecting with an Ethernet cable Select On the Canon IJ Network Tool dialog, select LAN connection, then click OK. Wi-Fi router Select printer to use The MX860 is set at the factory to connect to a wireless (Wi-Fi) network. - Page 24 Click Manual Setup Enter network name Enter the name of the network (SSID) you would like the MX860 to join. Choose an encryption method that matches what is in use for your network. If you do not have encryption enabled on your network, select Do Not Use on the encryption method pop-up menu, then click Connect.
- Page 25 Click Connect Complete the network setup When the Setup Completion dialog appears: Disconnect the USB cable and place the MX860 where it will be used. Next. On your computer, click If the MX860 does not connect, see section 5.6 of the printed manual "Network Setup Troubleshooting."...
- Page 26 If the connection results are less than “Good,” move the MX860 to Remeasurement a new location, then click performance test. Add the Printer (OS X v10.5.x) The Printer Browser window will open automatically. Select the printer Click More Printers. Select MX860 series.
- Page 27 Select MX860 series. Add. Click Select the Scanner The Canon IJ Network Scanner Selector dialog opens. Select scanner From the pop-up menu, select Canon MX860 series In the Network Device List pane, select the MAC address of the MX860. There should be only one device listed unless you have more than one MX860 series device connected to your network.
-
Page 28: Wired Networks
a single access point Confirm that a checkmark appears next to the selected device, then click Exit. Wi-Fi router Congratulations! You are finished with the setup. Go to "Start Using Your MX860!" on page 37. multiple access points (example: Airport Extreme and Airport Express) Wired Networks Wi-Fi router Wi-Fi... - Page 29 WLAN/LAN, then press the Select the desired network connection method ( then press the button. LAN connection Select On the Canon IJ Network Tool dialog, select LAN connection, then click OK. Select printer to use Select button. Select Wired LAN...
- Page 30 If your network uses pre-assigned IP addresses (also called fixed or static addresses), select Use following IP address in the pop-up menu and enter the appropriate information, then click Connect. If the MX860 is not detected automatically, the Set Printer...
- Page 31 Disconnect the USB cable, then click Add the Printer (OS X v10.5.x) The Printer Browser window will open automatically. Select the printer Click More Printers. MX860 series. Select Click Add. The letters and numbers after "MX860 series" show the MAC address for this device (Media Access Control address, a unique identifi er for any equipment connected to a network).
- Page 32 Add the Printer (OS X v10.4.x) The Printer List window will open automatically. Click Add the printer Click More Printers. MX860 series. Select Click Add. Add the Printer (OS X v10.3.9) The Printer List window will open automatically. Click The Printer Browser window opens.
-
Page 33: Connecting Additional Computers
Network. After installing the software and restarting your computer, the Canon IJ Network Tool automatically starts. LAN connection Select On the Canon IJ Network Tool dialog, select LAN connection, then click OK. "Set Up the Software" on prepare hardware software... - Page 34 Cancel When the Cancel Setup screen appears, click Cancel, or if the You have no printers available screen appears, click Cancel. Add the Printer (OS X v10.5.x) The Printer Browser window will open automatically. Select the printer Click More Printers.
- Page 35 Add the Printer (OS X v10.4.x) The Printer List window will open automatically. Click Add the printer Click More Printers. MX860 series. Select Click Add. Add the Printer (OS X v10.3.9) The Printer List window will open automatically. Click The Printer Browser window opens.
- Page 36 Select the Scanner The Canon IJ Network Scanner Selector dialog opens. Select scanner From the pop-up menu, select Canon MX860 series In the Network Device List pane, select the MAC address of the MX860. There should be only one device listed unless you have more than one MX860 series device connected to your network.
-
Page 37: Start Using Your Mx860
MX860. From here you can open various applications and on- screen manuals with a single click. To start the Solution Menu, click the Canon Solution Menu icon on the Dock. On-Screen Manual To open the on-screen manual, click the Get help for your Canon product or software button in the Solution Menu. - Page 38 Call 800-OK-CANON to locate a dealer near you, or visit the Canon eStore at www.canonestore.com. QT1-0851-V01 Canon and PIXMA are registered trademarks of Canon Inc. in the United States and may be registered trademarks or trademarks in other countries. IMAGEANYWARE is a trademark of Canon.
Need help?
Do you have a question about the PIXMA Q T 1 0 8 5 1 V 0 1 and is the answer not in the manual?
Questions and answers