Table of Contents
Advertisement
Quick Links
Advertisement
Table of Contents

Subscribe to Our Youtube Channel
Related Manuals for Carbine 34cs


Summary of Contents for Carbine 34cs
- Page 1 O W N E R ’ S M A N U A L SECURITY SYSTEM with KEYLESS ENTRY...
-
Page 2: Congratulations
Congratulations Congratulations on the purchase of this CARBINE keyless entry and security system. Reading this owners guide prior to using the system will familiarize you with it’s many features. If issues arise or you have questions, contact your installing dealer first. Additionally, you can contact us online at www.carbine.com or call 310-735-2000. -
Page 3: Table Of Contents
Contents Congratulations ..................2 Replacement Remote Controls ..............2 Remote Configuration ................4 LCD Configurations ..................5 Arming/ Disarming ..................7 Disarm without a Transmitter ..............7 Passive Arming/Locking ................8 Panic Alarm ....................8 Trunk Release (CH#3) ................9 AUX Output (CH#4) ..................9 Valet Mode....................10 Trigger the System ...................11 Progressive Door Trigger ................11 Tamper Warnings ..................11 Forced Passive Arming ................12... -
Page 4: Remote Configuration
Remote Configuration Button Feature Comment Lock/ Arm Press and release. Unlock/ Disarm Press and release. Panic Alarm On/Off Press and hold for 2 sec. Arm and delete the Press two times within 5 seconds. – on-board shock sensor 2 short chirps + 1 long Arm and delete the option- Press three times within 10 seconds. -
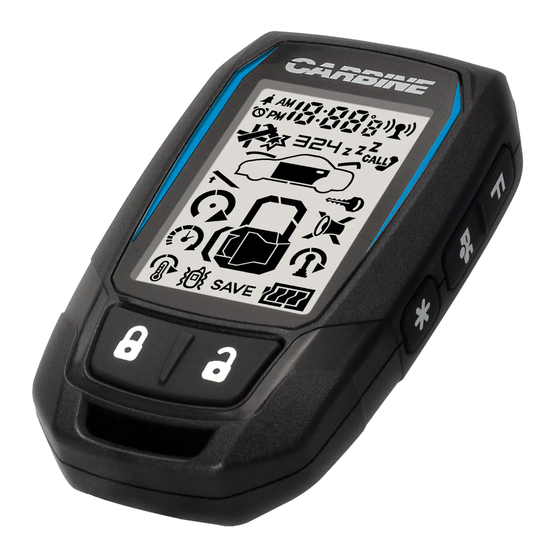
Page 5: Lcd Configurations
Standard LCD Icon Configurations LCD Icon Description LCD Icon Description The lock icon will be The unlock icon will be displayed when the doors displayed when the doors are locked and the system are locked and the system is is armed disarmed The valet mode icon will be The time display shows actual... - Page 6 LCD Icon Description LCD Icon Description The remote battery needs to The remote battery is full be replaced The door is open or the alarm The hood is open or the alarm has been triggered from an has been triggered from an open door open hood The trunk is open or the...
-
Page 7: Arming/ Disarming
Note: If the system had previously been triggered, the tamper warning chirps will always sound upon disarm. Disarm without the Remote Control Your CARBINE system has an override mode that allows you to disarm your system in the event that you have lost or damaged your remote controller. -
Page 8: Passive Arming/Locking
Passive Arming/Locking Your CARBINE system can be programmed to Passive Arm and Lock the doors. If both of these features are programmed on, your CARBINE system will automatically arm and lock the doors 30 seconds after the last protected entrance is closed. -
Page 9: Trunk Release (Ch#3)
Trunk Release (CH#3) Press and hold the button for 1.2 seconds to release the trunk/ hatch lid - The vehicle must have electronic trunk control - The trunk release control option must be installed AUX Output Activation (CH#4) Depending on your installation, your installer may have connected the channel #4 output to your vehicle. -
Page 10: Valet Mode
Valet Mode (By Valet Button) Valet mode is a convenience when you take your car in for service or allow someone who may not be familiar with your security system to drive your vehicle. - All doors must be closed - Turn the ignition key On then Off. -
Page 11: Trigger The System
Progressive Door Trigger This feature is ON by default and can be programmed off by the installer. When your CARBINE system is armed and a door is opened, instead of “full alarm mode” the system will chirp the horn/siren 10 times prior to going into full alarm mode. -
Page 12: Forced Passive Arming
Forced Passive Arming As additional protection, the Forced Passive Arm feature will arm the security system 1 hour after exiting the vehicle. In some cases, you may forget to press the button to arm your system. Forced Passive Arming will keep the vehicle protected. By default, this system is ON and active unless programmed differently by the installer. -
Page 13: Ignition Key Controlled Dome Light
Ignition Key Controlled Dome Light - If dome light control has been installed, every time you stop the engine (Ignition Key Off), the dome light in your vehicle will illuminate. - When you disarm your security system the dome light will illuminate. - Page 14 Turn the ignition key to ON and then press the button on the CARBINE remote controller for 1 second. The parking lights will flash, and the siren will chirp once. AHS is now armed. Start the engine and drive the vehicle as normal.
- Page 15 AHS Triggered Sequence Once the AHS is triggered, the follow sequence will occur; - 15 seconds after the door(s) is closed, the LED in the RCC will begin to flash. - 45 seconds later, the horn/siren will begin to chirp and the parking lights will begin to flash.
- Page 16 During the first 60 seconds of the triggering sequence (LED on the RCC is flashing), the AHS can be disarmed by turning ON the ignition key and pressing the button on the CARBINE remote controller. If you happen to be driving the vehicle, simply press the button on the remote controller.
-
Page 17: Programming The Lcd Remote Controller
LCD Remote Controller Settings and Programming Enter Settings: To get into transmitter feature programming mode, press and hold the “F” button for 3 seconds. You will hear 2 beeps and the clock display will flash. Follow the instructions enclosed for each setting you want to program or change. - Page 18 Function Setting Daily Clock Display 1. Press the button to adjust hours. 2. Press the button to adjust minutes. 3. To exit the clock setting mode, push and hold the “F” button for 3 seconds or simply do nothing for 15 seconds. Note: Adjusting hours will change AM-PM.
- Page 19 Function Setting 1. Press and release the “F” key five times. Backlight Brightness Setting “50p” will be displayed. 2. Press the button to adjust the light level. You have “0p”, “50p” and “100p” to choose from. Note: Raising the display brightness to 100p will consume more battery power.
-
Page 20: Pairing A Replacement Remote Control
The horn/siren chirps 1 long chirp. The new remote is programmed. 8. Turn the ignition key to the Off position. A long chirp from the horn confirms that the pairing mode is off. Note: Your CARBINE security system will accept codes from up to (4) transmitters. -
Page 21: System Maintenance / Battery Replacement
System Maintenance Replacing the LCD 2-Way Remote Controller Battery The CARBINE LCD 2- way remote controllers are powered by a CR2450 Lithium battery. When the battery begins to weaken, the battery life indicator on the LCD screen will display the condition of the battery. - Page 22 Replacing the 4 Button Remote Controller Battery The CARBINE remote controllers are powered by a CR2032 Lithium battery. When the battery begins to weaken, the operating range of the remote control is reduced and the LED indicator on the remote will begin to dim.
- Page 24 © Copyright 2021 Magnadyne Corporation. All Rights Reserved. No part of this publication may be produced without the expressed written permission of Magnadyne Corporation. www.carbine.com | call 310-735-2000 | UM-34CS...
Need help?
Do you have a question about the 34cs and is the answer not in the manual?
Questions and answers