Table of Contents
Advertisement
Care and Use Manual
Model PGR304
Model PGR364GL
Low Back Model LB36R
Model PGR484GG
Low Back Model LB48R
®
Thermador Professional
Range
FOR RESIDENTIAL USE ONLY
All Gas Models PGR30, PGR36, PGR48
LE MANUEL DE SOIN ET D'UTILISATION
EN ENGLAIS AVEC ADVERTISSEMENTS EN FRANÇAIS
© 2002 BSH Home Appliances Corp.
Advertisement
Table of Contents

Related Manuals for Thermador PGR30


Summary of Contents for Thermador PGR30
- Page 1 Low Back Model LB36R Model PGR484GG Low Back Model LB48R ® Thermador Professional Range FOR RESIDENTIAL USE ONLY All Gas Models PGR30, PGR36, PGR48 LE MANUEL DE SOIN ET D’UTILISATION EN ENGLAIS AVEC ADVERTISSEMENTS EN FRANÇAIS © 2002 BSH Home Appliances Corp.
-
Page 2: For Your Safety
A SPECIAL MESSAGE TO OUR CUSTOMERS Thank you for selecting the Thermador PROFESSIONAL time to read this entire booklet before using your new appliance for the first time. The booklet contains suggestions we believe will be helpful as well as directions for using all the features of this range. -
Page 3: Table Of Contents
Model & Parts Identification – PGR304 ... 10 Guide to Knob Identification and Location ... 11 Section Four: Using the Cooktop Using the Cooktop ... 12 – 13 Flame Setting Guidelines ... 14 Proper Cookware ... 15 – 16 Surface Burner Cooking Chart ... 17 – 18 Using the Grill . -
Page 4: Care And Use Manual Conventions
All Gas PGR484GG ... All Gas, 48" wide Range with Four Gas Introduction Cooktop Burners and self-cleaning Gas Oven Gas Cooktop Burners, Griddle and self-cleaning Gas Oven Gas Cooktop Burners, Grill and self-cleaning Gas Oven Cooktop Burners and self-cleaning Gas Oven Gas Cooktop Burners, Griddle, large self-cleaning Gas Oven and one auxiliary oven. -
Page 5: Section One: General Safety Instructions
To light the cooktop burners manually, carefully hold a lighted match to the burner ports and turn the gas control knob to HI. During a power failure you can use the cooktop burners, but each must be lit with a match. -
Page 6: Safety ............................................................................. 3
In the event a burner goes out and gas escapes, open a window or a door. Do not attempt to use the cooktop until the gas has had time to dissipate. Wait at least 5 minutes before using the range. -
Page 7: Precautions
SECTION ONE: GENERAL SAFETY INSTRUCTIONS Warning: The appliance is for cooking. Based on safety considerations, never use the oven or cooktop to warm or heat a room. Also, such use can damage the cooktop or oven parts. When using the cooktop: DO NOT TOUCH... -
Page 8: Precautions ................................................................... 5
• In case of fire or when inten- tionally “flaming” liquor or other spirits on the cooktop, follow hood manufacturer’s in- structions. 364 GD 364 GL Page 6... -
Page 9: Section Two: Before You Begin
Before Using Your Range for the First Time Remove all packaging materials and temporary labels from oven and cooktop. 1. Check that you have the items listed on Page 6. 2. Record the Model and Serial number on Page 42. See "Data Rating Plate." These may be used for any future contacts with your servicer or the factory. -
Page 10: Section Three: Description
SECTION THREE: DESCRIPTION Model and Parts Identification Gas Model PGR484GG - Shown Has a grill, a griddle and four burners, two ExtraLow® and two standard. Model PGR486GD – Has a griddle and six burners, two ExtraLow® and four standard. Model PGR486GL – Has a grill and six burners, two ExtraLow® and four standard. Key for PGR48 Models 1. -
Page 11: Model & Parts Identification - Pgr366
SECTION THREE: DESCRIPTION Gas Model PGR366 - Shown Model PGR364GD – Has a center griddle and four burners, two ExtraLow® and two standard. Model PGR364GL – Has a center grill and four burners, two ExtraLow® and two standard. Key for PGR Models 1. -
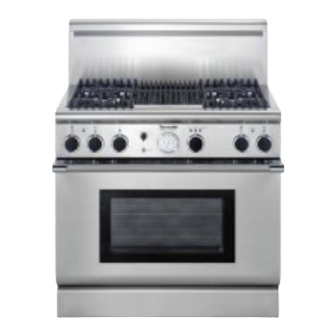
Page 12: Model & Parts Identification - Pgr304
SECTION THREE: DESCRIPTION Model and Parts Identification Gas Model PGR304 - Shown Key for PGR304 Models 1. 9" Low Back or Island Trim (Island Trim ordered separately) 2. Burner Grates & Burners ® 3. Control Knobs, ExtraLow 4. Control Knobs, Standard Burners (2) 5. -
Page 13: Guide To Knob Identification And Location
OFF 150 200 250 300 350 400 450 500 Broil 6. Main Oven Knob OFF 150 200 250 300 350 400 450 500 Broil Clean PGR484GGZS PGR484GDZS PGR484GLZS PGR30 MODEL PGR304ZS PGR36 MODELS PGR366ZS PGR364GDZS PGR364GLZS PGR48 MODELS Page 11... -
Page 14: Section Four: Using The Cooktop
SECTION FOUR: USING THE COOKTOP USING THE COOKTOP SEALED BURNERS Sealed Star™ Burner Base The cooktop features four or six gas surface burners; each rated at 15,000 BTU/HR. The burners are sealed to the stainless steel top frame to prevent... - Page 15 SECTION FOUR: USING THE COOKTOP Operation of the ExtraLow Burners • XLO, the very lowest setting, is achieved by cycling the flame ON for approximately 8 seconds and OFF for 52 seconds of each minute. • When the knob is set just below...
-
Page 16: Flame Setting Guidelines
It is necessary to light each one individually. • If the cooktop is being used when the power failure occurs, turn all knobs to the OFF position. • The standard burners and grill can... -
Page 17: Proper Cookware
SECTION FOUR: USING THE COOKTOP COOKWARE RECOMMENDATIONS SAFETY PRECAUTIONS: Food packaged in aluminum foil should not be placed directly on the burner grate. Aluminum foil can melt during cooking. Do not let plastic, paper or cloth come in contact with a hot burner grate. They may melt or catch fire. -
Page 18: Specialty Cookware
SECTION FOUR: USING THE COOKTOP SPECIALTY COOKWARE FLAT -BOTTOM WOK PAN ROUND-BOTTOM WOK IN SUPPORT RING • Woks – Either flat based or round bottom woks with the accessory ring can be used on models without a built-in wok burner. Round bottom woks must be used with a support ring. -
Page 19: Surface Burner Cooking Chart
SECTION FOUR: USING THE COOKTOP SURFACE BURNER COOKING CHART Food BEVERAGES Cocoa BREADS French Toast, Pancakes, Grilled Sandwiches BUTTER Melting CEREALS Cornmeal, Grits, Oatmeal CHOCOLATE Melting DESSERTS Candy Pudding and Pie Filling Pudding EGGS Cooked in Shell Fried, Scrambled Poached... - Page 20 SECTION FOUR: USING THE COOKTOP SURFACE BURNER COOKING CHART Food Simmering: Stewed Chicken, Corned Beef, Tongue, etc. PASTAS Macaroni, Noodles, Spaghetti POPCORN (use a heavy, flat bottom pan) PRESSURE COOKER Meat Vegetables RICE SAUCES Tomato Base White, Cream, Bernaise, Hollandaise...
-
Page 21: Using The Grill
SECTION FOUR: USING THE COOKTOP A VENTILATING HOOD of adequate cubic-feet-per-minute capacity vented to the outside of the house is recommended for installation ABOVE THE RANGE AND GRILL. For most kitchens with a wall mounted hood, a certified hood is recommended. The hood must be installed according to installation instructions furnished with the hood and local building code requirements. - Page 22 SECTION FOUR: USING THE COOKTOP Disassembly/Assembly of the Grill CAUTION: • Use extreme care when placing the grill components into the grill compartment. Avoid contacting the ceramic igniter which could break preventing operation of the grill. • The grill must be assembled as shown. The...
- Page 23 SECTION FOUR: USING THE COOKTOP USING THE GRILL COOKING ON THE GRILL • The burner should light within approximately 5 seconds. • Preheat grill for 10 to 15 minutes minimum. The hot grill sears the food, sealing in the juices. The...
-
Page 24: Grill Cooking Chart
SECTION FOUR: USING THE COOKTOP GRILL COOKING CHART Food Weight or Thickness MEATS Beef Hamburgers 1/2 to 3/4 inch (13 mm to 19 mm) Steaks Rib, Club, Tenderloin, Porterhouse, T-Bone, Sirloin Rare 1" (25 mm) (140ºF) 1-1/2" (38 mm) Medium 1"... - Page 25 SECTION FOUR: USING THE COOKTOP GRILL COOKING CHART Food Weight or Thickness MEATS Pork Ham Steaks (precooked) 1/2 inch Hot Dogs POULTRY Chicken Broiler/Flyer 2 to 3 pounds Halved or Quartered Breasts, bone-in FISH AND SEAFOOD Steaks Halibut, 3/4 to 1 inch...
-
Page 26: About The Griddle
SECTION FOUR: USING THE COOKTOP ABOUT THE GRIDDLE (Available on some models) DESCRIPTION The built in griddle is made of restaurant quality aluminum coated with titanium. This produces a surface with even heat that is easy to clean. The griddle has an aluminized steel tube burner that is lit by a spark igniter. -
Page 27: Section Five: Using The Oven
SECTION FIVE: USING THE OVEN TIPS FOR BAKE PREHEATING THE OVEN Many foods such as meat, poultry, casseroles, or other long cooking foods cook well without preheating the oven. See your recipe for pre– heating recommendation. Preheating time depends on the temperature setting and the number of racks in the oven. -
Page 28: Convection Bake
SECTION FIVE: USING THE OVEN TIPS FOR CONVECTION BAKE PREHEATING THE OVEN Many foods such as meat, poultry, casseroles, or other long cooking foods cook well without preheating the oven. See your recipe for pre– heating recommendation. Preheating time depends on the temperature setting and the number of racks in the oven. -
Page 29: Setting Bake/Convection•Bake
SECTION FIVE: USING THE OVEN Setting Bake / Convection Bake BAKE/CONVECTION BAKE These cooking modes are for baking, roasting or warming using one, two or three racks. TO SET THE GAS OVEN 1. Select BAKE or CONVECTION•BAKE using the Selector switch. 2. -
Page 30: Other Uses Of Bake
SECTION FIVE: USING THE OVEN SLOW COOKING AND LOW TEMPERATURE USES OF THE OVEN In addition to providing perfect temperatures for baking and roasting, the oven can be used at low oven temperatures to keep hot, cooked foods at serving temperature, to dehydrate food and to warm plates. -
Page 31: Baking Chart
SECTION FIVE: USING THE OVEN Food Size Cookies 12"x15" Cookie Sheet Layer Cakes 8" or 9" Round Sheet Cakes 9"x13" Pan Bundt™ Cakes 12 Cup Brownies 9"x9" Pan or Bar Cookies Biscuits 12"x15" Cookie Sheet Quick Bread 8"x4" Loaf Pan Muffins 12 cup Muffin Pan Fruit Pies... -
Page 32: Broil
SECTION FIVE: USING THE OVEN BROIL TIPS FOR BROIL PREHEATING THE BROILER It is recommended that you preheat the broil element before starting to cook. Preheat until the dial reaches broil. GETTING THE BEST RESULTS Be sure to defrost food before broiling. -
Page 33: Setting Broil And Convection Broil
SECTION FIVE: USING THE OVEN Setting Broil for Gas Oven BROIL - Gas Oven Only the infrared burners heat in the BROIL mode. Place rack in recommended position on Page 32. Before placing food in the oven for broiling, preheat the broiler element until the dial reaches “Broil.”... -
Page 34: Broiling And Roasting Chart
SECTION FIVE: USING THE OVEN Broiling and Roasting Chart All meats are placed on the broiler pan included with the range. Food Item Rack Number Mode Beef Ground Beef Patties, 1/2" thick T-Bone Steak Flank Steak Eye of Round Roast Pork Loin Roast Poultry... -
Page 35: Section Six: Care And Maintenance
When the oven is set for CLEAN, only the cooktop burners (four or six) may be used. The 12-inch oven (Model PGR48 only), the griddle and/ or the grill cannot be used. -
Page 36: Self Cleaning The Oven
SECTION SIX: CARE AND MAINTENANCE SELF CLEANING THE OVEN To Set Self-Clean for the Large Main Self-Cleaning Oven 1. Select CLEAN using the Selector switch. 2. Set Oven Control Knob to CLEAN. Cooling Blower turns on. OVEN ON light and HEATING light turn on. LOCK light turns on. -
Page 37: Range Cleaning
4. Any part of this appliance can be cleaned with hot sudsy water. When rinsing is required, rinse thoroughly. 5. Always wipe dry immediately to avoid water marks. COOKTOP CLEANING CHART Cooktop Part / Material Burner Base and Cap and Spill Tray / Stainless Steel... - Page 38 SECTION SIX: CARE AND MAINTENANCE COOKTOP CLEANING CHART Cooktop Part / Material Exterior Finish /Back Panel Stainless Steel Grates: / Porcelain Enamel on Cast Iron Griddle Grease Tray / Titanium Coated Aluminum Slide back and lift Suggested Cleaners • Nonabrasive Cleaners: Hot water and detergent, ammonia, Fan- ®...
- Page 39 SECTION SIX: CARE AND MAINTENANCE COOKTOP CLEANING CHART, Cooktop Part / Material Griddle / Titanium surfaced Grill Box / Stainless Steel Grill Radiant, Heat Grill Burner, Grill Deflector, Heat Grill Electrode, Spark Grill Can Assembly Grease Catch Tray continued Suggested Cleaners •...
- Page 40 SECTION SIX: CARE AND MAINTENANCE COOKTOP CLEANING CHART, Cooktop Part / Material Grill Drip Pan / Stainless Steel Grill Grate / Porcelain Enamel on Cast Iron Igniters / Ceramic Surface Spill Trays / Stainless Steel Trim Strips (Located between stainless steel spill trays;...
- Page 41 SECTION SIX: CARE AND MAINTENANCE OVEN CLEANING CHART Part/Material/Soil Condition OVEN Broil Pan Grid Chrome Plated Aluminum (12" oven) Broil Pan Bottom Porcelain Enamel Aluminum (12" oven) Cavity Porcelain Enamel on Steel Large Main Oven 12" Oven Cleaning Products/Directions DO NOT CLEAN IN SELF-CLEANING OVEN To loosen cooked on food, sprinkle empty hot grid with powdered laundry detergent or squirt with liquid detergent and cover with wet paper towels.
-
Page 42: Range Cleaning Chart
Use care to keep cleaners and water away from the door vents. If water or cleaners spill into the vents, water may streak the glass inside. See Cooktop, Back Panel, Stainless Steel, Page 36. See Oven Cavity, Page 39. General Kitchen Cleaners: Formula 409 •... -
Page 43: Do-It-Yourself Maintenance
It is necessary to light each standard burner individually. If the cooktop is being used when the power failure occurs, turn all of the burner control knobs to the OFF position. Then, the standard burners can be lighted by holding a match at the ports and turning the control knob to the HI position. -
Page 44: Before Calling For Service
SECTION SEVEN: BEFORE CALLING FOR SERVICE BEFORE CALLING FOR SERVICE Before calling for Service, check the following to avoid unnecessary service charges. Be sure to check these items first: Is there a power outage in the area? Is the household fuse blown or the circuit breaker tripped? Is the range disconnected from the electrical supply? IF THE BURNERS DO NOT IGNITE •... -
Page 45: Warranty
WARRANTY FULL ONE YEAR WARRANTY Covers one year from the date of installation or date of occupancy for a new previously unoccupied dwelling, Save your dated receipt or other evidence of the installation/occupancy date. ® Thermador Will Pay For: All repair labor and replacement parts found to be defective due to materials and workmanship. - Page 46 Notes...
- Page 47 Notes...
- Page 48 Specifications are for planning purposes only. Refer to installation instructions and consult your countertop supplier prior to making counter opening. Consult with a heating and ventilating engineer for your specific ventilation requirements. For the most detailed information, refer to installation instructions accompanying product or write Thermador indicating model number.
Need help?
Do you have a question about the PGR30 and is the answer not in the manual?
Questions and answers