
Related Manuals for Samsung UN75ES9000F


Summary of Contents for Samsung UN75ES9000F
- Page 1 LED TV Chassis : U84A Model : UN75ES9000F SERVICE Manual LED TV Contents 1. Precautions 2. Product specifications 3. Disassembly and Reassembly 4. Troubleshooting 5. Wiring Diagram UN75ES9000F...
-
Page 2: Table Of Contents
Contents 1. Precautions ........................1-1 1-1. Safety Precautions ......................1-1 1-2. Servicing Precautions ......................1-3 1-3. Static Electricity Precautions ....................1-4 1-4. Installation Precautions .......................1-5 2. Product Specifications....................2-1 2-1. Product Information ......................2-1 2-2. Detail Factory Option ......................2-4 2-3. Accessories .........................2-5 2-4. Viewing the Function ......................2-6 3. - Page 3 This Service Manual is a property of Samsung Electronics Co.,Ltd. © 2012 Samsung Electronics Co.,Ltd. Any unauthorized use of Manual can be punished under applicable All rights reserved. International and/or domestic law. Printed in Korea...
-
Page 4: Precautions
1. Precautions 1. Precautions 1-1. Safety Precautions Follow these safety, servicing and ESD precautions to prevent damage and to protect against potential hazards such as electrical shock. 1-1-1. Warnings For continued safety, do not attempt to modify the circuit board. Disconnect the AC power and DC power jack before servicing. - Page 5 1. Precautions 1-1-4. Product Safety Notices Some electrical and mechanical parts have special safetyrelated characteristics which are often not evident from visual inspection. The protection they give may not be obtained by replacing them with components rated for higher voltage, wattage, etc.
-
Page 6: Servicing Precautions
1. Precautions 1-2. Servicing Precautions An electrolytic capacitor installed with the wrong polarity might explode. WARNING Before servicing units covered by this service manual, read and follow the Safety Precautions section of this manual. CAUTION If unforeseen circumstances create conflict between the following servicing precautions and any of the safety precautions, always follow the safety precautions. -
Page 7: Static Electricity Precautions
1. Precautions 1-3. Static Electricity Precautions Some semiconductor (solid state) devices can be easily damaged by static electricity. Such components are commonly called Electrostatically Sensitive Devices (ESD). Examples of typical ESD are integrated circuits and some field-effect transistors. The following techniques will reduce the incidence of component damage caused by static electricity. Immediately before handling any semiconductor components or assemblies, drain the electrostatic charge from your body by touching a known earth ground. -
Page 8: Installation Precautions
1. Precautions 1-4. Installation Precautions For safety reasons, more than a people are required for carrying the product. Keep the power cord away from any heat emitting devices, as a melted covering may cause fire or electric shock. Do not place the product in areas with poor ventilation such as a bookshelf or closet. The increased internal temperature may cause fire. -
Page 9: Product Specifications
2. Product specifications 2. Product Specifications 2-1. Product Information 2-1-1. Model Comparison Model UN75ES9000F Front View * W : Width H : High D : Depth Detail View Front Color Rose gold/CB Set with Stand 66.07 x 40.075 x 12.9 inches Dimensions 75"... - Page 10 2. Product specifications 2-1-2. Feature & Specifications Model UN75ES9000F Feature • Digital-TV, RF, 3-HDMI(Port 1-DVI/Port2- ARC/Port 3-MHL), 1-Component, 2-A/V(A/V 1 is shared with Component), 3-USB2.0(Media Play), LAN • Brightness : Mega Contrast • PIP(in HDMI 1, 2, 3, Component 1, PC Mode and Sub picture is available only in TV mode(DTV/ATV)) •...
- Page 11 2. Product specifications 2-1-3. Specification Comparison to Old Models Model UE9Z(UN75ES9000F) UD9Z(UN75D9000ZF) Design Diplay Type LED TV LED TV Built-in Tuner Resolution 1920 x 1080 1920 x 1080 LCD Panel TFT LCD Panel 240 Hz TFT LCD Panel 240 Hz Screen Size 75"...
-
Page 12: Detail Factory Option
2. Product specifications 2-2. Detail Factory Option NOTE If you replace the main board with new one, please change the factory option as well. The options you must change are "Type". Model Name UN75ES9000F Vendor PANEL Code BN95-00730A Spec. LTJ750HL02-V... -
Page 13: Accessories
2. Product specifications 2-3. Accessories Product Description Code. No Remark Holder-Wire stand BN61-05491A Samsung Component Adaptor BN39-01154W Electronics Service center CI Card Adaptor 3709-001663 NOTE Evolution Kit (Sold Saparately) • This socket is designed to accept an extension device called Evolution Kit. The Evolution Kit enables the TV to run a variety of the latest applications for a better user experience. -
Page 14: Viewing The Function
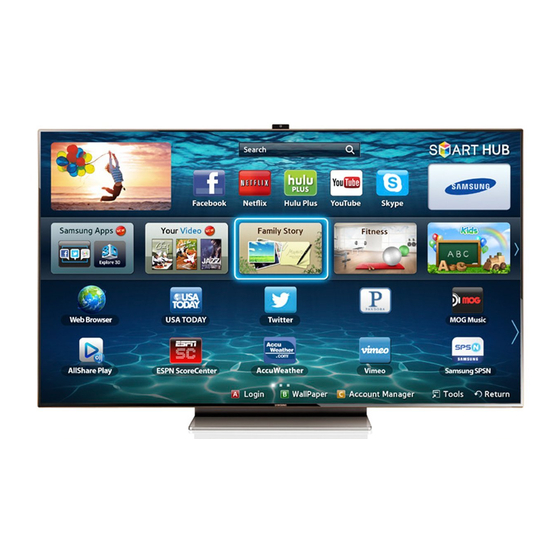
2. Product specifications 2-4. Viewing the Function 2-4-1. Family Story „ Concept Effortless way to access family content. • To provide an access to family photos, messages and events at anytime and anywhere • You can share from TV, mobile, tablet or PC with your family •... - Page 15 Family story allows consumers to stay connected with their families Enjoy family's moments in everywhere Enjoy the service on various Samsung devices like TV, mobile, tablet, PC. Also you can upload contents to the free web storage which is big enough to store over 1,000 HD-level pictures.
- Page 16 2. Product specifications User Scenario Create Group Main Home Create Group (Before Log-in or Activation) Select Group Invite Members...
- Page 17 2. Product specifications Join Group Main Home Create Group (Before Log-in or Activation) Join Group Invite Code...
- Page 18 2. Product specifications Create Contents Use ‘Create’ menu in Family Story app Use ‘Share’ menu in Gallery [tab] [[phone]] Use ‘Create’ menu in Family Story app You can browse and select USB storage [tab] [[phone]] 2-10...
- Page 19 2. Product specifications Fitness „ Service Structure • Calorie Feedback → Unified Integration on ‘Fitness Hub’ Home Exercise : Exer-VOD, Exer-Guide Outdoor Exercise : Mobile Exer-App • Achievement based upon mission → Maximization of exercise efficiency by motivation Fitness Workout Contents Calorie Feedback Exercise Exercise...
- Page 20 2. Product specifications Service Overview Unified fitness care service with a variety of exercise apps • Provides fitness contents from various providers with feedback on calorie burn • Motivates users through goal setting and exercise tracking menu • Allows synchronization with fitness accessories and mobile apps Fitness Accessories Home Exercise Outdoor Exercise...
- Page 21 2. Product specifications Service Details Exercise This screen appears when entering ‘Fitness’ or selecting the Exercise tab of the 3 categories in main screen of ‘Fitness’. • Exercise Tab Name Description Goal & Status Goal image, Goal name, How much weight users want to lose, Status Recommended The latest played content, and the latest updated contents in the same categories Contents...
- Page 22 2. Product specifications Progress This screen appears when selecting History tab of the 3 categories in main screen of ‘Fitness’. • Progress Tab Name Description Preview Area Provide preview panels of various history information of History category. • Body Profile, Exercise History, Achievements •...
- Page 23 2. Product specifications Kids „ What is this Service for? Kids” service brings kids and parents an easy and safe way to enjoy their favorite contents via 4 major features. • Provides a wide variety of fun and safe content for children •...
- Page 24 2. Product specifications How to Use “Browse All” and “Parents” Gather my favorites to My Choice and enjoy it anytime. Browse All - Browse all content and add favorites to My Choice Parents - My Choice’ at Parents menu How to Use “Sticker book” •...
- Page 25 2. Product specifications 2-4-2. Hi TV Control Smart Touch Control „ Viewing the Control 2-17...
- Page 26 The Smart Touch Control and The IR Blaster 2. Product specifications For more detailed information about Smart Touch Control, see "Using the Smart Touch Control" in ✎ e-Manual. Viewing the Smart Touch Control For more detailed information about Smart Touch Control, see "Using the Smart Touch Control" in e-Manual. Smart Touch Control You can speak a voice command that displayed to the TV using MIC.
- Page 27 2. Product specifications Gesture Control „ Volume / Channel Control Shake your hand in front of TV. Indicate a menu about CH/VOL in screen. If your hand let down on the screen, Grabbing hand is a Click. Move a cursor by using hand gesture, the manu will be a close.
- Page 28 2. Product specifications Voice Control „ Volume / Channel Control Control CH by command "Channel UP/DOWN". Show a Voice cognition Menu by command "Hi TV". Control Volume by command "Volume UP/DOWN". 2-20...
-
Page 29: Disassembly And Reassembly
3. Disassembly and Reassemble 3. Disassembly and Reassembly This section of the service manual describes the disassembly and reassembly procedures for the LED TV. This LED TV contains electrostatically sensitive devices. Use caution when handling these components. WARNING 3-1. Disassembly and Reassembly Disconnect the LED TV from the power source before disassembly. - Page 30 3. Disassembly and Reassemble Description Picture Description Screws Remove the screws of Rear-Cover. 6001-002755 (M3 x L6 Machine) Lift up and remove the Rear-Cover. CAUTION Becareful when you lift up the Rear- Cover, it's really sharp. • Rear view of 75". Remove the Speakers(R/L).
- Page 31 3. Disassembly and Reassemble Description Picture Description Screws Remove the screws of Main Board and SMPS Board. NOTE Disconnect all cable connectors before 6001-002653 removing any Board. (M3 x L6, Machine) Remove the T-CON Bracket. 6001-002621 (M4 x L8, Machine) Rear view.
-
Page 32: Troubleshooting
4. Troubleshooting 4. Troubleshooting 4-1. Troubleshooting 4-1-1. Previous check Check the various cable connections first. Check to see if there is a burnt or damaged cable. Check to see if there is a disconnected or loose cable connection. Check to see if the cables are connected according to the connection diagram. Check the power input to the Main Board. - Page 33 4. Troubleshooting How to check inner pattern? „ Enter ‘Service Mode.’ If you do not have Factory remote control Power OFF MUTE Power On If you have Factory remote control INFO Factory Choose ‘SVC.’ Choose ‘Test pattern.’ Select the each pattern and then check all pattern is ok or not. Option Control Test Pattern...
- Page 34 4. Troubleshooting Simple flow chart of malfunction „ Does the TV turn Can you see anything on the screen? Can you see OSD menu running on the screen? Can you see Digital Channel broadcast ? Check LVDS cable connected to Main Board. Check the Power Cord.
- Page 35 4. Troubleshooting 4-1-2. Troubleshooting Picture Quality First of all, please perform the Picture Test and confirm that your TV is properly displaying test image. • MENU → Support → Self Diagnosis → Picture Test Problem Solution • The TV image does not look as Store displays are all tuned to digital, HD (high definition) channels.
- Page 36 4. Troubleshooting Sound First of all, please perform the Picture Test and confirm that your TV is properly displaying test image. • MENU → Support → Self Diagnosis → Picture Test Problem Solution • There is no sound or the sound is Please check the volume of the device (Cable/Sat Box, DVD, Blu-ray etc) connected to your TV.
- Page 37 4. Troubleshooting Problem Solution • The wireless network connection The Samsung Wireless USB dongle is required to use a wireless network. failed. • Make sure the Network Connection is set to Wireless. • Make sure the TV is connected to a wireless IP sharer (router).
- Page 38 New Functions Problem Solution I lost the ‘PC Share Manager’ install CD. You can download E-manual and DLNA install program in samsung’s web site. (www.samsung.com - support - download cener - enter your model name. Sound of HDMI1/DVI • No sound in HDMI/DVI mode.
- Page 39 Even though I set the 'Auto Displayed frequency in information OSD is information of input source, not of output image Samsung 120Hz model display always 120Hz picture. The method of 'Frequency Motion Plus 120' on, display Rate Conversion'(FRC) is different according to Auto Motion Plus option you select.
- Page 40 Connected Home or Screen Share function which are found on Samsung Smartphones. Check that the PC Share Manager is enabled, the Samsung TV is set to allow connections and the ScreenShare function on the connected cell phone is enabled. To use the cell phone's Connected Home function, check that the shared folder is set and the Share mode is 'On.'...
- Page 41 4. Troubleshooting Problem Solution I cannot find the remote Check that the ScreenShare Client device is correctly connected to the network of the sharing device that the DTV is connected to. control service provided by the ScreenShare Server from the Run network test in the network setup menu and confirm that MAC Address, IP Address, ScreenShare Client.
- Page 42 Check if the PC is turned off. see on the TV has suddenly Check if the Samsung TV is set to reject connections in the access control menu of the disappeared. What should I do? Samsung PC Share Manager. If so, change the setting to allow connections.
- Page 43 • I cannot play a video file. In Only videos recorded by specific Samsung camcorders and digital cameras can be played. Other videos may or may not be played depending on the resolution and format. Media Play (USB & DLNA) Refer to 'Play' row of following table.
- Page 44 • I want to get new widget. You can add your widget using 'Samsung Apps' in SMART HUB , just choose widget and click 'Add widget My Profile'. Additional widget will be updated continuous. • I forget my profile password.
- Page 45 • After I have created my account This occurs because you are not connected to your partner account for Samsung Apps. Connect to your partner account on the Settings page using your actual PC-website and logged into the system, account and then try again.
- Page 46 To connect to the AP, set the Encryption type to AES. If Pure High-Throughput 802.11n mode (or Greenfield 802.11n mode) is selected and the Encryption type is set to AES, your Samsung TV will connect to the AP providing you with optimum performance.
- Page 47 When using a wireless network, If Samsung Wireless Link is On, a 5G-bandwidth wireless sharing device may not be found in a search (restriction). If Samsung Wireless Link is Off or the product does not the user's sharing device cannot have the Samsung Wireless Link function, please retry searching to find the sharing be found in a search.
- Page 48 4. Troubleshooting Problem Solution • There is no device on the list TV can search the peer Wi-Fi Direct device when the peer Wi-Fi Direct device is in the Wi-Fi Direct mode. Please run the Wi-Fi Direct function on the peer Wi-Fi Direct when Wi-Fi Direct menu on TV is device(e.g., run the Wi-Fi Direct menu)."...
- Page 49 On TV, you can upload content via USB. • How can users invite their family Samsung Account : Users can invite members with Samsung Account. They need to put Samsung Account on the and this invitation will be delivered to other party’s email. members? •...
- Page 50 4. Troubleshooting 4-1-3. Camera Module (MOIP Module) Can not use voice control or too low the volume in skype Mute + 5 + 6 + 9 + Exit It is Camera inspection mode. Check the sound. In case of no sound : It is a MOIP module problem. Please reconnect the module or change the module.
- Page 51 4. Troubleshooting 4-1-4. Using the Smart Touch Control with an IR Blaster When you connect an IR Blaster with your TV, you can control connected external devices with your TV using the Smart Touch Control. IR receiver • Smart Touch Control 30 cm ~ 4 m •...
-
Page 52: Factory Mode Adjustments
4. Troubleshooting 4-2. Factory Mode Adjustments 4-2-1. Entering Factory Mode To enter ‘Service Mode’ Press the remote -control keys in this sequence : • If you do not have Factory remote control Power OFF MUTE Power On • If you have Factory remote control INFO Factory •... - Page 53 4. Troubleshooting 4-2-2. Factory Data Option „ Factory Menu Name Data Range Factory Reset Type 75A2UF0E Local set EU_**** Depending on Region, Local Set is different. Basic Model UES9000 SVC Model 9000 TUNER Auto UK/Nordic : SEC_T2S2 EU : ALPS_TCS2 Ch table NONE Front Color...
- Page 54 4. Troubleshooting Factory Menu Name Data Range TTX List Flof TTX Group UserOSD ND ADJ Support 24Px4 Support Power Indicator Support BD Wise Support RF Remocon Support Data Service Support PVR Support 3D Support EchoFp WSS Support … ColorSpace Support RGB Type OTA Support OTA Duration Test...
- Page 55 4. Troubleshooting Factory Menu Name Data Range DDR SSC Value Napoli DDR SSC ON/OFF Napoli DDR SSC MFR Napoli DDC SSC MRR EchoFP LVDS SSC On/Off EchoFP LVDS SSC MFR EchoFP LVDS SSC MRR EchoFP DDR SSC On/Off EchoFP DDR SSC MFR EchoFP DDR SSC MRR DDR Margin A CTRL_OFFSET_0_3...
- Page 56 4. Troubleshooting Factory Menu Name Data Range Cr2 TH Cr3 TH Cr4 TH Cr5 TH Cr6 TH Cr7 TH S.DEV0 S.DEV1 EEPROM RESET EER RESET NVR All Clear FANET ON/OFF Fast USB Booting ON/OFF Panel Key Type If PANEL KEY Horizontal Num of PANEL KEY …...
- Page 57 4. Troubleshooting Factory Menu Name Data Range Menu Display … Picture Menu Lock … PANEL BUTTON LOCK … Energy Saving … Power on Option … Auto Source … Music Mode AV … Msic Mode PC … Music Mode Comp … Music Mode Backlight …...
- Page 58 4. Troubleshooting Factory Menu Name Data Range Pilot Level Low Thld 0x10h Amp Volume 0xCBh Amp Scale 0x35h AMP Speaker EQ AMP EQ CheckSum 0x0181D0 AMP PEQ Test Ready SPDIF PCM Level PEQ Inx WF EQ CheckSum WF Type Tuner Status 2173_tcint 2173_rssilint 2173_rssihint...
- Page 59 4. Troubleshooting Factory Menu Name Data Range Num of PANEL KEY Num of USB Port MFT Offset 62.5 Select LCD/PDP Num of DECODER Num of TUNER HDMI/DVI SEL Indicator Led Wall Mount HV Flip Num Of Display DVI/HDMI SOUND Auto HDMI HOT PLUG Disable HOTPLUG SWITCHING...
- Page 60 4. Troubleshooting Factory Menu Name Data Range SCC Mode Dynamic SCC ON/OFF SCC Input Data ;278 sSCC Const sSCC Hx sSCC Hy sSCC Lx sSCC Ly pSCC Const pSCC Hx pSCC Hy pSCC Lx pSCC Ly SCC Source Data SWAP „...
- Page 61 4. Troubleshooting Factory Menu Name Data Range Panel Auto Setting PANEL DISPLAY TIME T-CON USB Download T-CON CheckSum CPLD USB Download REMOCON PAIRING TC905x7 TC90507 FFT Size_0 Guard Interval_0 Freq. Offset_0 SNR_0 IF AGC_0 TMCC Lock_0 TS Packet_0 Master Lock_0 A_Modulation_0 A_Code Rate_0 A_Timer InterLeave_0...
- Page 62 4. Troubleshooting Factory Menu Name Data Range IR_ON_OFF 0xaa BT ADDRESS BT UPGRADE SVC Reset Expert „ Factory Menu Name Data Range N/D ADJ Source ADC/WB „ Factory Menu Name Data Range AV Calibration Comp Calibraion PC Calibration HDMI Calibration ADC Target 1st_AV_Low 1st_AV_High...
- Page 63 4. Troubleshooting Factory Menu Name Data Range 1st_Cb_BH 1st_Cb_BL 1st_Cr_RH 1st_Cr_RL 2nd_R_L 2nd_G_L 2nd_B_L 2nd_R_H 2nd_G_H 2nd_B_H White Balance Sub Brightness R-Offset G-Offset B-Offset Sub Contrast R-Gain G-Gain B-Gain Movie R-Offset Movie B-Offset Movie R-Gain Movie B-Gain 4-32...
-
Page 64: White Balance
4. Troubleshooting 4-3. White Balance 4-3-1. Calibration Into the Factory Mode. Select Menu. Select ADC/WB menu. Select menu. Option Control Expert AV Calibration ADC/WB Comp Calibration Advanced PC Calibration HDMI Calibration 4-3-2. Service Adjustment You must perform Calibration in the Lattice Pattern before adjusting the White Balance. Color Calibration „... - Page 65 4. Troubleshooting Method of Color Calibration (AV) „ Apply the NTSC Lattice (N0. 3) pattern signal to the AV IN 1 port. Press the Source key to switch to “AV1” mode. Enter Service mode. Select the “ADC” menu. Select the “AV Calibration” menu. In “AV Calibration Off”...
- Page 66 4. Troubleshooting 4-3-3. Adjustment Into the Factory Mode. Select Menu. Select ADC/WB menu. Select White Balance menu. Option Control (low light) (hight light) Expert Sub Brightness Sub Contrast White Balance ADC/WB R offset R gain Advanced G offset G gain B offset B gain 4-35...
-
Page 67: White Ratio (Balance) Adjustment
4. Troubleshooting 4-4. White Ratio (Balance) Adjustment You can adjust the white ratio in factory mode (1:Calibration, 3:White-Balance). Since the adjustment value and the data value vary depending on the input source, you have to adjust these in CVBS, Component 1 and HDMI 1 modes. The optimal values for each mode are configured by default. -
Page 68: Rs-232C
4. Troubleshooting 4-5. RS-232C RS232C Control • Port : COM#(Serial) • Bit rate : 115200 • Data Bit : 8 bit • Parity : None • Stop Bits : 1 • Flow Control : None Description of RS232C Pin# Name Full Name Pin# Name... -
Page 69: Av Control Tabe
4. Troubleshooting 4-6. AV Control Tabe Control Item Cmd1 Cmd2 Cmd3 Value General Power Power 0x00 0x00 0x00 0x00 0x01 0x02 Volume Direct 0x01 0x00 0x00 (0~100) 0x01 0x00 Down 0x02 0x00 Mute 0x02 0x00 0x00 0x00 Direct 0x04 Continuous 0x01 0x00 0x03... - Page 70 4. Troubleshooting Control Item Cmd1 Cmd2 Cmd3 Value CAL-NIGHT 0x04 CAL-DAY 0x05 BD Wise 0x06 Relax Not Support 0x07 only PDP (2012) BackLight 0~20 0x01 0x00 (0~20) (CellLight) Contrast 0~100 0x02 0x00 (0~100) Brightness 0~100 0x03 0x00 (0~100) Sharpness 0~100 0x04 0x00 (0~100)
- Page 71 4. Troubleshooting Control Item Cmd1 Cmd2 Cmd3 Value 0x01 xvYCC 0x10 0x00 0x01 Motion Lighting 0x11 0x00 0x01 LED Motion Plus 0x0a 0x07 0x00 On(Normal) 0x01 Cinema 0x02 Not Support Ticker 0x03 Picture Color Tone Cool 0x0a 0x00 0x00 Option Standard 0x01 Warm1...
- Page 72 4. Troubleshooting Control Item Cmd1 Cmd2 Cmd3 Value Demo 0x05 Screen Picture Size 16:9 0x0b 0x0a 0x01 0x00 Adjustment Zoom1 0x01 Zoom2 0x02 Wide Fit 0x03 0x04 Screen Fit 0x05 Smart View I 0x06 Smart View II 0x07 Auto Wide 0x08 Wide Zoom 0x09...
- Page 73 4. Troubleshooting Control Item Cmd1 Cmd2 Cmd3 Value 100hz 0x01 (0~20) 300hz 0x02 (0~20) 1khz 0x03 (0~20) 3khz 0x04 (0~20) 10khz 0x05 (0~20) Reset 0x06 0x00 TruSurround 0x02 0x00 0x00 HD (echo) Virtual Surrond 0x01 (echo) TruDialog 0x03 0x00 0x00 (echo) Dialog 0x01...
- Page 74 4. Troubleshooting Control Item Cmd1 Cmd2 Cmd3 Value Auto Stereo Manual 0x0b 0x00 0x00 Not Support only KOREA Auto 0x01 (2012) Control Item Cmd1 Cmd2 Cmd3 Value Key Generation refer to 0x0d 0x00 0x00 table Show/Hide Show 0x0e 0x00 0x00 0x00 Control add 2012...
-
Page 75: Software Upgrade
4. Troubleshooting 4-7. Software Upgrade Software Upgrade can be performed by downloading the. latest firmware from samsung.com to a USB memory device. • Current Version - The software already installed in the TV. Software is represented as ‘Year/Month/Day_Version’. 4-7-1. How to Check the Software Version Use the Main Menu „... - Page 76 4. Troubleshooting 4-7-2. How to Upgade Software Insert a USB drive containing the firmware upgrade downloaded from samsung.com into the TV. NOTE Please be careful not to disconnect the power or remove the USB drive while upgrades are being applied.
-
Page 77: Cover-Middle Rear Dimension
4. Troubleshooting 4-8. Cover-Middle Rear Dimension 75 inch 4-46... -
Page 78: Wiring Diagram
5. Wiring Diagram 5. Wiring Diagram 5-1. Wiring Diagram... -
Page 79: Connector
5. Wiring Diagram 5-2. Connector CN1405_FHD (to Panel) CN603(to HDMI2) Ch3[0]- HDMI1_RX2+ HDMI1_RXCLK+ SDA_NAPOLI Ch1[4]+ HDMI1_RX2- HDMI1_RXCLK- NAPOLI_PWM1 Ch1[4]- HDMI1_RX1+ HDMI_CEC SCL_NAPOLI Ch1[3]+ Ch1[3]- HDMI1_RX1- HDMI1_DDC_SCL NAPOLI_PWM2 HDMI1_RX0+ HDMI1_DDC_SDA SDA_PANEL Ch1CLK+ PANEL_I2C_SW Ch1CLK- HDMI1_RX0- HDMI1_5V EMITTER SYNC CN604(to HDMI3) NAPOLI_VSYNC Ch1[2]+ HDMI1_RX2+ HDMI1_RXCLK+... - Page 80 5. Wiring Diagram CN402(to PC Sound) CN401(to Function/IR) USB_BT_DM PC_SR_IN FRAME_SYNC_IN ENTER_INPUT PC_SL_IN EMITTERSYNC A3.3V BLUETOOTH_ A3.3V CN301(to Speaker) NRESET MSCL_A5V LED_CNTR USB_BT_DP A3.3V PC_SL_IN MSDA_A55V LED_CNTR CN201(to Power board) OP401(to Optical Jack) DGND PWM_DIM2_CPLD_ SW_POWER_OUT CN1503(USB1) OVD_ON_OFF PWM_DIM3_CPLD_ USB1_VCC_PW USB1_DP USB1_DM DGND...
- Page 81 5. Wiring Diagram CN1502 (USB 2) CN1901 (UPGRADE TV MODULE) USB2_VCC_5V_PW USB_DP ECHO_I2STX1_SPK_ DGND MOIP USB3_DM DGND LVDS_EVEN_TX3- UP_MODULE_SYNC CN1501 (USB 3) LVDS_EVEN_TX3+ EXT_GPI0_NRESET LVDS_EVEN_TX4- B3.3V_PW USB3_VCC_5V_PW USB_DP LVDS_EVEN_TX4+ EXT_GPIO1_WAKEUP USB3_DM DGND ECHO_I2STX1_ UP_MODULE_SPDIF CN1901 (UPGRADE TV MODULE) LRCLK ECHO_I2STX1_BCLK A5V_PW B13V_UP_PW HUB2CPU_USB_DM...
-
Page 82: Connector Functions
5. Wiring Diagram 5-3. Connector Functions Connector Function CN201 CNM803 Supply main power from IP board to Main Board. CON8 CNM803 Dimming signal from T-con board to IP. CN1601 CON3 The LVDS signal transfered from Main Board to Panel. -
Page 83: Exploded View & Part List [Un75Es9000Fxza
Exploded Views and Parts List 1. Exploded View & Part List Exploded View Copyright© 1995-2012 SAMSUNG. All rights reserved. - Page 84 DC VSS-LED TV PD BD; PD75B2L_CSM,PSLF501D CB01 BN61-07938A BRACKET-AV; UE8000 55",PCM,T0.4 M0014 BN94-06006B ASSY PCB MAIN; UN75ES9000FXZA R001A BN96-24424B ASSY COVER P-REAR; UE9000 75,UO,PCM T0.8 BN96-24382A ASSY BOARD P-5WAY SWITCH FUNCTION; UE9000 BN96-24420B ASSY STAND P-HONEYCOMB; UE9000 75",W/W,SQ Copyright© 1995-2012 SAMSUNG. All rights reserved.
-
Page 85: A-2. Electrical Parts List
ASSY BRACKET P-STAND NECK;UE9000 75",EGI ...4 T0081 6001-002284 SCREW-MACHINE;BH,+,M4,L8,ZPC(WHT),SWRCH1 ...4 BN61-08499A BRACKET-STAND NECK;UE9000 75",EGI-SECC P ...4 BN61-08500A BRACKET-STAND SUPPORT;UE9000 75",EGI-SEC BN91-08844T ASSY SHIELD;UN75ES9000FXZA,ZC 6001-002756 SCREW-MACHINE;BH,+,M3,L6,ZPC(WHT),SWRCH1 BN02-00102B TAPE FILAMENT;UE7000,#893,0.15,25,50,WHI EC13 BN39-01713A LEAD CONNECTOR;UN75ES9000,Flat Connector EC13 BN39-01714A LEAD CONNECTOR;UN75ES9000,Flat Connector Copyright© 1995-2012 SAMSUNG. All rights reserved. - Page 86 TAPE THERMAL-GRAPHITE L;ES9000 75",E-GRA ..5 EC13 BN39-01696A LEAD CONNECTOR;75" SNB Wire-harness_Righ ..5 EC13 BN39-01697A LEAD CONNECTOR;75" SNB Wire-harness_Left ..5 BN61-08235A HOLDER-LGP;SNB,M3*L4.9*SCALOCK,trap,4.9, ..5 BN61-08501A BRACKET-PCB TOP;UE9000 75",AL,EXTRUSION ..5 BN61-08533A BRACKET-TCON BOTTOM;UE9000 75",EGI-SECC ..5 BN61-08535A BRACKET-PCB POWER TOP;UE9000 75",EGI-SEC Copyright© 1995-2012 SAMSUNG. All rights reserved.
- Page 87 ..5 BN61-08512A FRAME-MOLD MIDDLE (D);ES9000 75",PC+GF,W BN96-19966B ASSY STAND P-LINK;UE9000 75",W/W,SQUARE, ...4 BN60-00162X SPACER-FOAM;FOAM,30000mm,Dark Gray,1T,15 ...4 BN61-02932L BRACKET-STOPPER NUT;LED TV,M3,D5.5,L7.5, ...4 BN61-02932M BRACKET-STOPPER NUT;LED TV,M4,D6,L7,BRAC ...4 BN61-02932T BRACKET-STOPPER NUT;LED-TV,M3,D7,L6.6,BR ...4 BN61-02932V BRACKET-STOPPER NUT;LED TV,M8*D15*L17,L1 Copyright© 1995-2012 SAMSUNG. All rights reserved.
- Page 88 SHEET-INSULATOR SOURCE L;UE9000 75",PET, ..5 BN63-09969A SHEET-INSULATOR SOURCE R;UE9000 55",PET, ...4 BN96-24423C ASSY COVER P-DECORATION TOP;UE9000 75",W ..5 BN61-08548G BRACKET-STOPPER NUT;LED TV,M3*D6*L2.6,L2 ..5 BN61-08548J BRACKET-GUIDE PIN;LED TV,D3*L4.1,L4.1,D3 ..5 BN63-09846C COVER-DECORATION TOP;UE9000 75",AL,EXTRU M0017 BN91-09867B ASSY CHASSIS;UN75ES9000FXZA Copyright© 1995-2012 SAMSUNG. All rights reserved.
- Page 89 1203-007018 IC-DC/DC CONVERTER;TPS54821RHL,QFN,14P,3 ...4 1203-007080 IC-DC/DC CONVERTER;AOZ1051PI,SO-8,8P,4.9 ...4 1204-003317 IC-VIDEO PROCESS;SDP1101,FBGA,196P,11.5x ...4 1204-003318 IC-DECODER;SDP1106,FCBGA,1188P,35x35mm,P ...4 1205-003231 IC-BUFFER;DS90LV804,LLP,32P,5x5mm,PLASTI ...4 1205-003735 IC-SWITCH;AP2151WG-7,SOT25,5P,2.9x1.6mm, ...4 1205-004155 IC-SWITCH;AOZ1360AIL,SO-8,8P,4.9X3.9mm,P ...4 1205-004385 IC-ETHERNET CONTROLLER;RTL8201F-VB-CGT,Q ...4 1405-001271 VARISTOR;35V,20Vdc,5A,1.0x0.5x0.6mm,TP,1 ...4 R105 2007-000138 R-CHIP;100ohm,5%,1/16W,TP,1005 Copyright© 1995-2012 SAMSUNG. All rights reserved.
- Page 90 ...4 2007-007309 R-CHIP;12Kohm,1%,1/16W,TP,1005,0.35 ...4 2007-007312 R-CHIP;20Kohm,1%,1/16W,TP,1005 ...4 2007-007317 R-CHIP;2.2Kohm,1%,1/16W,TP,1005 ...4 2007-007318 R-CHIP;1Kohm,1%,1/16W,TP,1005 ...4 2007-007517 R-CHIP;240ohm,1%,1/16W,TP,1005 ...4 2007-007617 R-CHIP;2.49Kohm,1%,1/10W,TP,1608 ...4 2007-007698 R-CHIP;5.1Kohm,1%,1/16W,TP,1005 ...4 2007-007766 R-CHIP;2Kohm,1%,1/16W,TP,1005 ...4 MR11 2007-008015 R-CHIP;75ohm,1%,1/16W,TP,1005 ...4 2007-008137 R-CHIP;24Kohm,1%,1/16W,TP,1005 ...4 2007-008175 R-CHIP;330ohm,1%,1/16W,TP,1005 Copyright© 1995-2012 SAMSUNG. All rights reserved.
- Page 91 ...4 AD480 2203-005344 C-CER,CHIP;22nF,10%,25V,X7R,TP,1005,0.5T ...4 2203-005642 C-CER,CHIP;0.22nF,5%,50V,NP0,TP,1005 ...4 AD480 2203-005968 C-CER,CHIP;4.7nF,10%,50V,X7R,TP,1005,0.5 ...4 VC37 2203-006048 C-CER,CHIP;100nF,10%,10V,X7R,TP,1005 ...4 AD480 2203-006088 C-CER,CHIP;330nF,10%,10V,X7R,TP,1608 ...4 AD480 2203-006126 C-CER,CHIP;47nF,10%,16V,X7R,TP,1005 ...4 C102 2203-006158 C-CER,CHIP;100nF,10%,16V,X7R,TP,1005,0.5 ...4 C802 2203-006348 C-CER,CHIP;1000nF,10%,25V,X5R,TP,1608,0..4 2203-006474 C-CER,CHIP;22000nF,20%,6.3V,X5R,TP,2012 Copyright© 1995-2012 SAMSUNG. All rights reserved.
- Page 92 ...4 CN1501 3722-003044 JACK-USB;4P/1C,NI,BLK,SMD-A,A-TYPE ...4 3722-003151 JACK-PIN;5P(ULTRA SLIM),NI,BLK,ANGLE(SSR ...4 CN1701 3722-003199 JACK-MODULAR;8P/8C,ANGLE,AU,1P ...4 CN502 3722-003208 JACK-PHONE;1P/7C,P-BRONZE,YEL,SMD-A(DIP) ...4 3722-003216 JACK-PHONE;1P/7C,P-BRONZE,BLACK,SMD-A(DI ...4 3722-003394 JACK-PHONE;1P/6C,AU,BLK,ANGLE ...4 ET01 BN40-00228A TUNER;DNVS203EH144A,DNVS203EH144A,VSBFul ...4 BN41-01800B PCB MAIN;UE7000,FR-4,4,A,1.2,192*240,1 ...4 BN68-02775A LABEL-SMD;ALL MODELS,8.5,21,COMMON Copyright© 1995-2012 SAMSUNG. All rights reserved.
- Page 93 ..5 6001-002671 SCREW-MACHINE;BH,+,M3,L6,ZPC(BLK),SWRCH1 ..5 T0524 6902-000341 BAG PE;LDPE,T0.05,L90,W70,TRP,,,PE MARK M001A BN96-22897A ASSY MISC P-IR BLASTER;VG-IRB2000,North BN96-24515A ASSY ACCESSORY 3D GLASSES;SSG-3550CR,inb BN92-11280A ASSY P/MATERIAL;UE9000 75,W/W T0214 0203-001269 TAPE-OPP MASKING;#301,T0.06,W75,L50000,N 6902-001482 BAG SHEET;HDPE/NITRON,T0.015/T1.0,W700,L 6902-001492 BAG PE;HDPE/NITRON,T0.015/T0.5,W1900,L10 Copyright© 1995-2012 SAMSUNG. All rights reserved.
- Page 94 ASSY BOX;UE9000 75,USA T0077 BH68-00329D LABEL BAR CODE-02;NO CE,NO WT`Y,MPRII,LA BN69-06714A BOX-SET,IN;75UD9500,CB,C1,DW1,YEL,W2256, BN69-08003A BOX-SET,OUT;75UE9000,CB,C3,DW3,YEL,W1823 BN69-08004B BOX-01,SET PROTECT;75UE9000,CB,C3,DW3,YE BN92-11307A ASSY LABEL;UN75ES9000FXZA CIS1 0203-001598 TAPE-FILAMENT;#8915,0.15,12,55000,CLR BN68-03608H LEAFLET-00,STOP GUIDE;All SAMSUNG,ENG/FR BN68-04454V LABEL-01,STICKER;UE9Z,ZA,PET,T0.05,38,14 BN68-04618C LABEL-LED-HIGHLIGHT STICKER;ES9000,PET,T T0527 BP68-00052B LABEL-00,RATING;FPTV,PET,T0.05,93,73 Copyright© 1995-2012 SAMSUNG. All rights reserved.
- Page 95 Quick Parts: Verify before Ordering HELP : 888-751-4086; 866-894-0637 FE) FIRMWARE GSPN http://gspn3.samsungcsportal.com PLUS ONE Firmware http://my.plus1solutions.net/clientPortals/samsung Avail on GSPN HOT TIPS - Check for continuous Firmware upgrade for 11/2/12 this model series… 2012 LED TV Echo-P Firmware (T-ECPAKUC, 1041.1)
- Page 96 UN75ES9000FXZA Fast Track Troubleshooting Manual...
- Page 97 UN75ES9000 Power On Sequence 2. CN201(POWER) B5V_PW B13V_PW SW_POWER_ B13V_PW B5V_PW B13V_PW PWM_DIMMING_ A5V_PW TCON1_BUFF PWM_DIMMING_ TCON2_BUFF B13VS_PW OVD_ON_OFF PWM_DIMMING_ TCON3_BUFF B13VS_PW OVD_LEVEL PWM_DIMMING_ B5V_PW_1 TCON4_BUFF A5V_PW 5V Standby PWM_DIMMING_TCON2 _BUFF SW_Power_OUT 0-3.3V Power On PWM_DIMMING_TCON3 _BUFF PWM_DIMMING_TCON1_BUFF PWM_DIMMING_TCON4_BUFF Remove CN201 to test LED Backlight...
- Page 98 UN75ES9000 16 sets of LED Drives CN802A L5- L6- L6+ nc L7- L7+ L8- L8+ 2 L5+ L2- L6- nc L3- L3+ L4- L4+ 1 CN802B 18 R8- R8+ R7- R7+ nc nc R6- R5- R5+ 17 R4- R4+ R3- R3+ nc nc R1- R1+ CN802A...
- Page 99 MoIP Module Troubleshooting...
- Page 100 Function Control Troubleshooting Standby A3.3V on Function Connector, Pin All Pins should read 3.3V before commands. Press, at Key 1, Pin 6. 3.3V to 0.0V DC Left, Right, Up, Down Key 2, Pin 7. Check specific voltages chart.
- Page 101 2012 LCD/LED Signal Path for Troubleshooting Echo-P T-CON/FRC Board Main Board T-CON T-CON LVDS Echo-P CABLE Inputs HDMI Etc. Boot Customer Panel Logo Picture Test T-CON Or “Echo-FP Post Test Pattern” Also generated on T-CON Board. (UN75ES9000 )
- Page 102 2012 LED Factory Test Mode (ES9000) Test Procedure: 1. Access Factory Mode Standby: Mute,182,power Power On: Info, Factory & Select 2. Select Test Pattern Main Board Patterns Test Select: EchoP Pattern Sel 3. Select EchoP Pattern Set Use the right arrow key to Scroll through patterns 4.Select SOC T-CON Test Pattern...
- Page 103 2012 Factory Test Mode UN75ES9000 Option Bytes UES9000 ----- SAMEX IMPORTANT NEW to 2012!!!!… Basic Model & SVC Model Added to Option Byte Settings!! Check & Set Option Bytes Whenever replacing Main Board or to verify correct Settings for any model. Service Mode: Mute –...
- Page 104 2012 Factory Test Mode (ES8000 Sample) Specific Upgrades may be necessary to perform. Sub Micom Upgrade Mic Upgrade BT Upgrade Function Upgrade Camera Upgrade...
- Page 105 Quick Parts: Verify before Ordering HELP : 888-751-4086; 866-894-0637 FE) FIRMWARE GSPN http://gspn3.samsungcsportal.com PLUS ONE Firmware http://my.plus1solutions.net/clientPortals/samsung Avail on GSPN HOT TIPS - Check for continuous Firmware upgrade for 11/2/12 this model series… 2012 LED TV Echo-P Firmware (T-ECPAKUC, 1041.1)
- Page 106 UN75ES9000FXZA Fast Track Troubleshooting Manual...
- Page 107 UN75ES9000 Power On Sequence 2. CN201(POWER) B5V_PW B13V_PW SW_POWER_ B13V_PW B5V_PW B13V_PW PWM_DIMMING_ A5V_PW TCON1_BUFF PWM_DIMMING_ TCON2_BUFF B13VS_PW OVD_ON_OFF PWM_DIMMING_ TCON3_BUFF B13VS_PW OVD_LEVEL PWM_DIMMING_ B5V_PW_1 TCON4_BUFF A5V_PW 5V Standby PWM_DIMMING_TCON2 _BUFF SW_Power_OUT 0-3.3V Power On PWM_DIMMING_TCON3 _BUFF PWM_DIMMING_TCON1_BUFF PWM_DIMMING_TCON4_BUFF Remove CN201 to test LED Backlight...
- Page 108 UN75ES9000 16 sets of LED Drives CN802A L5- L6- L6+ nc L7- L7+ L8- L8+ 2 L5+ L2- L6- nc L3- L3+ L4- L4+ 1 CN802B 18 R8- R8+ R7- R7+ nc nc R6- R5- R5+ 17 R4- R4+ R3- R3+ nc nc R1- R1+ CN802A...
- Page 109 MoIP Module Troubleshooting...
- Page 110 Function Control Troubleshooting Standby A3.3V on Function Connector, Pin All Pins should read 3.3V before commands. Press, at Key 1, Pin 6. 3.3V to 0.0V DC Left, Right, Up, Down Key 2, Pin 7. Check specific voltages chart.
- Page 111 2012 LCD/LED Signal Path for Troubleshooting Echo-P T-CON/FRC Board Main Board T-CON T-CON LVDS Echo-P CABLE Inputs HDMI Etc. Boot Customer Panel Logo Picture Test T-CON Or “Echo-FP Post Test Pattern” Also generated on T-CON Board. (UN75ES9000 )
- Page 112 2012 LED Factory Test Mode (ES9000) Test Procedure: 1. With TV Power On… “Mute/147/Mute” for a Main Board Test Pattern & “Mute/369/Mute” for a T-CON Board Test Pattern 2. Access Factory Mode Standby: Mute,182,power Power On: Info, Factory Main Board Patterns Test &...
- Page 113 2012 Factory Test Mode UN75ES9000 Option Bytes UES9000 ----- SAMEX IMPORTANT NEW to 2012!!!!… Basic Model & SVC Model Added to Option Byte Settings!! Check & Set Option Bytes Whenever replacing Main Board or to verify correct Settings for any model. Service Mode: Mute –...
- Page 114 2012 Factory Test Mode (ES8000 Sample) Specific Upgrades may be necessary to perform. Sub Micom Upgrade Mic Upgrade BT Upgrade Function Upgrade Camera Upgrade...
Need help?
Do you have a question about the UN75ES9000F and is the answer not in the manual?
Questions and answers