Table of Contents
Advertisement
Available languages
Available languages
Quick Links
Advertisement
Table of Contents

Subscribe to Our Youtube Channel
Related Manuals for AsVIVA DB2


Summary of Contents for AsVIVA DB2
- Page 1 BEDIENUNGSHANDUCH / MANUAL VERSION: C-BU www.AsVIVA.de...
-
Page 3: Table Of Contents
INHALTSVERZEICHNIS GEWÄHRLEISTUNGSBESTIMMUNGEN ....................... 3 WICHTIGE HINWEISE ZU IHREM PRODUKT ....................4 WICHTIGE SICHERHEITSHINWEISE ......................5 PRODUKTÜBERSICHT ............................ 6 TEILELISTE ................................ 7 SPEZIFIKATIONEN ............................7 ZUSAMMENBAU .............................. 8 SENSOR MODUL ............................. 9 APP ...................................11 AUFWÄRMEN UND DEHNEN ........................14 TRAININGHINWEISE............................16 ÜBUNGSVORSCHLÄGE ..........................17 AKKU ................................21 GEWÄHRLEISTUNGSRECHT ........................22 TABLE OF CONTENTS... -
Page 4: Gewährleistungsbestimmungen
Ersatzteilbestellungen und Reparaturaufträge richten Sie bitte unter Angabe der Kundennummer bzw. Rechnungsnummer an Ihren Händler oder direkt an uns. Unsere Serviceadresse: https://www.asviva.de/kontakt-formular Damit Ihnen unsere Service-Mitarbeiter optimal weiterhelfen können, beachten Sie bitte folgende Vorgehensweise: Ist ein bestimmtes Teil beschädigt? Teilen Sie uns bitte anhand der Teileiste die genaue Teilenummer mit. -
Page 5: Wichtige Hinweise Zu Ihrem Produkt
WICHTIGE HINWEISE ZU IHREM PRODUKT Danke, dass Sie sich für eines unserer Produkte entschieden haben und für das damit entgegenge- brachte Vertrauen. Um Ihnen ein einwandfreies Produkt liefern zu können, obliegen alle unsere Produk- te und deren Produktion einer ständigen sowie ausführlichen Qualitätskontrolle. Sollte dennoch ein Fehler auftreten, Ihnen das Produkt nicht zusagen oder sollten Sie Anmerkungen und Vorschläge haben, so bitten wir Sie nicht zu zögern und Kontakt mit unserem Support unter WAS IST ZU BEACHTEN? -
Page 6: Wichtige Sicherheitshinweise
WICHTIGE SICHERHEITSHINWEISE Bitte lesen Sie die Anleitung genau durch, bevor Sie mit den Zusammenbau beginnen! Bauen Sie das Gerät nach der Aufbauanleitung auf und verwenden Sie nur die für den Aufbau des Stellen Sie sicher, dass der Sensor korrekt eingebaut ist, so dass eine Trainingsaufzeichnung per App gewährleistet werden kann. -
Page 7: Produktübersicht
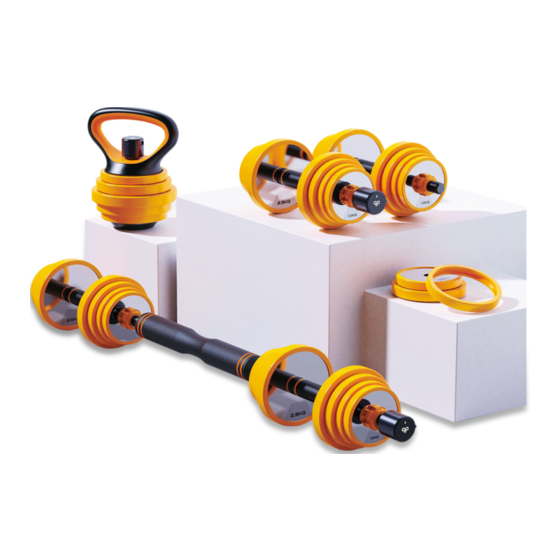
PRODUKTÜBERSICHT... -
Page 8: Teileliste
TEILELISTE 1 x Sensor Module 1x USB Ladegerät SPEZIFIKATIONEN Model: IB-BK-004 Software-Plattform: Apple iOS 9.0 oder Android 4.4 oder höher Verbindung: Bluetooth 4.0 Sensor: 6-axis Gyroscope Sensor Akku/Batterie: 180mAh Li-Ion Ladeanschluss: Micro USB Input: 5V - 1A Erweiterbare Inhalte in App:... -
Page 9: Zusammenbau
ZUSAMMENBAU Das Sensor Modul wird für Kurzhanteln und Langhanteln verwendet. Bitte stellen Sie sicher, dass der USB-Ladeanschluss oben ist, wenn Sie das Gerät mit der APP verbinden. Kurzhanteln installieren Kurzhantel Sensor Modul Anschluss App Langhantel installieren USB Anschluss Langhantel Sensor Modul Die meisten Hanteln können manuell installiert und leicht demontiert werden. -
Page 10: Sensor Modul
SENSOR MODUL ERSTINBETRIEBNAHME 1. Bitte schließen Sie das Netzteil und das Sensormodul über das USB Ladekabel an. 2. Dieses wird aktiviert, wenn der Bildschirm des Geräts aufleuchtet und die Stromnetzlinie angezeigt werden. 3. Bitte laden Sie über 20 Minuten vor dem ersten Gebrauch und stellen Sie sicher, dass der LED-Bildschirm mindestens 2 Linien anzeigt. - Page 11 SENSOR MODUL STATUS ANZEIGE LED Status Vollständig geladen (1 verbleibende Linie ist etwa 25% Leistung) Vollständig geladen langsam blinkend: Ladevorgang Schnelles Blinken: Warnung bei niedrigem Batteriestand Langsam blinkend: Warten auf App-Verbindung Schnelles Blinken: Verbunden mit App Ton Status (“Di“ = Piepton) “Di”...
-
Page 12: App
INSTALLATION MOVE-IT APP Scannen Sie den QR-Code, um die Move It-App herunterzuladen. Alternativ können Sie auch im Appstore oder Playstore nach Move it Fitness suchen. Bei der ersten Geräteverbindung wird empfohlen, andere Bluetooth-Geräte zu schließen, um eine gegenseitige Beeinflussung zu vermeiden. Sie können auch versuchen, Ihr Telefon oder die Bluetooth-Funktion neu zu starten. - Page 13 KOPPELN DES GERÄTS Rufen Sie das Menü der Move It APP auf und verbinden Sie das Gerät, indem Sie auf der Move-it App folgendes auswählen: > ME > DEVICE MANAGEMENT > POWER DUMBBELL und der Anleitung folgen. Starten Sie das Koppeln des Geräts (Power Dumbbell). Das Gerät wird automatisch gescannt, der Name des Geräts wird angezeigt, und Sie können es durch Anklicken koppeln.
- Page 14 TRAINING STARTEN Rufen Sie das Hauptmenü der Move It APP auf Klicken Sie auf „Workout > Power Dumbell“ Wählen Sie einen der Modi „Freestyle Training“ oder (Freies Training) „Personalized Plan“ (Personalisierter Plan Starten Sie das Training.
-
Page 15: Aufwärmen Und Dehnen
AUFWÄRMEN UND DEHNEN Aufwärmphase und Abkühlphase 1. Aufwärmphase 5 bis 10 Minuten Gymnastik und Stretching. Vorbereitung des Organismus auf die bevorstehende Traingsleistung. 2. Trainingsphase 15 bis 40 Minuten intensives aber nicht zu überfordendes Training 3. Abkühlphase 5 bis 10 Minuten Gymnastik und Stretching um die Muskulatur zu lockern und Muskelkater vorzu- beugen. - Page 16 AUFWÄRMEN UND DEHNEN Dehnung der hinteren Oberschenkmuskulatur: Setzen Sie sich auf den Boden und strecken Sie Ihr- rechtes Bein. Winkeln Sie Ihr linkes Bein so an, dass die Fußsohle die Innenseite Ihres rechten Oberschenkels berührt. Beugen Sie sich nun so weit wie möglich nach vorne und versuchen Sie, die Zehen an Ihrem rechten Bein zu berühren.
-
Page 17: Traininghinweise
TRAININGSHINWEISE Um spürbare körperliche und gesundheitliche Verbesserungen zu erreichen, müssen für die Bestim- mung des erforderlichen Trainingsaufwandes die folgenden Faktoren beachtet werden: 1. Intensität Die Stufe der körperlichen Belastung beim Training muss den Punkt der normalen Belastung über- schreiten, ohne dabei den Punkt der Atemlosigkeit bzw. Erschöpfung zu erreichen. Ein geeigneter Richtwert für ein effektives Training kann dabei der Puls sein. -
Page 18: Übungsvorschläge
ÜBUNGSVORSCHLÄGE ZIELMUSKELN: Rückenmuskulatur 02 KURZHANTEL SCHULTERZÜGE 01 EINARMIGES KURZHANTEL-RUDERN 03 KURZHANTEL HARD PULL ZIELMUSKELN: Schultermuskulatur 02 SITZENDER SCHULTER-PUSH 01 VERTIKALES HANTEL-HEBEN 03 KURZHANTEL SEITEN-HEBEN... - Page 19 ÜBUNGSVORSCHLÄGE ZIELMUSKELN: Armmuskulatur 02 SITZENDE, EINARMIGE KURZHANTELBEUGUNG 01 KURZHANTEL CURLS SITZEND ABWECHSELND 03 KURZHANTEL CURLS ZIELMUSKELN: Beinmuskulatur 01 KURZHANTEL KNIEBEUGEN 02 KURZHANTEL LUNGES (AUSFALLSCHRITT) 03 KURZHANTEL-BEUGEN SITZEND...
- Page 20 ÜBUNGSVORSCHLÄGE ZIELMUSKELN: Brustmuskulatur 01 LIEGESTÜTZE MIT HANTELN IN RÜCKENLAGE 02 KURZHANTEL-PUSH IN RÜCKENLAGE 04 KURZHANTEL ZIEHEN IN RÜCKENLAGE 03 BANKDRÜCKEN BERGAB 05 FLYING BIRD FLACH LIEGEND 06 FLIYING BIRD ANLEHNEND...
- Page 21 ÜBUNGSVORSCHLÄGE BARBELL TRAINING Kurzhantelstange Verbindungsstück Kurzhantelstange Verbindungsstück mit beiden Kurzhantelstangen verschrauben 01 LANGHANTEL-BANKDRÜCKEN 02 LANGHANTEL-NACKENPRESSE 03 DEADLIFT MIT GERADEM BEIN...
-
Page 22: Akku
AKKU Wie lange muss der Akku geladen werden? Der Akku wird in ca. 2 Stunden vollständig geladen. Die Akku-LED leuchtet während des Ladevorgangs rot und schaltet sich aus, wenn der Akku vollständig geladen ist. Wie lange hält das Gerät, nachdem es vollständig aufgeladen wurde? Das Gerät kann bei voller Ladung eine Woche lang ununterbrochen verwendet werden und es kann einen Monat lang im Standby-Zustand gehalten werden. -
Page 23: Gewährleistungsrecht
GEWÄHRLEISTUNGSRECHT Herzlichen Glückwunsch zu Ihrer Entscheidung zum Kauf eines Produkts aus dem Hause AsVIVA. Gemäß des zum 01. Januar 2002 geänderten europäischen Gewährleistungsrechts, steht Ihnen eine gesetzliche Gewährleistungsfrist von 2 Jahren zu. Die Gewährleistungsfrist beginnt mit der Übergabe der Ware durch den Fachhändler. -
Page 26: Warranty Terms
Four our equipment we provide the legal warranty of 2 years. For spare parts and repair orders, please contact your dealer or directly to AsVIVA, Indicating the customer number or invoice number. Our service is available 24 hours. - Page 27 If nevertheless an item is defective and needs to be repaired, you do not like the product or you have any suggestions about it, please do not hesitate to contact our support team at service@asviva.de. WHAT NEEDS TO BE CONSIDERED? •...
-
Page 28: Important Safety Instructions
IMPORTANT SAFETY INSTRUCTIONS Please read the instructions carefully before you start the assembly! • individual parts enclosed for the assembly of the device. • Make sure that the sensor is correctly installed so that a training recording via app can be guaranteed. -
Page 29: Product Overview
PRODUCT OVERVIEW... -
Page 30: Parts List
PARTS LIST 1 x Intelligent sensor module 1x USB Charging SPECIFICATIONS Model: IB-BK-004 Platform: Apple iOS 9.0 or Android 4.4 or higher Connection: Bluetooth 4.0 Sensor: 6-axis Gyroscope Sensor Battery: 180mAh Li-Ion Charging Port: Micro USB Input: 5V - 1A Evolving contents in App:... -
Page 31: Assembly
ASSEMBLY The Sensor module is used for dumbbells and barbells. Please make sure that the USB charging port is up when you connect the device to the APP. Dumbbell Install Sensor Module Dumbbell Connecting APP Barbell Install Upside USB Port Sensor Module Barbell •... -
Page 32: Sensor Module
SENSOR MODULE OPERATION 1. Please connect the power supply and the sensor module via the USB charging cable. 2. This is activated when the screen of the unit lights up and the power line is displayed. 3. Please charge the Sensor over 20 minutes least 2 lines. - Page 33 SENSOR MODULE DISPLAY STATUS LED display state Last lighting: Fully charge (1grid is about 25% power) Last lighting: Fully charge Slowly flashing: Charging Fast flashing: Low battery reminding Slowly flashing: Waiting for App connecting Fast flashing: Connected APP Sound State “Di”...
-
Page 34: App
INSTALLATION MOVE-IT APP Scan the QR code to download the Move It app. Alternatively, you can search for Move it Fitness in the Appstore or Playstore. to avoid mutual interference. You can also try restarting your phone or the Bluetooth function. PAIRING THE DEVICE Note: Please pair the product through the app and not through your phone‘s system Bluetooth setting. - Page 35 PAIRING THE DEVICE Go to the Move It APP menu and connect the unit by selecting the following on the Move-it App: > ME > DEVICE MANAGEMENT > POWER DUMBBELL and follow the instructions. Start pairing the device (Power Dumbbell). The device is automatically scanned, the name of the device is displayed and you can pair it by clicking on it.
- Page 36 START THE TRAINING - Call up the main menu of the Move It APP - Click on Workout > Power Dumbbell - Select one of the modes „Freestyle Training“ or „Personalised Plan“. - Start the workout.
-
Page 37: Warm Up And Stretching
WARM UP AND STRETCHING Warm-up and cool-down 1. Warm up phase 5 to 10 minutes of gymnastics and stretching. Preparation of the organism for the upcoming training performance. 2. Exercise phase 15 to 40 minutes of intensive but not too demanding training. 3. - Page 38 WARM UP AND STRETCHING Stretching the posterior thigh muscles: Sit on the floor and stretch your right leg. Angle your left leg so that the sole of your foot touches the inside of your right thigh. Now bend forward as far as possible and try to touch the toes on your right leg.
-
Page 39: Exercise Instructions
EXERCISE INSTRUCTIONS In order to achieve noticeable physical and health improvements, the following factors must be consi- dered when determining the amount of training required: 1. Intensity The level of physical exertion during training must exceed the point of normal exertion without reaching the point of breathlessness or exhaustion. -
Page 40: Exercise Suggestions
EXERCISE SUGGESTIONS EXERCISED MUSCLES: Back muscles 02 DUMBBELL SHRUGS 01 BOW ONE ARM DUMBBELL ROWING 03 DUMBBELL HARD PULL EXERCISED MUSCLES: Shoulder muscles 01 VERTICAL DUMBBELL ALTERNATING FRONT LIFT 02 SEATED DUMBBELL PUSH SHOULDER 03 BOW DUMBBELL SIDE LIFT... - Page 41 EXERCISE SUGGESTIONS EXERCISED MUSCLES: Arm muscles 02 SITTING DOWN, ONE ARM DUMBBELL BENDING 01 SEATED DUMBBELL ALTERNATE CURL 03 SEATED DUMBBELL CURL EXERCISED MUSCLES: Leg muscles 01 DUMBBELL SQUAT 02 DUMBBELL LUNGES 03 SIT BACK DUMBBELL BENDING...
- Page 42 EXERCISE SUGGESTIONS EXERCISED MUSCLES: Chest muscles 01 FLAT SUPINE DUMBBELL PUSH 02 SUPINE DUMBBELL PUSH 04 SUPINE DUMBBELL PULL 03 DOWNHILL DUMBBELL BENCH PRESS 05 FLAT LYING DUMBBELL FLYING BIRD 06 RECLINING DUMBBELL FLYING BIRD...
- Page 43 EXERCISE SUGGESTIONS BARBELL TRAINING 01 BARBELL BENCH PRESS 02 BARBELL NECK PRESS 03 STRAIGHT LEG DEADLIFT...
-
Page 44: Battery
BATTERY How long does the battery need to be charged? The battery is fully charged in approx. 2 hours. The battery LED lights up red during charging and switches off when the battery is fully charged. How long will the unit last after it is fully charged? The unit can be used continuously for a week on a full charge and it can be kept in standby for a month. -
Page 45: Warranty Device
WARRANTY DEVICE Congratulations on your decision to purchase a device from AsVIVA. According to the European guarantee law, amended as of January 1, 2002, You have a legal warranty period of 2 years. The guarantee period begins with the handover of the device by the specialist dealer.
Need help?
Do you have a question about the DB2 and is the answer not in the manual?
Questions and answers