Table of Contents
Advertisement
Quick Links
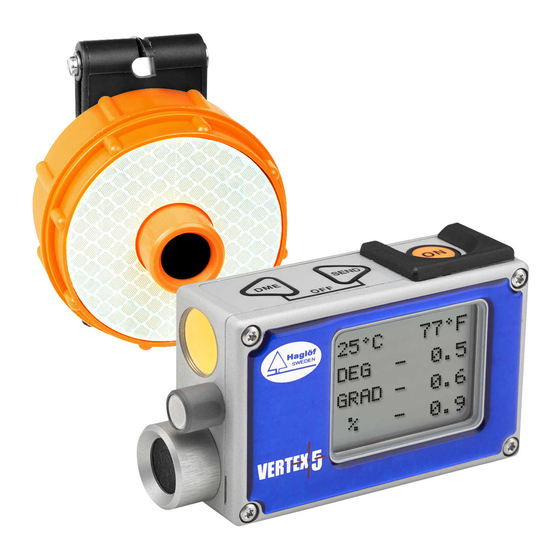
Vertex 5 – Quick Guide
2020-12-02
VERTEX 5 - ADVANCED USER'S GUIDE
The included USB memory stick contains the Vertex 5 - Advanced User's Guide and Communication program for
Windows Haglof BLE Commander.
KEYPAD
ON
button: Used to start the Vertex, to confirm a value and as a trigger when
•
measuring.
•
DME
button: Used for distance measurement, to navigate in menus and to
change the brightness of the red cross sight.
•
SEND
button: Used to send data to Vertex memory or with IR (DPII, MDII Calipers) or Bluetooth® to
external devises and to navigate in menus.
•
DME
SEND: Used to Turn the Vertex off.
TURN ON/OFF T3 TRANSPONDER
1. Hold the Vertex 5 and the Transponder T3 ultrasonic transceivers close to each
other, about 0-2 cm/0-1 in.
2. Press the
DME button.
a.
2 short beeps are heard from the transponder when turned on
b. 4 short beeps are heard from the transponder when turned off.
HEIGHT MEASUREMENT WHEN USING THE T3 TRANSPONDER
1. Start the transponder and place it on the object to measure at the preset TRP.HGT.
2. Press
ON and select HEIGHT. Aim towards the transponder positioned at the preset
TRP.HGT.
3. Press and hold down
red cross sight is now flashing.
4. Aim to the height to measure. Press and hold down
then release the button. The measured height is displayed.
5. Repeat the procedure from step 4 to measure more heights on the same object.
HEIGHT MEASURING WITHOUT USING THE T3 TRANSPONDER
ON, select HEIGHT and then press
1. Press
(Change the M.DIST in SETTINGS)
2. Aim to the point that corresponds to the preset TRP.HGT and press and hold down
ON until the sight cross goes out then release button. The red cross sight starts to flash.
3. Aim to the height to measure. Press and hold down
out then release the
4. Repeat the procedure from step 4 to measure more heights on the same object.
© 2020, Haglöf Sweden AB.
ON until the sight cross goes out then release the button. The
SEND to use the M.DIST value displayed.
ON button. The measured height is displayed.
ON until the sight cross goes out
ON until the red cross sight goes
4
3
3
2
2020-12-02
Advertisement
Table of Contents

Related Manuals for Haglof Vertex 5


Summary of Contents for Haglof Vertex 5
- Page 1 Vertex 5 – Quick Guide 2020-12-02 VERTEX 5 - ADVANCED USER'S GUIDE The included USB memory stick contains the Vertex 5 - Advanced User's Guide and Communication program for Windows Haglof BLE Commander. KEYPAD button: Used to start the Vertex, to confirm a value and as a trigger when •...
- Page 2 Vertex 5 – Quick Guide 2020-12-02 ANGLE MEASURING ON to start the Vertex and go to ANGLE and press 1. Press Aim to the point where to measure the angle. Press and hold down ON until the red cross sight goes out then release the button.
- Page 3 Haglof Link will connect, show CONNECTED TO VERTEX 1001 and the Vertex will transfer the file. b. If Haglof Link do not connect and find the Vertex 5, click CONNECT TO DEVICE , Haglof Link will search for the unit. When the Vertex unit appears in the list, click and select it.
- Page 4 2. Measure the exact distance of 10m/32.8 feet with a measuring tape or similar. 3. Start the Transponder T3 and place it at the finish of the exact 10m distance. 4. Go to the zero point for the measured distance and aim the front of the Vertex 5 instrument to the transponder.
Need help?
Do you have a question about the Vertex 5 and is the answer not in the manual?
Questions and answers