
Related Manuals for CSL CS101


Summary of Contents for CSL CS101
- Page 1 CSL CS101 EPC Class 1 Gen 2 RFID Handheld Reader User’s Manual Version 2.0.1 CSL: The One-Stop-Shop for RFID Solutions...
-
Page 2: Table Of Contents
CSL CS101 EPC CLASS 1 GEN 2 RFID HANDHELD READER USER'S MANUAL, VERSION 2.0.1 Content Content ......................... 2 FCC and IC Statement ....................6 Introduction ........................7 CS101 Handheld RFID Reader .................... 7 How to Use this Manual ....................7 Product Package ....................... - Page 3 CSL CS101 EPC CLASS 1 GEN 2 RFID HANDHELD READER USER'S MANUAL, VERSION 2.0.1 Main Menu ........................39 Setup ..........................39 Reader Information ......................40 Tag Inventory ........................41 Tag Ranging ........................42 Setting Up the Language on CS101 .................. 43 CS101 .NET Demo Application ..................
- Page 4 12.2 RFID Processor Firmware Upgrade Procedure ..............149 12.2.1 Procedure for CSL reader with RFID Processor App version 1.3.xx or 1.4.xx ....149 12.2.2 Procedure for CSL reader with RFID Processor App version 1.5.xx or after ....159 Copyright © Convergence Systems Limited, All Rights Reserved...
- Page 5 CSL CS101 EPC CLASS 1 GEN 2 RFID HANDHELD READER USER'S MANUAL, VERSION 2.0.1 Usage Tips for CS101 ..................... 167 13.1 Introduction ........................167 13.2 General Tips ........................167 13.3 System Tips ........................167 13.4 Write Tag Tips ....................... 167 13.5...
-
Page 6: Fcc And Ic Statement
CSL CS101 EPC CLASS 1 GEN 2 RFID HANDHELD READER USER'S MANUAL, VERSION 2.0.1 FCC and IC Statement FCC NOTICE: To comply with FCC part 15 rules in the United States, the system must be professionally installed to ensure compliance with the Part 15 certification. It is the responsibility of the operator and professional installer to ensure that only certified systems are deployed in the United States. -
Page 7: Introduction
– in that it is designed to replace fixed reader in many applications where fixed reader is a non-portable and therefore non-viable option. In fact it is nicknamed “Fixed Reader in Your Hand”. CS101 is a product that arises out of popular requests for applications such as: Dock Door applications where the handheld reader is used to complement fixed reader when tags are not 100% read by the fixed reader. -
Page 8: Product Package
CSL CS101 EPC CLASS 1 GEN 2 RFID HANDHELD READER USER'S MANUAL, VERSION 2.0.1 Product Package 3.3.1 Basic Package Content The reader package contains: • Handheld reader • Charger with power adapter and country specific power cord • Batteries – 2 pieces •... -
Page 9: Product Specification
ISO 18000-6C and EPCglobal Class 1 Gen 2 UHF RFID protocol compliant including dense reader mode Ultra long read range – peak at 8 meters open space with DogBone tags. (CS101-H-2 Version) Ultra high read rate –... - Page 10 CSL CS101 EPC CLASS 1 GEN 2 RFID HANDHELD READER USER'S MANUAL, VERSION 2.0.1 Specifications: Physical Characteristics: Length: 19.7 cm; Width: 12.2 cm; Height: 22.3 cm; Weight: 1 Kg Environment: Operating Temp: -20 C to 50 Storage Temp: C to 75...
-
Page 11: Hardware Installation
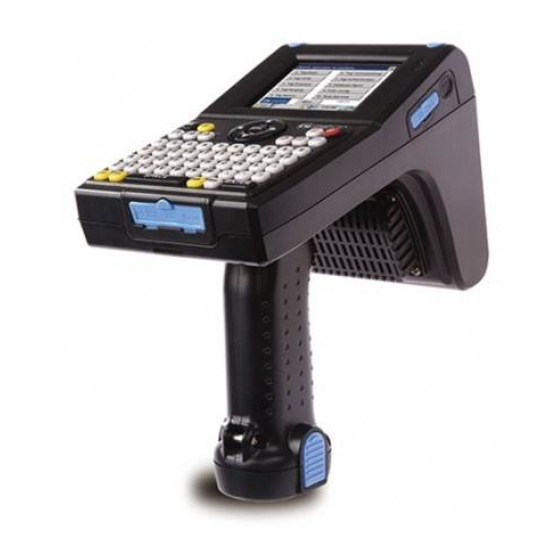
CSL CS101 EPC CLASS 1 GEN 2 RFID HANDHELD READER USER'S MANUAL, VERSION 2.0.1 Hardware Installation Devices 4.1.1 Reader The CSL CS101 handheld RFID Reader is an EPCglobal Class 1 Gen 2 handheld reader product. Status LCD Touch Screen 58 Keys... - Page 12 CSL CS101 EPC CLASS 1 GEN 2 RFID HANDHELD READER USER'S MANUAL, VERSION 2.0.1 Barcode Reader RFID Antenna Inside Figure 4-3 CS101 Reader Plan View The reader is connected to the network via Wi Fi. The reader can have a static IP address or can obtain an IP address using DHCP.
-
Page 13: Charger
Note: If the battery goes into the over-current protection by shorting the battery terminals, the battery will not output the voltage until the battery is put into CS101 charger cradle to trigger the battery to release the status of over-current protection. -
Page 14: Usage Recommendation
CSL CS101 EPC CLASS 1 GEN 2 RFID HANDHELD READER USER'S MANUAL, VERSION 2.0.1 Usage Recommendation 4.3.1 Strap: Wrist Strap and Shoulder Strap The wrist strap and shoulder strap should be attached to the handheld reader to allow additional weight support during use. -
Page 15: Do's & Don'ts When Using Cs101 Handheld Reader
CSL CS101 EPC CLASS 1 GEN 2 RFID HANDHELD READER USER'S MANUAL, VERSION 2.0.1 4.3.3 Do’s & Don’ts when using CS101 Handheld Reader User should pay attention when using CS101 RFID Reader. 1. Do not turn on the reader operating (read/write tags) and leave it unattended. - Page 16 CSL CS101 EPC CLASS 1 GEN 2 RFID HANDHELD READER USER'S MANUAL, VERSION 2.0.1 5. Do not let devices with strong RF radiation close to the reader. e.g mobile phone Reader antenna too close to the mobile phone items 6. Do configure the Wi-Fi settings of handheld reader to be either disabled or locked with an access point.
- Page 17 CSL CS101 EPC CLASS 1 GEN 2 RFID HANDHELD READER USER'S MANUAL, VERSION 2.0.1 7. Do keep certain distance between reader and the tagged items Copyright © Convergence Systems Limited, All Rights Reserved...
-
Page 18: Verification And Validation
CSL CS101 EPC CLASS 1 GEN 2 RFID HANDHELD READER USER'S MANUAL, VERSION 2.0.1 Verification and Validation The reader comes with standard demo application. Double click the icon “CS101 Callback Demo” to start. Figure 4-6 WinCE Screen The main menu will be shown on screen. - Page 19 CSL CS101 EPC CLASS 1 GEN 2 RFID HANDHELD READER USER'S MANUAL, VERSION 2.0.1 the reader setting, e.g. firmware version, country code and antenna power output etc. Whenever the reader is stayed in the idle state (not during reading or writing the tags), you can press the function key “F1”...
- Page 20 CSL CS101 EPC CLASS 1 GEN 2 RFID HANDHELD READER USER'S MANUAL, VERSION 2.0.1 Figure 4-10 Tag Inventory Operation Take the sample tags and put them in front of the handheld reader, all the tag’s EPC within the read range of the reader will be read by handheld reader: Figure 4-11 Tag Inventory –...
-
Page 21: Cautions
CSL CS101 EPC CLASS 1 GEN 2 RFID HANDHELD READER USER'S MANUAL, VERSION 2.0.1 Cautions The default IP address of handheld reader is configured as DHCP. To change this IP address, please go to System Configuration page by clicking the “System Config” button of the demo application to do that. -
Page 22: Software Installation
CS101 .NET Demo App on WinCE OS with User Interface UDP Server Demo Program on Windows OS using Command Prompt CS101 Barcode and SnapShot Demo App on WinCE OS with User Interface CS101 VB Demo App on WinCE OS with User Interface... - Page 23 For Developer User’s Manual Demo Applications (SDK) CS101 .NET API Demo Build on WinCE OS with User Interface CS101 Java API Demo Build on WinCE OS with User Interface UDP Server Demo Build on Windows OS using Command Prompt CS101 Barcode Demo Build on WinCE OS with User Interface...
-
Page 24: Restore Cs101 Os To Factory Default Setting
USER'S MANUAL, VERSION 2.0.1 Restore CS101 OS to Factory Default Setting This section provides guidelines to the user to restore the software to factory default in the CSL CS101 Reader. The following areas will be covered in this section: Restore of the Windows CE OS on CS101... -
Page 25: Restore Cs101 Os To Factory Default Setting Procedure
CSL CS101 EPC CLASS 1 GEN 2 RFID HANDHELD READER USER'S MANUAL, VERSION 2.0.1 5.2.2 Restore CS101 OS to Factory Default Setting Procedure 1. Use a fully charged battery to power on CS101 2. Press and keep holding the “Power” key for 1 second Copyright ©... - Page 26 CSL CS101 EPC CLASS 1 GEN 2 RFID HANDHELD READER USER'S MANUAL, VERSION 2.0.1 WHILE holding the “Power” key, press “Reset” key simultaneously for 5 seconds. 4. After that, ONLY release the “Reset” key, leaving the Power key still pressed by finger.
- Page 27 CSL CS101 EPC CLASS 1 GEN 2 RFID HANDHELD READER USER'S MANUAL, VERSION 2.0.1 6. Press [Yes] when reconfirmation box appears. 7. Press [OK] button to confirm the System ROM formatting. 8. Wait until System ROM formatting process is finished.
- Page 28 Use the Pen CS101 provided to do the Calibration. 10. Tap the screen to confirm the calibration settings. 11. After the 1st Touch Screen calibration for CS101, wait until CS101 enters Win CE. 12. Please go to Section 4 to Install Basic Components for CS101.
-
Page 29: Install Basic Components
RFID module inside, Dot Net Framework, Demo App, etc. 1. After the Win CE OS is upgraded, wait until CS101 enter Win CE. Unzip the package CS101 Basic Components Installers.zip (provided by CSL) in PC to a directory. - Page 30 CSL CS101 EPC CLASS 1 GEN 2 RFID HANDHELD READER USER'S MANUAL, VERSION 2.0.1 4. Open the folder inside CS101 Win CE. 5. Check the files in . They are “CS101 Basic Components Installers” RfidUsbDriverCE.cab, NETCFv2.wce5.armv4i.cab, NETCFv35.wce.armv4.cab, BarcodeSavePowerModeSetup21-Oct-2009.CAB and sqlce30.wce5.armv4i.cab.
- Page 31 CSL CS101 EPC CLASS 1 GEN 2 RFID HANDHELD READER USER'S MANUAL, VERSION 2.0.1 6. Starting from RfidUsbDriverCE.cab, double click the cab files to install the files. A file location will pop up. Simply press “OK” to install the component to the default directory provided.
- Page 32 CSL CS101 EPC CLASS 1 GEN 2 RFID HANDHELD READER USER'S MANUAL, VERSION 2.0.1 8. After CS101 Basic Components installed, the Barcode Power Save Mode should be set before use. Enter CS101 Program Files. 9. In Program Files, enter BarcodeSavePowerMode Setup.
- Page 33 12. Press OK when “Successful” is prompt. Then exit this program by pressing the “x” button on the upper right corner of the Barcode application window. 13. User can go to Section 5 to install the latest CS101 Demo App. Copyright © Convergence Systems Limited, All Rights Reserved...
-
Page 34: Install Cs101 Demo App
CSL CS101 EPC CLASS 1 GEN 2 RFID HANDHELD READER USER'S MANUAL, VERSION 2.0.1 5.2.4 Install CS101 Demo App After installation of Basic Components for CS101, the user can install latest CSL CS101 Demo App from CSL website (http://www.convergence.com.hk/download-support-installer-cs101-demo-app/) to enable the CSL RFID handheld reader features. - Page 35 CSL CS101 EPC CLASS 1 GEN 2 RFID HANDHELD READER USER'S MANUAL, VERSION 2.0.1 4. Check the files in “CS101 Demo Apps2.1.45_Installer” Choose “ CS101 Demo CE(VS2008)”. 5. Double click the cab file to install the file “ . Press “OK” to CS101 Demo CE(VS2008)”...
- Page 36 CSL CS101 EPC CLASS 1 GEN 2 RFID HANDHELD READER USER'S MANUAL, VERSION 2.0.1 7. Click and hold the shortcut of Demo App. Choose “Rename” to rename the file. 8. Double Click to run the renamed Demo App. Copyright © Convergence Systems Limited, All Rights Reserved...
- Page 37 CSL CS101 EPC CLASS 1 GEN 2 RFID HANDHELD READER USER'S MANUAL, VERSION 2.0.1 9. In the main menu, choose “Inventory” 10. Click “Start” to run Inventory Copyright © Convergence Systems Limited, All Rights Reserved...
-
Page 38: Quick Start
Quick Start Start the Callback Demo Program • Press the power button to power up the reader. • Click the CS101 Callback Demo Program icon on the desktop to run the demo program. Figure 5-1 CS101 Screen Copyright © Convergence Systems Limited, All Rights Reserved... -
Page 39: Main Menu
CSL CS101 EPC CLASS 1 GEN 2 RFID HANDHELD READER USER'S MANUAL, VERSION 2.0.1 Main Menu User can press [Up] and [Down] to choose to enter the operation and configuration of CS101. User can press [Exit] to quit the Demo Program. Figure 5-2B... -
Page 40: Reader Information
CSL CS101 EPC CLASS 1 GEN 2 RFID HANDHELD READER USER'S MANUAL, VERSION 2.0.1 Reader Information You can check the current reader configuration in the “Reader Information”. Whenever the reader is stayed in the idle state (not during reading or writing the tags), you can press the function key “F1”... -
Page 41: Tag Inventory
CSL CS101 EPC CLASS 1 GEN 2 RFID HANDHELD READER USER'S MANUAL, VERSION 2.0.1 Tag Inventory Tag inventory provides an efficient way to read and count all tags at a time. In tag inventory, a duplicate filter is implemented to filter out the tags with same EPC ID, hence the tags with same EPC ID will not be displayed on the screen more than once. -
Page 42: Tag Ranging
CSL CS101 EPC CLASS 1 GEN 2 RFID HANDHELD READER USER'S MANUAL, VERSION 2.0.1 Tag Ranging The Tag Ranging lets user read tags with RSSI (RF Signal Strength Indicator), the RSSI value will keep changing when the handheld reader moves to and from the tags (RSSI will increase when the handheld reader is moved close to the tags). -
Page 43: Setting Up The Language On Cs101
Setting Up the Language on CS101 CS101 supports different language including English, Simplified Chinese, Traditional Chinese and Japanese (for CS101-3 Japan reader only). This language setting can be changed on the operating system. Go to “Regional Settings” by clicking Start” “Settings” “Control Panel”... - Page 44 CSL CS101 EPC CLASS 1 GEN 2 RFID HANDHELD READER USER'S MANUAL, VERSION 2.0.1 Select the language on the pull-down list and click “OK” button. The reader will reboot automatically and the new language setting will be effective after the reboot.
-
Page 45: Cs101 .Net Demo Application
“CS101 Callback-based API 2.0 Programmer’s Manual”. Main Menu In main menu of the CS101 .NET Demo App, the configuration information of the reader is shown and you can select the various functions. Copyright © Convergence Systems Limited, All Rights Reserved... -
Page 46: Inventory
CSL CS101 EPC CLASS 1 GEN 2 RFID HANDHELD READER USER'S MANUAL, VERSION 2.0.1 Inventory This page demonstrates the tag inventory function (TAG_INVENTORY) for reading tags continuously with the RSSI value and read count displayed. Click the “Start” button to start reading tags. -
Page 47: Ranging
CSL CS101 EPC CLASS 1 GEN 2 RFID HANDHELD READER USER'S MANUAL, VERSION 2.0.1 Ranging This page demonstrates the function of reading tags by the TAG_RANGING API function. It reads tags continuously with the RSSI value and read count displayed. -
Page 48: Read / Write
CSL CS101 EPC CLASS 1 GEN 2 RFID HANDHELD READER USER'S MANUAL, VERSION 2.0.1 Read / Write This page demonstrates the function of reading and writing different memory banks of a selected tag. Click on the “Search” button to scan for and select the tag you want to access. - Page 49 CSL CS101 EPC CLASS 1 GEN 2 RFID HANDHELD READER USER'S MANUAL, VERSION 2.0.1 Read the tag: After the tag is selected, you can click the “2. Read Tag” tab to read the memory banks of this tag. Click on the “Read” button to read all the memory banks...
- Page 50 CSL CS101 EPC CLASS 1 GEN 2 RFID HANDHELD READER USER'S MANUAL, VERSION 2.0.1 For the “User Memory” bank, you could also change the offset word and length of words you want to read. After entering the [Offset=0, Word=1] (in terms of words), user can configure the offset value of User Bank and number of Data Words to be read.
- Page 51 CSL CS101 EPC CLASS 1 GEN 2 RFID HANDHELD READER USER'S MANUAL, VERSION 2.0.1 If the memory bank is locked, input the access password in “Access Password” field to read the tag data. Write the tag: Click on the “3.Write Tag” tab on the top to write data on the selected tag memory banks.
- Page 52 CSL CS101 EPC CLASS 1 GEN 2 RFID HANDHELD READER USER'S MANUAL, VERSION 2.0.1 Tick the checkbox(es) of the memory bank(s) you want to write. Input the new data of that field(s) and then click the [Write] button to write the new data.
- Page 53 CSL CS101 EPC CLASS 1 GEN 2 RFID HANDHELD READER USER'S MANUAL, VERSION 2.0.1 Exit Read/Write: To exit this Read/Write function, click the [Exit] tab. Copyright © Convergence Systems Limited, All Rights Reserved...
-
Page 54: Write Epc And Pc
CSL CS101 EPC CLASS 1 GEN 2 RFID HANDHELD READER USER'S MANUAL, VERSION 2.0.1 Write EPC and PC CS101 can write EPC and PC data to the Tag with EPC and PC ID specified. 7.6.1 Write Any EPC 1. Choose [WriteAnyEPC] in the menu. - Page 55 CSL CS101 EPC CLASS 1 GEN 2 RFID HANDHELD READER USER'S MANUAL, VERSION 2.0.1 3. Set the initial value to be written. 4. Set the Mask value for the tags to be written. 5. Press [Start] to start new EPC value writes to the tags.
-
Page 56: Write Fix Epc
CSL CS101 EPC CLASS 1 GEN 2 RFID HANDHELD READER USER'S MANUAL, VERSION 2.0.1 7.6.2 Write Fix EPC 1. Choose [WriteFixEPC] in the menu. 2. Set the number of tags to be written. 3. Set the Mask value for the tags to be written. - Page 57 CSL CS101 EPC CLASS 1 GEN 2 RFID HANDHELD READER USER'S MANUAL, VERSION 2.0.1 4. Input the Fix Q Value for the tags. 5. Press [Start] to start new EPC value writes to the tags. Copyright © Convergence Systems Limited, All Rights Reserved...
-
Page 58: Write Any Pc
CSL CS101 EPC CLASS 1 GEN 2 RFID HANDHELD READER USER'S MANUAL, VERSION 2.0.1 7.6.3 Write Any PC 1. Choose [WriteAnyPC] in the menu. 2. Set the number of tags to be written. 3. Input the Initial value for the tags. - Page 59 CSL CS101 EPC CLASS 1 GEN 2 RFID HANDHELD READER USER'S MANUAL, VERSION 2.0.1 4. Set the Mask value for the tags to be written. 5. Press [Start] to start new PC value writes to the tags. Copyright © Convergence Systems Limited, All Rights Reserved...
-
Page 60: Geiger Counter Search
CSL CS101 EPC CLASS 1 GEN 2 RFID HANDHELD READER USER'S MANUAL, VERSION 2.0.1 Geiger Counter Search This page demonstrates the Geiger counter tag search mode. Input the EPC ID of the tag (or partial of the EPC ID) you want to search and then click the “Geiger” button. - Page 61 CSL CS101 EPC CLASS 1 GEN 2 RFID HANDHELD READER USER'S MANUAL, VERSION 2.0.1 Press [Stop] to stop the search. Click the target tag in the list and press [Select]. Press [Geiger] to start the Geiger Search. When the tag is seen, it shows the RSSI value with the beep sound effect.
-
Page 62: Tag Security
CSL CS101 EPC CLASS 1 GEN 2 RFID HANDHELD READER USER'S MANUAL, VERSION 2.0.1 Tag Security This page demonstrates the tag security operations (lock and unlock). Click the link [Please Click Here To Select A Tag] to scan for the tag... - Page 63 CSL CS101 EPC CLASS 1 GEN 2 RFID HANDHELD READER USER'S MANUAL, VERSION 2.0.1 When user presses [Search] the searched tags will be displayed. Select the tag you want to apply security and click [Select] button. After the tag is selected, select the security you want to apply on each memory bank.
- Page 64 CSL CS101 EPC CLASS 1 GEN 2 RFID HANDHELD READER USER'S MANUAL, VERSION 2.0.1 For EPC and User Memory (USER) banks: • UNLOCK: Unlock the bank – allow user to write it without access password • PERM_UNLOCK: Permanently unlock the bank – allow user to write it forever without access password (cannot lock it again) •...
- Page 65 In Tag Security, the “User Perm-lock” function is used for block-level (64 bits) Perma-lock of tag’s user memory. This function is only applicable for new tag that is compliant with the EPC Class 1 Gen 2 Tag Specification v1.2. Moreover, this function is only support on CS101 with firmware version 1.3.68 or above.
- Page 66 CSL CS101 EPC CLASS 1 GEN 2 RFID HANDHELD READER USER'S MANUAL, VERSION 2.0.1 3) Search and Select the target tag. 4) Enter the correct Access Password of the tag 5) Click [Read] button to read the status of each block (64 bits) of the user memory...
- Page 67 CSL CS101 EPC CLASS 1 GEN 2 RFID HANDHELD READER USER'S MANUAL, VERSION 2.0.1 6) In order to change the lock status of a block, right-click on the block you want to lock and select “Permalock” on the pull-down list.
-
Page 68: Kill
CSL CS101 EPC CLASS 1 GEN 2 RFID HANDHELD READER USER'S MANUAL, VERSION 2.0.1 Kill This page demonstrates the Kill Tag operation. Click the link “Click here to select a tag to destroy” to scan and select the tag Copyright © Convergence Systems Limited, All Rights Reserved... - Page 69 CSL CS101 EPC CLASS 1 GEN 2 RFID HANDHELD READER USER'S MANUAL, VERSION 2.0.1 After the tag is selected, enter the kill password of the tag as below. If the kill password of the tag is set as “00000000”, that means no password is set on the tag and it could not be killed.
-
Page 70: Barcode
CSL CS101 EPC CLASS 1 GEN 2 RFID HANDHELD READER USER'S MANUAL, VERSION 2.0.1 7.10 Barcode This page demonstrates the barcode scanning function of the reader, both 1-D and 2-D barcodes. Click the “Start” button or press the trigger key to start reading barcode. -
Page 71: Udpout
USER'S MANUAL, VERSION 2.0.1 7.11 UDPout CS101 can pass the received tag data to PC real time using UDPout mode. 1. To begin, the PC with Port Forwarding IP address in the intranet is required. In “Internet Protocol Version 4 (TCP/IPv4) Properties”, set the PC IP address to fixed IP address which Port Forwarding is available. - Page 72 CSL CS101 EPC CLASS 1 GEN 2 RFID HANDHELD READER USER'S MANUAL, VERSION 2.0.1 Download and unzip the latest version UDPServer_vX.X.X.zip 4. In the unzipped folder “UDPServer_vX.X.X”, Run “UDPServer.exe”. Copyright © Convergence Systems Limited, All Rights Reserved...
- Page 73 USER'S MANUAL, VERSION 2.0.1 5. Check with the CS101 reader. Choose “UDPout” mode. Press [Start] in the form “FormUDPout”. 6. The tag data is listed out in CS101 and also displayed in the PC UDP Server Demo Program. PC UDP Server Demo Program...
-
Page 74: Setup
CSL CS101 EPC CLASS 1 GEN 2 RFID HANDHELD READER USER'S MANUAL, VERSION 2.0.1 7.12 Setup This “Setup” page allows the user to perform basic configuration on the reader. For more information about the Gen 2 parameters, please refer also refer to the EPC Class 1 Gen 2 Specifications. - Page 75 CSL CS101 EPC CLASS 1 GEN 2 RFID HANDHELD READER USER'S MANUAL, VERSION 2.0.1 General Options In “General Options”, you could configure the reader’s link profile, power and frequency settings. Profile – default setting is profile 2 Power – output power, display value = power x 10 (e.g. 300 = 30dBm) Country –...
- Page 76 CSL CS101 EPC CLASS 1 GEN 2 RFID HANDHELD READER USER'S MANUAL, VERSION 2.0.1 Inventory Config The page allows user to configure the Gen 2 parameters settings for custom inventory operation. Operation: operate in continuous or non-continuous reading (Continuous or Blocking...
- Page 77 CSL CS101 EPC CLASS 1 GEN 2 RFID HANDHELD READER USER'S MANUAL, VERSION 2.0.1 DynamicQ This page allows setting of the Q parameter when using Dynamic Q algorithms. Copyright © Convergence Systems Limited, All Rights Reserved...
- Page 78 CSL CS101 EPC CLASS 1 GEN 2 RFID HANDHELD READER USER'S MANUAL, VERSION 2.0.1 Barcode This page is used for configuring the barcode scanner. TimeSync This page is used for entering the NTP server for time synchronization. Copyright © Convergence Systems Limited, All Rights Reserved...
-
Page 79: Changing Output Power And Link Profile
CSL CS101 EPC CLASS 1 GEN 2 RFID HANDHELD READER USER'S MANUAL, VERSION 2.0.1 7.13 Changing Output Power and Link Profile User can press the <F4> and <F5> keys on the reader to change the output power of the reader before press [Start] to run inventory mode. -
Page 80: Reader Configuration
CSL CS101 EPC CLASS 1 GEN 2 RFID HANDHELD READER USER'S MANUAL, VERSION 2.0.1 Reader Configuration Reader Configuration Overview The diagram below shows the configuration components of CS01 RFID reader. Frequency and Country Fixed Channel RSSI Filter Power Level Inventory Algorithm:... -
Page 81: Power Level
30 dBm using CS101 .NET Demo App. To set up power level of the CSL RFID Reader, press “Setup” button in the Main Menu. In Setup, choose the tab “General Options” Copyright © Convergence Systems Limited, All Rights Reserved... - Page 82 CSL CS101 EPC CLASS 1 GEN 2 RFID HANDHELD READER USER'S MANUAL, VERSION 2.0.1 User can change the power level by changing the value in the field “Power”. Press “Apply” button at the top right corner to confirm. Please note that Antenna port output power is set in 0.1dBm. The default value is 300, which is equal to 30dBm.
-
Page 83: Country, Frequency And Fixed Channel
920MHz ~ 925MHz (FCC) Please refer to the document “Regulatory status for using RFID in the UHF spectrum” and the Order Code of CSL RFID Reader to set the Country, Frequency and Fixed Channel. Copyright © Convergence Systems Limited, All Rights Reserved... - Page 84 N=7: 920-925 MHz (China, Australia, Malaysia, Hong Kong etc) N=8: 915-922 MHz (Japan) User can set the Country, Frequency and Fixed Channel of CSL RFID Reader using .NET Demo App. To set up Country, Frequency and Fixed Channel of the CSL RFID Reader, press “Setup”...
- Page 85 CSL CS101 EPC CLASS 1 GEN 2 RFID HANDHELD READER USER'S MANUAL, VERSION 2.0.1 In Setup, choose the tab “General Options” Choose the country / region in the field “Country” If user wants to operate the Reader in one frequency channel, tick the checkbox “Fixed Channel”...
- Page 86 CSL CS101 EPC CLASS 1 GEN 2 RFID HANDHELD READER USER'S MANUAL, VERSION 2.0.1 The updated configuration can be checked in the Main Menu of Demo App. Copyright © Convergence Systems Limited, All Rights Reserved...
-
Page 87: Rssi Filter
CSL CS101 EPC CLASS 1 GEN 2 RFID HANDHELD READER USER'S MANUAL, VERSION 2.0.1 RSSI Filter The RSSI (Received Signal Strength Indicator) value is an indicator of signal strength from an RFID tag to an RFID reader. Normally RSSI can be used in Estimating the distance between an RFID tag and an RFID reader. - Page 88 CSL CS101 EPC CLASS 1 GEN 2 RFID HANDHELD READER USER'S MANUAL, VERSION 2.0.1 In Demo App, press “Geiger” in the Main Menu. Place the tag in front of reader antenna for distance estimation. In the GeigerSearchForm, press “Geiger”, user can check the range of RSSI value.
- Page 89 CSL CS101 EPC CLASS 1 GEN 2 RFID HANDHELD READER USER'S MANUAL, VERSION 2.0.1 Go to the Main Menu. Press “Setup” in the Main Menu. Click on “Inventory Config”, tick the checkbox “Enable” and set the RSSI threshold value in the field “RSSI filter”.
-
Page 90: Link Profile
The default setting is profile 2. It is also the recommended setting for most of the common applications. In CS101-3 (Japan) and CS101-1 (ETSI) readers, only profiles 0, 2, 3 and 5 are selectable. (Profile 0 is also not advised for CS101-3 Japanese reader). - Page 91 USER'S MANUAL, VERSION 2.0.1 User can set the Link Profile of CSL RFID Reader using .NET Demo App. To set up Link Profile of the CS101 RFID Reader, press “Setup” button in the Main Menu. In Setup, choose the tab “General Options”...
-
Page 92: Target And Toggle A / B Flag
A to B (or vice versa) as a result of being singulated. In CSL RFID Reader Read / Write configuration, Target is the parameter of RFID protocol Inventory – Query Command. The options for Query Command in the field Target are “A”, “B”... - Page 93 Flag B for certain period of time depending on the persistence selection. Please check EPCGlobal specs in detail. To set up Target of the CS101 Reader, press “Setup” button in the Main Menu. Choose the tab “Inventory Config”.
-
Page 94: Session And Tag Selection
CSL CS101 EPC CLASS 1 GEN 2 RFID HANDHELD READER USER'S MANUAL, VERSION 2.0.1 Session and Tag Selection Session is an inventory process comprising a reader and an associated Tag population. A reader chooses one of four sessions and inventories Tags within that session. The reader and associates Tag population operate in one and only one session for the duration of an inventory round. -
Page 95: Inventory Algorithm: Fix Q And Dynamic Q Algorithm
Inventory Algorithm: Fix Q and Dynamic Q Algorithm In CS101 readers, it consists of two main inventory algorithms (Fixed Q Algorithm and Dynamic Q Algorithm ). The variable Q algorithms differ in their mechanism for adjusting the Q values at the end of each round. - Page 96 An inventory cycle is comprised of one or more inventory rounds, and is terminated when a round is executed with Q = 0 and no tags read. To set up Q Algorithm of the CS101 Reader, press “Setup” button in the Main Menu. Click on the tab “Inventory Config”.
- Page 97 CSL CS101 EPC CLASS 1 GEN 2 RFID HANDHELD READER USER'S MANUAL, VERSION 2.0.1 If “FIXEDQ” is chosen, user can go to the tab “FixedQ” and set the value of Q in the field “Q Value” Press “Apply” button at the top right corner to confirm.
-
Page 98: Barcode
USER'S MANUAL, VERSION 2.0.1 8.10 Barcode To set up Barcode of the CS101 Reader, press “Setup” button in the Main Menu. Click on the tab “Barcode”. The “Enable PowerSave Mode” button is used for setting the barcode module to power save mode. - Page 99 CSL CS101 EPC CLASS 1 GEN 2 RFID HANDHELD READER USER'S MANUAL, VERSION 2.0.1 For setting up the barcode format you want to scan, check the “Enable” box, select the Barcode format (e.g. “ALL”) and then click “Enable Symbol” button.
-
Page 100: Time Synchronization
CSL CS101 EPC CLASS 1 GEN 2 RFID HANDHELD READER USER'S MANUAL, VERSION 2.0.1 8.11 Time Synchronization To set up Time Synchronization, press “Setup” button in the Main Menu. Click on the tab “TimeSync”. User can input the address in the field NTP Server and press “Time Sync”... -
Page 101: Wifi Configuration
CSL CS101 EPC CLASS 1 GEN 2 RFID HANDHELD READER USER'S MANUAL, VERSION 2.0.1 8.12 WiFi Configuration 1. Go to “Control Panel” and choose “Network and Dial-up Connections” 2. User can set the properties for CS101 WiFi network. 3. Go back to the “Control Panel” and then click WLAN icon. - Page 102 CSL CS101 EPC CLASS 1 GEN 2 RFID HANDHELD READER USER'S MANUAL, VERSION 2.0.1 4. Enable or disable the WLAN settings can set here by toggling the icon 5. Click “Choose Network…” 6. Select the available access point Copyright © Convergence Systems Limited, All Rights Reserved...
- Page 103 CSL CS101 EPC CLASS 1 GEN 2 RFID HANDHELD READER USER'S MANUAL, VERSION 2.0.1 7. Click “Connect & Lock” 8. User can double click the access point in the list and configure the wireless properties if necessary. 9. The wireless LAN is configured, and you can try to connect to the Internet by using “Internet Explorer”...
-
Page 104: Software Development Kit
CSL CS101 EPC CLASS 1 GEN 2 RFID HANDHELD READER USER'S MANUAL, VERSION 2.0.1 Software Development Kit The CSL CS101 handheld reader software development kit provides the following components for quick and easy application development: Software specifications Block diagrams Application Programming Interface (API) definitions... -
Page 105: Software Specifications
The CS101 Demonstration Application is a comprehensive C# demonstration program that demonstrates how to write an application on the CS101 platform. It offers all possible RFID related and barcode related functionalities. The purpose is to give a good Out-Of-Box OOB experience to the system integrator. -
Page 106: Cs101 Keep Alive Monitor
12. System Configuration 13. Factory Defaults 9.1.3 CS101 Keep Alive Monitor CS101 Keep Alive Monitor is an independent application that is turned on during WinCE boot up to monitor health situations, including: Battery Monitoring and Alert Memory (RAM) Monitoring and Alert... -
Page 107: Build Environment
PC. The following 14 steps are needed to set up the build environment. The following Build Environment is tested and suggested for CS101 developers: 1. Operating System: Microsoft Windows 7 installed. Microsoft Visual Studio 2008 Professional Edition 3. -
Page 108: Cs101 Demo Operation With Special Purpose Rfid Tags
CS101 Demo Operation with Special Purpose RFID Tags The CSL CS101 handheld reader can work with CSL Special Purpose RFID Tags – Monza4QT, UCODE7, BAP ID Card Tag and Cold Chain Tag. BAP ID Card Tag is used for long read range detection and Cold Chain Tag is used for temperature monitoring and data logging. -
Page 109: Cs101 Demo Operation With Ucode7 Tag
10.2 CS101 Demo Operation with UCODE7 Tag User can use “UCODE7” mode in CS101 reader to change the EPC of the UCODE7 tag CS6321. The maximum backscatter strength and PSF alarm flag can also be set of UCODE7 can also be set using CS101 reader. - Page 110 3. To write new value to EPC data bank of the tag, set the “Offset” (EPC data bank offset in words), “Repeat” (repeat for write error) and “EPC Header” (new EPC value). Press “Start Write EPC Header” to confirm and CS101 will write the new EPC value to the UCODE7 tag.
- Page 111 UCODE7. To begin, go to the tab “Scan Tag” and press “Scan” to check the status of the tag. 6. Move the tag in front of the CS101 reader. User can check the status of maximum backscatter strength (MBS) and PSF alarm flag (PSF) in the UCODE7.
- Page 112 CSL CS101 EPC CLASS 1 GEN 2 RFID HANDHELD READER USER'S MANUAL, VERSION 2.0.1 Set the checkboxes to toggle the setting. Press “Start Write” to confirm. 9. Go to the tab “Scan Tag” again and press “Scan”. The status of the tag is updated.
-
Page 113: Cs101 Demo Operation With Bap Id Card Tag
1. EPC 2. Battery Status User can use “CS9010” Mode in CS101 Demo App to check EPC and Battery status of BAP ID Card Tags when before use. 1. In the Main Menu of Demo App, Press Down until “CS9010” is found. - Page 114 CSL CS101 EPC CLASS 1 GEN 2 RFID HANDHELD READER USER'S MANUAL, VERSION 2.0.1 4. Press Start to run the application. 5. The EPC and Battery Status (B!) can be checked. The BAP ID Card Tag can be read in long read range if “OK” is checked in the field “B!”.
-
Page 115: Cs101 Demo Operation With Cold Chain Tag
CSL CS101 EPC CLASS 1 GEN 2 RFID HANDHELD READER USER'S MANUAL, VERSION 2.0.1 10.4 CS101 Demo Operation with Cold Chain Tag The flow diagram below shows the operation steps: Power on CS101 and go to Open CS101 Demo App In the Main Menu Choose “ColdChain”... -
Page 116: Temperature Alert In "Coldchain" Mode For Cold Chain Tags Cs8300
1. In the Main Menu of Demo App, Press green button “Down” until “ColdChain” is found. 2. Choose “ColdChain”. 3. Put the ColdChain CS8300 Tag at a distance of at least 30 cm in front of CS101 reader. Copyright © Convergence Systems Limited, All Rights Reserved... - Page 117 CSL CS101 EPC CLASS 1 GEN 2 RFID HANDHELD READER USER'S MANUAL, VERSION 2.0.1 4. In the Cold Chain Menu, choose “Scan Tag”. 5. In the tab “Scan Tag”, press “Start” to scan the target Cold Chain Tag (CS8300). 6. Press “Stop” to stop scanning. Check the tag model “CS8300-X” in the field “Model”.
- Page 118 CSL CS101 EPC CLASS 1 GEN 2 RFID HANDHELD READER USER'S MANUAL, VERSION 2.0.1 For CS8300, when receiving card from factory (first use), user has to set its BAP mode to “Enable” state before use. The card’s BAP mode is disabled ex-factory to conserver battery life.
- Page 119 CSL CS101 EPC CLASS 1 GEN 2 RFID HANDHELD READER USER'S MANUAL, VERSION 2.0.1 9. The target BAP ID card Tag is now enable. Press “OK” to continue 10. Go to “Configuration/Start/Stop …”, Ensure the option “CS8300” is chosen and press “Scan”...
- Page 120 CSL CS101 EPC CLASS 1 GEN 2 RFID HANDHELD READER USER'S MANUAL, VERSION 2.0.1 12. In the form “FormColdChainMonitorConfig”, set Temp Threshold in Celsius. In the field “Under”, input the lower temperature limit. In the field “Over”, input the upper temperature limit.
- Page 121 CSL CS101 EPC CLASS 1 GEN 2 RFID HANDHELD READER USER'S MANUAL, VERSION 2.0.1 13. Set the sampling rate for the temperature monitoring and alert process in the field “Sampling Interval (0-63)”. Please ensure that the values range from 0 to 63.
- Page 122 CSL CS101 EPC CLASS 1 GEN 2 RFID HANDHELD READER USER'S MANUAL, VERSION 2.0.1 14. In the field “Sampling Start Delay (0-63)”, set the time for the target tag to start temperature monitoring and alert process after the tag is configured and enabled.
- Page 123 CSL CS101 EPC CLASS 1 GEN 2 RFID HANDHELD READER USER'S MANUAL, VERSION 2.0.1 16. Remember to tick the checkbox “Apply bilinear calibration” and press “Enable”. 17. Make sure the target tag is in Enable state before the process start.
- Page 124 CSL CS101 EPC CLASS 1 GEN 2 RFID HANDHELD READER USER'S MANUAL, VERSION 2.0.1 19. If the surrounding temperature reaches the configured temperature limit, Temperature Alert Status (T!) is changed to Failed. 20. When the user want to end the temperature monitoring process, press “Stop” to stop the process.
- Page 125 CSL CS101 EPC CLASS 1 GEN 2 RFID HANDHELD READER USER'S MANUAL, VERSION 2.0.1 22. Go to tab “Set BAP Mode (for CS8300)”, press “Disable”. 23. The state of BAP is changed to Disable with prompt message. Press “OK” to continue.
-
Page 126: Temperature Alert In "Coldchain" Mode For Cold Chain Tags Cs8301
1. In the Main Menu of Demo App, Press “Down” until “ColdChain” is found. 2. Choose “ColdChain”. 3. Put the ColdChain CS8301 Tag at a distance of 30 cm in front of CS101 reader. 4. In the Cold Chain Menu, choose “Scan Tag”. - Page 127 CSL CS101 EPC CLASS 1 GEN 2 RFID HANDHELD READER USER'S MANUAL, VERSION 2.0.1 5. In the tab “Scan Tag”, press “Start” to scan the target Cold Chain Tag (CS8301). 6. Press “Stop” to stop scanning. Check the tag model “CS8301-X” in the field “Model”.
- Page 128 CSL CS101 EPC CLASS 1 GEN 2 RFID HANDHELD READER USER'S MANUAL, VERSION 2.0.1 Press “Stop”, Select the target Tag and press “Config”. In the form “FormColdChainMonitorConfig”, set Temp Threshold in Celsius. In the field “Under”, input the lower temperature limit.
- Page 129 CSL CS101 EPC CLASS 1 GEN 2 RFID HANDHELD READER USER'S MANUAL, VERSION 2.0.1 10. Set the sampling rate for the temperature monitoring and alert process in the field “Sampling Interval (0-63)”. Please ensure that the values range from 0 to 63.
- Page 130 CSL CS101 EPC CLASS 1 GEN 2 RFID HANDHELD READER USER'S MANUAL, VERSION 2.0.1 11. In the field “Sampling Start Delay (0-63)”, set the time for the target tag to start temperature monitoring and alert process after the tag is configured and enabled.
- Page 131 CSL CS101 EPC CLASS 1 GEN 2 RFID HANDHELD READER USER'S MANUAL, VERSION 2.0.1 13. Remember to tick the checkbox “Apply bilinear calibration” and press “Enable”. 14. Make sure the target tag is in Enable state before the process start.
- Page 132 CSL CS101 EPC CLASS 1 GEN 2 RFID HANDHELD READER USER'S MANUAL, VERSION 2.0.1 15. The Temperature (˚C), Temperature Alert Status (T!) and Battery Status (B!) are monitored in the screen in the sampling rate the user defined. 16. If the surrounding temperature reaches the configured temperature limit, Temperature Alert Status (T!) is changed to Failed.
- Page 133 CSL CS101 EPC CLASS 1 GEN 2 RFID HANDHELD READER USER'S MANUAL, VERSION 2.0.1 17. When the user want to end the temperature monitoring process, press “Stop” to stop the process. 18. User has to disable the Tag again. Press “Disable” in the tab “Configuration/Start/Stop …”.
-
Page 134: Temperature Logging In "Coldchain" Mode For Cold Chain Tags Cs8304
1. In the Main Menu of Demo App, Press “Down” until “ColdChain” is found. 2. Choose “ColdChain”. 3. Put the ColdChain (CS8304) Tag at a distance of 30 cm in front of CS101 reader. 4. In the Cold Chain Menu, choose “Scan Tag”. - Page 135 CSL CS101 EPC CLASS 1 GEN 2 RFID HANDHELD READER USER'S MANUAL, VERSION 2.0.1 5. In the tab “Scan Tag”, press “Start” to scan the target Cold Chain Tag (CS8304). 6. Check the tag model “CS8304-X” in the field “Model”. If the tag model is not “CS8304-X”, find a new tag of this model.
- Page 136 CSL CS101 EPC CLASS 1 GEN 2 RFID HANDHELD READER USER'S MANUAL, VERSION 2.0.1 DO NOT change the enable state in BAP Mode for CS8304. Go to tab “Temperature Log Monitor (CS8304/5)” directly. 9. User can set at most 2 sets Temperature data record lower and upper limit (in Celsius) in the field “Temp1 TH”, “Temp2 TH”...
- Page 137 CSL CS101 EPC CLASS 1 GEN 2 RFID HANDHELD READER USER'S MANUAL, VERSION 2.0.1 11. Press “Scan” and check the target tag EPC. Press “Stop” when the tag is found. 12. Press “Stop” when the tag is found. 13. Check the field “T!” is in “OK” state before use. If not, please order a new tag from CSL.
- Page 138 CSL CS101 EPC CLASS 1 GEN 2 RFID HANDHELD READER USER'S MANUAL, VERSION 2.0.1 14. The default value in the field “Temp Log” is “Stop”. Press “Start Log” to enable the temperature data logging process. 15. When the temperature data logging process starts, the state in the field “Temp Log“...
- Page 139 CSL CS101 EPC CLASS 1 GEN 2 RFID HANDHELD READER USER'S MANUAL, VERSION 2.0.1 17. When the temperature data logging process stops, the field “Temp Log” is changed to “Stop”. Press “OK” to continue. 18. User can check the temperature log data recorded by the target Tag.
- Page 140 CSL CS101 EPC CLASS 1 GEN 2 RFID HANDHELD READER USER'S MANUAL, VERSION 2.0.1 20. User can press “OK” to exit. 21. To exit the application, choose the tab Exit. Copyright © Convergence Systems Limited, All Rights Reserved...
-
Page 141: Cs101 Demo Application Software Upgrade
CS101 Demo Application Software Upgrade 11.1 Demo Application Upgrade User can visit the CSL website (http://www.convergence.com.hk) > Downloads & Support > CS101 to find the latest release software for upgrade of CS101 Reader. Copyright © Convergence Systems Limited, All Rights Reserved... -
Page 142: Pc Demo Application Upgrade - For User
CSL CS101 EPC CLASS 1 GEN 2 RFID HANDHELD READER USER'S MANUAL, VERSION 2.0.1 11.2 PC Demo Application Upgrade - For User 1. In the section “Demo App”, check the latest version of Demo Application and download it. Copyright © Convergence Systems Limited, All Rights Reserved... - Page 143 CSL CS101 EPC CLASS 1 GEN 2 RFID HANDHELD READER USER'S MANUAL, VERSION 2.0.1 2. Uninstall the original Demo App previous installed in CS101 Reader. Unzip and copy the downloaded Demo App to CS101 from PC via USB or SD card Double click and install Demo App.
-
Page 144: Pc Demo Application Upgrade - For Developer
CSL CS101 EPC CLASS 1 GEN 2 RFID HANDHELD READER USER'S MANUAL, VERSION 2.0.1 11.3 PC Demo Application Upgrade - For Developer 1. In the section “Software Development Kit”, check the latest version of SDK and download Copyright © Convergence Systems Limited, All Rights Reserved... - Page 145 CSL CS101 EPC CLASS 1 GEN 2 RFID HANDHELD READER USER'S MANUAL, VERSION 2.0.1 2. Unzip and check the “Release Libraries”. 3. Copy the SDK Library folder inside the folder “Release Libraries” and replace the folders in “Release Libraries” in current Developer’s project.
- Page 146 CSL CS101 EPC CLASS 1 GEN 2 RFID HANDHELD READER USER'S MANUAL, VERSION 2.0.1 4. Open the Developer’s project in Microsoft Visual Studio. Rebuild the project with latest SDK libraries. Copyright © Convergence Systems Limited, All Rights Reserved...
-
Page 147: Cs101 Firmware Upgrade
USER'S MANUAL, VERSION 2.0.1 CS101 Firmware Upgrade 12.1 Firmware Upgrade Procedure Overview CSL CS101 Readers have 1 RFID Processor for RFID application. The application firmware can be upgradable via Firmware Upgrade software provided (CS101FwUpgrade 2.X.X.exe). RFID Processor Firmware - Bootloader... - Page 148 CSL CS101 EPC CLASS 1 GEN 2 RFID HANDHELD READER USER'S MANUAL, VERSION 2.0.1 The flow diagram for Firmware Upgrade procedure Check RFID Processor Firmware Version (Bootloader + Application) Current RFID Processor Upgrade RFID Processor Bootloader Application version = v1.3.xx / v.1.4.xx?
-
Page 149: Rfid Processor Firmware Upgrade Procedure
1. User must check the RFID Firmware version before doing RFID Firmware upgrade. If the RFID Firmware Vers is 1.5.xx, please refer to section “3.2 Procedure for CSL reader with RFID Firmware App 1.5.xx”. 2. Please download the latest Firmware Upgrade tool from CSL website (Downloads and Support for CS101). - Page 150 CSL CS101 EPC CLASS 1 GEN 2 RFID HANDHELD READER USER'S MANUAL, VERSION 2.0.1 3. Download the latest RFID Processor bootloader (bootloader_V1001.a79) and firmware (image_V1527.a79 in this example) from “Firmware - RFID Processor Bootloader” and “Firmware - RFID Processor Application”.
- Page 151 CSL CS101 EPC CLASS 1 GEN 2 RFID HANDHELD READER USER'S MANUAL, VERSION 2.0.1 5. In the PC, go to directory “Computer” > “CS101” > “\” > “My Documents” 6. Unzip downloaded "CS101FwUpgrade 2.0.6.zip". Copy the unzipped folder “CS101FwUpgrade 2.0.6” together with the Bootloader image (“bootloader_V1001.a79”) and the latest RFID Processor Firmware (“image_V1527.a79”...
- Page 152 CSL CS101 EPC CLASS 1 GEN 2 RFID HANDHELD READER USER'S MANUAL, VERSION 2.0.1 7. In CS101 screen, go to directory “My Device” > “My Documents” > “CS101FwUpgrade2.0.6”. Run “CS101 FwUpgrade.exe” Please run the exe file by double clicking the file within this directory only.
- Page 153 CSL CS101 EPC CLASS 1 GEN 2 RFID HANDHELD READER USER'S MANUAL, VERSION 2.0.1 8. If the Battery Power is below 90% of fully charged, please replace the battery in CS101 with a fully charged battery. 9. Check the current version of the firmware. Click [Open].
- Page 154 CSL CS101 EPC CLASS 1 GEN 2 RFID HANDHELD READER USER'S MANUAL, VERSION 2.0.1 10. Choose the RFID bootloader firmware file “bootloader_V1001.a79”. Click [OK] to confirm. 11. Press [Start Update] to start firmware update process. Copyright © Convergence Systems Limited, All Rights Reserved...
- Page 155 CSL CS101 EPC CLASS 1 GEN 2 RFID HANDHELD READER USER'S MANUAL, VERSION 2.0.1 12. Wait until the firmware update process is finished. DO NOT power off the reader during the process. 13. At the end of the firmware update process, click [Close] to exit the Firmware Upgrade window.
- Page 156 CSL CS101 EPC CLASS 1 GEN 2 RFID HANDHELD READER USER'S MANUAL, VERSION 2.0.1 14. Check the current version of the firmware. If Current firmware version = 1.0.01, the bootloader is successfully installed in previous steps. To continue, click [Open].
- Page 157 CSL CS101 EPC CLASS 1 GEN 2 RFID HANDHELD READER USER'S MANUAL, VERSION 2.0.1 16. Press [Start Update] to start firmware upgrade process. 17. Wait until the firmware update process is finished. DO NOT power off the reader during the process.
- Page 158 USER'S MANUAL, VERSION 2.0.1 18. At the end of the firmware update process, click [Close] to exit the Firmware Upgrade window. Open CSL CS101 Demo App. The updated firmware version can be checked. Copyright © Convergence Systems Limited, All Rights Reserved...
-
Page 159: Procedure For Csl Reader With Rfid Processor App Version 1.5.Xx Or After
RFID Firmware Vers is 1.3.xx and 1.4.xx, please refer to section “4.1 Procedure for CSL reader with RFID App version 1.3.xx and 1.4.xx )”. 2. Please download the latest Firmware Upgrade tool from CSL website (Downloads and Support for CS101). The latest version is " CS101FwUpgrade 2.0.6.zip". - Page 160 CSL CS101 EPC CLASS 1 GEN 2 RFID HANDHELD READER USER'S MANUAL, VERSION 2.0.1 3. Download the latest firmware (image_V1527.a79 in this example) from “Firmware - RFID Processor Application”. 4. Connect CS101 to PC via USB provided. Copyright © Convergence Systems Limited, All Rights Reserved...
- Page 161 CSL CS101 EPC CLASS 1 GEN 2 RFID HANDHELD READER USER'S MANUAL, VERSION 2.0.1 5. In the PC, go to directory “Computer” > “CS101” > “\” > “My Documents” 6. Unzip downloaded "CS101FwUpgrade 2.0.6.zip". Copy the unzipped folder “CS101FwUpgrade 2.0.6” together with the latest RFID Processor firmware (“image_V1527.a79”...
- Page 162 CSL CS101 EPC CLASS 1 GEN 2 RFID HANDHELD READER USER'S MANUAL, VERSION 2.0.1 7. In CS101 screen, go to directory My Device” > “My Documents” > “CS101FwUpgrade2.0.6”. Run “CS101 FwUpgrade.exe” Please run the exe file by double clicking the file within this directory only.
- Page 163 CSL CS101 EPC CLASS 1 GEN 2 RFID HANDHELD READER USER'S MANUAL, VERSION 2.0.1 If the Battery Power is below 90% of fully charged, please replace the battery in CS101 with a fully charged battery. 9. Check the current version of the firmware. Click [Open].
- Page 164 CSL CS101 EPC CLASS 1 GEN 2 RFID HANDHELD READER USER'S MANUAL, VERSION 2.0.1 10. Choose the latest RFID Processor application file. Click [OK] to confirm. 11. Press [Start Update] to start firmware upgrade process. Copyright © Convergence Systems Limited, All Rights Reserved...
- Page 165 CSL CS101 EPC CLASS 1 GEN 2 RFID HANDHELD READER USER'S MANUAL, VERSION 2.0.1 12. Wait until the firmware update process is finished. DO NOT power off the reader during the process. 13. At the end of the firmware update process, click [Close] to exit the Firmware Upgrade window.
- Page 166 CSL CS101 EPC CLASS 1 GEN 2 RFID HANDHELD READER USER'S MANUAL, VERSION 2.0.1 Open CSL CS101 Demo App. The updated firmware version can be checked. Copyright © Convergence Systems Limited, All Rights Reserved...
-
Page 167: Usage Tips For Cs101
13.2 General Tips CS101 is designed to give long read range and high read rate operations for situations where a fixed reader may be inconvenient, or a fixed reader may lack the needed angular and distance flexibility, or a fixed reader design may require too many units whereas a handheld reader can be easily moved around for lower initial infrastructure cost. -
Page 168: Application Details
CSL CS101 EPC CLASS 1 GEN 2 RFID HANDHELD READER USER'S MANUAL, VERSION 2.0.1 13.5 Application Details 13.5.1 Business Process Analysis The business process of the customer must be analyzed carefully to find places where the RFID tagging and reading can occur. The system integrator may be applying RFID to the whole process or may only be able to apply RFID to part of the process. - Page 169 CSL CS101 EPC CLASS 1 GEN 2 RFID HANDHELD READER USER'S MANUAL, VERSION 2.0.1 RFID Project Goals Definition & Agreement with All Stakeholders Initial Feasibility Planning of Applying RFID to Business Tagging Required? Types of tags? Tagging Throughput Requirements Tagging Quality Requirements...
- Page 170 CSL CS101 EPC CLASS 1 GEN 2 RFID HANDHELD READER USER'S MANUAL, VERSION 2.0.1 Typical Read Range Requirement Number of Nodes? Node-to-node Separation Distances? Sensor Fusion Possibilities/Requirements Control Automation Requirements Detailed Feasibility Planning of Applying RFID to Business Throughput Estimation...
-
Page 171: Appendix A. Rfid Basics
CSL CS101 EPC CLASS 1 GEN 2 RFID HANDHELD READER USER'S MANUAL, VERSION 2.0.1 Appendix A. RFID Basics Passive tag RFID technology involves the reader, the antenna and the tag. The reader sends out energy in the relevant frequency band to the antenna via RF cables, and the antenna radiates the energy out. -
Page 172: Appendix B. Glossary
CSL CS101 EPC CLASS 1 GEN 2 RFID HANDHELD READER USER'S MANUAL, VERSION 2.0.1 Appendix B. Glossary Air interface The complete communication link between an Interrogator and a Tag including the physical layer, collision arbitration algorithm, command and response structure, and data-coding methodology. - Page 173 CSL CS101 EPC CLASS 1 GEN 2 RFID HANDHELD READER USER'S MANUAL, VERSION 2.0.1 Interrogators is large relative to the number of available channels (for example, 50 active Interrogators operating in 50 available channels). Duplicate elimination time Time span of a duplicate elimination cycle, within which duplicate tags will be removed.
- Page 174 CSL CS101 EPC CLASS 1 GEN 2 RFID HANDHELD READER USER'S MANUAL, VERSION 2.0.1 Inventory enabling trigger The initial trigger that turns on the RF power of the reader to start doing inventory Inventory Enabling Cycle Time between an inventory enabling trigger and inventory disabling trigger.
- Page 175 CSL CS101 EPC CLASS 1 GEN 2 RFID HANDHELD READER USER'S MANUAL, VERSION 2.0.1 Operating procedure Collectively, the set of functions and commands used by an Interrogator to identify and modify Tags. (Also known as the Tag-identification layer.) Passive Tag (or passive Label) A Tag (or Label) whose transceiver is powered by the RF field.
- Page 176 CSL CS101 EPC CLASS 1 GEN 2 RFID HANDHELD READER USER'S MANUAL, VERSION 2.0.1 that are read already will not respond to the reader for a short period of time. This can avoid the strong tags from dominating the week ones.
- Page 177 CSL CS101 EPC CLASS 1 GEN 2 RFID HANDHELD READER USER'S MANUAL, VERSION 2.0.1 Trigger A stimulus that causes the reader to recognize it and do something about it. Trusted Server Server for automatic data submission by the reader using the event engine.
-
Page 178: Appendix C. Federal Communication Commissions Compliance
CSL CS101 EPC CLASS 1 GEN 2 RFID HANDHELD READER USER'S MANUAL, VERSION 2.0.1 Appendix C. Federal Communication Commissions Compliance This equipment has been tested and found to comply with the limits for a class B digital device, pursuant to Part 15 of the FCC Rules. These limits are designed to provide reasonable protection against harmful interference when the equipment is operated in a commercial environment. -
Page 179: Appendix D. Maximum Permissible Exposure
CSL CS101 EPC CLASS 1 GEN 2 RFID HANDHELD READER USER'S MANUAL, VERSION 2.0.1 Appendix D. Maximum Permissible Exposure Maximum Permissible Exposure Requirement: Section 47 CFR §1.1307 Three different categories of transmitters are defined by the FCC in OET Bulletin 65. These categories are fixed installation, mobile, and portable and are defined as follows: •... - Page 180 CSL CS101 EPC CLASS 1 GEN 2 RFID HANDHELD READER USER'S MANUAL, VERSION 2.0.1 limits, but the exposed person is fully aware of the potential for exposure and can exercise control over his or her exposure by leaving the area or by some other appropriate means.
- Page 181 CSL CS101 EPC CLASS 1 GEN 2 RFID HANDHELD READER USER'S MANUAL, VERSION 2.0.1 The CS101 RFID reader is a handheld reader that is used in a handheld operation manner: RFID antenna and > 30 cm distance Wi-Fi antenna are...
- Page 182 CSL CS101 EPC CLASS 1 GEN 2 RFID HANDHELD READER USER'S MANUAL, VERSION 2.0.1 Radio Frequency Radiation Exposure Evaluation ─ RFID Mode: The measured highest RF output power of the EUT feeding to the embedded antenna was 28.6dBm at 927.25MHz. According to §1.1310 of the FCC rules, the power density limit for General Population/Uncontrolled Exposure at 927.25 MHz is...
- Page 183 CSL CS101 EPC CLASS 1 GEN 2 RFID HANDHELD READER USER'S MANUAL, VERSION 2.0.1 Radio Frequency Radiation Exposure Evaluation ─ WiFi Mode: The measured highest RF output power of the EUT feeding to the embedded antenna was 11.5dBm at 2412MHz. According to §1.1310 of the FCC rules, the power density limit for General Population/Uncontrolled Exposure at 2412MHz is = 1.0 mW/cm...
Need help?
Do you have a question about the CS101 and is the answer not in the manual?
Questions and answers