Sign In
Upload
Download
Table of Contents
Contents
Add to my manuals
Delete from my manuals
Share
URL of this page:
HTML Link:
Bookmark this page
Add
Manual will be automatically added to "My Manuals"
Print this page
×
Bookmark added
×
Added to my manuals
Manuals
Brands
CSL Manuals
Rfid Systems
CS463
User manual
CSL CS463 User Manual
Hide thumbs
1
2
3
Table Of Contents
4
5
6
7
8
9
10
11
12
13
14
15
16
17
18
19
20
21
22
23
24
25
26
27
28
29
30
31
32
33
34
35
36
37
38
39
40
41
42
43
44
45
46
47
48
49
50
51
52
53
54
55
56
57
58
59
60
61
62
63
64
65
66
67
68
69
70
71
72
73
74
75
76
77
78
79
80
81
82
83
84
85
86
87
88
89
90
91
92
93
94
95
96
97
98
99
100
101
102
103
104
105
106
107
108
109
110
111
112
113
114
115
116
117
118
119
120
121
122
123
124
125
126
127
128
129
130
131
132
133
134
135
136
137
138
139
140
141
142
143
144
145
146
147
148
149
150
151
152
153
154
155
156
157
158
159
160
161
162
163
164
165
166
167
168
169
170
171
172
173
174
175
176
177
178
179
180
181
182
183
184
185
186
187
188
189
190
191
192
193
194
195
196
197
198
199
200
201
202
203
204
205
206
207
208
209
210
211
212
213
214
215
216
217
218
219
220
221
222
223
224
225
226
227
228
229
230
231
232
233
234
235
236
237
238
239
240
241
242
243
244
245
246
247
248
249
250
251
252
253
254
255
256
257
258
259
260
261
262
263
264
265
266
267
268
269
270
271
272
273
274
275
276
277
278
279
280
281
282
283
284
285
286
287
288
289
290
291
292
293
294
295
296
297
298
299
300
301
302
303
304
305
306
307
308
309
310
311
312
313
314
315
316
317
318
319
320
321
322
323
324
325
326
327
328
329
330
331
332
333
334
335
336
337
338
339
340
341
342
343
344
345
346
347
page
of
347
Go
/
347
Contents
Table of Contents
Bookmarks
Table of Contents
1 Release Notes
Table of Contents
2 Content
3 Regulatory Regions
Introduction
Fcc Statement and IC Statement
European Ce
Hong Kong Ofca
Australia as
New Zealand Nz
4 Introduction
Csl Intelligent Fixed Reader Family
Cs463 4 Port Intelligent Fixed Reader
Product Package
Basic Package Content
Product Specifications
Product Accessories
How to Connect to and Control Csl Intelligent Fixed Reader
Software Development Kits
5 Reader Basics
Basic Hardware
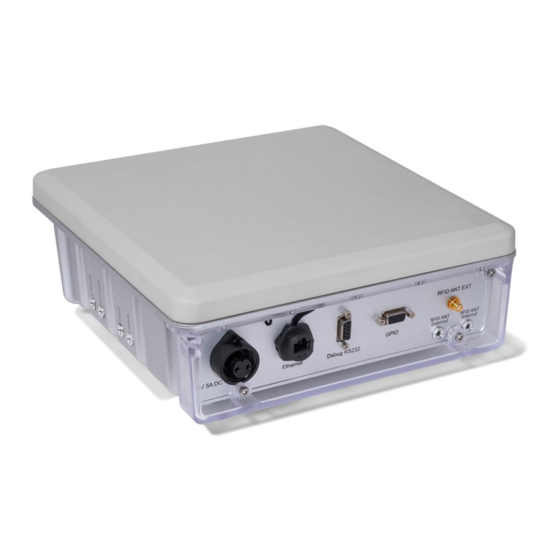
CS463 Basic Hardware
CS203X Basic Hardware
Set up Hardware
Set up CS463
Set up CS203X
Mounting of Csl Intelligent Fixed Readers
Operating Systems and Versions on Csl Intelligent Fixed Readers
Connecting to Csl Intelligent Fixed Readers Using Browser
Connecting to Csl Intelligent Fixed Readers Via Debug Serial Port
Connecting to Csl Intelligent Fixed Readers Via Ssh
Embedded Linux Applications Development
File Transfer to and from Cs463 Using Usb Memory Device
Connecting to Host Pc Using Usb Client Port
Connect from Usb Host Port Using Usb Com Driver to Ausb Client
Connecting from Control Serial Port to Rs232 Client Devices
Gpio Port and Accessories for Connection
Connecting to Bluetooth Devices: E.g. Speaker
Wireshark Logging on Pc Server Side
6 Gpio Ports Connection Guide
General Purpose Input (Gpi)
General Purpose Output (Gpo)
7 Quick Start
Cs463 Quick Start
Cs203X Quick Start
8 Web Browser Interface Details
Home Page
Status
Users Management
Add User
Delete User
Modify Password
List Users
Set Auto Logout Time
Login/Logout
System
Reader ID
Capture Point Name
Access Mode
Custom Embedded RFID Application
Frequency Configuration
Operation Profile
Memory Information
Configuration Backup/Restore
Power up Notification
8.4.10 Heartbeat
8.4.11 Log File Configuration
8.4.12 Download Log File
8.4.13 Company Label
8.4.15 Advanced Settings
8.4.16 Scheduled Restart
8.4.17 Restart System
Network Management
Ethernet Configuration
Wi Fi Configuration
Cloud Server Basic Settings
Cloud Server Data Formatter
Time and Timer Setting
Date/Time
Time Zone
NTP Setup
Tag & Tag Filter
Tag Group
Tag Database
Tag Filter
I/O Management
I/O Port Testing
Event Management
Event Management
Trigger
Resultant Action
Tag Inventory
Display Tag Group/Database Record
Version Management
Firmware Upgrade
9 Read Tag Using Browser Interface and Event Engine
Example 1: Example Event Send to Csl Demo Cloud Server
Example 2: Traffic Control - Management of Traffic at Building Entrance
Example 3: Multiple Antenna Ports with Different Events for each Port
Example 4: Example Event Using Database Tag Group and Database Display
Example 5: Read Magnus S3 Tag Temperature
10 Read Tag Using Csl Unified Api
11 Read Tag Using Llrp V1.1 Api
12 Read Tag Using Cs461 High Level Api (Csl Http/Xml Api)
13 Read Tag Using Cs461 Low Level Api (Mach1 Api)
14 Read Tag Using Cs108 Bluetooth Api
15 Read Tag Using Custom Embedded Rfid
16 Demo Source Codes for Download
17 Historical Firmware Versions
Appendix A: Federal Communications Commission Compliance
Appendix B: Reader Modes (Link Profiles)
Appendix C: Sessions
Appendix D: Tag Population and Q
Appendix E: Query Algorithm
Appendix F: Target
Appendix G: Receiver Amplifier Gain Values
Appendix H: Tagfocus
Appendix I: Fastid
Appendix J: Security
Appendix K: Models & Regulatory Region
Appendix L: Technical Support
Advertisement
Quick Links
Download this manual
CSL EPC RFID
Intelligent Fixed Reader Family
User's Manual: CS463, CS203X
CS463 4 Port Reader
CS203X Integrated Reader
Version 2.0
2021 May 13
CSL: The One-Stop-Shop for RFID Solutions
Table of
Contents
Previous
Page
Next
Page
1
2
3
4
5
Advertisement
Table of Contents
Need help?
Do you have a question about the CS463 and is the answer not in the manual?
Ask a question
Questions and answers
Related Manuals for CSL CS463
Rfid Systems CSL CS208-3G User Manual
Intelligent integrated rfid reader with gps (105 pages)
Rfid Systems CSL CS468 User Manual
16-ports epc class 1 gen 2 rfid reader (144 pages)
Rfid Systems CSL CS468 User Manual
Epc class 1 gen 2 rfid fixed reader (17 pages)
Rfid Systems CSL CS101 User Manual
Epc class 1 gen 2 rfid handheld reader (183 pages)
Rfid Systems CSL CS203X User Manual
(347 pages)
Rfid Systems CSL CS203X-2 User Manual
Epc class 1 gen 2 rfid reader (20 pages)
Rfid Systems CSL CS468-2 User Manual
Epc class 1 gen 2 rfid fixed reader (15 pages)
Rfid Systems CSL CS710S User Manual
Rfid sled handheld reader (238 pages)
Rfid Systems CSL 300521 User Manual
Pcie sata 3 controller (2x sata intern/extern) (32 pages)
This manual is also suitable for:
Cs203x
Table of Contents
Print
Rename the bookmark
Delete bookmark?
Delete from my manuals?
Login
Sign In
OR
Sign in with Facebook
Sign in with Google
Upload manual
Upload from disk
Upload from URL


Need help?
Do you have a question about the CS463 and is the answer not in the manual?
Questions and answers