Advertisement
Available languages
Available languages
INSTRUCTION SHEET
PRODUCT: 80501 Deluxe Around the Spare
• Page 1 of 2
ASSEMBLY INSTRUCTIONS:
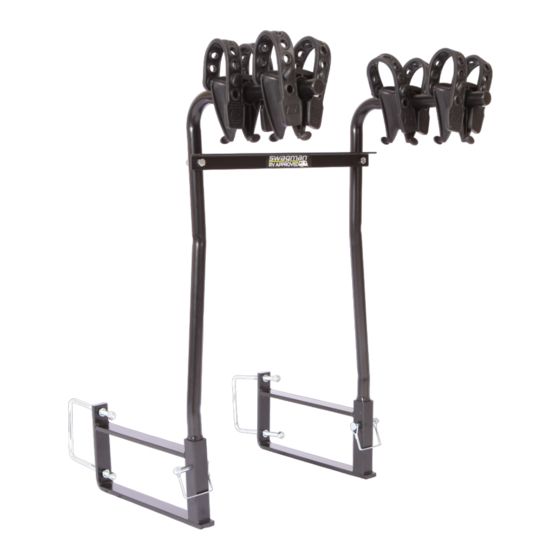
1. Attach cross bar (B) to upper tube (A) as shown in Fig. 1, using 5/16" x 1-1/2" bolts, 5/16" lock washers, and 5/16" nuts. Insert plastic end caps
into upright tubes.
2. Assemble lower tube retainer brackets (C) to rear bumper using 3/8" U-bolts, lock washers and nuts. Do not tighten the nuts. Insert upper
tubes into pockets in retainer brackets, and secure with lock pin on either right or left side, as shown in Fig. 1. Tighten the 3/8" nuts.
3. Bikes must be secured to the carrier crossbar with the (2) nylon straps provided as shown on in Fig. 3 to avoid any possible separation. It is
the owner's responsibility to check the tightness of the strap periodically for continued safety. It is also recommended to tie the bike wheels
together with material not supplied with this kit to prevent the wheels from turning. Do not create any downward vertical force on any part
of the carrier when so securing tying the bikes. Carefully read and follow the important notes on page 2.
BIKE CRADLE INSTRUCTIONS:
1. Position one of the anti-sway cradles close to the seat tube.
2. Secure the bikes by pulling the strap over the top tube of the bike frame (Fig. 2).
3. The second strap is to go around the seat tube. This will help prevent the bikes from swaying. On the opposite cradle pull both straps over
the top tube.
4. You should check the straps periodically and after stopping to ensure they are still tight and that they have not loosened. Failure to do so will
void warranty.
Warning: DO NOT USE ANY STRETCH OR ELASTIC CORDS TO SECURE BIKES WHATSOEVER. USE OF SUCH CORDS MAY CREATE
EXCESSIVE FORCES BEYOND THE CARRIER'S LOAD CAPACITY AND CAUSE DAMAGE TO THE CARRIER, BIKES, AND/OR VEHICLE.
Maximum capacity of carrier is 70 lbs. Do not exceed manufacturer's rated bumper capacity.
PART
A: (2) Upper Tubes
B: (1) Crossbar
C: (2) Retainer Brackets
D: (4) Cradles (come factory installed)
HARDWARE
E: (4) 3/8" Lock washers
F: (4) 3/8" Nuts
G: (2) 3/8" U-Bolts
H: (2) 5/16" x 1-1/2" Bolts
I: (2) 5/16" Lock washer
J: (2) 5/16" Nuts
K: (2) Nylon Straps
L: (2) Lock Pins
300 - 1880 Government St. • Penticton, B.C. Canada V2A 7J1 • Phone (250) 490-8883 • Fax (250) 490-8885 • www.swagman.net
1
J
I
A
G
F
E
C
B
H
L
D
REV 23/10/19
Advertisement
Table of Contents

Related Manuals for Swagman 80501


Summary of Contents for Swagman 80501
- Page 1 I: (2) 5/16” Lock washer J: (2) 5/16” Nuts K: (2) Nylon Straps L: (2) Lock Pins REV 23/10/19 300 - 1880 Government St. • Penticton, B.C. Canada V2A 7J1 • Phone (250) 490-8883 • Fax (250) 490-8885 • www.swagman.net...
- Page 2 ATTN: STATE OF CALIFORNIA CONSUMERS WARNING: Cancer and Reproductive Harm • www.P65Warnings.ca.gov REV 23/10/19 300 - 1880 Government St. • Penticton, B.C. Canada V2A 7J1 • Phone (250) 490-8883 • Fax (250) 490-8885 • www.swagman.net...
- Page 3 I: (2) rondelles 5/16 po J: (2) écrous 5/16 po K: (2) courroies de nylon L: (2) goupilles de sécurité REV 23/10/19 300 - 1880 Government St. • Penticton, B.C. Canada V2A 7J1 • Phone (250) 490-8883 • Fax (250) 490-8885 • www.swagman.net...
- Page 4 2. Renseignez-vous auprès du détaillant afin de vous procurer un adaptateur permettant d’installer un vélo à tube horizontal incliné sur le porte-vélos. REV 23/10/19 300 - 1880 Government St. • Penticton, B.C. Canada V2A 7J1 • Phone (250) 490-8883 • Fax (250) 490-8885 • www.swagman.net...
Need help?
Do you have a question about the 80501 and is the answer not in the manual?
Questions and answers