Table of Contents
Advertisement
Quick Links
Advertisement
Table of Contents

Related Manuals for BlazeVideo A350W


Summary of Contents for BlazeVideo A350W
- Page 1 TRAIL CAMERA MODEL#: A350W INSTRUCTION MANUAL V1.0...
-
Page 2: Table Of Contents
TABLE OF CONTENTS 1. IN THE BOX....................1 2. IMPORTANT NOTE..................1 3. INTRODUCTION..................2 4. PARTS AND CONTROLS................3 5. INSTALLING THE BATTERIES AND SD CARD........7 5.1. Loading Batteries................7 5.2. Inserting the SD Card..............8 6. USING THE CAMERA.................9 7. THE OFF, ON, AND SURVEILLANCE MODES........9 7.1. -
Page 3: In The Box
1. IN THE BOX 1 x Camera, 1 x Mounting Strap, 1 x Instruction Manual, 1 x Mini USB Cord, 1 x Antenna Note: Memory card and batteries are not included (user supplied). 2. IMPORTANT NOTE 2.1. About Batteries Require eight (8) 1.5V AA Alkaline or Lithium batteries. We recommend the use of Energizer AA Lithium batteries in this camera to obtain maximum battery life. -
Page 4: Introduction
Google LLC. 3. INTRODUCTION 3.1. About the Camera The A350W is a new generation of Wi-Fi trail camera. The camera has a built-in Wi-Fi and Bluetooth module, so that you can connect and operate the camera through a dedicated APP (“TrailCam Mobile”). -
Page 5: Parts And Controls
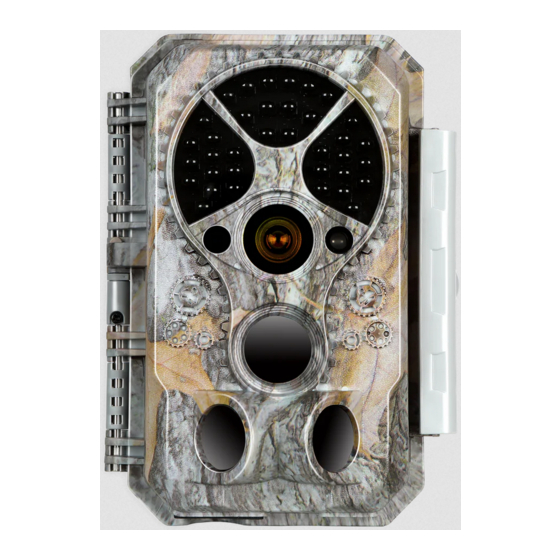
Clear night vision, flash range 100ft. The camera is equipped with 36pcs high performance infrared no glow 940nm LEDs that function as a flash (invisible to human and animal eyes) Wide view angle - 70° Easy to use/program with well-designed operation buttons ... - Page 6 Antenna IR LEDs Light Sensor Indicator Optics Lock Hole Lens Central Lock PIR Lens Buckle Side Side PIR Lens PIR Lens Figure 1: Front View Install the antenna: The antenna is placed in the accessory slot on the right side of the package box. Please screw the antenna into the mounting base on the top of the camera and tighten it (Figure 1).
- Page 7 The camera provides the following connections for external devices: Mini USB port and SD card slot etc. (Figure 2). Tripod Base SD Card 1/4" - 20 Holder DC 12V/1A Microphone Plug 5.5x2.1mm Mini USB Port Figure 2: Bottom View The camera has one security cable hole and two strap holes on the back.
- Page 8 batteries slot supported (Figure 4). Battery Color Compartment Screen and Cover Operation Buttons Figure 4: Inside View Surveillance Mode Power Switch Figure 5: Operation Buttons A power switch is used to power on (ON mode) or off the camera (OFF mode). A START button is used to quickly make the camera into the surveillance mode (motion detection or time lapse per your settings (Figure 5).
-
Page 9: Installing The Batteries And Sd Card
5. INSTALLING THE BATTERIES AND SD CARD Before you begin learning how to use your camera, you will first need to install a set of batteries and insert an SD card. Although that may only take you a minute, there are some important notes about both batteries and SD cards you should be aware of, so please take the time to read the following directions and cautions:... -
Page 10: Inserting The Sd Card
Figure 6: Loading the Batteries 5.2. Inserting the SD Card Insert the SD card (with the camera powered off), before beginning to operate the camera. Don't insert or remove the SD 一 card when the camera is powered on or in the surveillance mode. -
Page 11: Using The Camera
screen in ON mode. Formatting the SD card by using the camera's "Format SD Card" menu option before first use is recommended, especially when a card has been used in other devices. To take out the SD card, just gently push in the card (do not ... -
Page 12: Off Mode
SURVEILLANCE mode: When the camera is powered on, press START button to enter the surveillance mode. When the screen is off, the camera enters standby and will perform according to your settings. APP & Wi-Fi Connection: You can use the APP to connect the camera when the camera is operating in the ON or SURVEILLANCE mode. -
Page 13: Surveillance Mode
will perform as your settings in the menu. In the ON mode, you can connect the camera to a computer's USB port to download your images. 7.3. SURVEILLANCE Mode Any time after the batteries and SD card have been inserted, you can switch on the camera. -
Page 14: Enable Wi-Fi And Bluetooth
NOTES: The screenshots shown in this section are indicative only. The actual diagram on different versions of APP, iOS and Android may differ. During the use of the TrailCam APP (Referred to as APP), please grant the APP access to Wi-Fi, Bluetooth, storage, location and camera of your device, and enable the Local Network (if on iOS14), which are necessary to take pictures and videos. -
Page 15: Select Camera Type
Figure 9: Tap to add your camera 8.4. Select Camera Type Figure 10: Select Wi-Fi camera type Please tap Wi-Fi camera. The APP only supports Wi-Fi camera at the moment, and will be enhanced to support cellular camera in the future (sold separately). -
Page 16: Search Your Camera And Link
8.5. Search Your Camera and Link Figure 11: Select your camera By default, in the list the camera will be indicated as ID “NONAME_A350W” if the camera name is not assigned. After you set the camera name in settings, the camera ID will be updated as “XXXX_A350W”... - Page 17 Figure 12: Allow Wi-Fi Connection on iOS Device A system pop-up message will show (Figure 12). Please tap ‘Join’ to allow Wi-Fi connection. The string “CAM8Z6_E9316A9F2066” is the name of Wi-Fi hotspot on the camera to allow Wi-Fi connection. Among cameras, the prefix CAM8Z6 is fixed, E9316A9F2066 is the internal camera identifier which may vary from different cameras.
-
Page 18: App Navigation
8.6. APP Navigation The APP supplies 4 main features : Camera, Status, Settings and Gallery. See the Table 1 and Figure 14~17 for more details. Table 1 - APP Navigation Features Details Refer to Preview, manual taking pictures or Camera Figure 14 videos. - Page 19 Figure 14: Camera Figure 15: Status Figure 16: Settings Figure 17: Gallery...
-
Page 20: Important Notes On App Wi-Fi Connection
8.7. Important Notes on APP Wi-Fi Connection Notes When the camera’s Wi-Fi is connected, the camera will stop SURVEILLANCE (motion detecting or time lapse). Disconnect Wi-Fi to enable the camera to go back to SURVEILLANCE mode. TIP: How to re-enable the camera start motion detection? Tap the camera ID “JOHN_A350W”... -
Page 21: Advanced Settings
9. ADVANCED SETTINGS The trail camera comes with preset manufacturer settings. You can change the settings to meet your requirements. Once the camera screen is on, press MENU key to enter/exit the menu. Press the UP/DOWN key to move the marker, Press the LEFT/RIGHT key to change the setting, and press the OK key to confirm the change. - Page 22 Select video resolution (pixels per 1296P frame). Higher resolution produces Video 1080P better quality videos, but creates larger Quality 720P files that take more of the SD card capacity. Select video recording length. seconds, Note: It is highly recommended to set the Video Optional night video length to less than 30...
- Page 23 more, and the Medium/Low setting is helpful in cold weather. Note: this option is invalid if Mode is set as “Time Lapse”. Selecting On will activate the side motion sensors. It brings faster trigger speeds and helps capture fast moving animals.
- Page 24 and save battery power. M – Month, D – Day, Y – Year hh – Hour, mm – Minute Note: Use "LEFT/RIGHT" key to M/D/Y Date / switch parameters, use "UP/DOWN" to hh:mm Time set current date and time. Date input AM/PM format may change.
-
Page 25: Mounting And Positioning
every day. For instance, if the starting time is set at 18:35 and the ending time at 8:25, the camera will function from 18:35 the current day to 8:25 the next day. Outside the time period the camera will not be triggered or take photos/videos. -
Page 26: Sensing Angle And Distance Test
from the place to be monitored, with the camera placed at a height of 2.5-3.5ft. (0.75-1m). Also, keep in mind that you will get the best results at night when the subject is within the ideal flash range, no farther than 100ft. (30m) and no closer than 10ft. - Page 27 angle and monitoring distance of the camera. To perform the test: Switch the camera to the ON mode. Press MENU button, go to “Motion Test”. The camera will count down a max 30-second delay and be ready to capture motion.
-
Page 28: Starting
You can avoid potential false triggers due to temperature and motion disturbances in front of the camera by not aiming it at a heat source or nearby tree branches or bush (especially on windy days). Do NOT install the camera behind the glass window as that is not possible to sense any motion. -
Page 29: Technical Specifications
are saved with file names like DSCF0001.JPG and videos like DSCF0001.MP4. The MP4 video files can be played back on most popular media players, such as Windows Media Player, QuickTime, VLC etc. There are different ways this can be done. You can directly review the photos or videos on the camera screen. - Page 30 (Not included), max capacity 512GB Picture Resolution 32MP, 24MP, 16MP, 8MP, 4MP 2304 x 1296@20fps (16:9), Video Resolution 1920 x 1080P@30fps (16:9), 1280 x 720P@30fps (16:9) PIR Sensitivity High/Normal/Low PIR Sensing 90ft (Below 77°F/25°C) Distance Total 120° (while side motion sensors PIR Sensing Angle enabled).
-
Page 31: Troubleshooting
8V - Low Battery (Batteries die) Low Battery 9V - Night vision is unavailable in low Alarm voltage (Almost die) Mini-USB, Standard size SD card holder, Interface External Power (DC 12V/1A, Plug 5.5x2.1mm) Mounting Strap, Tripod Base (1/4-20) Waterproof IP66 Operation -4~140°F/-20~60°C Temperature... -
Page 32: Warranty
14. WARRANTY ONE YEAR LIMITED WARRANTY Your Trail Camera warranty covers your trail camera for one year after the original purchase date. We warrant that your camera will be free from defects in materials and workmanship when operated in normal use and conditions. This warranty does not cover consumer caused damages such as misuse, abuse, improper handling or installation, damaged caused by wild animals, or repairs attempted by someone other...
Need help?
Do you have a question about the A350W and is the answer not in the manual?
Questions and answers