Table of Contents
Advertisement
Quick Links
Item
# 1003132154
# 1003124900
# 1003063524
# 1003054956
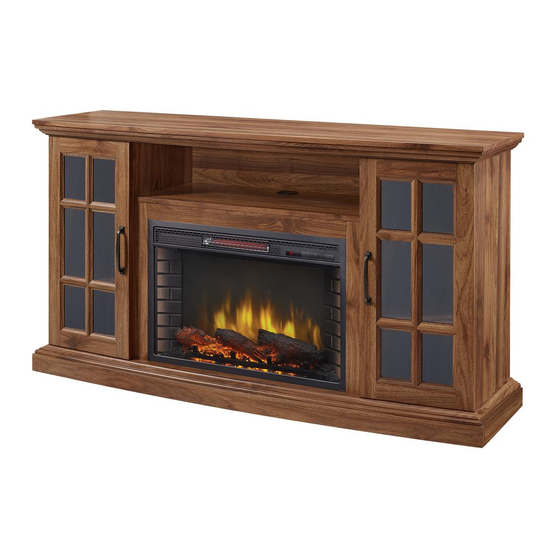
EDENFIELD COLLECTION: ELECTRIC FIREPLACE MEDIA MANTEL
PLEASE READ THIS MANUAL BEFORE INSTALLING AND USING APPLIANCE
IF THE INFORMATION IN THIS MANUAL IS NOT FOLLOWED EXACTLY, AN ELECTRICAL SHOCK OR FIRE MAY RESULT
We appreciate the trust and confidence you have placed in Home Decorators Collection through the purchase of this Avondale Grove
collection electric fireplace media mantel. We strive to continually create quality products designed to enhance your home. Visit us online
to see our full line of products available for your home improvement needs. Thank you for choosing Home Decorators Collection!
USE AND CARE GUIDE
IMPORTANT INSTRUCTIONS
CAUSING PROPERTY DAMAGE, PERSONAL INJURY OR LOSS OF LIFE.
INSTALLER: Leave this manual with the appliance.
CONSUMER: Retain this manual for future reference.
Questions, problems, missing parts? Before returning to the store,
call Home Decorators Collection Customer Service
8 a.m. - 7 p.m., EST, Monday-Friday, 9 a.m. - 6 p.m., EST, Saturday
HOMEDEPOT.COM/HOMEDECORATORS
WARNING!
1-800-986-3460
THANK YOU
Model
# 365-302-121
# 365-302-121-Y
# 365-302-165-Y
# 365-302-48-Y
04-19-2018
Advertisement
Table of Contents

Subscribe to Our Youtube Channel
Related Manuals for Home Decorators Collection EDENFIELD 365-302-121


Summary of Contents for Home Decorators Collection EDENFIELD 365-302-121
- Page 1 THANK YOU We appreciate the trust and confidence you have placed in Home Decorators Collection through the purchase of this Avondale Grove collection electric fireplace media mantel. We strive to continually create quality products designed to enhance your home. Visit us online to see our full line of products available for your home improvement needs.
-
Page 2: Table Of Contents
Table of Contents Table of Contents ........2 Package Contents . -
Page 3: Pre-Assembly
Pre-Assembly PLANNING ASSEMBLY Before you begin assembly, locate the instructions and hardware. Compare all parts with the Hardware Included and Package Contents lists. Be sure you have all the parts and can identify them. A helping hand is always good. Assemble your mantel with an adult assistant if pos- sible. -
Page 4: Package Contents
Pre-Assembly (continued) PACKAGE CONTENTS Part Description Quantity Part Description Quantity Top Panel Cabinet Door Base Panel Side Back Panel Media Shelf Upper Back Panel Side Panel Top Trim Adjustable Shelf Left Trim Left Inside Panel Right Trim Right Inside Panel... -
Page 5: Assembly
Assembly Attaching the trim to side panels □ Locate the inside panels (F & G) and place on a soft surface to protect the finish. □ Attach the left trim (M) and right trim (N) to the inside panels by turning the bolts (AA) clockwise through the connector. - Page 6 Assembly (continued) Attaching the media shelf □ Insert four wood dowels (BB) into the unthreaded holes in the media shelf (C). □ Line up the four wood dowels (BB) in the media shelf (C) with the unthreaded holes in the left and right inside panel (G &...
- Page 7 Assembly (continued) Attaching the side panels □ Line up the connectors on the side panels (D) with holes on the base (B). □ Attach the left and right side panels (D) to the base assembly by inserting four bolts (AA) through the connector in the side panels and turning clockwise.
- Page 8 Assembly (continued) Attaching the back panels □ Locate the back panels (J & K) and line them up to the back of the media console with the finished side facing in. □ Insert and tighten thirty-six screws (DD) to attach the back panels (J &...
- Page 9 Assembly (continued) Attaching the doors □ Line up the hinges in the left and right doors (H) with the hinge plates in the left and right side panels. □ Tighten the screws to attach the hinges to the hinge plates. Do not strip the screws by overtightening. Attaching the knobs □...
- Page 10 Assembly (continued) Installing the shelves □ Locate the four shelves (E) and place them on a soft surface to protect the finish. □ Insert the sixteen shelf pins (FF) into the interior of the side panels (D, F & G). Be sure to insert the pins parallel to one another to ensure the shelves (E) are level.
-
Page 11: Care And Cleaning
Care & Cleaning □ Always turn the heater OFF and unplug the power cord from the outlet before cleaning. □ Cleaning of the control panel, located in the upper right-hand corner of the fireplace behind the sliding control panel cover, is to be done only using a soft cloth, slightly dampened in water (if needed, a small amount of dish soap can be added to the water) and dried using a clean, dry soft cloth. - Page 12 Service Parts (continued) Part Description Quantity Part Number Part Number Part Number 36-302-121/36-302-121-Y 36-302-165-Y 36-302-48-Y Burnished Walnut Finish Aged White Finish Espresso Finish Top Panel 20-01-099 20-01-112 20-01-125 Base Panel 20-01-100 20-01-113 20-01-126 Media Shelf 20-01-101 20-01-114 20-01-127 Side Panel 20-01-102 20-01-115 20-01-128...
-
Page 13: Troubleshooting
Troubleshooting If you have any questions regarding the product, please call Home Depot Customer Service, 1-800-986-3460, 8 a.m. – 7 p.m. EST, Monday – Friday, 9 a.m. - 6 p.m., EST, Saturday. Problem Possible Cause Solution □ The fireplace is not plugged in. □... - Page 14 Questions, problems, missing parts? Before returning to the store, call Home Decorators Collection Customer Service 8 a.m. - 7 p.m., EST, Monday-Friday, 9 a.m. - 6 p.m., EST, Saturday 1-800-986-3460 HOMEDEPOT.COM/HOMEDECORATORS Retain this manual for future use. Manufactured by: GHP Group, Inc. • 6440 W. Howard St. • Niles, IL 60714-3302...
Need help?
Do you have a question about the EDENFIELD 365-302-121 and is the answer not in the manual?
Questions and answers