Table of Contents
Advertisement
Quick Links
Advertisement
Chapters
Table of Contents

Related Manuals for SATA 05221


Summary of Contents for SATA 05221
- Page 1 Digital Clamp Multimeter 钳型万用表 05221 中文...
-
Page 2: Table Of Contents
目 录 概述 ..................................安全信息 ................................. 电气符号 ................................. 一般特性 ................................. 电气特性 ................................. 交流电压 ................................直流电压 ................................交流电流 ................................电阻 ................................二极管测量 ..............................通断测试 ................................. 面板说明 ................................使用说明 ................................交流电压测量 ..............................直流电压测量 ..............................交流电流测量 ..............................电阻测量 ................................. 二极管测量 ..............................通断测量 ................................. 电池更换与维护... -
Page 3: 安全信息
05221 用户手册 概述 本仪表是一种性能稳定,安全、可靠的3 1/2数字钳形表。整机电路设计以大规模集成 电路双积分A/D转换器为核心,全量程的过载保护电路,独特的外观设计使之成为性能 优越的测量仪表。可用于测量直流电压、交流电压、交流电流、电阻、二极管和电路 通断。 安全信息 本仪器的设计符合IEC 61010,污染等级2级,过电压标准 (CATIII 300V) 警告 为避免电击和人伤害,请遵循以下操作要求:... - Page 4 05221 用户手册 1. 仪器存在破损时,请勿使用。使用前请检查外壳。尤其应注意连接器周围的绝缘。 2. 检查表笔的绝缘是否有损坏或暴露的金属。检查表笔是否导通。如果表笔有损坏, 请更换后再使用。 3. 若仪器工作失常,请勿使用。保护设施可能已遭破坏。 若有疑问,应把仪器送去维修。 4. 切勿在爆炸性的气体,蒸汽或灰尘附近使用本仪器。 5. 切勿在端子之间或端子与地之间施加超过仪表上所标示的额定电压。 6. 使用前,通过测量已知电压的方式确认仪器工作正常。 7. 维修时,只使用指定的更换部件。 8. 对于30Vac有效值,42Vac峰值或60Vac以上的电压,工作时要小心,这类电压会有 电击的危险。 9. 使用表笔时,应把手指置于表笔上的护指装置后。 10.为避免电击,使用者不要接触任何裸露的导体,使用者应与地保持绝缘。...
- Page 5 05221 用户手册 12. 连接时,先连接公共测试导线,而后才连接带电的测试导线。 拆除接线时,先拆带电的测试导线,而后才拆除公共测试导线。 13. 打开仪器的电池盖或外壳前,应先将表笔拆下,并将钳头从被测导体上取下。 14. 仪器的电池盖或外壳的一部分被拆下或松开时,切勿使用仪器。 15. 当出现底电池符号 " "(或" "),应马上更换电池。 电池电量不足会使仪器读数错误,从而导致电击或人身伤害。 16. 给一个输入端子接上一个危险的电压时, 请注意,在所有其他端子上可能出现此电压。 17. CATIII:直接连接到配电盘的大型设备(固定设备)的一次线路及配电盘 与插座之间的电气线路。不要把本仪器用于属于CAIV的测量。...
- Page 6 05221 用户手册 提示 为避免对仪器或设备造成损害,请遵守以下几点要求: 在测量电阻,二极管和通断之前,先断开被测电源并对所有的高压电容器放电。 ● 使用正确的端子,功能和量程。 ● 打开外壳前,先把表笔从仪器上移开。 ● 移动功能/档位开关前,应先使表笔和钳头从被测导体或电路上移开。 ●...
-
Page 7: 电气符号
05221 用户手册 电气符号 交流电 警惕!有危险,使用前请参阅说明书 地端子 有双重绝缘或加强绝缘保护 直流电 警惕!有电击危险 符合欧盟指令 一般特性 1. 最大显示:1999 (3 1/2位) 2. 显示方法:LCD显示 3. A/D转换方式:双积分式A/D转换... - Page 8 05221 用户手册 4.过量程显示:LCD上显示 "1" 5.采样速率:约3次/秒 6.测试位置误差:测量电流时因未将待测源置于适当位置而产生1%的读值误差 7.传感器种类:AC测量的钳形互感器 8.钳头开启最大尺寸: 直径27mm 9.预测电流导线最大尺寸: 直径25mm 10.电池低电压指示:LCD上出现 " "或 " " 11.电源:3V CR2032, 3只 12.工作温度:0°C ~ 40°C, 相对湿度:<75% 13.贮存温度:-20°C ~ 60°C, 相对湿度:<85% 14.尺寸:151mm×65mm×34mm 15.重量:约127g (含电池)
-
Page 9: 电气特性
05221 用户手册 电气特性 精度保证期限为一年 精度保证工作条件:温度18°C ~ 28°C, 湿度<75% RH 精度表示的格式为:± (%读数 + 字数) 功能 量程 分辨率 精度 过量程指示 300V ± (1.2%+3) 见备注1 交流电压 输入阻抗:9MΩ 频率响应:40Hz ~ 400Hz 最大输入电压:300Vrms 显示:正弦波有效值(平均值响应)... -
Page 10: 直流电压
05221 用户手册 备注1:当仪表测量超过300V的信号时,是可以显示实际测量所得到的数值, 但可能引起危险。 功能 量程 分辨率 精度 过量程指示 300V ± (1.0%+2) 见备注1 直流电压 输入阻抗:9MΩ 最大输入电压:300Vrms 备注1:当仪表测量超过300V的信号时,是可以显示实际测量所得到的数值, 但可能引起危险。... -
Page 11: 交流电流
05221 用户手册 功能 量程 分辨率 精度 过量程指示 屏幕显示“1” 10mA ± (3.0%+5) 屏幕显示“1” 200A 100mA ± (2.5%+5) 交流电流 见备注1 400A AC转换类型:正弦波输入、平均值响应,校正读数至与有效值一致。 频率:50 ~ 60Hz 最大允许输入电流:400A 备注1:当仪表测量超过400A的电流时,是可以显示实际测量所得的数值, 但可能引起危险。... -
Page 12: 二极管测量
05221 用户手册 功能 量程 分辨率 精度 过量程指示 2000Ω 1Ω ± (1.2%+2) 屏幕显示“1” 电阻 200kΩ 100Ω ± (1.5%+2) 功能 量程 分辨率 精度 显示正向压降近似值 二极管测试 (开路电压约3V) -10-... -
Page 13: 通断测试
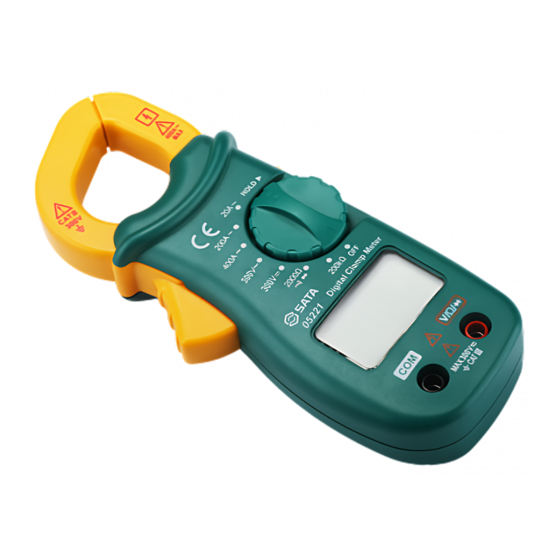
05221 用户手册 功能 量程 分辨率 说明 当电阻≤约30Ω, 1Ω 通断测试 蜂鸣器产生蜂鸣 面板说明 1. 钳头 用于夹取待测导体。测量时导体应位于钳头内中心位置。 2. 钳头板机 用于控制钳头的开启与闭合。 3. 显示屏 3 1/2位液晶显示,最大读数1999 -11-... - Page 14 05221 用户手册 4. "COM" 插孔 测量电压、电阻、通断或二极管时黑色(负极性) 表笔的输入插孔。 5. "VΩ " 插孔 测量电压、电阻、通断或二极管时红色(正极性) 表笔的输入孔。 6. 功能/档位开关 该开关用于选择所需的功能和档位。 7.数据保持按钮 按下该按钮,则当前的读数即被保持在LCD上, 屏幕出现"HOLD"。再按下该按钮,则取消数据 保持功能,同时"HOLD"消失。 -12-...
-
Page 15: 使用说明
05221 用户手册 使用说明 交流电压测量 1.将黑色表笔插入"COM"插孔,红色表笔插入"VΩ "插孔。 2.将功能开关置于"300V "档位上。 3.将测试笔连接到待测电源或电路的两端。 4.读取读数。 直流电压测量 1.将黑色表笔插入"COM"插孔,红色表笔插入"VΩ "插孔。 2.将功能开关置于"300V "档位上。 3.将测试笔连接到待测电源或电路的两端。 4.红色测试笔所接端子的极性将和电压值一同显示在显示器上。 -13-... -
Page 16: 交流电流测量
05221 用户手册 交流电流测量 1. 将功能开关设置在所需的交流电流测试量程上。 2. 用钳表夹取待测导体,然后缓慢地放开板机,直到钳头完全闭合。 注意: 确保待测导体被夹取在钳头中央。钳表一次只能测量一个电流导体。若同时 测量两个或两个以上的导体,则会产生错误读数。 3. 读取显示屏上的读数。 注意: 不要用手或皮肤接触任何裸露及带电导体。用钳表夹取待测导体前,必须事 先从表上取下表笔。 -14-... -
Page 17: 电阻测量
05221 用户手册 电阻测量 1. 将黑色表笔插入"COM"插孔,红色表笔插入 "VΩ "插孔。 2. 将功能选择开关置于所需的电阻档("2000Ω"或"200kΩ")。 3. 将两测试笔跨接在待测电阻两端,即可测得电阻值。 注意: 如果将功能选择开关置于"2000Ω"档,当电阻小于约30Ω时,仪器内置蜂鸣 器将会发声。当在线路上测量电阻和通断之前,先断开线路电源并对所有的 电容充分放电。 -15-... -
Page 18: 二极管测量
05221 用户手册 二极管测量 1. 将黑色表笔插入"COM"插孔,红色表笔插入 "VΩ "插孔 (注意红色表笔的极性为"+")。 2. 将功能开关置于" "量程,将表笔跨接到待测二极管 (红色表笔接二极管的正极,黑色表笔接二极管的负极)。 3. 从LCD上读取被测二极管正向压降的近似值(读数的单位为"mV")。 通断测量 1. 将黑色表笔插入"COM"插孔,红色表笔插入"VΩ "插孔。 2. 将功能选择开关置于" "档。 3. 将两测试笔跨接在待测电阻两端,当电阻小于约30Ω时,仪器内置蜂鸣器将会发声。 注意:当在线路上测量通断之前,先断开线路电源并对所有的电容充分放电。 -16-... - Page 19 05221 用户手册 电池更换和维护 当显示屏出现符号" "(或" ")时,表示电池电量不足。 更换电池时,请拆下电池门上的螺丝,卸下用过的电池,换上新的同种型号的电池 (3V,CR2032,3个)。如图,确保电池的极性正确("+"极朝上)。盖上电池门,再锁紧螺丝。 打开外壳前,先把表笔和钳头从所有被测 电路上移开。定期用湿布和中性清洁剂清 洁外壳。请使用勿溶剂或研磨剂。 电池夹 (更换电池时请拨动) -17-...
-
Page 20: 电池更换与维护
05221 用户手册 附件 表笔 一付 说明书 一本 产品的处置 尊敬的用户: 当您不再使用本产品,想要丢弃时,请记住它的许多元件包含可 回收的有价值的材料。 请不要把本产品丢到垃圾箱,而应向当地有关部门谘询。 -18-... - Page 21 TABLE OF CONTENT WARRANTY ································································································································································································ SAFETY INFORMATION ··········································································································································································· CAUTION ···································································································································································································· ELECTRICAL SYMBOLS ··········································································································································································· GENERAL DESCRIPTION ········································································································································································· GENERAL SPECIFICATION ······································································································································································ SPECIFICATIONS ······················································································································································································ AC Voltage ····················································································································································································· DC Voltage ·················································································································································································· AC Current ·················································································································································································· Resistance ·················································································································································································· Audible Continuity ···································································································································································· Diode Test ··················································································································································································· FRONT PANEL ························································································································································································...
- Page 22 FRONT PANEL ·························································································································································································· OPERATING INSTRUCTION ···································································································································································· Measuring DC Voltage ······························································································································································· Measuring AC Voltage ······························································································································································· Measuring AC Current ······························································································································································· Measuring Resistance ······························································································································································ Measuring for continuity ························································································································································· Measuring Diode ········································································································································································ BATTERY REPLACEMENT ····································································································································································· GENERAL MAINTENANCE ····································································································································································· ACCESSORIES ··························································································································································································...
-
Page 23: Warranty
05221 Users Manual WARRANTY This instrument is warranted to be free from defects in material and workmanship for a period of one year. Any instrument found defective within one year from the delivery date and returned to the factory with transportation charges prepaid, will be repaired, adjusted, or replaced at no charge to the original purchaser. - Page 24 05221 Users Manual Warning To avoid possible electric shock or personal injury, follow these guidelines: ● Do not use the meter if it is damaged. Before you use the meter, inspect the case. Pay particular attention to the insulation surrounding the connectors.
- Page 25 05221 Users Manual ● Use with caution when working above 30V ac rms, 42V peak, or 60V dc. Such voltages pose a shock hazard. ● When using the probes, keep your fingers behind the finger guards on the probes. ●...
- Page 26 05221 Users Manual ● Remaining endangerment: When an input terminal is connected to dangerous live potential it is to be noted that this potential at all other terminals can occur! ● CAT III-Measurement Category III is for measurements performed in the building installation.
-
Page 27: Caution
05221 Users Manual CAUTION To avoid possible damage to the meter or to the equipment under test, follow these guidelines: Disconnect circuit power and discharge all high-voltage capacitors before testing resistance,diode ● and continuity. Use the proper function and range for your measurements. -
Page 28: Electrical Symbols
05221 Users Manual ELECTRICAL SYMBOLS Alternating Current Direct Current Both direct and alternating current Caution, risk of danger, refer to the operating manual before use. Caution, risk of electric shock. Earth (ground) Terminal Conforms to European Union directives The equipment is protected throughout by double insulation or reinforced insulation. -
Page 29: General Description
05221 Users Manual GENERAL DESCRIPTION This meter is a compact 3 1/2-digit digital clamp meters for measuring DC voltage, AC voltage, AC current, resistance, diode and continuity. They are easy to operate and are ideal instruments. GENERAL SPECIFICATION Display: 3 1/2 -digit LCD with a max. reading of 1999 Sampling rate: Approximate 3 times per sec. -
Page 30: Specifications
05221 Users Manual Battery : 3V battery, CR2032 or equivalent, 3 pieces Low battery indication : " " or " " on LCD Operation temperature : 0°C ~ 40°C , <75%RH Storage temperature : -20°C ~ 60°C , <85%RH Size : 151mm X 65mm X 34mm... -
Page 31: Ac Voltage
05221 Users Manual Functions Range Resolution Accuracy Overrange Indication 300V ± (1.2%+3) ___________ [1] AC Voltage Input impedance: 9M Response: Average, calibrated in rms of sine wave Frequency range: 40Hz~400Hz Max. permitted input voltage: 300Vrms [1] If the voltage being measured is > 300V, the display may show the value of the voltage;... -
Page 32: Dc Voltage
05221 Users Manual Functions Range Resolution Accuracy Overrange Indication 300V ± (1.0%+2) ___________ [1] DC Voltage Input impedance: 9M Max. permitted input voltage: 300Vrms [1] If the voltage being measured is > 300V, the display may show the value of the voltage;... -
Page 33: Ac Current
05221 Users Manual Functions Range Resolution Accuracy Overrange Indication " 1 " shown on display 10mA ± (3.0%+5) " 1 " shown on display 200A 100mA AC Current ± (2.5%+5) ___________ [1] 400A Response: Average, calibrated in rms of sine wave Frequency range: 50Hz~60Hz Max. -
Page 34: Resistance
05221 Users Manual Functions Range Resolution Accuracy Overrange Indication 2000 ± (1.2%+2) " 1 " shown on display Resistance 200k ± (1.5%+2) Functions Range Resolution Description The built-in buzzer will sound If the Continuity test 1Ω resistance is less than about 30 . -
Page 35: Front Panel
05221 Users Manual FRONT PANEL 1. Clamp Jaw Used to clamp the conductor to be measured. To get more accurate reading, the conductor should be in the center of the jaws. 2. Trigger Used to open and close the jaws for AC current measurement. -
Page 36: Operating Instruction
05221 Users Manual 6. Rotary Switch Used to select desirable function and range as well as to turn on /off this meter. 7. "HOLD" Button Press this HOLD button to hold the present reading on the display. " HOLD "... -
Page 37: Measuring Ac Voltage
05221 Users Manual Measuring AC Voltage ● Insert the plug of the black test lead to the "COM" jack, the plug of the red test lead to the " " jack. ● Set the rotary switch to " " position. -
Page 38: Measuring Resistance
05221 Users Manual b. The conductor should be in the center of the area closed by the jaws in order to get an accurate reading. c. Don't touch the conductor with your hand or skin. ● Read the reading on the display. -
Page 39: Measuring For Continuity
05221 Users Manual Before you do in-circuit resistance measurement, make sure that the power of the circuit has been disconnected and all the capacitors have been discharged. Measuring for continuity ● Insert the plug of the black test lead to the "COM" jack, the plug of the red test lead to the "... -
Page 40: Measuring Diode
05221 Users Manual Measuring Diode ● Insert the plug of the black test lead to the "COM" jack, the plug of the red test lead to the " " jack( the polarity of the red test lead is "+"). ●... - Page 41 05221 Users Manual To replace the batteries, remove the screw on the battery door, replace the exhausted batteries with new batteries of the same type(3V battery, CR2032 or equivalent). Refer to the figure, the Plus (" ") side of the batteris must face up. Rejoin the battery door and reinstall the screw.
-
Page 42: General Maintenance
05221 Users Manual GENERAL MAINTENANCE Periodically wipe the case with a damp cloth and mild detergent. Do not use abrasives or solvents. Dirt or moisture in the jacks can affect readings. Clean the jacks as follows: ● Make sure that no object is clamped in the jaws. -
Page 43: Accessories
05221 Users Manual ACCESSORIES Manual: 1 piece Test leads: 1 pair NOTE 1. This manual is subject to change without notice. 2. Our company will not take the other responsibilities for any loss. 3. The contents of this manual can not be used as the reason to use the meter for any special application. - Page 44 S A T A T O O L ( S H A N G H A I ) L I M I T E D 客户服务: 上海市碧波路 号 楼 (邮编: 201203 Customer Service: 3/F, No. 177, Bibo Road, Shanghai. (201203) 电话...
Need help?
Do you have a question about the 05221 and is the answer not in the manual?
Questions and answers