Table of Contents
Advertisement
Quick Links
Advertisement
Chapters
Table of Contents

Related Manuals for SATA DY03005


Summary of Contents for SATA DY03005
- Page 1 NON CONTACT VOLTAGE AC/DC Digital Multimeter 交直流数字万用表 NON CONTACT VOLTAGE DY03005 1.5V DY03005 FUSED 10A FUSED FOR 10 sec MAX 200mA600V 600V MAX EVERY 15min CAT II 600V 中文...
-
Page 3: Table Of Contents
目 录 简介 ..............................安全须知 ............................电器符号 ............................综合规范 ............................面板介绍 ............................技术指标 ............................操作说明 ............................测量直流或交流电压 ........................ 测量直流或交流电流 ........................ 测量电阻 ............................ 二级管测试 ........................... 通断测试 ............................ 测量电池 ............................非接触交流电压探测 ........................火线判断 ............................维护保养 ............................电池和保险丝的更换 ........................附件 ..............................说明 .............................. -
Page 4: 安全须知
DY03005 用户手册 简介 DY03005一款多功能手动量程数字万用表, 可测量交直流电压、 交直流电流、 电阻、 二极管、 电路通断 、 电池、 并具有非接触交流电压探测, 火线判断, LCD背光及手电筒功能。 全量程过载保护, 是一款性能 优越的电工仪表。 本仪器的设计符合IEC 61010, 污染等级2级, 测量种类II ( CATII 600V )。 安全须知 为避免电击和人身伤害, 请遵循以下操作要求: 使用前请检查外壳, 尤其应注意连接器周围的绝缘。 仪器存在破损时, 请勿使用。 ● 检查表笔的绝缘是否有损坏或暴露的金属。 检查表笔是否导通。 ● 如果表笔有损坏, 请更换后再使用。 在测量电阻, 通断, 二极管或温度之前, 先断开被测电路的电源, 并对所有电容充分放电。... - Page 5 DY03005 用户手册 切勿在端子之间或端子与地之间施加超过仪表上所标示的额定电压。 ● 使用前, 通过测量已知电压的方式确认仪器工作正常。 ● 维修时, 只使用指定的更换部件。 ● 对于30Vac有效值、 42Vac峰值或60Vdc以上的电压, 工作时要小心, 这类电压会有电击的危险。 ● 使用表笔时, 应把手指置于表笔上的护指装置之后。 ● 连接时, 先连接公共测试导线, 而后才连接带电的测试导线。 拆除接线时, 先拆带电的测试导线, 而 ● 后才拆除公共测试导线。 打开电池盖或仪器外壳之前, 应先将表笔拆下。 ● 仪器的电池盖或外壳的一部分被拆下或松开时, 切勿使用仪器。 ● 当出现低电池符号 “ ” , 应马上更换电池。 电池电量不足会使仪器读数错误, 从而导致电击或人 ●...
-
Page 6: 电器符号
DY03005 用户手册 电气符号 交流电 地端子 直流电 有双重绝缘或加强绝缘保护 交流或直流 警惕! 有电击危险 警惕! 有危险. 使用前请参阅说明书 符合欧盟指令 综合规范 显示屏: 3 1/2位液晶显示屏, 最大读数1999 存贮温度: -10℃~ 50℃, 相对湿度: < 85% 负极性指示: 负号 “▬” 自动显示在屏幕上 电源: 9V 6F22电池, 1节 IP等级: IP20 电池低电压指示: “ ” 示在屏幕上 采样速率: 2 ~ 3次/秒(近似值) 尺寸:... -
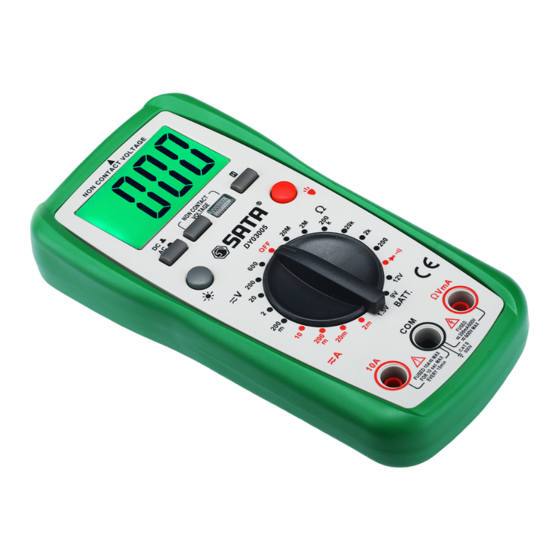
Page 7: 面板介绍
DY03005 用户手册 面板介绍 显示屏 NON CONTACT VOLTAGE 3 1/2位液晶显示, 最大读数1999 “AC/DC” 切换按钮 测量电压或电流时, 该按钮用于选择交流或直流测量功能. 交流电压探测按钮 NON CONTACT VOLTAGE 背光按钮 按该按钮可开启或关闭背光功能。 背光开启约30秒之后将自 DY03005 动关闭。 功能/量程开关 该开关用于选择所需的功能和档位, 也用于开启和关闭电源 。 不使用仪器时, 该开关应置于 “OFF” 位置. “10A” 插孔 1.5V 测量电流(200mA~10A)时, 红色表笔的输入插孔。 “COM” 插孔 黑色(负极性)表笔的输入插孔。 FUSED 10A... - Page 8 DY03005 用户手册 “ΩVmA” 插孔 除了测量大于200mA的电流测量外, 进行其它测量时红色表 笔的输入插孔。 NON CONTACT VOLTAGE 照明按钮 按住该按钮不放可启动照明功能, 松开该按钮则关闭照明功 能。 交流电压探测指示灯 NON CONTACT VOLTAGE “H” 按钮 用于进入或退出数据保持模式。 DY03005 护套 照明灯 1.5V FUSED 10A FUSED FOR 10 sec MAX 200mA600V 600V MAX EVERY 15min CAT II 600V...
-
Page 9: 技术指标
DY03005 用户手册 技术指标 精度在校正后一年内指定, 温度18℃~28℃, 相对湿度: <75%。 精度指标采用的形式: ± ([读数%] + [最低有效数位]) 功 能 量 程 分辨率 精 度 过量程指示 200mV 100µV ±(0.5%+5) 屏幕显示 “OL” 10mV ±(0.8%+5) 直流电压 200V 100mV 600V ±(1.0%+5) 见备注1 输入阻抗: 10MΩ 最大输入电压: 600Vdc 备注1: 当仪表测量超过600V的信号时, 是可以显示实际测量所得的数值, 但可能引起危险。... - Page 10 DY03005 用户手册 功 能 量 程 分辨率 精 度 过量程指示 200mV 100µV ±(1.0%+5) 屏幕显示 “OL” 10mV ±(1.2%+5) 交流电压 200V 100mV 600V 见备注1 频率范围: 40Hz ~ 400Hz 显示: 正弦波有效值(平均值响应) 最大输入电压: 600V ac rms 备注1: 当仪表测量超过600V的信号时, 是可以显示实际测量所得的数值, 但可能引起危险。...
- Page 11 DY03005 用户手册 功 能 量 程 分辨率 精 度 过量程指示 1µA ±(1.0%+5) 20mA 10µA ±(1.0%+5) 屏幕显示 “OL” 200mA 100µA ±(1.5%+5) 直流电流 10mA ±(2.0%+5) 见备注1 过载保护: “ΩVmA” 插孔输入: 250mA/250V快速熔断保险丝 “10A” 插孔输入: 10A/250V快速熔断保险丝 最大被测电流: 10A(持续时间<10秒, 间隔>15分种) 备注1: 当仪表测量超过10A的电流时, 是可以显示实际测量所得的数值, 但可能引起危险。...
- Page 12 DY03005 用户手册 功 能 量 程 分辨率 精 度 过量程指示 1µA ±(1.3%+5) 屏幕显示 “OL” 20mA 10µA ±(1.3%+5) 200mA 100µA ±(1.8%+5) 交流电流 见备注1 10mA ±(3.0%+5) 过载保护: “ΩVmA” 插孔输入: 250mA/250V快速熔断保险丝 “10A” 插孔输入: 10A/250V快速熔断保险丝 最大被测电流: 10A(持续时间<10秒, 间隔>15分种) 频率范围: 40Hz ~ 400Hz 显示: 正弦波有效值(平均值响应)
- Page 13 DY03005 用户手册 功 能 量 程 描 述 测试电流 约20mA 屏幕将显示电池的工作电压, 1.5V 约5mA 从而可以判断电池的质量. 电池测试 约4mA 功 能 量 程 分辨率 精 度 过量程指示 200Ω 0.1Ω 2kΩ 1Ω 20kΩ 10Ω ±(1.2%+5) 屏幕显示 “OL” 电 阻 200kΩ 100Ω 2MΩ 1kΩ 20MΩ...
-
Page 14: 操作说明
DY03005 用户手册 功能 量 程 备 注 开路电压: 约2.8V 液晶屏显示二极管的正向电压降的近似值。 测试电流: 约1mA 二极管测试 如果被测线路的电阻值小于约20Ω, 则内置蜂鸣器会发出响声。 如果被测线路的电阻值大于100Ω, 则蜂鸣器不响。 开路电压: 约2.8V 如果被测线路的电阻值在20Ω和100Ω之间, 则蜂鸣器可能响, 通断测试 也可能不响。 操作说明 数据保持模式 按一下 “H” 按钮, 则当前读数被保持在屏幕上, 同时屏幕出现 “ ” 符号。 再按一下该按钮, 则取消 数据保持功能, “ ” 符号消失。 -11-... -
Page 15: 测量直流或交流电压
DY03005 用户手册 测量直流或交流电压 把黑表笔接到 “COM” 插孔, 红表笔接到 “ΩVmA” 插孔。 把量程开关设在所需的 V档。 如果待测电压的大小范围事先不知道, 则先将量程开关置于最高 档, 然后逐渐往下调, 直到获得满意的分辨力。 按 “AC/DC” 切换按钮, 根据按钮旁的图标提示选择直流或交流电压测量功能。 将表笔跨接在待测电源或电路的两端。 读取读数。 当测量直流电压时, 红表笔连接端的极性也将同时指示。 测量直流或交流电流 把黑表笔连接到 “COM” 插孔。 当待测电流的绝对值小于200mA时, 红表笔接到 “ΩVmA” 插孔。 当 电流的绝对值≥200mA(不能超过10A), 红表笔接到 “10A” 插孔。 将量程开关设到所需的 A档。 如果待测电流的大小范围事先不知道, 则先将量程开关置于最高... -
Page 16: 测量电阻
DY03005 用户手册 测量电阻 将黑表笔接到 “COM” 插孔, 红表笔接到 “ΩVmA” 插孔。 将量程开关设在所需的Ω档。 将表笔跨接到待测电阻的两端。 读取屏幕读数。 注意: 当电阻的阻值大于1MΩ时, 读数可能要数秒才会稳定。 这对于高阻测量是正常的。 当输入端子开路时, 屏幕显示 “OL” 作为过量程指示。 测量之前, 断开待测电路的电源并对所有电容进行充分放电。 二极管测试 把黑表笔接到 “COM” 插孔, 红表笔接到 “ΩVmA” 插孔。 将量程开关设到 位置。 将红表笔接到待测二极管的正极, 黑表笔接到二极管的负极。 从屏幕上读取二极管的正向电压降的近似值。 若表笔接反, 则屏幕显示 “OL” 。 -13-... -
Page 17: 通断测试
DY03005 用户手册 通断测试 把黑表笔接到 “COM” 插孔, 红表笔接到 “ΩVmA” 插孔。 把量程开关设到 档。 把表笔跨接到待测电路的两端。 当电阻低于约20Ω时, 蜂鸣器会产生蜂鸣。 注意: 测量之前, 断开被测电路的电源, 并对所有电容进行充分放电。 测量电池 将黑表笔接到 “COM” 插孔, 红表笔接到 “ΩVmA” 插孔。 根据待测电池的额定电压, 将量程开关设到相应的BATT.档。 将表笔跨接到待测电池的两极。 屏幕将显示电池的工作电压。 -14-... -
Page 18: 非接触交流电压探测
DY03005 用户手册 非接触交流电压探测 按住交流电压探测按钮不放, 把仪表的顶部靠近待测物体。 当仪器探测到交流电压时, 仪器的内置 蜂鸣器将发出不连续声音, 同时交流电压探测指示灯将闪烁。 注意: 由于仪器的探测范围所限, 探测时, 即使蜂鸣器不响, 交流电压探测指示灯不亮, 被测物体也可能 带电, 应避免电击危险。 使用前, 请探测一个已知电压以验证仪器功能正常。 刚按下交流电压探测按钮时, 蜂鸣器可能会响两声, 交流电压探测指示灯会闪烁两次, 这种情况 是正常的, 不影响探测。 为避免电击, 使用时不要用手或皮肤接触任何导体。 -15-... -
Page 19: 火线判断
DY03005 用户手册 火线判断 将表笔的一端插入任一输入插孔, 将表笔的探针直接接触待测电源插座的输出端子。 按住交流电 压探测按钮不放, 当仪器探测到交流电压时, 仪器的内置蜂鸣器将发出不连续声音, 同时交流电压探 测指示灯将闪烁。 注意: 由于仪器的探测范围所限, 测量时, 即使蜂鸣器不响, 交流电压探测指示灯不亮, 被测物体也可能 带电, 应避免电击危险。 使用前, 请探测一个已知电压以验证仪器功能正常。 刚按下交流电压探测按钮时, 蜂鸣器可能会响两声, 交流电压探测指示灯会闪烁两次, 这种情况 是正常的, 不影响探测。 为避免电击, 使用时不要用手或皮肤接触任何导体。 -16-... -
Page 20: 维护保养
DY03005 用户手册 维护保养 除更换电池和保险丝外, 若非合格的专业技师并且拥有足够的校准、 性能测试和维修仪表的相关 说明, 切勿尝试修理或保养仪表。 建议校准周期为12个月。 不使用时, 仪表应存放于干燥、 无强电磁 场的场所。 定期用湿布和少许清洁剂擦拭外壳, 切勿使用磨料或溶剂。 端子若弄脏或潮湿可能会影响读数。 要 清洁端子: 关闭仪表电源并且取下测试导线。 把端子内可能存在的灰尘摇掉。 取一个新棉棒并沾上酒精, 清洁每个输入端子内部。 若仪表出现故障, 首先检查电池和保险丝, 然后查阅本手册以确定仪表的使用方法正确。 -17-... -
Page 21: 电池和保险丝的更换
DY03005 用户手册 电池和保险丝的更换 当屏幕上显示 “ ” 符号, 表示电池的电量不足, 必须立即更换。 将护套取下, 然后卸下电池盖的 螺丝, 打开电池盖。 用新的同型号电池更换旧电池, 确保电池极性正确。 盖好电池盖, 锁好螺丝, 装 好护套。 如果保险丝需要更换, 请将护套取下, 然后卸下后盖上的螺丝。 打开后盖, 轻轻将其移到一旁。 用相 同规格的新保险丝更换烧坏的保险丝。 重新装好后盖和螺丝, 然后装好护套。 本机使用两个保险丝: F1: 250mA/250V快速熔断保险丝 F2: 10A/250V快速熔断保险丝 警 告 为避免因读数错误而导致电击或人身伤害, 当电池低电压符号 “ ” 出现时应立即更换电池。... - Page 22 DY03005 用户手册 开箱检查 表笔: 1付 9V电池(6F22): 1节 说明书: 1本 保修卡: 1张 说明 本公司保留对说明书内容修改的权利。 本公司不负责任何由于使用时引起的其它损失。 本说明书内容不能作为将产品用做特殊用途的理由。 -19-...
- Page 24 TABLE OF CONTENT Introduction ··································································································································································································· Warning ··········································································································································································································· Electrical Symbols ······················································································································································································· Screen Introduction ····················································································································································································· General Specification ················································································································································································· Technical Specification ·············································································································································································· Operating Instruction ················································································································································································· Data Hold Mode ···················································································································································································· Measuring DC or AC Voltage ····························································································································································· Measuring DC or AC Current ···························································································································································· Measuring Resistance ······································································································································································· Continuity Test ·····················································································································································································...
-
Page 25: Introduction
DY03005 Users Manual Introduction This meter is a compact 3 1/2-digit digital multimeter for measuring DC and AC voltage, DC and AC current, resistance, continuity, diode, and battery. In addition, non-contact AC voltage detection, live ac wire detection and illumination functions are also provided. It features polarity indication, data hold, full-range overload protection, and etc. - Page 26 DY03005 Users Manual ● When servicing the meter, use only specified replacement parts. ● Use caution when working with voltage above 30V ac rms, 42V peak, or 60V dc. Such voltages pose a shock hazard. ● When using the probes, keep your fingers behind the finger guards on the probes.
-
Page 27: Electrical Symbols
DY03005 Users Manual Electrical Symbols Direct Current Earth (ground) Terminal Alternating Current Fuse Both direct and alternating current Conforms to European Union directives Caution, risk of electric shock. The equipment is protected throughout by double insulation or reinforced insulation. Caution, risk of danger, refer to the... - Page 28 DY03005 Users Manual Screen Instruction 1. Display 3 1/2-digit LCD, with a max. reading of 1999 NON CONTACT VOLTAGE 2. " AC/DC " Button Used to switch between DC and AC functions. 3. AC Voltage Detection Button NON CONTACT 4. Backlight Button VOLTAGE Press this button to turn on or off the backlight.
- Page 29 DY03005 Users Manual ΩVmA 8. " " Terminal This terminal is a plug-in connector for the red test lead for all measurements except temperature measurements and the current measurements * 200mA. It is also a plug-in connector for the positive NON CONTACT VOLTAGE (+) plug of the K type thermocouple for temperature measurements.
-
Page 30: General Specification
DY03005 Users Manual General Specification Display: 3 1/2-digit LCD, with a max. reading of 1999 Negative Polarity Indication: Negative sign " - " shown on the display automatically Sampling Rate: About 2 - 3 times/sec IP Degree: IP20 Battery: 9V battery, 6F22 or equivalent, 1 pieces Low Battery Indication: "... - Page 31 DY03005 Users Manual Functions Range Resolution Accuracy Overrange Indication 200mV 100µV ±(0.5%+5) 10mV ±(0.8%+5) " OL " shown on display DC Voltage 200V 100mV 600V ___________ [1] ±(1.0%+5) Input Impedance: 10MΩ Max. Allowable Input Voltage: 600V dc [1] If the voltage being measured is >600V,the display may show the value of the voltage,but the measurement is dangerous.
- Page 32 DY03005 Users Manual Functions Range Resolution Accuracy Overrange Indication 200mV 100µV ±(1.0%+5) 10mV " OL " shown on display AC Voltage ±(1.2%+5) 200V 100mV 600V ___________ [1] Frequency Range: 40Hz - 400Hz Response: Average, calibrated in rms of sine wave Max.
- Page 33 DY03005 Users Manual Functions Range Resolution Accuracy Overrange Indication 1µA ±(1.0%+5) 20mA 10µA ±(1.0%+5) " OL " shown on display DC Current 200mA 100µA ±(1.5%+5) 10mA ±(2.0%+5) ___________ [1] Overload Protection: 250mA/250V FAST Fuse (for "ΩVmA" terminal inputs) 10A/250V FAST Fuse (for "10A" terminal inputs) Max.
- Page 34 DY03005 Users Manual Functions Range Resolution Accuracy Overrange Indication 1µA ±(1.3%+5) 20mA 10µA ±(1.3%+5) " OL " shown on display AC Current 200mA 100µA ±(1.8%+5) 10mA ±(3.0%+5) ___________ [1] Overload Protection: 250mA/250V FAST Fuse (for "ΩVmA" terminal inputs) 10A/250V FAST Fuse (for "10A" terminal inputs) Max.
- Page 35 DY03005 Users Manual Functions Range Resolution Test Current 1.5V about 20mA The working voltage of the battery will be shown on the display so that the quality of the about 5mA Battery Test battery can be judged. about 4mA Functions...
- Page 36 DY03005 Users Manual Functions Range Remark Open Circuit Voltage: about 2.8V The approx. forward voltage drop of the diode will be displayed. Diode test Test Current: about 1mA The built-in buzzer will sound if the resistance is less than about 20Ω.
-
Page 37: Data Hold Mode
DY03005 Users Manual Operating Instruction Data Hold Mode Press the " H " button to hold the present reading on the display. " " appears on the display as an indicator. To exit the Data Hold mode, press the button again. "... -
Page 38: Measuring Dc Or Ac Current
DY03005 Users Manual Measuring DC or AC Current Connect the black test lead to the "COM" terminal. Connect the red test lead to the " ΩVmA " terminal if the current to be measured is less than 200mA. If the current is between 200mA and 10A, connect the red test lead to the "10A"... -
Page 39: Measuring Resistance
DY03005 Users Manual Measuring Resistance Connect the black test lead to the "COM" terminal and the red test lead to the " ΩVmA " terminal. Set the range switch to desired Ω range position. Connect the test leads across the object to be tested. -
Page 40: Battery Test
DY03005 Users Manual Battery Test Connect the black test lead to the "COM" terminal and the red test lead to the " ΩVmA " terminal. According to the rated voltage of the battery to be tested, set the range switch to the corresponding BATT. range position. -
Page 41: Live Ac Wire Detection
DY03005 Users Manual Because of the meter's detection limit, a line ( or conductor) under test may be live even if the buzzer does not sound and the AC Voltage Detection Indicator does not light. Before use, verify the meter's operation by detecting a known AC voltage. -
Page 42: Maintenance
DY03005 Users Manual Maintenance Warning Except replacing fuse and battery, never attempt to repair or service the meter unless you are qualified to do so and have the relevant calibration, performance test, and service instructions. Store the meter in a dry place when not in use. Don't store it in an environment with intense electromagnetic field. - Page 43 DY03005 Users Manual Battery and Fuse Replacement Warning To avoid false readings, which could lead to possible electric shock or personal injury, replace the battery as soon as the low battery indicator ( ) appears. To prevent damage or injury, use only replacement fuses specified.
-
Page 44: Unpacking Inspection
DY03005 Users Manual Unpacking Inspection Manual : Test Lead : 1set Warranty Card : 9V 6F22 : Present K Type Thermocouple: 1 piece Note This manual is subject to change without notice. Our company will not take the other responsibilities. - Page 48 S A T A T O O L ( S H A N G H A I ) L I M I T E D 客户服务: 上海市碧波路 号 楼 (邮编: 201203 Customer Service: 3/F, No. 177, Bibo Road, Shanghai. (201203) 电话...
Need help?
Do you have a question about the DY03005 and is the answer not in the manual?
Questions and answers