Advertisement
Quick Links
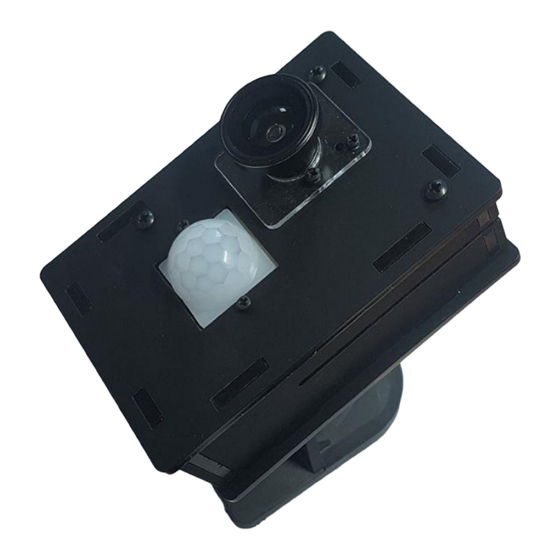
Pi PIR Camera Box Assembly Instructions
The laser-cut parts of the case are protected by an adhesive film which needs to be removed before assembly.
Bill of Materials
Raspberry Pi B+ / 2 / 3
Raspberry Pi Camera
6x black matte acrylic plates
1x thin clear acrylic plates
7x 1/4" black screws
1x 3/16" steel screw
3x 1" M/F hex standoffs
4x 1/4" F/F hex standoffs
6x M2 x 10mm black screw
6x M2 nut
10x M2 washer
2x M5 Screw
2x M5 Nut
4x rubber feet
Optional for wall mounting:
Wall mount
2x M5 screws
2x M5 nuts
Optional:
Magnetic lens
NOTE: Acrylic is a hard and stiff plastic which is sensitive to stress concentrations and shares a certain level of
fragility with glass. Acrylic can scratch easily and should be cleaned with a mild solution of dish detergent and
warm water. Never use cleaners unsuitable for acrylic. Never use a dry, abrasive cloth.
Here are the parts from the case kit:
Advertisement

Subscribe to Our Youtube Channel
Related Manuals for Raspberry Pi PIR


Summary of Contents for Raspberry Pi PIR
- Page 1 Pi PIR Camera Box Assembly Instructions The laser-cut parts of the case are protected by an adhesive film which needs to be removed before assembly. Bill of Materials Raspberry Pi B+ / 2 / 3 Raspberry Pi Camera ...
- Page 2 Follow these images checking parts and orientation of the acrylic pieces. You will see a before and after image for each step. Make sure you have all the parts ready, shown in the before picture. Orientate your Pi to match the above picture and secure the 1" M/F stand offs in the bottom-left, top-left and top- right corners using the 1/4"...
-
Page 3: Optional - Wall Mount
OPTIONAL - Wall Mount Attach the wall mounting bracket to the rear acrylic plate using the two M5 screws and nuts. - Page 4 Now we need to attach the Pi to the rear plate using four 1/4" black screws.
- Page 5 Attach the camera cable to your Pi.
- Page 6 Attach the three jumper wires to the Pi's GPIO pins (colours may vary). Attach a wire to pin Pin 2, another to Pin 6 and the last one to Pin 26.
- Page 7 Next thing to do is attach the side acrylic plates. Make sure you have each of the 4 camera box walls in the correct orientation. The arrows indicate the knotches that will be inserted into the bottom plate.
- Page 8 Now we need to attach our camera modle to the front plate. Start by placing the thin clear acrylic plate into position and insert a M2 x 10mm screw into each corner mounting hole.
- Page 9 Carefully turn the plate over so the ends of the screws are now facing you. Place TWO M2 washers onto each of the screws. Add the camera module...
- Page 10 And finally secure in place using the M2 nuts.
- Page 11 Now we are going to attach the PIR module. Start by inserting the M2 x 10mm screws into each mounting hole from the underside. Add just one washer to each screw.
- Page 12 Add the PIR module. Secure in place using the M2 nuts.
- Page 13 Time to attach our camera cable and jumper wires. With the 3 pins of the PIR module facing you, attach the jumper wires in this order: JUMPER WIRE - PIR MODULE Pin 2 - LEFT...
- Page 14 Pin 6 - RIGHT Pin 26 - MIDDLE Finally secure the top plate into position using the 1/4" black screws. OPTIONAL - Camera Lens...
- Page 15 Be sure to press it on nice an firm so you get a good fit. Now simply place the lens onto the magnetic ring! For information on how to setup your PIR sensor, follow our simple tutorial here.
Need help?
Do you have a question about the PIR and is the answer not in the manual?
Questions and answers