Advertisement
Quick Links
7/1/2019
Setting up your Raspberry Pi
How to set up and start your Raspberry Pi for the rst time
Raspberry Pi
Introduction
Step 1
Here you'll learn about your Raspberry Pi, what things you need to use it, and how to set it up.
https://projects.raspberrypi.org/en/projects/raspberry-pi-setting-up/print
Setting up your Raspberry Pi | Raspberry Pi Projects
Projects
1/34
Advertisement

Related Manuals for Raspberry Pi 4 b


Summary of Contents for Raspberry Pi 4 b
- Page 1 How to set up and start your Raspberry Pi for the rst time Raspberry Pi Introduction Step 1 Here you’ll learn about your Raspberry Pi, what things you need to use it, and how to set it up. https://projects.raspberrypi.org/en/projects/raspberry-pi-setting-up/print 1/34...
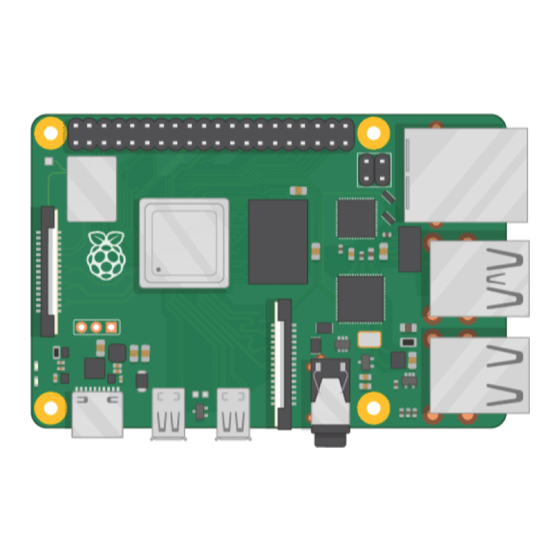
- Page 2 Which Raspberry Pi? There are several models of Raspberry Pi (https:/ /www.raspberrypi.org/products/), and for most people Raspberry Pi 4 Model B is the one to choose. Raspberry Pi 4 Model B is the newest, fastest, and easiest to use. https://projects.raspberrypi.org/en/projects/raspberry-pi-setting-up/print 2/34...
- Page 3 Raspberry Pi Zero and Zero W are smaller and require less power, so they’re useful for portable projects such as robots. It’s generally easier to start a project with Raspberry Pi 4, and to move to Pi Zero when you have a working prototype that a smaller Pi would be useful for.
- Page 4 7/1/2019 Setting up your Raspberry Pi | Raspberry Pi Projects You need a power supply that provides: At least 3.0 amps for Raspberry Pi 4 https://projects.raspberrypi.org/en/projects/raspberry-pi-setting-up/print 4/34...
- Page 5 7/1/2019 Setting up your Raspberry Pi | Raspberry Pi Projects At least 2.5 amps for Raspberry Pi 3 https://projects.raspberrypi.org/en/projects/raspberry-pi-setting-up/print 5/34...
- Page 6 Your Raspberry Pi needs an SD card to store all its les and the Raspbian operating system. You need a microSD card with a capacity of at least 8 GB. Many sellers supply SD cards for Raspberry Pi that are already set up with Raspbian and ready to go. A keyboard and a mouse To start using your Raspberry Pi, you need a USB keyboard and a USB mouse.
- Page 7 HDMI The Raspberry Pi has a HDMI output port that is compatible with the HDMI port of most modern TVs and computer monitors. Many computer monitors may also have DVI or VGA ports. Raspberry Pi 4 has two micro HDMI ports, allowing you to connect two separate monitors.
- Page 8 7/1/2019 Setting up your Raspberry Pi | Raspberry Pi Projects Raspberry Pi 1, 2 and 3 have a single full-size HDMI port, so you can connect them to a screen using a standard HDMI-to-HDMI cable. https://projects.raspberrypi.org/en/projects/raspberry-pi-setting-up/print 8/34...
- Page 9 7/1/2019 Setting up your Raspberry Pi | Raspberry Pi Projects If your screen has a DVI port, you can connect the Pi to it using a HDMI-to-DVI cable. Some screens only have a VGA port. To connect your Pi to such a screen, you can use a HDMI-to-VGA adapter.
- Page 10 A case You may want to put your Raspberry Pi in a case. This is not essential, but it will provide protection for your Raspberry Pi. If you’d like, you can use the o cial case for Raspberry Pi 4 (https:/ /www.raspberrypi.org/...
- Page 11 If you have an SD card that doesn’t have the Raspbian operating system on it yet, or if you want to reset your Raspberry Pi, you can easily install Raspbian yourself. To do so, you need a computer that has an SD card port —...
- Page 12 7/1/2019 Setting up your Raspberry Pi | Raspberry Pi Projects You should see a box linking to the NOOBS les. Click on the box. https://projects.raspberrypi.org/en/projects/raspberry-pi-setting-up/print 12/34...
- Page 13 7/1/2019 Setting up your Raspberry Pi | Raspberry Pi Projects The simplest option is to download the zip archive of the les. Make sure to pay attention to where you save the archive, so that you can nd it again quickly.
- Page 14 7/1/2019 Setting up your Raspberry Pi | Raspberry Pi Projects https://projects.raspberrypi.org/en/projects/raspberry-pi-setting-up/print 14/34...
- Page 15 Setting up your Raspberry Pi | Raspberry Pi Projects Extract NOOBS from the zip archive Next, you will need to extract the les from the NOOBS zip archive you downloaded from the Raspberry Pi website. Find the downloaded archive — by default, it should be in your folder.
- Page 16 7/1/2019 Setting up your Raspberry Pi | Raspberry Pi Projects Now open another Explorer/Finder window and navigate to the SD card. It’s best to position the two windows side by side. Select all the les in the folder and drag them into the SD card window to copy them to the card.
- Page 17 Connect your Raspberry Pi Step 4 Now get everything connected to your Raspberry Pi. It’s important to do this in the right order, so that all your components are safe. Insert the SD card you’ve set up with Raspbian (via NOOBS) into the microSD card slot on the underside of your Raspberry Pi.
- Page 18 7/1/2019 Setting up your Raspberry Pi | Raspberry Pi Projects Note: Many microSD cards come inside a larger adapter — you can slide the smaller card out using the lip at the bottom. Find the USB connector end of your mouse’s cable, and connect the mouse to a USB port on Raspberry Pi (it doesn’t matter which port you use).
- Page 19 Make sure your screen is plugged into a wall socket and switched on. Look at the HDMI port(s) on the Raspberry Pi — notice that they have a at side on top. Use a cable to connect the screen to Raspberry Pi’s HDMI port — use an adapter if necessary.
- Page 20 7/1/2019 Setting up your Raspberry Pi | Raspberry Pi Projects Raspberry Pi 4 Connect your screen to the rst of Raspberry Pi 4’s HDMI ports, labelled HDMI0. You can connect an optional second screen in the same way. https://projects.raspberrypi.org/en/projects/raspberry-pi-setting-up/print 20/34...
- Page 21 7/1/2019 Setting up your Raspberry Pi | Raspberry Pi Projects Raspberry Pi 1, 2, 3 Connect your screen to the single HDMI port. https://projects.raspberrypi.org/en/projects/raspberry-pi-setting-up/print 21/34...
- Page 22 If you want to connect your Raspberry Pi to the internet via Ethernet, use an Ethernet cable to connect the Ethernet port on Raspberry Pi to an Ethernet socket on the wall or on your internet router. You don’t need to do this if you want to use wireless connectivity, or if you don’t want to connect to the internet.
- Page 23 7/1/2019 Setting up your Raspberry Pi | Raspberry Pi Projects If the screen you are using has speakers, ound will play through those. Alternatively, connect headphones or speakers to the audio port if you prefer. https://projects.raspberrypi.org/en/projects/raspberry-pi-setting-up/print 23/34...
- Page 24 Step 5 Your Raspberry Pi doesn’t have a power switch: as soon as you connect it to a power outlet, it will turn on. Plug the USB power supply into a socket and connect it to your Raspberry Pi’s power port.
- Page 25 Setting up your Raspberry Pi | Raspberry Pi Projects First-time startup with NOOBS If this is the rst time you’re starting your Raspberry Pi with an SD card containing NOOBS, you will see the NOOBS installer. This software will walk you through installing the Raspbian operating system (OS).
- Page 26 Click Yes in the warning dialogue box, and then sit back and relax. The Raspbian installation process will take a bit of time. When Raspbian has been installed, click OK. Your Raspberry Pi will restart, and Raspbian will then boot up.
- Page 27 7/1/2019 Setting up your Raspberry Pi | Raspberry Pi Projects After a few seconds the Raspbian Desktop will appear. Finish the setup Step 6 https://projects.raspberrypi.org/en/projects/raspberry-pi-setting-up/print 27/34...
- Page 28 7/1/2019 Setting up your Raspberry Pi | Raspberry Pi Projects When you start your Raspberry Pi for the rst time, the Welcome to Raspberry Pi application will pop up and guide you through the initial setup. Click Next to start the setup.
- Page 29 7/1/2019 Setting up your Raspberry Pi | Raspberry Pi Projects Enter a new password for your Raspberry Pi and click Next. https://projects.raspberrypi.org/en/projects/raspberry-pi-setting-up/print 29/34...
- Page 30 Connect to your WiFi network by selecting its name, entering the password, and clicking Next. Note: if your Raspberry Pi model doesn’t have wireless connectivity, you won’t see this screen. Click Next let the wizard check for updates to Raspbian and install them (this might take a little while).
- Page 31 7/1/2019 Setting up your Raspberry Pi | Raspberry Pi Projects Click Done or Reboot to nish the setup. Note: you will only need to reboot if that’s necessary to complete an update. https://projects.raspberrypi.org/en/projects/raspberry-pi-setting-up/print 31/34...
- Page 32 Setting up your Raspberry Pi | Raspberry Pi Projects Where to nd help Step 7 If you’re having problems with your Raspberry Pi, there are lots of places you can get help and advice: Check out the help section (https:/ /www.raspberrypi.org/help/) and the troubleshooting guide ttps:/ /www.raspberrypi.org/learning/troubleshooting-guide/)
- Page 33 Step 8 Take a look at our Using your Raspberry Pi (https:/ /projects.raspberrypi.org/en/projects/raspberr y-pi-using) guide. Explore what you can do with your Raspberry Pi by creating some of our digital making projects (http /projects.raspberrypi.org), for example: Robot antenna (https:/ /projects.raspberrypi.org/en/projects/robot-antenna) —...
- Page 34 7/1/2019 Setting up your Raspberry Pi | Raspberry Pi Projects Published by Raspberry Pi Foundation (https:/ /www.raspberrypi.org) under a Creative Commons license (https:/ /creativecommons.org/licenses/by-sa/4. 0/). View project & license on GitHub (https:/ /github.com/RaspberryPiLearning/raspberry-pi-setting-up) https://projects.raspberrypi.org/en/projects/raspberry-pi-setting-up/print 34/34...
Need help?
Do you have a question about the 4 b and is the answer not in the manual?
Questions and answers