SCIFIT SXT7000 User Manual
Hide thumbs
Also See for SXT7000:
- Owner's operation manual (36 pages) ,
- Operation manual (32 pages) ,
- User's operation manual (17 pages)

Related Manuals for SCIFIT SXT7000


Summary of Contents for SCIFIT SXT7000
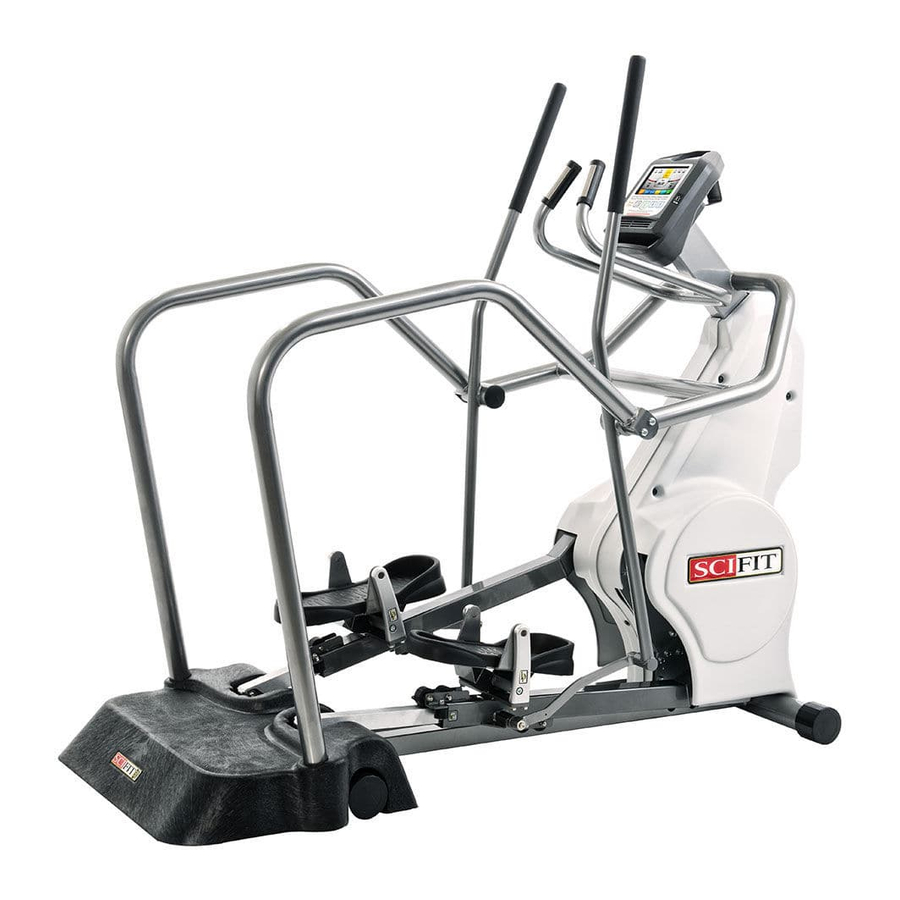
- Page 1 SXT7000/SXT7000E Machine User's Manual Total Body Elliptical All SXT7000, SXT7000E, SXT7001 and SXT7007 models.
- Page 3 United Kingdom All Other EMEA Countries and Distributor Business EMEA* North America Life Fitness UK LTD Bijdorpplein 25-31 SCIFIT Queen Adelaide 2992 LB Barendrecht Ely, Cambs, CB7 4UB 5151 S. 110th E. Avenue THE NETHERLANDS Telephone: General Office (+44) 1353.666017 Tulsa, OK, 74146 U.S.A...
- Page 4 User and Service Documents Link https://lifefitness9512.zendesk.com/hc/en-us https://lfworld.lifefitness.com Additional information is available online using the links above. أعلاه الرابط باستخدام الإنترنت على إضافية معلومات تتوفر 点击上面的链接可在线获取更多信息。 Flere oplysninger er tilgængelige online gennem linket ovenfor. Bijkomende informatie is online beschikbaar via bovenstaande link. Vous trouverez plus d'informations en ligne à...
-
Page 5: Table Of Contents
© Copyright 2021, Life Fitness, LLC. All Rights Reserved. Life Fitness, Hammer Strength, Cybex, ICG and SCIFIT are registered trademarks of Life Fitness, LLC and its affiliated companies and subsidiaries. Brunswick and related trademarks used under license from Brunswick Corporation. Disclaimer: Images and specifications are current as of the date of publication and are subject to change. -
Page 6: Introduction
If warnings are missing or damaged, please contact customer service immediately for replacement warning labels. Warning labels are shipped with every product and should be installed before the product is used. SCIFIT is not responsible for missing or damaged warning labels. - Page 7 • This machine is not intended for use by persons with reduced physical sensory or mental capabilities, or lack of experience and knowledge, unless they have been given supervision or instruction concerning use of the machine by a person responsible for their safety.
-
Page 8: Mantenance
Mantenance Maintenance COMPONENT WHEN Covers, Pedals, Handlebars and Console Damp Cloth Daily Console LCD Screen LCD Screen Wipes Weekly Nuts and Bolts Tighten When Neccessary Bimonthly Telerail Roller Guide Damp Cloth Monthly Battery Refer to “Rotary CNSL Prog. Manual” For Monthly battery Check Instruct. -
Page 9: Assembly
Assembly Attaching The Console NOTE: The console received is model dependent. The following is how to attach either a Standard or HUR-ERGOLINE console. Tools Required: • Phillips Screw Driver or Cordless Drill W/Phillips Bit Components Standard or HUR/ERGO console Screw, M5 x 12mm Phillips HD Qty. - Page 10 HUR/ERGO console NOTE: HUR/ERGO communication cables from the machine and console will be labeled "COMM". Connect these together. Securing the console. Page 8 of 24...
-
Page 11: Machine Relocation
Machine Relocation WARNING: Two people required to lift machine. Lift the rear of the machine until the front transport wheel makes contact on the floor, then move forward. 2. Once placed at the desired location, adjust the front and rear end caps to level the machine. Page 9 of 24... -
Page 12: Attaching Extended Handrails
Attaching Extended Handrails CAUTION: Failure to place the machine on a stable/level surface may result in injury to yourself or others. Level the machine by rotating the front and rear tube end caps. 2. Starting on the left side, use a 7/32" Allen hex bit to remove two 3/8-16 x .75 socket screws on the upper handlebar weldment. - Page 13 3. Place the easy access platform onto the rear cross tube. 4. Position the platform so the telerails are centered between the openings. Page 11 of 24...
- Page 14 5. Insert the rear end of the left handrail into the hole opening of the platform using a back and forth motion. 6. Align the other end of the handrail with the mounting holes of the upper handlebar weldment arm. Page 12 of 24...
- Page 15 7. Loosely reinsert the socket screws removed previously in step 2. 8. Repeat steps 5 thru 7 for the right handlebar. 9. Tighten both left and right handlebar screws. ASSEMBLY COMPLETE Page 13 of 24...
-
Page 16: Features
Features Heart Rate There are two options to track the user's hear rate. The following will describe those options. Option 1: Contact Heart Rate Two metal heart rate grip sensors are located in front of the console. Grasping these grips will allow the console to display the user heart rate on the screen. -
Page 17: Hur-Ergo/Power Entry Connections
HUR-ERGO/Power Entry Connections Serial Number Decal Location Page 15 of 24... -
Page 18: Specifications
Width 32" (81.3 cm) Intelli-Fit Console Contact Heart Rate Grips Cushioned Arm Handles BioFlex Articulating Footpads Leveling End Caps White or Charcoal Covers (Model dependent) Safety Perimeter SXT7000 40” (1 Meter) 40” 40” (1 Meter) (1 Meter) 40” (1 Meter) -
Page 19: Specifications Sxt7000E
Specifications SXT7000E Weight 336 lbs. (152 kg) Maximum User Weight 425 lbs. (193 kg) Power Self generating w/auto recharge battery back-up. Optional Low Voltage AC adapter available. Resistance System Electromagnetic Self Generating Bi-directional Resistance. Programs Manual, Fit Quik, Constant Workout, ISO-Strength, 7- Preprogrammed Hill profiles, Heart Rate, Power Fit, Heart Fit, Stress Test and Random Accuracy Class... -
Page 20: Biomechanical Positioning
Biomechanical Positioning Machine Entry 1. Carefully grab one of the handlebars, then place one foot on a foot pedal and begin to raise yourself upward. 2. As the handles begin to move grab the other, then place your other foot on the foot pedal to stabilize yourself. 3. -
Page 21: Warranty
All terms of this warranty are void if this product is moved beyond the continental borders of the United States of America (excluding Alaska, Hawaii and Canada) and are then subject to the terms provided by that country’s local authorized SCIFIT representative. -
Page 22: How To Get Replacement Parts And Service
How to get replacement parts and service Refer to the front of this manual for your local service contact information. Reference your name, address and the serial number of your Product. They will tell you how to get a replacement part, or, if necessary, arrange for service where your Product is located. Exclusive Warranty THIS LIMITED WARRANTY IS IN LIEU OF ALL OTHER WARRANTIES OF ANY KIND EITHER EXPRESSED OR IMPLIED, INCLUDING BUT NOT LIMITED TO THE IMPLIED WARRANTIES OF MERCHANTABILITY AND FITNESS FOR... - Page 23 NOTES Page 21 of 24...
- Page 24 NOTES Page 22 of 24...
- Page 25 NOTES Page 23 of 24...
- Page 26 P4769C 2021 www.scifit.com...
Need help?
Do you have a question about the SXT7000 and is the answer not in the manual?
Questions and answers