Speakerbus ALTO User Manual
Hide thumbs
Also See for ALTO:
- Quick start manual (2 pages) ,
- Quick start manual (2 pages) ,
- Frequently asked questions (3 pages)

Related Manuals for Speakerbus ALTO


Summary of Contents for Speakerbus ALTO
- Page 1 User Guide ALTO Revision 1 Published Date: 21 July 2021 Guide Reference: UG704/R1 speakerbus.com...
- Page 2 Statement of Conditions Speakerbus reserves the right to make changes to the products described in this document without notice. Speakerbus Technology Limited does not assume any liability that may occur due to the use or application of the product(s) describes herein.
-
Page 3: Table Of Contents
ALTO (iD704) User Guide Contents Introduction......................... 7 Features ................................. 7 About this guide ..............................9 Product version ..............................9 Further help ................................9 Getting Started ........................11 What’s in the box..............................11 Optional Speakerbus accessories ........................11 Attaching the optional gooseneck microphone ..................11 Stand adjustment .............................. 12 Connecting an Ethernet cable and optional handset/headset ............... - Page 4 ALTO (iD704) User Guide Push to latch .................................. 32 Tap latch ..................................33 Make a call private ............................33 Group talk ................................34 Adjust the volume of a speaker channel or master volume ..............34 Mute/unmute a speaker channel ........................35 Mute all speaker channels ..........................36 Menu ...........................37...
- Page 5 ALTO (iD704) User Guide Voice Services ................................73 Key Properties ................................75 General Settings ................................76 Voice Recording ................................78 Status ....................................80 General Tab ................................80 Links Tab ................................... 83 Statistics ..................................83 Maintenance .................................. 83 Backup and Restore ............................... 84 Default ..................................
- Page 6 ALTO (iD704) User Guide...
-
Page 7: Introduction
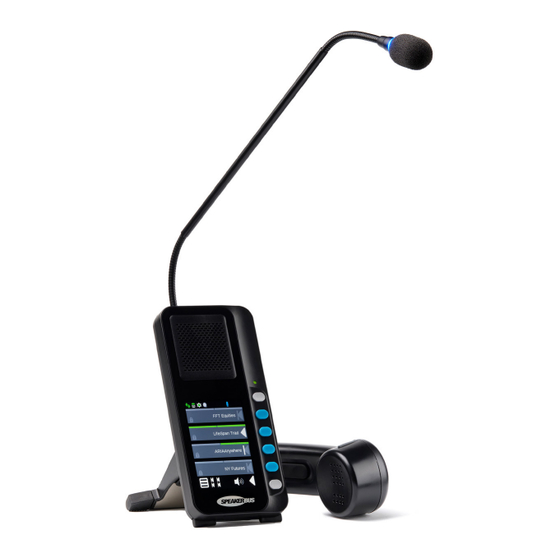
Powered using PoE technology ALTO can run in either hosted or standalone mode. ALTO’s menus give access to all the Speakerbus voice services that the user is permissioned to access and allows any four to be selected and assigned to individual speaker channels. Channels may be re-assigned by the user at any time. - Page 8 Two Fixed keys (Info / Clear) Two fixed keys for ALTO user information and to clear all open, to talk, voice services assigned to the four speaker channel keys. Individual and Master Volume Controls Individually configurable volume controls for each speaker channel and for the master volume.
-
Page 9: About This Guide
This guide explains how to use ALTO when managed by Speakerbus iManager Communications Management System (iCMS) in hosted mode; this is ALTO’s out of the box configuration. To use ALTO in stand alone mode, see Engineering Tools on page 55 and Appendix B - Embedded Web Browser on page 63. - Page 10 ALTO (iD704) User Guide...
-
Page 11: Getting Started
● RJ9 to RJ12 Headset adapter (Sales Code: 10-04-087) Attaching the optional gooseneck microphone To attach the optional Speakerbus gooseneck microphone: 1. Open the stand to 90 degrees using the push to release button on the rear, see Stand adjustment on page 12. -
Page 12: Stand Adjustment
ALTO (iD704) User Guide Stand adjustment ALTO’s adjustable stand can be set to one of four positions using the stand release mechanism (push to release) button on the rear. Stand Release Mechanism (push to release) The four positions are shown in the illustrations below. -
Page 13: Connecting An Ethernet Cable And Optional Handset/Headset
(RJ12) (RJ45) Logging on ALTO, out of the box, is set in hosted mode to be managed by a Speakerbus iManager Centralised Management System (iCMS) which is indicated by an on screen iCMS Status indicator . If either are displayed, see Status indicators on page 20. - Page 14 ALTO (iD704) User Guide To log on to ALTO: 1. Touch the white text entry field below ID. 2. Enter your ID using the alphanumeric keypad. Touch the shift softkey to rotate between the lower case, upper case and numeric only keypad.
- Page 15 ALTO (iD704) User Guide 4. Touch the white text entry field below Password. 5. Enter your password using the alphanumeric keypad. Touch the shift softkey to rotate between the lower case, upper case and numeric only keypad. 6. Once you have entered the Password touch the confirm softkey...
-
Page 16: Logon Invalid
ALTO (iD704) User Guide 7. Touch the confirm softkey to logon. Logon invalid Check your ID is correctly entered and re-enter the password by touching the white text entry field below Password, see Logging on on page 13. Touch the confirm softkey to logon. -
Page 17: Logging Out
ALTO (iD704) User Guide Logging out To log out of ALTO: 1. Touch the menu select softkey located at the bottom left of the touchscreen. This displays several menu options (see below). 2. Touch the Logout softkey 3. Touch the confirm softkey... - Page 18 ALTO (iD704) User Guide...
-
Page 19: Alto Elements
Menu ALTO Front View: ● Speaker. ● Status indicators. ALTO’s network status, iCMS status, SIP registrar status, recording configuration status, microphone type, gooseneck microphone levels within acceptable limits and handset active, see Status Indicators on page 20. ● 4 x Speaker Channels. Each channel contains: ●... -
Page 20: Rear View
ALTO (iD704) User Guide Rear view Gooseneck Microphone Interface (phono) Handset Network Interface Interface (RJ12) (RJ45) Status LED’s 6 PIN Serial Port (Diagnostics) Stand Release Mechanism (push to release) ALTO Rear View: ● Gooseneck Microphone Interface (phono). ● Handset Interface (RJ12). -
Page 21: Network Status
Indicates the iCMS connection is good, ALTO is configured in hosted mode. Warning Indicates ALTO is out of sync, there is a SIP configuration issue or a restart is required to apply some settings (animated while processing XML files received from iCMS). -
Page 22: Microphone Type
ALTO (iD704) User Guide State State Explanation No user / Indicates ALTO is logged out or running in stand alone mode. stand alone 5. Microphone Type State State Explanation Open Mic. Indicates the internal open microphone is the current audio source. -
Page 23: Channel Indicators
ALTO (iD704) User Guide Channel indicators Two virtual LEDs are associated with each speaker channel, displayed in the thin bar above each of the four speaker channels, see Call state indicators on page 25. Speaker Channel Indicators Indicator Call State Idle. -
Page 24: Contextual Softkeys
Contextual Softkeys Softkey Function Menu select, when touched displays the top level ALTO configuration menu, see Menu on page 37. Group Talk, initiates a group talk. When touched all linked speaker channels become active allowing talking to several speaker channels simultaneously. To configure this softkey, see Group Talk on page 39. -
Page 25: Call State Indicators
ALTO (iD704) User Guide Call state indicators Channel Indicators Left Call Right Call State Indicator State Indicator The channel speaker status indicators display the speaker channel’s voice service status. Left call Right Explanation Channel Channel state call state indicators indicators... - Page 26 ALTO (iD704) User Guide Left call Right Explanation Channel Channel state call state indicators indicators indicator indicator VAD on VAD off Broadcast in listen-only state, no talk permission. Flashing If channel If channel muted muted Slow flashing Slow flashing Broadcast on handset in listen-only state, no talk permission.
- Page 27 ALTO (iD704) User Guide Left call Right Explanation Channel Channel state call state indicators indicators indicator indicator VAD on VAD off MRD or broadcast talk attempt; note this differs from ARD in that no connecting Flashing icon is shown. If a talk attempt is...
-
Page 28: Privacy Call State Indicators
ALTO (iD704) User Guide Left call Right Explanation Channel Channel state call state indicators indicators indicator indicator VAD on VAD off MRD or broadcast talk attempt; note this differs from ARD in that no connecting Flashing icon is shown. If a talk attempt is... -
Page 29: Touchscreen Gestures
Held here Held elsewhere To make a call private, see page 33. Touchscreen gestures ALTO supports several context dependant touchscreen gestures: ● Swipe up/down touch gestures. ● Swipe left/right touch gestures. ● Swipe arc touch gesture. ● Two finger touch gesture. -
Page 30: Swipe Left/Right Touch Gestures
ALTO (iD704) User Guide Swipe left/right touch gestures When in the volume adjustment screen (see page 34 or Swipe arc touch gesture below) the left/right finger gesture adjusts individual volume levels or the master volume level. Swipe arc touch gesture The volume adjustment screen (see page 34) can be accessed using an elliptical clockwise or anticlockwise gesture. -
Page 31: Speaker Channels
ALTO (iD704) User Guide Speaker Channels This section explains how to: ● Talk on a speaker channel, see page 31. ● Make a call private, see page 33. ● Group talk, see page 34. ● Adjust the volume of a speaker channel or master volume, see page 34. -
Page 32: Push To Talk
ALTO (iD704) User Guide Speaker Channel 1 Talk Key Speaker Channel 2 Talk Key Speaker Channel 3 Talk Key Speaker Channel 4 Talk Key Clear / Cancel Key Push to talk The push to talk mode is the default setting for speaker channel talk keys. -
Page 33: Tap Latch
ALTO (iD704) User Guide Tap latch ● Please ensure latching is enabled on the speaker channel. For more information, see Edit Speaker Key on page 48. ● Please ensure Tap latch is set, see Speaker Settings on page 51. ●... -
Page 34: Group Talk
ALTO (iD704) User Guide Group talk Group Talk The group talk softkey is used to talk simultaneously onto multiple speaker channels, to configure see Group Talk on page 39. To talk on a group call touch and hold down on the group talk softkey. Release when finished talking. -
Page 35: Mute/Unmute A Speaker Channel
ALTO (iD704) User Guide To adjust the volume levels of individual speaker channels or the master volume touch the volume menu softkey or use a swipe arc touchscreen gesture, see Touchscreen gestures on page 29. Speaker Channel 1 Volume Control... -
Page 36: Mute All Speaker Channels
ALTO (iD704) User Guide Mute all speaker channels Mute All Speaker Channels Softkey To mute the volume of all speaker channels touch the bottom mute all softkey There is no equivalent overall unmute. -
Page 37: Menu
Speaker Dipping. This option is used to edit speaker dipping settings such as local dipping type, dipping level and audio restore delay, see Speaker Dipping on page Send Logs. This option is used to send ALTO diagnostic logs to a TFTP server, see Send Logs on page 53. -
Page 38: Voice Services
The voice services option is used to assign voice services to speaker channel keys. A maximum sixteen voice services can be registered to ALTO but only four can be assigned to ALTO’s four speaker keys. Voice services assigned to speaker channels can be added to group talk, see Group Talk on page 39. -
Page 39: Group Talk
Group Talk The group talk option is used to assign up to four speaker channels to the group talk softkey located on ALTO’s default page. When the group talk softkey is touched all linked speaker channels become active allowing talking to several speaker channels simultaneously. -
Page 40: Assign Speaker Channel(S) To Group Talk
Assign Speaker Channel(s) to Group Talk To assign (add) speaker channel(s) to group talk: 1. Touch the menu select softkey located on ALTO’s default screen. 2. Touch the voice services softkey . This displays the group talk add/delete screen. 3. Touch ‘Add/Delete’. This will display the select channels screen. -
Page 41: Unassign Speaker Channel(S) From Group Talk
Unassign Speaker Channel(s) from Group Talk To unassign (delete) speaker channel(s) from group talk: 1. Touch the menu select softkey located on ALTO’s default screen. 2. Touch the voice services softkey . This displays the group talk add/delete screen. 3. Touch ‘Add/Delete’. This will display the select channels screen. In the scenario below... -
Page 42: Group Talk Edit
Group Talk Edit To edit group talk: 1. Touch the menu select softkey located on ALTO’s default screen. 2. Touch the voice services softkey . This displays the group talk add/delete screen. 3. Touch the edit. This displays the group talk edit screen. -
Page 43: Speaker Keys
The speaker keys option is used to assign (add), unassign (delete) and move voice services on speaker channel keys and to set latching/priority on each speaker key. A maximum sixteen voice services can be registered to ALTO but only four can be assigned to ALTO’s four speaker keys. -
Page 44: Add Speaker Key
ALTO (iD704) User Guide To configure speaker keys: 1. Touch the menu select softkey located on ALTO’s default screen. 2. Touch the speaker keys softkey . This displays the speaker keys add/delete/move/edit screen. Add Speaker Key To add (assign) a speaker key: 1. -
Page 45: Delete Speaker Key
Press the speaker key to the right of the speaker channel to add a speaker key. Delete Speaker Key To delete (unassign) a speaker key: 1. Touch the menu select softkey located on ALTO’s default screen. 2. Touch the speaker keys softkey . This displays the speaker keys add/delete/move/edit screen. -
Page 46: Move Speaker Key
Speaker Key 3 Speaker Channel 4 Speaker Key 4 Move Speaker Key To move a speaker key: 1. Touch the menu select softkey located on ALTO’s default screen. 2. Touch the speaker keys softkey . This displays the speaker keys add/delete/move/edit screen. - Page 47 ALTO (iD704) User Guide 3. Touch ‘Move’. This displays the select channel screen. 4. Touch a speaker channel to move. Press the speaker key to the right of the speaker channel to move. Speaker Channel 1 Speaker Key 1 Speaker Channel 2...
-
Page 48: Edit Speaker Key
ALTO (iD704) User Guide Edit Speaker Key To edit a speaker key: 1. Touch the menu select softkey located on ALTO’s default screen. 2. Touch the speaker keys softkey . This displays the speaker keys add/delete/move/edit screen. 3. Touch ‘Edit’. This displays the select channel screen. - Page 49 The available priority levels are 1, 2, 3 and 4. Priority is also used to determine the channel priority if a CB microphone is plugged into the handset port of ALTO. ● ALR. Audio Level Reduction is only available when Priority is set between 2-4. This option is used to set the amount of automatic volume level reduction to apply to a voice service assigned to the key when used in conjunction with Priority.
-
Page 50: User Settings
ALTO. The options are Trader 1, Trader 2 and Office. ● Trader 1. This setting removes all background sound during a call at the far end when an ALTO caller is not talking. The far end caller hears silence when the ALTO caller stops speaking. -
Page 51: Speaker Settings
2. Touch the user settings softkey . This displays the following options: ● Master Volume. This option is used to enable/disable ALTO’s touch screen master volume slider. ● Ring On Busy. This option is used to enable/disable ring on busy for MRDs. When disabled... -
Page 52: Speaker Dipping
● Microphone. This option refers to a gooseneck/internal microphone. When it is selected audio is transmitted from the gooseneck/internal microphone. ● Handset. This option refers to the handset port which is located at the back of ALTO. When its is selected audio is transmitted and received on the handset. -
Page 53: Send Logs
. This displays the following options: ● Local Dipping. The options are Off, Duplex or Simplex. ● Duplex. This type of dipping is used to dip the volume level of ALTO’s channels in monitor mode when another channel is set to talk mode. -
Page 54: Resynchronisation
Resynchronisation The resynchronisation option is used when ALTO is out of sync with iCMS (iManager Centralised Management System) when the iCMS status icon is yellow, see Status Indicators on page 20. Resyncing ALTO will clear down any active calls. -
Page 55: Engineering Tools
Administrator. To access engineering tools: 1. Touch the menu select softkey located on ALTO’s default screen. 2. Touch the engineering tools softkey 3. Touch the white text entry field below Password. 4. Enter your password using the alphanumeric keypad. Touch the shift softkey to rotate between the lower case, upper case and numeric only keypad. -
Page 56: Information
Log settings including network trace, network, CMSIF, ControlTask, DspProc, MTFIF, QModule, UI and watchdog details. Audio test. Touchscreen test. Information The speaker settings option is used to view ALTO system information such as software version, network, iCMS, iCS, recording and speaker statuses. - Page 57 ALTO (iD704) User Guide To access information: 1. Touch the menu select softkey located on ALTO’s default screen. 2. Touch the information softkey Softkey Function Software versions. Network status. iCMS (iManager Centralised Management System) status. iCS (iManager Communications Server) status.
- Page 58 ALTO (iD704) User Guide...
-
Page 59: Appendix A - Safemode
This appendix explains how to configure the iManager Centralised Management System (iCMS) communications server IP Address for ALTO when in hosted mode. Out of the box ALTO is configured to auto-discover your organisation’s iCMS communications server and should not be modified unless you have multiple iCMS communication servers or need to point ALTO to specific iCMS communications server(s) on your organisation’s network. - Page 60 ALTO (iD704) User Guide 3. Once you have entered the ID touch the confirm key 4. A Password is not required. 5. Touch the confirm key to logon to safemode. 6. To exit Engineering Tools/safemode touch the back softkey The following table describes each sub menu. Touch an icon to enter the sub menu, make...
- Page 61 ALTO (iD704) User Guide Softkey Function Traceroute test. Load factory default settings. IP settings including dynamic (DHCP) and static IP address, domain name, network mask, gateway address, DNS server address and localhost name. iCMS (iManager Centralised Management System) primary and secondary address and iCMS port number.
- Page 62 ALTO (iD704) User Guide...
-
Page 63: Appendix B - Embedded Web Browser
To access the web browser you will require either ALTO’s IP address or domain name. Info Key To retrieve ALTO’s IP address:... -
Page 64: Logging In/Out
Logging in/out Logging In To log into the ALTO web browser: 1. Type ALTO’s IP address or domain name into the web browser. This displays an information page. The supported web browsers are: Internet Explorer, Edge, Chrome and Firefox. 2. When you have read the information, select Continue, which is located in the bottom right hand corner of the web page. -
Page 65: Logging Out
ALTO (iD704) User Guide There are two login options available: Administrator and Guest. Administrator gives full configuration access to ALTO, and Guest gives viewing access. Although it is possible to make changes using Guest access, it is not possible to apply the changes. -
Page 66: Menu
This is the default landing page, once logged in, which displays ALTO’s unit model (iD704) and the web browser software version. Users This page allows you to set up or edit the various security features within the ALTO. It contains... -
Page 67: Seat User
Password, Configure Web Password, Configure Web Password Expiry and Install Web Certificate. Seat User This option is used to seat a user or to edit the username and password for logging into ALTO. Username and password must be between 1 and 20 characters in length. -
Page 68: Configure Engineering Tools Password
ALTO (iD704) User Guide Configure Engineering Tools Password This option is used to set the engineering tools password to access engineering tools via ALTO’s touch screen menu, see Engineering Tools on page 55. To set a new password: 1. Select the Configure Engineering Tools Password option. -
Page 69: Configure Web Password Expiry
The default values are password expiry enabled and 30 days password expiry period. ● Enable password expiry. This option allows you to enable the password expiry feature. When enabled ALTO will automatically require a new password for both Guest and Administrator accounts after the password expiry period has been reached. -
Page 70: Network Services
2. After making changes to these settings press the Apply button. Network Services This page allows you to configure all the network settings within ALTO. ALTO requires a restart when the following network settings are changed: IP address, local host name and local domain name. - Page 71 ALTO will attempt to use the IP address previously obtained through DHCP, if any. If this does not exist ALTO will check to see if a static IP address has been set up, and use this as a last resort.
- Page 72 DHCP server. If it is not selected you can enter a domain name manually using the Local domain name text box. ● IP address - This option is used to manually enter the primary IP address of the ALTO. ● IP netmask. This option is used to manually enter the netmask details.
-
Page 73: Voice Services
Voice Services This page allows you to configure up to sixteen SbRTP/RTP/DMVS voice service channels. This page is hidden when the web interface is locked or when ALTO is managed by a Speakerbus iManager Centralised Management System (iCMS) in hosted mode. - Page 74 ● Ring on Busy. This option is used to enable/disable the Manual Ring Down (MRD) ring on busy function. When enabled ALTO will ring when it receives ringing signalling for an MRD call that is currently seen as busy-elsewhere.
-
Page 75: Key Properties
ALTO (iD704) User Guide Key Properties This page allows you to assign voice services to the four ALTO keys. Voice services can also be assigned using ALTO’s touch screen user interface menu, see Add Speaker Key on page 44. This page is hidden when the web interface is locked or when ALTO is managed by a Speakerbus iManager Centralised Management System (iCMS) in hosted mode. -
Page 76: General Settings
This page allows you to configure SbRTP, Group Talk latching/muting, speaker settings and general audio settings. This page is hidden when the web interface is locked or when ALTO is managed by a Speakerbus iManager Centralised Management System (iCMS) in hosted mode. - Page 77 Latching Mode option on page 77. ● Group Talk Muting. This option is used to enable/disable group talk muting. When enabled all speakers assigned to a group talk will be muted locally on ALTO for the duration of an active group talk.
-
Page 78: Voice Recording
Voice Services on page 73. This page is hidden when the web interface is locked or when ALTO is managed by a Speakerbus iManager Centralised Management System (iCMS) in hosted mode. - Page 79 Configurations on page 71. iManager Call Data Server (iCDS) is middleware which handles call data records (CDR), allowing third party devices such as voice recorders or call loggers to receive the call data records. The following are for reference only and cannot be modified within ALTO’s web interface.
-
Page 80: Status
After making changes to these settings press the Apply button. Status This page displays the various statuses of ALTO. There are two tabs: General and Links. The page needs to be refreshed (by pressing <F5> keyboard key) to check for changes in the status data. - Page 81 ALTO (iD704) User Guide Network Status Using DHCP ● Using. This displays whether ALTO is using DHCP or a Fixed IP address. For a description or to make changes to the settings below, see Network Settings on page 66. ● DHCP status.
- Page 82 ● SIP operation. This displays the status of the Speakerbus iManager Communications Server (iCS) service which will be either Enabled or Disabled. If enabled ALTO is being managed by a Speakerbus iManager Centralised Management System (iCMS) in hosted mode using an iCS and changes cannot be made to settings within the web interface.
-
Page 83: Links Tab
The location is displayed as Unknown when ALTO is in standalone mode. ● Local muting mode. This displays ALTO’s local muting/dipping mode as a value. 0 is Off, 1 is Duplex and 2 is Simplex. To make changes to this, see Speaker Dipping on page 77. -
Page 84: Backup And Restore
ALTO (iD704) User Guide Backup and Restore This option is used to back up and save ALTO’s settings (using the Backup the Configuration option) which can be restored (using the Restore and Configuration option) at a later time. The TFTP (trivial file transfer protocol) server IP address and TFTP server port number need to typed in TFTP Server IP Address and TFTP Server Port. -
Page 85: Reboot
It needs to be typed into the File name text box. Then press the Apply button to start the upgrade. Reboot This option is used to reboot ALTO. To reboot select the Reboot checkbox and press the Apply button. - Page 86 ALTO (iD704) User Guide...
-
Page 87: Appendix C - Specifications
ALTO (iD704) User Guide Appendix C - Specifications Touchscreen Display ● LCD multicolour touch screen display providing softkey and single touch gesture control. ● 480 x 320 pixels (164 PPI) 3.5 portrait Speaker Channels ● Up to 4 simultaneous audio streams Call Types ●... -
Page 88: System Management
● Built-in open microphone ● Built-in loudspeaker ● Optional: ● Speakerbus pluggable gooseneck microphone with LED (52-09-034). Close talking, noise cancelling. Dimensions: 550 x 8.5mm (21.6 x 0.33 in) ● Speakerbus handset, noise cancelling (SE HSETM-D) ● Third party handset / headset Support Voice Characteristics ●... -
Page 89: Dimensions / Weight
ALTO (iD704) User Guide Dimensions / Weight ● Width: 84mm ● Stand Width: 109mm ● Height: 182mm ● Depth: 38mm ● Stand Depth: 49mm ● Weight: 400g... -
Page 90: Power Requirements
Power Requirements ● PoE Class II IEEE 802.3at ● Maximum: 12.95 watts ● Local PSU option if required with multi span adaptor, Speakerbus Sales Code: iD POE Environmental ● Operating temperature 0°C – 35°C (32°F- 95°F) ● Relative humidity 10% - 95% RH, non-condensing ●... - Page 91 ALTO (iD704) User Guide...
- Page 92 © Speakerbus Technology Limited 2021 Registered Office: Ground Floor, Hanover House, Britannia Road, Queens Gate, Waltham Cross, Hertfordshire, EN8 7TF Registered in England No: 4415859...
Need help?
Do you have a question about the ALTO and is the answer not in the manual?
Questions and answers