Table of Contents
Advertisement
Quick Links
Advertisement
Table of Contents

Related Manuals for KYE Systems Corp. Genius GHT-510D


Summary of Contents for KYE Systems Corp. Genius GHT-510D
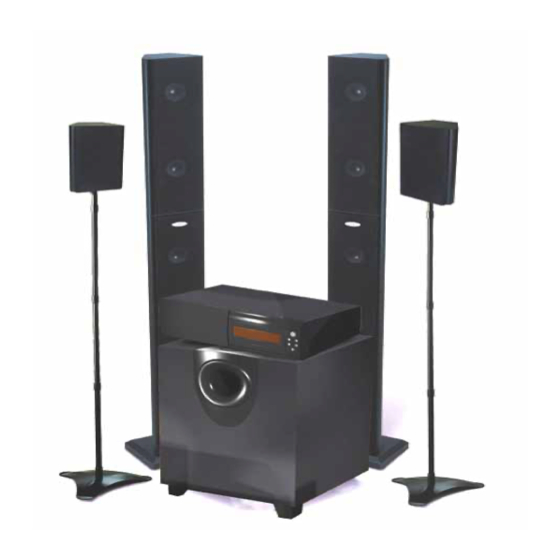
- Page 1 GHT-510D...
-
Page 2: Table Of Contents
ervice GHT-510D uide Table of Contents ................................. 4 ................................4 ................................5 Problems Descriptions .............................. 5 Solutions of the problems............................5 ...... 9 ........... 9 Disassemble & Assemble the Fuse..........................9 Disassemble & Assemble the Rear Cover....................... 10 Disassemble & Assemble Amplifier PCBA(SUB)....................11 Disassemble &... -
Page 3: R E T U R N S
ervice GHT-510D uide ........................20 ................21 ....................22 SUBWOOFER ................................ 22 Front..................................22 Rear ..................................22 Center..................................23... -
Page 4: O V E R V I E W
ervice GHT-510D uide Receiving Defective Speaker From Customer Verify problems & Proceeding necessary tests Function NG Analyzing possible malfunction causes Deciding & proceeding the rectification methods Function NG Function OK Replacing necessary defective parts Test the speaker if it works normally Function OK Return the speaker with proper repacking to... -
Page 5: P R O B L E M S
ervice GHT-510D uide Problems Descriptions 1 No Power 2 No Display 3 SW Malfunction 4 Noise 5 No Sound 6 Remove control does not work Solutions of the problems No Power Problem No Power Analyze the Signal Fuse Electronic Problem Cable(9P) Identify the Defective... - Page 6 ervice GHT-510D uide No Display Problem No Display Analyze the Mechanical Electronic Problem Identify the Defective Defective Defective Problem Causes Display Decoder Cable Monitor board Solution Replace Replace Replace Display Decoder Cable Monitor board SW Malfunction Problem SW Malfunction Analyze the Mechanical Electronic Problem...
- Page 7 ervice GHT-510D uide Noise Problem Noise Analyze the Speaker Electronic Problem Identify the Defective Defective Defective Defective Problem Causes Speaker Amplifier Main Board Board Solution Replace Replace Replace Replace Speaker Amplifier Main Board Board No Sound Problem No Sound Electronic Analyze the Problem Identify the...
- Page 8 ervice GHT-510D uide Remote Control does not work Problem Remote Control does not work Analyze the Mechanical Electronic Problem Identify the Defective Defective Defective Problem Causes Connection Emitter of Receiver of the remote batteries control Solution Replace Replace Replace Spring Emitter Receiver...
-
Page 9: H O W T O A S S E M B L Y A N D D I S A S S E M B L Y T H E S P E A K E R
ervice GHT-510D uide Disassemble & Assemble the Fuse Step 1 Use a screwdriver to turn counterclockwise and open the fuse’s cap. Fuse Step 2 Get the Fuse and replace it with the same rate. Step 3 To install the Fuse, reverse the steps shown above. -
Page 10: Disassemble & Assemble The Rear Cover
ervice GHT-510D uide Disassemble & Assemble the Rear Cover Step 1 figure 2.2.1. Using screwdriver to loose 12 screws. After taking all screws off, you can take up the Rear cover. To install the rear cover, reverse the steps shown above. -
Page 11: Disassemble & Assemble Amplifier Pcba(Sub)
ervice GHT-510D uide Disassemble & Assemble Amplifier PCBA(SUB) Step 1 *Disassemble the Rear Cover first. Disconnect the cables & wires *Mark the position of cables & wires Wires Cables Amplifier PCBA Step 2 To loose 2 screws.(A & B) Step 3 To loose 2 screws. -
Page 12: Disassemble & Assemble The Power Supply Pcba
ervice GHT-510D uide Disassemble & Assemble the Power Supply PCBA Step 1 P.S. *Disassemble the Rear Cover PCBA first. Disconnect the cable. cable wires Step 2 To loose 5 screws. First B-C-D and then A & E. Step 3 To suck the solder-point of the wires on Power Supply PCBA. -
Page 13: Disassemble & Assemble The Center Speaker
ervice GHT-510D uide Disassemble & Assemble the Center Speaker Step 1 To turn over the center speaker. Using a tweezers to remove the rubber pads. Using a screwdriver to remove 5 screws. (from A to E) Step 2 Remove the covers Step 3 Remove 4 screws. -
Page 14: Disassemble & Assemble The Main Board
ervice GHT-510D uide Disassemble & Assemble the main board Step 1 Do the disassembling steps 1 & 2 of the Center Speaker Step 2 To loose the 2 screws A & B. Step 3 To loose the 2 screws C & D. Remove the main board. -
Page 15: Disassemble & Assemble The Decoder Board
ervice GHT-510D uide Disassemble & Assemble the Decoder board Step 1 Remove the main board. Step 2 Use tweezers to remove the fixed glue. And then use your hands to separate decoder board from main board. *To install the decoder board, reverse the steps shown above. -
Page 16: Replace The Mpu
ervice GHT-510D uide Replace the MPU Step 1 Locate the MPU on the main board. Step 2 Unsolder the MPU. Remove the MPU. *To install the MPU, reverse the steps shown above. -
Page 17: Replace The Oscillator
ervice GHT-510D uide Replace the Oscillator Step 1 Locate the Oscillator on the main board. Oscillator Step 2 Unsolder the Oscillator. Remove the Oscillator Oscillator. *To install the Oscillator, reverse the steps shown above. -
Page 18: C H G H Td
ervice GHT-510D uide Step 1 Connecting the GHT-510D to a DVD or VCD player. Play a music CD on it. Step 2 Power on the GHT-510D. The monitor should display ‘321’ then ‘0db’. LED display ‘C’, ’L’, ’C’, ’SUB’, ’LS’, ’RS’, ’Digital’, ’Coaxial’, ’Lock’. Step 3 Press the volume +/- button if it changes the volume level of each channel. -
Page 19: I M P O R T A N T N O T E S
ervice GHT-510D uide PCB assembly is a kind of sophisticated electronic circuit board. Therefore, well packing will be required when sending them by post or courier. Some sophisticated IC components are mounted on the PCB assembly, hence it is necessary to pack each PCB assembly with a separate static protecting beg, in order to avoid static electricity. -
Page 20: T O O L S
ervice GHT-510D uide 1. VCD or DVD 2. MUSIC CD 1. Soldering-Iron(40W) 1. Tweezers 2. Screwdriver 3. Pliers 4. Multimeter 5. Glue-heater... -
Page 21: C B D
ervice GHT-510D uide Filter board Decoder board Volume Input signal Center control Amplifier PCBA Front Main board Power Transformer Surround Supply PCBA... -
Page 22: Part S L I S T
ervice GHT-510D uide SUBWOOFER Description Part number Speakers 8”100W 15230071000 AMP PCBA 20800101000 Fuse 125V/5A 10190128000 IC L7815 10300156000 IC L7915 10300157000 IC TL074 10300155000 IC BA033T 10300158000 Decoder PCBA 20800104000 Front Description Part number Speakers 1”5W 15230072000 Rear Description Part number Speakers 1”5W 15230072000... -
Page 23: Center
ervice GHT-510D uide Center Description Part number PCBA, Center 20800102000 IC TDA7296 10300154000...
Need help?
Do you have a question about the Genius GHT-510D and is the answer not in the manual?
Questions and answers