Graco 245970 Repair Parts
Displacement pump for use with reactor electric proportioners
Hide thumbs
Also See for 245970:
- Instructions manual (32 pages) ,
- Repair parts (28 pages) ,
- Instruction manual (28 pages)
Table of Contents
Advertisement
Quick Links
Repair - Parts
Displacement
Pump
309577A
™
FOR USE WITH REACTOR
ELECTRIC
PROPORTIONERS
3500 psi (24.5 MPa, 245 bar) Maximum Working Pressure
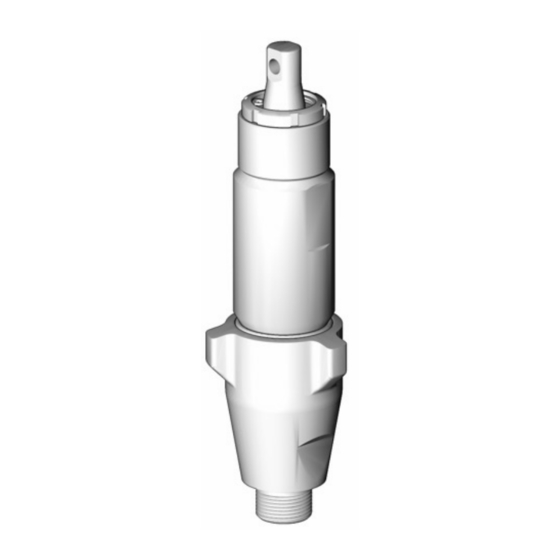
Part No. 245970, Series A
21 cc, used on Model E-20 and E-XP1
Part No. 245971, Series A
41 cc, used on Model E-XP2
Part No. 245972, Series A
55 cc, used on Model E-30
TI2663A
Graco Inc. P.O. Box 1441 Minneapolis, MN 55440-1441
Copyright 2003, Graco Inc. is registered to I.S. EN ISO 9001
Advertisement
Table of Contents

Related Manuals for Graco 245970


Summary of Contents for Graco 245970
- Page 1 Part No. 245971, Series A 41 cc, used on Model E-XP2 Part No. 245972, Series A 55 cc, used on Model E-30 TI2663A Graco Inc. P.O. Box 1441 Minneapolis, MN 55440-1441 Copyright 2003, Graco Inc. is registered to I.S. EN ISO 9001...
-
Page 2: Table Of Contents
Repair Kits ....... . 6 Graco Standard Warranty ....18 Clean and Inspect Parts . -
Page 3: Warning
Misuse can cause serious injury or death. • For professional use only. • Use equipment only for its intended purpose. Call your Graco distributor for information. • Read manuals, warnings, tags, and labels before operating equipment. Follow instructions. • Check equipment daily. Repair or replace worn or damaged parts immediately. - Page 4 Warning WARNING BURN HAZARD This equipment is used with heated fluid, which can cause equipment surfaces to become very hot. To avoid severe burns: • Do not touch hot fluid or equipment. • Allow equipment to cool completely before touching it. •...
-
Page 5: Pressure Relief Procedure
Pressure Relief Procedure Pressure Relief Procedure WARNING Shut off feed pumps and agitator, if used. Read warnings, page 3. Turn PRESSURE RELIEF/SPRAY valves (SA, SB) to PRESSURE RELIEF. Route fluid to waste Relieve pressure in gun and perform gun shut- containers or supply tanks. -
Page 6: Tools Needed
Snap-ring pliers • 1/2 in. (13 mm) diameter plastic rod • 7/8 in. deep-well socket (245970 only) Repair Kits A repair kit is available for your pump. Kit parts are marked with an asterisk, for example (3*). See page 17. -
Page 7: Disassembly
Disassembly Disassembly WARNING Shut main power OFF Pump rod and connecting rod move during operation. Moving parts can cause serious injury such as pinch- Disconnect fluid inlet (C) and outlet (D). ing or amputation. Keep hands and fingers away from connecting rod during operation. - Page 8 Disassembly To disconnect pump B: Enter jog mode (see operation manual). Run motor until component B pump is at bottom of its stroke. Press pump Turn PRESSURE RELIEF/SPRAY to stop. valves (SA, SB) to PRESSURE RELIEF. Shut main power OFF Disconnect fluid inlet (C) and outlet (D).
- Page 9 Disassembly Unscrew packing nut (19). Remove retaining Disassemble intake valve. Be sure to remove ring (22) and felt washers (21). o-ring (10). TI2665A Spring (8) is on Model 245972 only. TI2662A Tap rod (1) with non-sparking hammer to drive it out of cylinder (2).
- Page 10 Disassembly Using screwdriver in groove (H), remove sleeve Unscrew piston (7) from rod (1). Remove piston (4) from cylinder (2), or pull it off rod. Remove guide (6) and ball (16). Remove u-cup (13) and o-rings (3). bushing (14). TI2670A TI2666A Be sure top o-ring (3) comes out.
-
Page 11: Reassembly
Install throat u-cup as follows: onto rod (1). Install piston guide (6) and u-cup (13*) on piston (7). Lips of u-cup must face up. On Models 245970 and 245971, be sure lips of Models 245971 and 245972: Grease piston guide (6) face down. - Page 12 Reassembly Groove (H) in sleeve outer surface must be Install scraper kit (18*, 245971 and 245972 only) toward bottom. in bushing. Ensure that slots (J) in scrapers do not align and seal (K) fits under lip of bushing. Grease piston u-cup and sleeve top edge. Push piston assembly into top of sleeve (4).
- Page 13 Seat may be flipped over and used on other TI2687A side. Clean seat thoroughly. No scratches per- mitted on sealing edge. Model Torque ft-lb (N•m) 245970 65-75 (88-101) 245971 75-85 (101-114) 245972 145-155 (195-209) Torque packing nut (19) to 90-110 in-lb (10-12 N•m).
- Page 14 Reassembly To reconnect pump B: Continue screwing pump into housing until fluid outlet (D) is aligned with steel tube and top threads are +/- 1/16 in. (2 mm) of bearing face (N). See F . 2. Turn main power ON Tighten locknut (G) by hitting firmly with a non-sparking hammer.
- Page 15 Reassembly To reconnect pump A: Ensure locknut (G) is screwed on pump with flat side up. Screw pump into bear- ing housing (M) until pin holes align. Push pin (F) in. Pull retaining spring (E) down. See F . 2. Turn main power ON Continue screwing pump into housing until fluid outlet (D) is aligned with steel...
-
Page 16: Parts
Parts Parts Part No. 245970, Series A; includes items 1-7, 9-17, 19-22 Part No. 245971, Series A; includes items 1-7, 9-22 Part No. 245972, Series A; includes items 1-22 (shown) TI2577A 309577A... - Page 17 Parts Part No. 245970, Series A; includes items 1-7, 9-17, 19-22 Part No. 245971, Series A; includes items 1-7, 9-22 Part No. 245972, Series A; includes items 1-22 (shown) Part No. Description Part No. Description 114054 O-RING; Viton ® (245970) 240518 ROD, displacement;...
-
Page 18: Technical Data
Graco distributor to the original purchaser for use. With the exception of any special, extended, or limited warranty published by Graco, Graco will, for a period of twelve months from the date of sale, repair or replace any part of the equipment determined by Graco to be defective.
Need help?
Do you have a question about the 245970 and is the answer not in the manual?
Questions and answers