Table of Contents
Advertisement
No. 60087
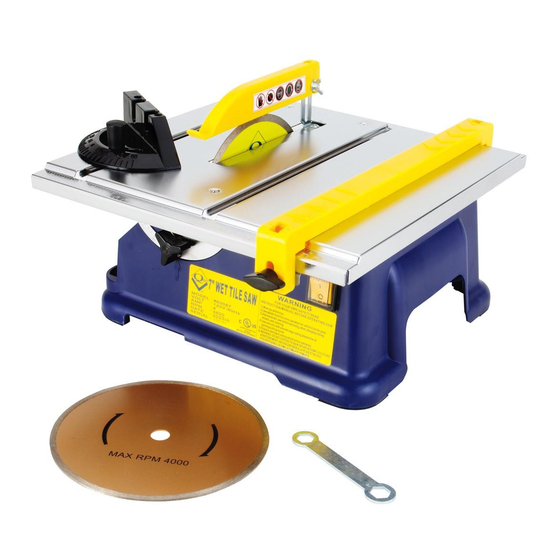
7 in. Wet Tile Saw
OWNER'S MANUAL
Scie coupe-carreau à eau de 180 mm
MANUEL D'UTILISATION
Sierra para losetas de
corteen húmedo de 180 mm
MANUAL DE OPERACIÓN
Pat. U.S. 6,782,882 B1
& U.S. D479,539 S
Read and follow all safety and operating
instructions before using this saw.
Lire et suivre toutes les directives de sécurité
et d'opération avant d'utiliser cette scie.
Lea y siga todas las instrucciones de funcionamiento
y seguridad antes de usar esta sierra.
Advertisement
Table of Contents

Related Manuals for QEP 60087


Summary of Contents for QEP 60087
- Page 1 No. 60087 7 in. Wet Tile Saw OWNER’S MANUAL Scie coupe-carreau à eau de 180 mm MANUEL D’UTILISATION Sierra para losetas de corteen húmedo de 180 mm MANUAL DE OPERACIÓN Pat. U.S. 6,782,882 B1 & U.S. D479,539 S Read and follow all safety and operating instructions before using this saw.
-
Page 2: Table Of Contents
7 in. Wet Tile Saw Scie coupe-carreau à eau de 180 mm Sierra para losetas de corteen húmedo de 180 No. 60087 TABLE OF CONTENTS TABLE DES MATIÈRES CONTENIDO Safety Instructions for Tile Saw....3 Instructions de sécurité pour Instrucciones de seguridad les scies à... -
Page 3: Safety Instructions For Tile Saw
SAFETY INSTRUCTIONS FOR TILE SAW READ THIS OWNER’S MANUAL COMPLETELY AND MAKE SURE YOU UNDERSTAND ALL OF IT’S SAFETY GUIDELINES. 1. KEEP GUARDS IN PLACE and in working order. 2. REMOVE ADJUSTING KEYS AND WRENCHES. Form habit of checking to see that keys and adjusting wrenches are removed from tool before turning it on. -
Page 4: Warning
B. If the plug or receptacle does get wet, DO NOT unplug the cord. Disconnect the fuse or circuit breaker that supplies power to the tool. Then, unplug and examine for presence of water in the receptacle. FOR YOUR OWN SAFETY READ INSTRUCTION MANUAL BEFORE OPERATING SAW. -
Page 5: Grounding Instructions
• To avoid the possibility of the appliance plug or receptacle getting wet, position tile saw to one side of a wall mounted receptacle to prevent water from dripping onto the receptacle or plug. The user should arrange a “drip loop” in the cord connecting the saw to a receptacle. The “drip loop” is that part of the cord below the level of the receptacle, or the connector if an extension cord is used, to prevent water traveling along the cord and coming in contact with the receptacle. -
Page 6: Safety Guidelines
Use only 3-wire extension cords that have 3-prong grounding plugs and 3-pole receptacles that accept the tool’s plug. Repair or replace damaged or worn cord immediately. GROUNDED, CORD-CONNECTED TOOLS INTENDED ILLUSTRATION 2 FOR USE ON A SUPPLY CIRCUIT HAVING A NOMINAL RATING LESS THAN 150 VOLTS: Metal screw... -
Page 7: Features Of The Tile Saw
FEATURES OF THE TILE SAW • Direct drive motor. • Wet cutting. • Water reservoir completely separated from all electrical components. • 7 in. continuous rim wet diamond blade included for cutting tile and other materials.* • Adjustable chrome table for precision miter cuts (0°–45° degrees). *This saw comes with a diamond blade that is ideal for cutting ceramic tile. - Page 8 BLADE GUARD 1. Attach the metal guard support (60087-6) to the blade guard (60087-4). 2. Screw the metal guard support (60087-6) from the top onto the cutting table. RIP GUIDE 1. Place the rip guide at either end of the cutting table and slide it onto the cutting table track.
-
Page 9: Electrical And Motor Specifications
ELECTRICAL AND MOTOR SPECIFICATIONS 120 VOLT MOTOR SPECIFICATIONS Volts 120 V Cycle 60 CYCLES 3600 RPM Amps 4 Amps CONNECT TILE SAW AS CLOSE AS POSSIBLE TO POWER SOURCE. BLADE REMOVAL INSTRUCTIONS Turn this Arbor Shaft TO REMOVE BLADE direction to remove 1. -
Page 10: Parts List
60087 PARTS LIST PARTS# PARTS NAME QTY. 60087-1 Rip Guide 60087-2 Wing Screw for Rip Guide 60087-3 Square Nut for Rip Guide 60087-4 Blade Guard 60087-5 Screw Set for Blade Guard 60087-6 Screw for Guard Support Set 60087-7 Angle Guide Set... -
Page 11: Exploded View
EXPLODED VIEW To assemble the tile guide and place into the cutting table - 11 -...
Need help?
Do you have a question about the 60087 and is the answer not in the manual?
Questions and answers