
Related Manuals for Zaxcom TRXLT3


Summary of Contents for Zaxcom TRXLT3
- Page 1 USER MANUAL Published March 2017 Firmware Version THD1-58 TRXLT3 Don’t Let The Size Fool You...
-
Page 2: Table Of Contents
TRXLT3 TRANSMITTER ........................... 4 HOME SCREEN .............................. 6 MAIN MENU ..............................7 ................................7 ICROPHONE UHF T ..............................7 RANSMIT REQUENCY ................................7 RANSMITTER SUB MENUS ..............................8 ....................................8 ENU GROUPS ..........................8 CCESSING AND NAVIGATING THE MENU GROUPS ............................8 NTERING AND NAVIGATING A SUB MENU .................................8... - Page 3 ALANCED EVEL AND TIME CODE NPUT – ..........................28 TEREO EVEL FOR STEREO TRANSMITTERS OPERATING FREQUENCIES ..........................29 ..........................29 EMOTE ONTROL AND UHF - A ....................................29 UDIO PRODUCT SUPPORT ............................. 31 SPECIFICATIONS ............................32 ZAXCOM WARRANTY POLICY AND LIMITATIONS ................... 33...
-
Page 4: Trxlt3 Transmitter
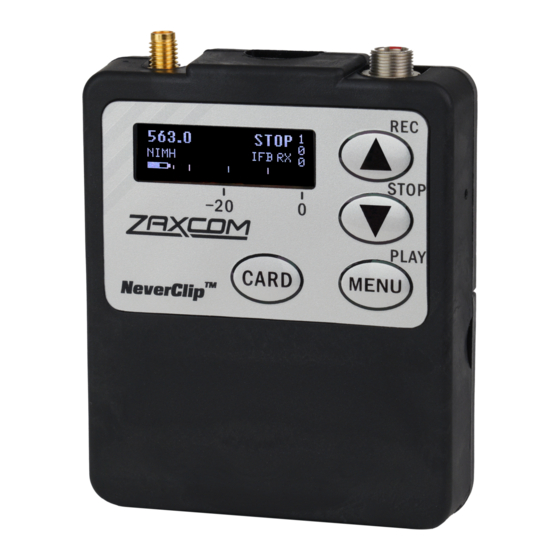
Zaxcom TRXLT3 Transmitter Layout TRXLT3 Transmitter 1. SSMA Antenna Connector 2. OLED Display 3. Card Key 4. Microphone Input Connector (3 Pin Lemo) 5. INC / Record Key Increases the parameters of a menu item. When in the home screen pressing INC with the CARD key will put the transmitter into record. - Page 5 Insert the card into the slot and press it down until you here a slight click. To remove it, press the card in until you hear the same click again. 4. Microphone / Input connector (3 pin Lemo) 5. Battery Compartment TRXLT3 uses 1 AA battery. Alkaline, Lithium or NiMH batteries can be used.
-
Page 6: Home Screen
Indicators at -20, -10, 0 dBFS Frequency - This is the transmit frequency of the TRXLT3. If the TRXLT3 is being used in RECORD ONLY mode “NOTX” will be displayed. ZaxNet Status IFB RX - The TRXLT3 is receiving ZaxNet. -
Page 7: Main Menu
The microphone gain is adjusted from this menu. This menu displays the gain setting in decibels and a meter indicating the audio signal. The meter is displayed horizontally from left to right. In the case of a TRXLT3 S operating in stereo mode, two meters will be displayed - one for each channel. Please note that the gain in stereo mode is applied to both sources simultaneously. -
Page 8: Sub Menus
Zaxcom TRXLT3 Menu Navigation Sub Menus Menu groups The TRXLT3 has six sub menu groups Time Code - Changes the time code parameters of transmitter. Transmit - Changes the parameters of the UHF transmitter. Record - Changes the parameters of the on-board recorder. -
Page 9: Time Code Menu
AUTO-LOAD REC RUN - In Auto-Load mode the TRXLT3 will go into record when it detects rolling time code, and will stop when the time code stops. If time code is lost because the IFB signal is too weak the unit will... -
Page 10: Mute Time Code Transmission Until Jammed
When turned ON the TRXLT3 will automatically set its frame rate to the frame rate that is being transmitted from the ZaxNet transmitter that is feeding the TRXLT3. If auto frame rate is set to OFF the frame rate will need to be adjusted manually. -
Page 11: Transmit Menu
TX DISABLE : NORMAL TX MODE Record Only Mode - Will set the TRXLT3 to act as a standalone recorder and will not transmit any audio over UHF. This will conserve battery power since the transmitter is disabled. ... -
Page 12: Record Menu
Zaxcom TRXLT3 Record Menu RECORD MENU SD Card Format This menu will only appear if a card was inserted prior to booting up PRESS UP KEY 5X: TO ERASE CARD The Micro SD card is erased and formatted from this menu. Please note that all cards need to be formatted in a 3 series transmitter prior to recording. -
Page 13: Time Left On Card
Record on boot up allows the onboard recorder to automatically start recording after the transmitter boots up. ON - The onboard recorder will automatically start to record after the TRXLT3 boots up. OFF - The onboard recorder will wait for a ZaxNet command or a manual record trigger to start recording. -
Page 14: Zaxnet Menu
Please keep in mind that the range will be limited when receiving ZaxNet from a TRX or ZFR. When the TRXLT3 is receiving a valid ZaxNet signal the signal strength will be shown as well as signal strength meter that runs vertically on the far right side of the screen. -
Page 15: Group Code Set
ZaxNet without affecting others. So for example a TRXLT3 set to Group 1 will be controlled by a ZaxNet transmitter set to Group 1 and a TRXLT3 assigned to group 2 will be controlled by a Group 2 ZaxNet transmitter. This is helpful if two or more people on set are sending ZaxNet commands. -
Page 16: Zaxnet Receive Before Transmit Time
This is adjustable from 1 to 20 Seconds. This menu adjusts the state of the ZaxNet transceiver. This also sets how long after boot-up up the TRXLT3 will search for ZaxNet time code before it begins transmitting its audio over ZaxNet for monitoring purposes. -
Page 17: Ifb Receive Pulse Set
ZaxNet Menu IFB Receive Pulse Set This menu will only appear if the TRXLT3 is set to go into transmit in the RX to TX Time menu. ZAXNET RX PULSE: The ZaxNet transceiver will stay in transmit mode and never go into receive mode. -
Page 18: Audio Menu
Zaxcom TRXLT3 Audio Menu AUDIO MENU High Pass Filter HIGH PASS FILTER: 90Hz ____ The high pass filter is turned on and adjusted from this menu. The high pass filter range is 70Hz to 220Hz in 10Hz increments. 2K Notch Filter 2K NOTCH FILTER The 2K notch filter is useful in removing digital RF interference that can be introduced into some microphones. -
Page 19: Dynamics
Zaxcom TRXLT3 Audio Menu Dynamics DYNAMICS The dynamics is a soft knee compressor that is located after the analog to digital converter which will limit the dynamic range to prevent clipping during occurrences of loud audio. Dynamics is comprised of both a... -
Page 20: Setup Menu
The TRXLT3 has an internal tone generator which will generate tone so the signal chain can be properly gain staged. From this menu pressing the INC key will turn on the tone generator and cycle through the tone options which are 500Hz at -20dBFS, 1000Hz at -20dBFS or 500Hz at full scale. -
Page 21: Qrx / Erx Firmware Update
Zaxcom TRXLT3 Setup Menu QRX / ERX Firmware Update PRESS TO SEND QRX PROG FILE This page is used to update the firmware on a QRX or ERX receiver. If the ZaxNet mode is set to OFF or receive (RX) this menu will allow for QRX firmware to be updated - if the ZaxNet mode is set to transmit (TX) then this menu will allow for ERX to be updated. -
Page 22: Information Page
This page displays the current firmware version, the serial number, the DSP version, and the option code to tell if the TRXLT3 is a stereo unit. If the TRXLT3 is a stereo version the option code will be 07, a non-stereo transmitter will display option code 03. -
Page 23: Transmitter Name Set
Zaxcom TRXLT3 Setup Menu Transmitter Name Set NAME: 1234 The transmitter name menu allows the transmitter to be named to be changed from the default name - which is the unit’s serial number. The name entered becomes part of the name of the recorded audio files, and is also included in the metadata of the BWF file. -
Page 24: Recording Format
Media Capacity The TRXLT3 can use Micro SD cards, up to 16 GB. While any size card will work we recommend using 4GB cards. All cards that are used in the TRXLT3 must be formatted in a 3 series transmitter to work properly, cards formatted in any other series transmitter will not record properly. -
Page 25: Firmware
2. Format a micro SD card in the transmitter. 3. Remove the card and with a computer delete the “SNXXXX.ME” file. 4. Download the TRX firmware “THD-XXX.bin” from the Zaxcom website and copy it onto the formatted card. 5. Insert the card into the transmitter. -
Page 26: Updating Qrx Firmware With Atrx Transmitter
Zaxcom TRXLT3 Firmware Updating QRX firmware with a TRX transmitter 1. Format a micro SD card in a TRX transmitter. 2. With a computer take the formatted card and perform the following: Delete the “SNXXXX.ME” file from the card. -
Page 27: Inputting Audio
Wiring Diagrams Inputting Audio The TRXLT3 use an unbalanced microphone input via a 3-pin micro-LEMO connector. An unbalanced dynamic microphone or a powered lavaliere can be used. The TRXLT3 can also accept a line-level input, though an inline pad is required. -
Page 28: Stereo Microphone Configuration - For Trxlas
Zaxcom TRXLT3 Wiring Diagrams Stereo Microphone Configuration – for TRXLAS Balanced Line Level and time code Input Stereo Line Level – for stereo transmitters... -
Page 29: Operating Frequencies
Zaxcom TRXLT3 Operating Frequencies Operating Frequencies ZaxNet - Remote Control and Time Code 2.403 to 2.475 GHz UHF - Audio TRXLT3.5 512.0 MHz to 614.0 MHz (Blocks 20 through 23) TRXLT3.6 596.0 MHz to 698.0 MHz (Blocks 23 through 26) - Page 30 Zaxcom TRXLT3 Antenna Cutting Chart...
-
Page 31: Product Support
Download the latest Firmware from: http://zaxcom.com/support/updates/ Download the latest User Manuals from: http://zaxcom.com/support/updates/ Submit Technical Questions at: http://www.zaxcom.com/submit-a-technical-question Submit information for Repair Services at: http://www.zaxcom.com/support/repairs Join the Zaxcom User Forum at: http://www.zaxcom.com/forum/forum.php Join the Zaxcom Face Book User Group at: https://www.facebook.com/groups/682199065139938/... -
Page 32: Specifications
Specifications Transmitter Power output: 25 / 50 mW – Firmware Selectable RF Modulation: Proprietary Digital Method RF Frequency Range: TRXLT3.5: 512 - 614 MHz TRXLT3.6: 596 -698 MHz Antenna Connector: 50 Ω SMA Female Emission Designator: 180 KV2E FCC Part: 75.861... -
Page 33: Zaxcom Warranty Policy And Limitations
Product exists to repair or replace a defective Product. Zaxcom’s replacement Product under its limited warranty will be manufactured from new and serviceable used parts. Zaxcom’s warranty applies to repaired or replaced Product for the balance of the applicable period of the original warranty or thirty days from the date of shipment of a repaired or replaced Product, whichever is longer. - Page 34 This alert does NOT apply to Part 74 users Warning: Changes or modifications to this device not expressly approved by Zaxcom Inc. could void the user’s authority to operate the equipment. NOTE: This equipment has been tested and found to comply with the limits for a Class B digital device, pursuant to Part 15 of the FCC Rules.
Need help?
Do you have a question about the TRXLT3 and is the answer not in the manual?
Questions and answers