
Related Manuals for Zaxcom ZMT4


Summary of Contents for Zaxcom ZMT4
- Page 1 USER MANUAL Published April 2021 Firmware Version ZMT-402 ZMT4 Light and Versatile...
-
Page 2: Table Of Contents
ZMT4 TRANSMITTER ............................. 4 HOME SCREEN .............................. 6 MAIN MENU ..............................7 ................................7 ICROPHONE UHF T ..............................7 RANSMIT REQUENCY ..................................7 HANTOM OWER ................................7 RANSMITTER SUB MENUS ..............................9 ....................................9 ENU GROUPS ..........................9 CCESSING AND NAVIGATING THE MENU GROUPS ............................9 NTERING AND NAVIGATING A SUB MENU .................................9... - Page 3 ........................26 AVALIER ICROPHONE ONFIGURATION ........................26 HREE AVALIER ICROPHONE ONFIGURATION ............................26 ICROPHONE NPUT ONFIGURATION OPERATING FREQUENCIES ..........................27 ..........................27 EMOTE ONTROL AND UHF - A ....................................27 UDIO PRODUCT SUPPORT ............................. 29 SPECIFICATIONS ............................30 ZAXCOM WARRANTY POLICY AND LIMITATIONS ................... 31...
-
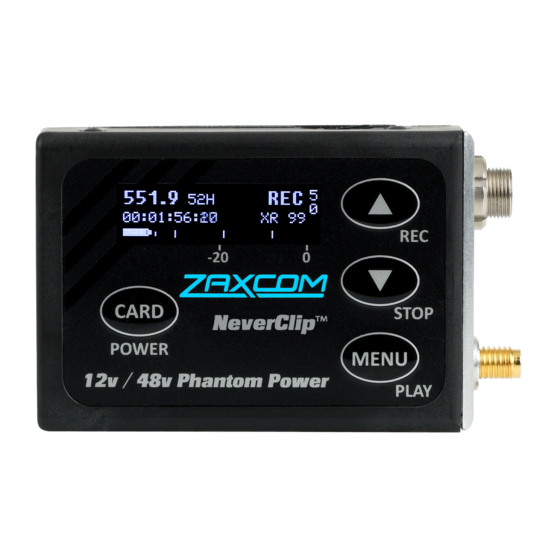
Page 4: Zmt4 Transmitter
Zaxcom ZMT4 Transmitter ZMT4 Transmitter 1. Card / Power Key Push and hold for 2 seconds to power on. • Push and hold 3 seconds followed by a quick press of the MENU key to power off. • Press 3 times quickly to access the sub menus. - Page 5 If this happens DO NOT fully open the battery door or try to reclose the door while the battery is stuck, as this can damage the power connector on the ZMT4 and will need to be sent in for service. If a battery gets caught please pull the battery off the door...
-
Page 6: Home Screen
Indicators at -20, -10, 0 dBFS Frequency - This is the transmit frequency of the ZMT4. If the ZMT4 is being used in RECORD ONLY mode “NOTX” will be displayed. ZaxNet Status IFB RX - The ZMT4 is receiving ZaxNet. -
Page 7: Main Menu
Phantom Power PHANTOM POWER: This menu is where the phantom power is turned on and adjusted from. The ZMT4 has 6 user selectable power options: When set to any voltage other than 5, the ZMT4 will input a balanced signal. - Page 8 Zaxcom ZMT4 Main Menu To unlock the transmitter • Press and hold the MENU key and press INC keys 5 times. • Powering down and reboot the transmitter.
-
Page 9: Sub Menus
Zaxcom ZMT4 Menu Navigation Sub Menus Menu groups The ZMT4 has six sub menu groups Time Code - Changes the time code parameters of transmitter. • Transmit - Changes the parameters of the UHF transmitter. • Record - Changes the parameters of the on-board recorder. -
Page 10: Time Code Menu
ZaxNet or if the unit is put into record manually by pressing the CARD and INC keys simultaneously. AUTO-LOAD REC RUN - In Auto-Load mode the ZMT4 will go into record when it detects rolling time code •... -
Page 11: Auto Frame Rate Enable
When turned ON the ZMT4 will automatically set its frame rate to the frame rate that is being transmitted from the ZaxNet transmitter that is feeding the ZMT4. If auto frame rate is set to OFF the frame rate will need to be adjusted manually. -
Page 12: Transmit Menu
Transmit Menu TRANSMIT MENU UHF Transmitter Power Level Set TX POWER: 50MW The UHF transmit power of the ZMT4 is set from this page. The transmit power can set to either 10 or 50mW. UHF Transmit Modulation Set TX FORMAT:... -
Page 13: Record Menu
The Micro SD card is erased and formatted from this menu. Please note that all cards need to be formatted in the ZMT4 prior to recording. Before formatting the card, the transmitter can optionally be renamed (see set up menu). When a transmitter is named that name is included in the recorded file names. -
Page 14: Time Left On Card
Automatic Record after Boot up RECORD ON BOOTUP Record on boot up allows the onboard recorder to automatically start recording after the ZMT4 boots up. ON - The onboard recorder will automatically start to record after the ZMT4 boots up. -
Page 15: Zaxnet Menu
This frequency will need to match the frequency of the corresponding ZaxNet transmitter. When the ZMT4 is receiving a valid ZaxNet signal the signal strength will be shown as well as signal strength meter that runs vertically on the far right side of the screen. -
Page 16: Group Code Set
ZaxNet without affecting others. So for example a ZMT4 set to Group 1 will be controlled by a ZaxNet transmitter set to Group 1 and a ZMT4 assigned to group 2 will be controlled by a Group 2 ZaxNet transmitter. This is helpful if two or more people on set are sending ZaxNet commands. -
Page 17: Zaxnet Receive Before Transmit Time
TC and confidence audio. This menu adjusts the state of the ZaxNet transceiver. This also sets how long after boot-up up the ZMT4 will search for ZaxNet time code before it begins transmitting its audio over ZaxNet for monitoring purposes. -
Page 18: Ifb Receive Pulse Set
ZNET RECORD BEEP When the record beep is set to ON, and the ZMT4 is recording, the confidence audio sent to the ERX via ZaxNet will have an audible beep, in variable intervals, giving conformation that the ZMT4 is indeed recording. The beeps will only be heard in the ERX and will not be recorded on the card, or be sent to the UHF receiver. -
Page 19: Audio Menu
Zaxcom ZMT4 Audio Menu AUDIO MENU High Pass Filter HIGH PASS FILTER: 90Hz The high pass filter is turned on and adjusted from this menu. The high pass filter range is 70Hz to 220Hz in 10Hz increments. 2K Notch Filter 2K NOTCH FILTER The 2K notch filter is useful in removing digital RF interference that can be introduced into some microphones. -
Page 20: Dynamics
Zaxcom ZMT4 Audio Menu Dynamics DYNAMICS The dynamics is a soft knee compressor that is located after the analog to digital converter which will limit the dynamic range to prevent clipping during occurrences of loud audio. Dynamics is comprised of both a... -
Page 21: Setup Menu
Setup Menu SETUP MENU Phantom Power PHANTOM POWER: This menu is where the phantom power is turned on and adjusted from. The ZMT4 has 6 user selectable power options: OFF, 3V, 12V, 24V, 36V or 45V Phantom • WARNING - make sure the microphone attached to the transmitter is rated for the applied voltage before engaging phantom power - not doing so can damage the microphone. -
Page 22: Qrx / Erx Firmware Update
Zaxcom ZMT4 Setup Menu QRX / ERX Firmware Update PRESS TO SEND QRX PROG FILE This page is used to update the firmware on a QRX or ERX receiver. If the ZaxNet mode is set to OFF or receive (RX) this menu will allow for QRX firmware to be updated - if the ZaxNet mode is set to transmit (TX) then this menu will allow for ERX to be updated. -
Page 23: Encryption Code Set
Zaxcom ZMT4 Setup Menu Encryption Code Set ID1: 000 ID2: 000 If an encryption code is set the transmitted audio will be encrypted and can only be listened to if the receiver has the matching encryption code entered. When receiving an audio signal and the codes do not match, all that will be heard is white-noise or silence. -
Page 24: Recording Format
Media Capacity The ZMT4 can use Micro SD cards, up to 16 GB. While any size card will work, we recommend using 4GB cards. Please note that regardless of the size of the card the onboard recorder will only be able to record up to 500 individual segments on any given card. -
Page 25: Firmware
1. From the ZaxNet menu set ZaxNet mode to transmit (TX). 2. Check that the ERX is set to the same ZaxNet frequency that the ZMT4 is set to transmit on. Check that the GROUP ID is set the same in both the ZMT4 and ERX, and make sure encryption is shut off. -
Page 26: Wiring Diagrams
Zaxcom ZMT4 Wiring Diagrams Wiring Diagrams The following 3-pin micro-LEMO connectors mate with the microphone connector: FGB.00.303.CLAD.22 – has a latch with a pull release. • FVB.00.303.NLA – has a latch with a twist release. • Please note it is required that the ground gets attached to the shell of the LEMO connector. -
Page 27: Operating Frequencies
Zaxcom ZMT4 Operating Frequencies Operating Frequencies ZaxNet - Remote Control and Time Code 2.403 to 2.475 GHz UHF - Audio ZMT4.5 512.0 MHz to 608.0 MHz (Blocks 20 through 23) ZMT4.6 578.0 MHz to 698.0 MHz (Blocks 23 through 26) - Page 28 Zaxcom ZMT4 Antenna Cutting Chart...
-
Page 29: Product Support
Download the latest Firmware from: http://zaxcom.com/support/updates/ Download the latest User Manuals from: http://zaxcom.com/support/updates/ Submit Technical Questions at: http://www.zaxcom.com/submit-a-technical-question Submit information for Repair Services at: http://www.zaxcom.com/support/repairs Join the Zaxcom User Forum at: http://www.zaxcom.com/forum/forum.php Join the Zaxcom Face Book User Group at: https://www.facebook.com/groups/682199065139938/... -
Page 30: Specifications
Zaxcom ZMT4 Specifications Specifications Transmitter RF Modulation: Proprietary Digital Method ZMT3-Phantom .5 RF Frequency Range: 512 - 608 MHz ZMT3-Phantom .6 RF Frequency Range: 576 - 698 MHz RF Frequency Step: 100 KHz RF Bandwidth in ZHD48 Mode: 50 KHz... -
Page 31: Zaxcom Warranty Policy And Limitations
Product exists to repair or replace a defective Product. Zaxcom’s replacement Product under its limited warranty will be manufactured from new and serviceable used parts. Zaxcom’s warranty applies to repaired or replaced Product for the balance of the applicable period of the original warranty or thirty days from the date of shipment of a repaired or replaced Product, whichever is longer. - Page 32 à faible puissance exempts de licence dans les bandes de télévision» USA - FCC Part 74, FCC Identifier PR6ZMT3 PHANTOM Canada - Industry Canada RSS 210, IC:12755A-ZMT3 PHANTOM Zaxcom Digital Wireless are protected under following patent #’s: 4,327,066 / 7,711,443 / 7,929,902 / 8,385,814 / 8,878,708 / 8,842,854...
Need help?
Do you have a question about the ZMT4 and is the answer not in the manual?
Questions and answers