Table of Contents
Advertisement
Quick Links
Advertisement
Table of Contents

Related Manuals for Zaxcom IFB200


Summary of Contents for Zaxcom IFB200
- Page 1 Certification Exhibit FCC ID: PR6IFB IC: 12755A-IFB FCC Rule Part: 15.247 IC Radio Standards Specification: RSS-210 ACS Project: 15-2006 Manufacturer: Zaxcom, Inc. Model: IFB200 User Manual 3998 FAU Blvd. Suite 310 Boca Raton, FL 33431 Tel: 561-961-5585 Fax: 561-961-5587...
- Page 2 USER MANUAL Published April 2015 IFB200 ZaxNet Remote Control. Reinvented...
-
Page 3: Table Of Contents
Table of Contents TABLE OF CONTENTS .......................... 2 KNOWING YOUR IFB-200 ........................4 HOME SCREEN ............................6 ............................6 LTERNATE CREEN ............................ 7 CREEN PERATIONS MAIN MENU ............................. 8 ..........................8 AVIGATING THE ............................. 8 EMOTE DJUST ..............................8 ELECT .......................... - Page 4 WIRING DIAGRAMS ..........................25 Balanced Line Level Analog In – ........................25 AES Digital in – ..............................25 ................................25 UDIO 12 Volt DC power – ............................25 SPECIFICATIONS ........................... 26 PRODUCT SUPPORT ..........................27 ZAXCOM WARRANTY POLICY AND LIMITATIONS ..............28...
-
Page 5: Knowing Your Ifb-200
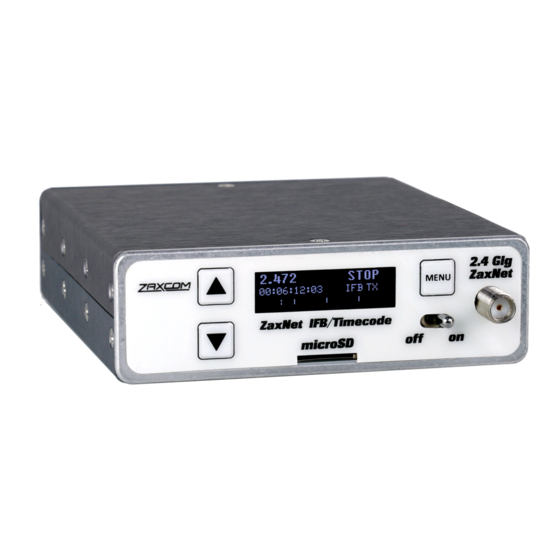
Knowing your IFB-200 1. INC Key Increases the parameters of a menu item. • From the home screen will change the transport commands of the corresponding transmitter. • 2. LCD Display 3. Menu Key Press it to access the menu and to advance to the next menu item.. •... - Page 6 1. Audio In Connector - TA5M This connector will be used to input both analog and digital audio. Analog audio is two channels balanced line level. • Digital audio is an AES pair. • 2. Audio Out - 3.5mm (summed to mono on tip of a TRS) When in playback the playback audio from the card will be outputted.
-
Page 7: Home Screen
• PLAY - TRX playback commands will be sent. Please note that this is the order of the commands as they appear in the IFB200. So for example to go from REC to PLAY you would need to press the DEC key 3 times and to go from PLAY to STOP you would need to press the INC key once. -
Page 8: Home Screen Operations
TRX the internal recorder will go into record as well. The IFB200 will boot up to “- - - -“ mode where no command is being sent. Press INC you will see REC displayed and a record command will be sent to the TRX and put the internal recorder into record mode. To stop, press the DEC key twice. -
Page 9: Main Menu
Please note that If the unit code is changed pressing the MENU key will navigate back to the Remote Gain Menu. If no changes are made to the unit code pressing the MENU key will advance the IFB200 to the next menu item. -
Page 10: Remote Power Mode
STANDBY the TRX, when powered up, will remain in standby mode until it receives the wake command from the IFB200 to wake it. Once the TRX is awoken the only way the TRX will go back into this mode is with a power cycle. -
Page 11: Playback Control
Once you have reduced the TRX power to Low 2 you can power down your TRX900CL. Once you power up the IFB200 all TRX’s being controlled will automatically come up to full power since after a power cycle the IFB200 will always boot up to the 0 Power setting. - Page 12 Zaxcom IFB200 Main Menu The IFB audio mix sets what audio will be transmitted from the IFB200 via ZaxNet. • RIGHT ONLY - Right inputted audio only. • LEFT ONLY - Left inputted audio only. • LEFT AND RIGHT - Both Left and right audio will be summed to mono and transmitted.
-
Page 13: Lock Page
When you land on this page a countdown clock will begin. After 5 seconds the transmitter will lock and the display will indicated that it is LOCKED followed by the time code. If you exit this screen before the 5 seconds is up the IFB200 will not lock. To unlock the IFB200 •... -
Page 14: Extended Menu
This menu adjusts the record format. Please note that any changes to the record format will require the IFB200 to be rebooted. US MONO - The IFB200 will record both inputs summed to mono. • STEREO -The IFB200 will record both inputs independently. -
Page 15: Ifb Mode
IFB MODE: TX This menu sets if the IFB200 will be a ZaxNet transmit or ZaxNet receiver. Please note that is the IFB200 is set to receive the TRX transmitter control items in the main menu will not be available. -
Page 16: Power Roll
Zaxcom IFB200 Extended Menu If this is set to ON and you start recording on the IFB200 all TRX transmitters that are being controlled via ZaxNet from the IFB200 will begin to roll. Power Roll POWER ROLL: Power Roll allows a TRX transmitter to stay at lower transmit power setting to conserve battery power. Then when you begin to record the transmitter will increase its output power. - Page 17 Zaxcom IFB200 Extended Menu When the drop out compensator is enabled, and if there is a brief drop out in the received ZaxNet audio, the drop out compensator will replace the drop out with a bit of the surrounding audio so the audio will match...
-
Page 18: Power Up Mode
The Micro SD card is erased and formatted from this menu. Please note that even though many cards are sold preformatted, you must format the card in the IFB200 prior to any recording. Only cards formatted in the TRX will work properly. -
Page 19: Time Code Jam Mode
In this mode the IFB200 will go into record mode when it detects rolling time code. And will stop when the time code stops. If time code is lost the unit will not stop but will continue in whatever state it was in until the time code signal is restored. -
Page 20: Group Code Select
REMOTE CONTROL GROUP CODE = 1 This menu allows you to set your IFB200 to a ZaxNet “GROUP.” This is the group code that the IFB200 is controlled in – not what group the IFB200 is controlling. Group ID lets you set your IFB200 to a “GROUP” that will be controlled via ZaxNet. -
Page 21: Erx Software Update
Automatic Record On Boot up RECORD ON BOOTUP Record after boot up will allow the IFB200 to automatically go into record after the unit boots up. ON - The IFB200 will automatically start to record after it boots up. •... -
Page 22: Home Screen Timecode Display
Extended Menu Home Screen Time Code Display HOME TC DISPLAY: This menu will determine if the IFB200 will display its ZaxNet transmit frequency or time code on the home screen. • ON - The home screen will display time code, recorder status on the top with the ZaxNet status and audio meters on the bottom. -
Page 23: Encryption Code
Zaxcom IFB200 Extended Menu Encryption Code Set ID1:000 ID0:000 If you set an encryption code the transmitted audio will be encrypted and can only be listened to if the receiver has the matching encryption code entered. When receiving an audio signal and the codes do not match, all that will be heard is white-noise or silence. -
Page 24: Media Capacity
4. Look at the Main Screen it should still be recording in segment #1. Media Capacity The IFB200 can use Micro SD cards, ranging in size from 128 MB to 16 GB. While any size card will work we recommend using 4GB cards. -
Page 25: Updating Ifb-200 Firmware
DEC key during the boot up will slow down the screen to allow easier viewing of the information. Updating the IFB200 Firmware 1. Download the new firmware from the Zaxcom website and load it onto a formatted card. 2. Insert the card into the IFB200. -
Page 26: Wiring Diagrams
Zaxcom IFB200 Wiring Diagrams Wiring Diagrams Balanced Line Level Analog In Uses a Switchcraft TA5-F to feed audio into the IFB200 Out of Mixer On IFB-200 PIN 1 on both PIN 1 PIN 2 - Left PIN 2 PIN 3 - Left... -
Page 27: Specifications
Zaxcom IFB200 Specifications Specifications IFB RF Transmitter RF Power Output: 10.4 dBm RF Modulation: Direct Sequence Spread Spectrum RF Frequency Range: 2.403 GHz to 2.473 GHz RF Frequency Step: 0.001 GHz (1 MHz) RF Bandwidth: 1 MHz Channel Separation: 1 MHz... -
Page 28: Product Support
Download the latest Firmware from: http://zaxcom.com/support/updates/ Download the latest User Manuals from: http://zaxcom.com/support/updates/ Submit Technical Questions at: http://www.zaxcom.com/submit-a-technical-question Submit information for Repair Services at: http://www.zaxcom.com/support/repairs Join the Zaxcom User Forum at: http://www.zaxcom.com/forum/forum.php Join the Zaxcom Face Book User Group at: https://www.facebook.com/groups/682199065139938/... -
Page 29: Zaxcom Warranty Policy And Limitations
Distributers may sell Product to resellers who then sell Product to end users. Please see below for warranty information or obtaining service. No warranty service is provided unless the Product is returned to Zaxcom Inc. or a Zaxcom dealer in the region where the Product was first shipped by Zaxcom. - Page 30 Warning: Changes or modifications to this device not expressly approved by Zaxcom Inc. could void the user’s authority to operate the equipment. NOTE: This equipment has been tested and found to comply with the limits for a Class B digital device, pursuant to Part 15 of the FCC Rules.
Need help?
Do you have a question about the IFB200 and is the answer not in the manual?
Questions and answers