Table of Contents
Advertisement
Quick Links
Advertisement
Table of Contents

Related Manuals for Zaxcom TRX900AA


Summary of Contents for Zaxcom TRX900AA
-
Page 2: Table Of Contents
Table of Contents KNOWING YOUR TRX-900AA ..........................3 MAIN MENU ................................6 Navigating the Main Menu ........................................6 Exiting the Main Menu .......................................... 6 Audio Gain ..............................................6 UHF Transmit Frequency ........................................6 Transport Control ............................................. 6 Timecode Frame Rate ..........................................7 IFB Earpiece Select .......................................... - Page 3 Timecode Into STA / TCA-100 ......................................32 ANTENNA CUTTING CHART ..........................33 OPERATING FREQUENCIES ..........................34 ............................... 34 EMOTE ONTROL AND IMECODE UHF A ......................................... 34 UDIO SPECIFICATIONS ..............................35 PRODUCT SUPPORT ............................37 ......................................37 ONSUMER LERT ZAXCOM WARRANTY POLICY AND LIMITATIONS ..................38...
-
Page 4: Knowing Your Trx-900Aa
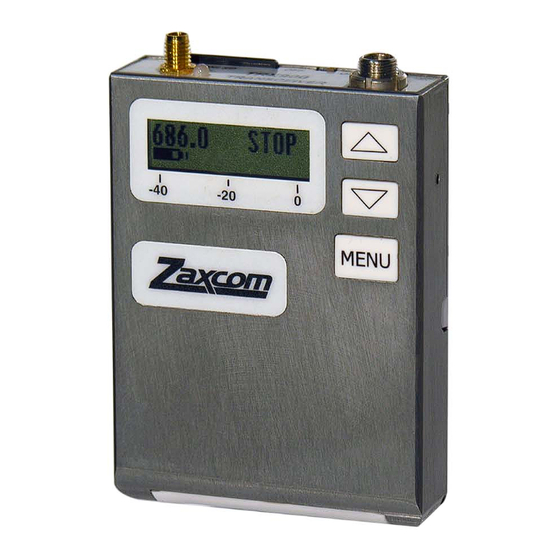
Knowing your TRX-900AA 1. SSMA Antenna Connector 2. Media Slot Media Slot To insert a micro SD card, with the screen facing you, turn the card so the finger contacts are facing to you and down toward the slot. Insert it into the slot and press it down until you here a slight click. To remove it, press the card in until you hear the same click again. - Page 5 6. INC / Record Key • Increases the parameters of a menu item. • When in the Home Screen pressing and holding it with the Home Screen Record enabled will put the TRX into record. • When in the Transport Control Screen while not recording will cause the TRX to play back. •...
- Page 6 Zaxcom TRX-900AA Manual Home Screen Home Screen ZaxNet Transport Frequency Status Status 567.4 STOP Battery Input Audio Meter Gain Level Meter Indications -20, -10, 0 dBFS Frequency – This is theUHF transmit frequency of the TRX-900AA. If the transmitter is being used in RECORD ONLY mode “NOTX” will be displayed.
-
Page 7: Main Menu
Zaxcom TRX-900AA Manual Main Menu Main Menu Navigating the Main Menu • Press the MENU Button to enter the menu. • To advance to the next menu press the MENU Button again. Exiting the Main Menu • To exit the menu at any time press and hold the MENU button for 1.5 seconds... -
Page 8: Timecode Frame Rate
Zaxcom TRX-900AA Manual Main Menu Timecode Frame Rate TIMECODE 23.98 01:02:34:01 This menu sets the timecode frame-rate that will be recorded. The TRX-900AA will lock to and record all standard timecode frame rates. • 23.98, 24, 25, 29.97DF, 29.97DF, 30 DF, 30 NDF... -
Page 9: Extended Menu
Zaxcom TRX-900AA Manual Extended Menu Extended Menu Navigating the Extended Menu • Press and hold the MENU key while powering up the unit. • Pressing the MENU key will advance you to the next menu item. Exiting the Extended Menu •... -
Page 10: 2K Notch Filter
200 kHz channel is legal. This setting will be used with 0=US on the Zaxcom ENG receiver or NORMAL on the QRX • STEREO -This format is used for stereo transmission of a TRX-900AA. It is used by customers in the... -
Page 11: Ifb Receive Mode
Zaxcom TRX-900AA Manual Extended Menu IFB Receive Mode Available on a TRX-900AA running software version 8.10 or higher RXMODE=RX This menu will allow the TRX to receive ZaxNet commands. NOTE: If this is set to OFF the next 6 • OFF – The transmitter will not receive any ZaxNet commands ZaxNet menu items will not appear. -
Page 12: Ifb Receive To Transmit Time
Zaxcom TRX-900AA Manual Extended Menu IFB Receive to Transmit time Available on a TRX-900AA running software version 8.10 or higher IFB RX TO TX: The TRX will receive ZaxNet only NORMAL RX and NOT transmit ZaxNet TC and audio. The TRX will transmit ZaxNet TC and... -
Page 13: Zaxnet Ifb Transmit Frequency
Zaxcom TRX-900AA Manual Extended Menu ZaxNet IFB Transmit Frequency Available on a TRX-900AA running software version 8.10 or higher IFB TX FREQ: 2.420 This is where you set the ZaxNet transmit frequency. This is the frequency that the transmitter will broadcast timecode and ZaxNet audio on for the purpose of confidence audio monitoring via an ERX receiver or Nomad. -
Page 14: Power-Up Mode
Zaxcom TRX-900AA Manual Extended Menu Power-Up Mode POWER UP MODE: LOCKED This menu determines if the keys will lock after power-up. • LOCKED – After power-up has completed, the transmitter will automatically go into Lock Mode to prevent accidental changes to the settings. -
Page 15: Time Code Jam Mode
Zaxcom TRX-900AA Manual Extended Menu Time Code Jam Mode TC JAM MODE: AUTO-JAM NORMAL If you are using record run timecode this menu controls weather the TRX-900AA will go into record when it receives running timecode. • AUTO-JAM NORMAL– The TRX will continuously jam timecode via ZaxNet. -
Page 16: Group Id = 1
Group 2 receivers. This allows you to control a group of receivers without affecting others. This will also help if two or more people on set are sending ZaxNet commands each person will be independent and won’t interfere with each other. Most users leave this set to 1 on all their Zaxcom products. -
Page 17: Dynamics
Zaxcom TRX-900AA Manual Extended Menu Dynamics DYNAMICS Dynamics OFF DYNAMICS PARMS When the Parameters are ON you can adjust the Dynamic Menu The Dynamics is a soft knee compressor that is located after the analog to digital converter. The Dynamics will limit the dynamic range to prevent clipping during occurrences of loud audio. -
Page 18: Analog To Digital Converter
• The settings are NIMH, Lithium and Alkaline (Displayed as “ - - - -“) NOTE: In the menu you will see “ENG” and “QRX” options for these battery types as well. This is so each type Zaxcom receiver model“ENG” RX-900 or “QRX” QRX-100 can correctly display the transmitter’s battery level. -
Page 19: Boot Up Mode
Zaxcom TRX-900AA Manual Extended Menu Boot Up Mode BOOT UP IN NORMAL MODE • REMOTE STANDBY – The transmitter boots up in Low Power Standby mode. The TRX-900AA will be waiting for a ZaxNet “WAKE” command to come up to full power. -
Page 20: Ifb Remote Control
Zaxcom TRX-900AA Manual Extended Menu IFB Remote Control This menu will not appear if the IFB settings allow the TRX to go into transmit mode. ALLOW IFB REMOTE CONTROL: ON This menu turns ON / OFF if the TRX-900AA will accept remote control commands via ZaxNet. -
Page 21: Phase Invert Channel
Zaxcom TRX-900AA Manual Extended Menu Phase Invert Channel PHASE INVER CH2 This will invert the phase of channel 2 (Right) audio to correct for a phasing issue. This would only be used in if you had a TRX-900AA with an STA adaptor and were using stereo mode. -
Page 22: Record On Bootup
Zaxcom TRX-900AA Manual Extended Menu Record On Bootup Available on a TRX-900AA running software version 8.10 or higher RECORD ON BOOTUP This menu will determine if the TRX-900AA will automatically go into record after the unit boots up. • ON - The transmitter will automatically start to record after it boots up. -
Page 23: Encryption Code Page
Zaxcom TRX-900AA Manual Extended Menu Encryption Code page ID1:000 ID0:000 If you set an encryption code the transmitted audio will be encrypted and can only be listened to if the receiver has the matching encryption code entered. When receiving an audio signal and the codes do not match, all that will be heard is white-noise or silence. -
Page 24: Accessories
Zaxcom TRX-900AA Manual Accessories Accessories STA Adapter The STA adaptors adds the ability to input two balanced lineline audio signals into the TRX-900AA, output audio and timecode as well as giving you the ability to power the unit from an external DC source. Both the STA 100 and 150 take in analog audio;... -
Page 25: Sta Operations
Zaxcom TRX-900AA Manual Accessories STA Operations Attaching the STA to the TRX-900AA The STA attaches with two screws. Align the contact pads on the STA and the TRX-900AA and tighten the two screws, alternating between the two screws until the STA is firmly attached. Tighten the screws until snug without over tightning. - Page 26 Zaxcom TRX-900AA Manual Accessories TCA-100 Timecode Adapter The TCA-100 timecode adaptor is used to jam timecode input to the TRX-900AA. To input timecode with the TCA-100 go to the Time Code Source Menu and set it to “SIDE CONNECTOR” (page14).
-
Page 27: Msa-100 Mute Switch
Zaxcom TRX-900AA Manual Accessories MSA-100 Mute Switch The MSA-100 adapter allows talent to turn ‘OFF’ the mic for privacy while still sending RF from the transmitter. The MSA-100 is enabled in the Mute Switch Menu (page 18). -
Page 28: Ea-100 Earpiece Adapter
Zaxcom TRX-900AA Manual Accessories EA-100 Earpiece Adapter The EA-100 is used for monitoring audio from the TRX-900AA. You can choose what to monitor from the IFB Earpiece Menu (Page 7). While the EA-100 has its own volume knob the audio level can be adjusted in the Side Tone Gain (page 18). -
Page 29: Media
The files generated by the recorder can only be recognized by Zaxcom’s ZaxConvert program. Using ZaxConvert will transfer the file to a Broadcast Wave or MP3 file. This utility is available to anyone for free from the http://www.zaxcom.com/software-updates... -
Page 30: Firmware
Updating TRX Firmware 1. Download the firmware from the Zaxcom website and load it onto a formatted card. 2. Insert the card into the TRX transmitter. 3. Simultaneously hold down the INC and DEC keys while powering up the unit. -
Page 31: Updating An Erx With Your Trx-900
Firmware Updating an ERX with your TRX-900 Your transmitter can be used to update the software in a Zaxcom ERX receiver. Your transmitter must be running version 7.02 or higher to do so. 1. Format a card in your TRX. -
Page 32: Inputting Audio
Zaxcom TRX-900AA Manual Wiring Diagrams Inputting Audio The TRX900AA use an unbalanced microphone input via a 3-pin micro-LEMO connector. You can use an unbalanced dynamic microphone or a powered lavaliere. You can use a line-level input though an inline pad is required. -
Page 33: Line Level Into Sta Adaptor
Zaxcom TRX-900AA Manual Wiring Diagrams Line Level into STA Adaptor Out of Mixer On STA Adaptor PIN 1 on both PIN 1 PIN 2 - Left PIN 2 PIN 3 - Left PIN 3 PIN 2 - Right PIN 5... -
Page 34: Antenna Cutting Chart
Zaxcom TRX-900AA Manual Antenna Cutting Chart Antenna Cutting Chart... -
Page 35: Operating Frequencies
Zaxcom TRX-900AA Manual Frequency Chart Operating Frequencies ZaxNet Remote Control and Timecode 2.403 to 2.475 GHz UHF Audio Frequency Block Range Channels 518.0 to 542.0 22 to 25 536.0 to 572.0 25 to 30 560.0 to 590.0 29 to 33 590.0 to 614.0... -
Page 36: Specifications
Zaxcom TRX-900AA Manual Specifications Specifications Transmitter TRX-900AA RF Power Output: 10 / 25 / 50 mW – Software Selectable RF Modulation: Proprietary Digital Method RF Frequency Range: 518.0 to 872.0 MHz (Typical Blocks are 36 MHz wide) RF Frequency Step: 100 KHz... - Page 37 Power TRX-900AA: Up to 8 Hours with 2 Lithium AA External (via Stereo Adapter): 9 to 18 VDC @ 125 mA All specifications are subject to change without notice. Zaxcom Digital Wireless is protected under patent #’s: 7,711,443 & 7,929,902...
-
Page 38: Product Support
Zaxcom TRX-900AA Manual Support Product Support Register your product with Zaxcom: http://www.zaxcom.com/product-registration Download the latest Firmware from: http://www.zaxcom.com/software-updates Download the latest User Manuals from: http://www.zaxcom.com/instruction-manuals Submit Technical Questions at: http://www.zaxcom.com/submit-a-technical-question Submit information for Repair Services at: http://www.zaxcom.com/repairs Join the Zaxcom Forum at: http://www.zaxcom.com/forum... -
Page 39: Zaxcom Warranty Policy And Limitations
Distributers may sell Product to resellers who then sell Product to end users. Please see below for warranty information or obtaining service. No warranty service is provided unless the Product is returned to Zaxcom Inc. or a Zaxcom dealer in the region where the Product was first shipped by Zaxcom.
Need help?
Do you have a question about the TRX900AA and is the answer not in the manual?
Questions and answers