Table of Contents
Advertisement
Quick Links
Instructions-Parts
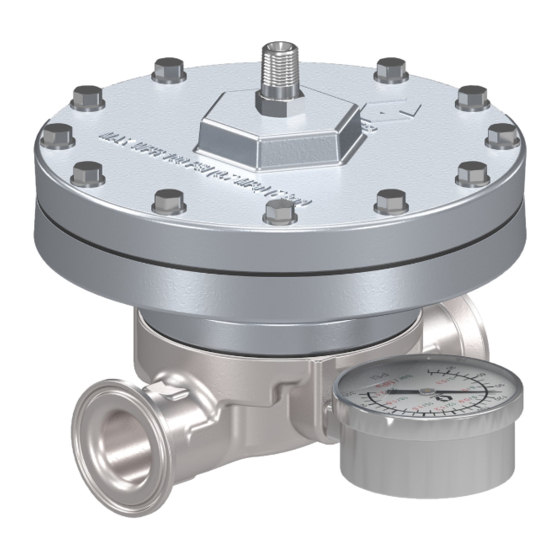
Pneumatic Back Pressure
Regulator
Controls fluid pressure and flow in circulation systems.
Important Safety Instructions
Read all warnings and instructions in this manual.
Save these instructions.
300 psi (2.1 MPa, 21 bar) Maximum Inlet Fluid Pressure
100 psi (0.7 MPa, 7 bar) Maximum Inlet Air Pressure
250 psi (1.72 MPa, 17.2 bar) Maximum Regulated Fluid Pressure
20 gpm (75 lpm) Maximum Flow Rate
Part No. 288117, 1-1/4 npt(f) inlet and outlet
Part No. 288262, 2 in. sanitary inlet and outlet
Part No. 288311, 1-1/2 npt(f) inlet and outlet
Part No. 15J498, Pneumatic Conversion Kit (see page 8)
Canadian Registration Number (CRN): Ontario - OC11377.5
311595C
ti8553a
Advertisement
Table of Contents

Related Manuals for Graco 311595C


Summary of Contents for Graco 311595C
- Page 1 Instructions-Parts Pneumatic Back Pressure Regulator 311595C Controls fluid pressure and flow in circulation systems. Important Safety Instructions Read all warnings and instructions in this manual. Save these instructions. 300 psi (2.1 MPa, 21 bar) Maximum Inlet Fluid Pressure 100 psi (0.7 MPa, 7 bar) Maximum Inlet Air Pressure 250 psi (1.72 MPa, 17.2 bar) Maximum Regulated Fluid Pressure...
- Page 2 This equipment includes but is not limited to: • Protective eyewear • Clothing and respirator as recommended by the fluid and solvent manufacturer • Gloves • Hearing protection 311595C...
-
Page 3: Installation
Pneumatic Back Pressure Regulator Fluid Pressure Regulator Fluid Return Line Air Spray Gun Back Pressure Regulator Air Supply Line Gun Air Supply Line Air Regulator Fluid Shutoff Valve Fluid Supply Line Fluid Flow Fluid Flow 8719B . 1. Typical Installation 311595C... - Page 4 (102) and torque the new seat to 15-20 ft-lb (21-27 N•m). 6. See F . 3. Install the diaphragm assembly. 7. Install the adapter (110) and screws (111). Torque the screws to 120-130 in-lb (13.6-14.7 N•m) oppo- sitely and in sequence, three times. 311595C...
- Page 5 (201). 6. Install the new diaphragm (204). 7. Install the cover (203) and screws (209). Torque the screws to 170-190 in-lb (19-21 N•m) in alternating pattern. Return the back pressure regulator to oper- ation. ti8556a . 4. Diaphragm Repair 311595C...
- Page 6 15J421 HOUSING; 1-7/8 un(f) inlet and outlet; used on 288262 and 288311 Optional 15J822 Carbide Repair Kit is also available: 102*† 171117 GASKET 103*† SEAT, regulator; 17-4 sst † Parts included in Conversion Kit 15J498 (purchase 104* 171912 GASKET separately), see page 8. 311595C...
- Page 7 Parts Part No. 288116 Diaphragm Housing Ref. Part No. Description 15U747 HOUSING, diaphragm 15J461 WASHER, support 15U746 COVER, diaphragm 180979 DIAPHRAGM 120730 SCREW, machine, hex wash hd 15H790 ROD, piston 103263 SCREW, machine 151519 FITTING, nipple, reducing ti8556a 311595C...
- Page 8 120-130 in-lb (13.6-14.7 N•m) oppo- sitely and in sequence, three times. 8. Apply thread lubricant to the adapter (110). Screw the diaphragm housing (2) onto the adapter. 9. Follow Installation and Operation instructions on ti9003a page 3. . 5. 15J498 Conversion Kit 311595C...
-
Page 9: Technical Data
PTFE coated 4 in. (102 mm) 288262 BPR, with 120755 Adapter (accessory) 7.25 in. (184 mm) 7.875 in. (200 mm) 10.71 in. (272 mm) 288311 BPR 7.25 in. (184 mm) 7.75 in. (197 mm) 311595C... -
Page 10: Graco Standard Warranty
With the exception of any special, extended, or limited warranty published by Graco, Graco will, for a period of twelve months from the date of sale, repair or replace any part of the equipment determined by Graco to be defective.
Need help?
Do you have a question about the 311595C and is the answer not in the manual?
Questions and answers