Table of Contents
Advertisement
Advertisement
Table of Contents

Related Manuals for OZtrail Sportiva Lodge Family


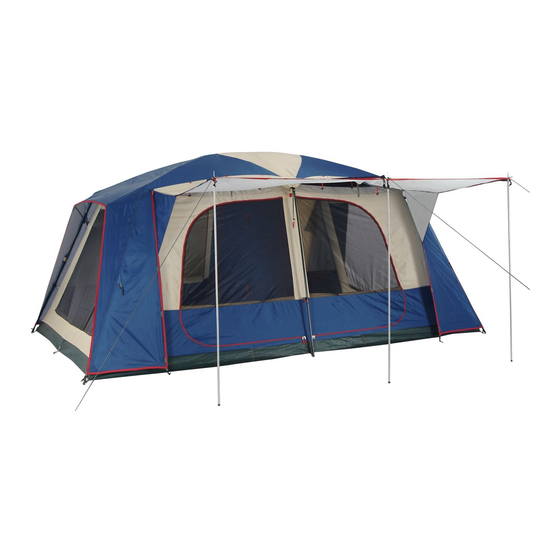
Summary of Contents for OZtrail Sportiva Lodge Family
-
Page 2: Table Of Contents
HELPFUL HINT • A separate detachable Ensuite tent with OZtrail advises to read your owner’s manual direct private access from Main tent fully and assemble your tent before going camping to ensure all parts are present and •... -
Page 3: Products And Parts
Product Code: DTS-LODF-B Thank you for purchasing a quality 2 x Pole bags OZtrail product. Please keep this Owner’s Manual in a safe and dry 2 x Cup holder place, it contains information and 1 x Gear loft helpful information. - Page 4 We recommend that you set up this product before you leave for your trip. Check that all parts are present and that you familiarise yourself with the assembly and disassembly of the product. If you have any questions, your OZtrail dealer will be happy to help you.
-
Page 5: Assembly Instructions
Assembly Instructions Step 1 Choose the site Select a sheltered camp site protected from the wind that will not allow water to pond under the tent floor. Clear a level area of all stones, twigs, etc. Step 2 Lay out the tent Unpack the contents of your tent. - Page 6 Assembly Instructions cont. Ensuite Tent hubs located across the middle of the tent. The correct hub is marked with red tape. 194cm 16mm Finally select the two “black steel roof reinforcement poles with yellow sticker”. These 19mm 70cm are inserted into the portico hubs located on the corners of the tent.
- Page 7 Assembly Instructions cont. Select one of the four “black steel wall poles Step 7 Attaching the Fly with red sticker. ” Insert one end into the middle Sheet on the Main tent portico hub with red tape and place the opposite end onto the ring and pin assembly at the base of the tent floor directly below.
- Page 8 Assembly Instructions cont. Step 8 Installing the side Step 9 Fitting the Poles to Halo poles the Portico Roof of Ensuite tent After the fly sheet is securely in place, select one of the two “grey fibreglass halo fly poles” Lay out the inner Ensuite tent facing the and place across the shortest side of the edge desired direction considering the future zipping...
- Page 9 Assembly Instructions cont. Ensure all guy ropes of the Main tent and Step 11 Attaching the Fly Ensuite are utilised. Make a loop (about Sheet on the Ensuite tent 30 – 50cm long) with a slider on the end of Lay the fly sheet out along the side of your the rope and peg out as far as possible from tent.
-
Page 10: Disassembly Instructions
Disassembly Instructions Step 1 Step 6 Unzip the connection between the Main tent Fold the tents in half, third or quarters. The and Ensuite tent. width of the folded tent should be the length of the pole bag. See Figure 11. Step 2 Step 7 Release awning, guy rope and Posibrace™... - Page 11 Disassembly Instructions Fold tent into a rectangular shape The width of the tent should not exceed the length of the pole bag Front of tent (door unzipped) Figure 11...
-
Page 12: Warranty
Warranty This OZtrail product is warranted for two HELPFUL HINT: years from date of purchase. OZtrail agrees AvOIDINg MOULD AND MILDEW during the warranty period to repair any manufacturing defects in the product or, at You should always pack your products both its option, replace the product with another clean and completely dry. -
Page 13: Prolonging The Life Of Your Tent/Shelter
Fading of colour is an early • When removing pegs, do not use the warning sign. OZtrail products are not webbing or corner of the tent as your designed as permanent dwellings or handle. -
Page 14: Important Safety And Care Information
Please read before setting up your tent/shelter CAMP SAFE - SAFETY HABITS TO PREvENT INJURY CAUSED BY FIRE Fabrics used in the construction of OZtrail tents/ • Do not pitch the tent/shelter near a camp shelters are designed to meet fire retardant fire or any other flame source standards US CPIA-84. - Page 15 Important Safety and Care Information cont. To prevent injury caused by your camping environment • Do not pitch your tent/shelter on an area that could get flooded • Do not pitch your tent/shelter near cliffs in case of collapse or rock fall •...
-
Page 16: Replacing The Shock-Cord
Poles and Shock Cord you will be ensuring that elasticity. you get the best performance and life out of your OZtrail Tent. Step Two: Threading the Pole Sections Tie a large knot in the end of the Shock Cord length. This knot needs to be large enough... - Page 17 Tent Pole and Shock Cord Replacement cont. Once your new pole is cut to length you can HELPFUL HINT follow the ‘Replacing Shock-Cord’ directions to Towards the end of the Pole Length it may get your Pole Length complete. get quite hard to thread the Pole Sections as the Shock Cord is stretching.
-
Page 18: Understanding Waterproofness
To prevent this, do not pitch the Know your tent tent over hollows and make sure water drains away from the tent. OZtrail tents are manufactured from waterproof and water repellent fabrics. However, with the STRUCTURAL INTEgRITY addition of seams, zips and other desirable... -
Page 19: Zips
Zips REDUCINg THE RISk OF JAMMINg CRIMPINg A ZIP-SLIDER FABRIC IN THE ZIP The most common reason why zips burst open is that the zip slider does not close the coil • When using the zip, hold the pull-tab tightly enough. Wear and tear may cause the between your thumb and forefinger with gap marked A to open up. - Page 20 Check out www.oztrail.com.au for other great products from OZtrail Leisure Products Imported by OZtrail Leisure Products • PO Box 1, Sumner Park QLD AUSTRALIA 4074 • Made in China...
Need help?
Do you have a question about the Sportiva Lodge Family and is the answer not in the manual?
Questions and answers