Table of Contents

Related Manuals for ChallengerOptics CO-OPM-18


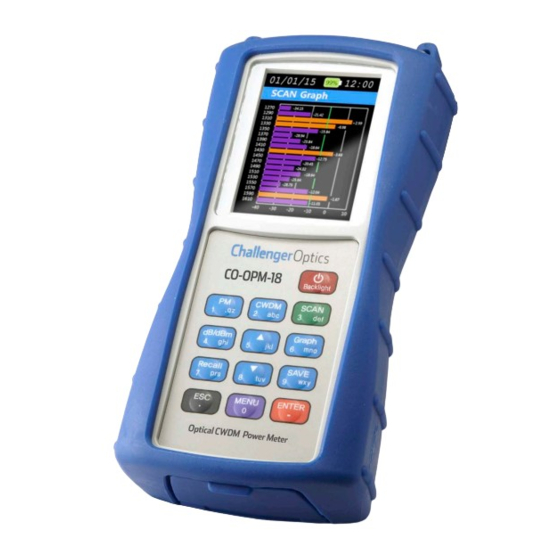
Summary of Contents for ChallengerOptics CO-OPM-18
-
Page 1: Table Of Contents
CO-OPM-18 / Interactive Operating Manual Best viewed with Adobe Acrobat Reader 1. Introduction 2.3 Menu 1.1 Special Features 2.3.1 Scan Set 1.2 Specifications 2.3.2 Select Wavelength 13 1.3 Accessories 2.3.3 Offset 1.4 Optical Standards 2.3.4 Auto Power Off 1.5 Charge Method 2.3.5 Time Set... -
Page 2: Introduction
Contents CO-OPM-18 1. Introduction 1.1 Special Features - Automatic Wavelength specific power measurement - Compact and lightweight for field use - Easy One Hand Operating - Measurement Save and Recall Function - Auto shut off function - Fast power up and test - High-quality graphics 1.2 Specifications... -
Page 3: Accessories
Contents CO-OPM-18 1.3 Accessories Description Quantity Body 1 ea Body Rubber Case 1 ea USB Data cable 1 ea Charger 1 ea User’s Manual 1 ea 1.4 Optical Standards Wavelength Parameter Unit Specification Range 1270-1610 Number of Channels... -
Page 4: Charge Method
Contents CO-OPM-18 1.5 Charge Method The CO-OPM-18 has a rechargeable battery. A USB power adapter and micro USB cable are provided for charging. Typical charge time is six hours. Charging conditions: LED Color Action of LED Conditions for battery charge... -
Page 5: Getting Started
Contents CO-OPM-18 2. Getting Started 2.1 Explanation of Operating Keys Function Backlight Power ON/OFF, Backlight ON/OFF Single Channel, Channel number and Power Display DWDM A Single DWDM Channel is measured and displayed SCAN All Wavelengths are scanned and power levels are displayed... -
Page 6: Key Function
Contents CO-OPM-18 2.2 Key Function 2.2.1 Power ON / OFF To turn on and off. Press the button for more Backlight than 2 seconds, the logo shown appears. The meter then displays the channel with the highest power level. -
Page 7: Power Meter
Contents CO-OPM-18 2.2.2 Power Meter Power Measurement has 2 options ‘Auto’ and ‘Manual’ . If you select ‘Auto’ , the instrument automatically scans the optical input and displays the wavelength which has been detected with the highest level of power. -
Page 8: Scan
Contents CO-OPM-18 2.2.4 Scan SCAN Press the button, the light source is scanned and the power level on each channel is displayed. You can select the page using ▲ ▼ the arrow keys. 2.2.5 dB / dBm This button toggles between dB &... -
Page 9: Graph
Contents CO-OPM-18 2.2.6 Graph Graph button is used after scanning to show power levels in graphical format. Press the button again it Graph returns to text mode. ChallengerOptics.com Wavelength Specific Optical Testing and Measurement Equipment... -
Page 10: Recall
Contents CO-OPM-18 p 10 2.2.7 Recall Recall button will recall saved measurements. ENTER Press to select the data – you want to display. ChallengerOptics.com Wavelength Specific Optical Testing and Measurement Equipment... -
Page 11: Save
Contents CO-OPM-18 p 11 2.2.8 Save SAVE button allows the user to save a measurement. The following message shows, and the measurement is saved using the current date and time as the filename. Then, press the button to ENTER –... -
Page 12: Menu
Contents CO-OPM-18 p 12 2.3 MENU MENU button, allows you to configure the operating environment of the CO-OPM-48. The menu consists of : ‘SCAN SET’ , ‘Off Set’ , ‘Auto Power Off’ , ‘Time Set’ , ‘Data Delete’ , ‘Data Format’ , ‘System Info’... -
Page 13: Select Wavelength
Contents CO-OPM-18 p 13 2.3.2 Select Wavelength The ‘Selected’ option allows user to select specific channels to be measured. Highlight the channel and press ‘Enter’ to toggle channel ON/OFF. 2.3.3 Offset If you are measuring at a test point you can set the ‘Offset’... - Page 14 Contents CO-OPM-18 p 14 2.3.3 Offset continued from previous page ENTER Press the button after – selecting ‘All Channel’ , you can set up all channel’s offset value between –25.99 to +25.99 dB. ‘+’ and ‘-’ sign can be changed to number ▲ and ▼...
-
Page 15: Auto Power Off
Contents CO-OPM-18 p 15 2.3.4 Auto Power Off The meter will automatically power down if the user does not input any key in the determined time. Press the button after ENTER – selecting ‘Auto Power Off’ , you can set the Auto power off time in minutes. -
Page 16: Time Set
Contents CO-OPM-18 p 16 2.3.5 Time Set ENTER Press the button after – selecting ‘Time Set’ , to set the date and current time. Enter date in YY/MM/DD format Enter time in HH/MM/SS format You can save the time by pressing button. -
Page 17: Data Delete
Contents CO-OPM-18 p 17 2.3.6 Data Delete Press the button after ENTER – selecting ‘Delete Data’ , you can delete saved measurements. Use ▲ and ▼ to select data set to be deleted. ENTER Press the key after –... -
Page 18: Data Format
Contents CO-OPM-18 p 18 2.3.7 Data Format You can delete all saved files by formatting the memory. Press the key after ‘Data ENTER – Format’ , message appears on the screen to confirm. Press the ENTER button, all files –... -
Page 19: Scan Display
Contents CO-OPM-18 p 19 2.3.9 Scan Display ‘Scan Display’ consists of ‘All’ and ‘Measured’ . This can be selected using ▲ ▼ ‘All ’will display power levels of All wavelengths measured by the meter REGARDLESS of power level. If you choose the ‘Measured’ , only wavelengths with a power level higher than -40 dBm are displayed. -
Page 20: Scan Mode
Contents CO-OPM-18 p 20 2.3.11 Scan Mode The ‘SCAN Mode’ consists of the ‘Single’ and ‘Repeat’ . This can be selected using ▲ ▼ If you choose the ‘Repeat’ , when selecting ‘SCAN’ , shows the real time changing power values. -
Page 21: Threshold
Contents CO-OPM-18 p 21 2.3.12 Threshold This will change the baseline of the meter. ‘-30.00 dBm’ is the default setting. Press the button after ENTER – selecting ‘Threshold’ , you can set the baseline. Baseline changes can be found at the graph screen. -
Page 22: Graph Color
Contents CO-OPM-18 p 22 2.3.13 Graph Color You can change the graph color. ChallengerOptics.com Wavelength Specific Optical Testing and Measurement Equipment... -
Page 23: Below Threshold
Contents CO-OPM-18 p 23 2.3.14 Below Threshold The ‘Below Threshold’ consists of the ‘Display’ and ‘Hide’ . This can be selected using ▲ ▼ If you choose the ‘Display’ , any power level BELOW the threshold will be displayed as it is measured.
Need help?
Do you have a question about the CO-OPM-18 and is the answer not in the manual?
Questions and answers