Table of Contents

Related Manuals for ChallengerOptics CO-OPM-MPO24


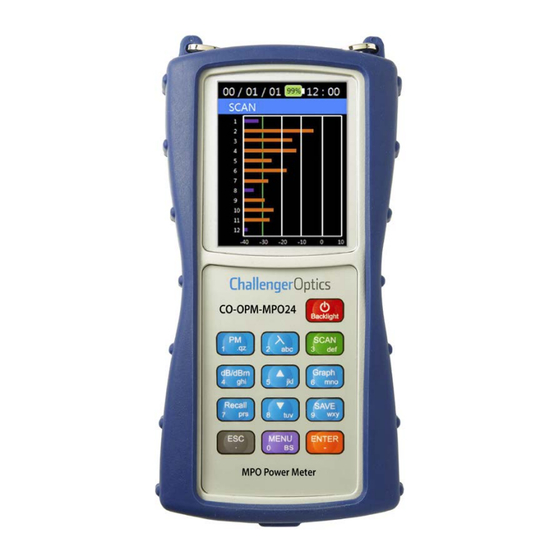
Summary of Contents for ChallengerOptics CO-OPM-MPO24
-
Page 1: Table Of Contents
CO-OPM-MPO24 / Interactive Operating Manual Best viewed with Adobe Acrobat Reader 1. Introduction 2.3 Menu 1.1 Special Features 2.3.1 Polarity 1.2 Specifications 2.3.2 Offset 1.3 Package Contents 3 2.3.3 Auto Power Off 1.4 Charge Method 2.3.4 Time Set 1.5 Meter Care 2.3.5 Data Delete... -
Page 2: Introduction
Contents CO-OPM-MPO24 1. Introduction 1.1 Special Features - 24 Fiber - Quick power measurement on all fibers - Compact size, one button operation - Color LCD for graph display - Light weight for easy field use - Quick start: No warm-up and 2 second measurement - Software provided for data management 1.2 Specifications... -
Page 3: Package Contents
1 ea User’s Manual - USB stick 1 ea 1.4 Charge Method The CO-OPM-MPO24 has a rechargeable battery. A USB power adapter and micro USB cable are provided for charging. Typical charge time is six hours. Charging conditions: LED Color... -
Page 4: Getting Started
Contents CO-OPM-MPO24 2. Getting Started 2.1 Explanation of Operating Keys Function Backlight Power On/Off, Backlight On/Off Single Fiber, Fiber number and Power Display λ Changing inspection wavelength SCAN Fiber are scanned and power levels are displayed dB/dBm Toggle between dB and dBm UOM ▲... -
Page 5: Key Function
Contents CO-OPM-MPO24 2.2 Key Function 2.2.1 Power ON / OFF To turn on and off. Press the button for Backlight more than 2 seconds, the logo shown appears. The meter then displays the channel with the highest power level. -
Page 6: Power Meter
Contents CO-OPM-MPO24 2.2.2 Power Meter Power Measurement has 2 options ‘Auto’ and ‘Manual’ . If you select ‘Auto’ , the instrument automatically scans the optical input and displays the wavelength which has been detected with the highest level of power. -
Page 7: Scan
This button toggles between dB (relative) & dBm (absolute) power measurements dB/dBm To measure the relative loss of an MPO circuit, connect the CO-OPM-MPO24 to a known light source with a short (test) jumper. (continued) ChallengerOptics.com Wavelength Specific Optical Testing and Measurement Equipment... - Page 8 Contents CO-OPM-MPO24 : Relative/Absolute Measurements 2.2.4 dB / dBm With dBm selected as the UOM, press scan. SCAN dB/dBm Press the dB/dBm button to choose dB as UOM (the meter will pause a few seconds while it stores the power measurements).
-
Page 9: Graph
Contents CO-OPM-MPO24 2.2.5 Graph Graph button is used after scanning to show power levels in graphical format. Scroll to view fibers 13-24 Press the Graph button again it returns to text mode. ChallengerOptics.com Wavelength Specific Optical Testing and Measurement Equipment... -
Page 10: Recall
Contents CO-OPM-MPO24 p 10 2.2.6 Recall button will recall Recall saved measurements. Press to select the data ENTER – you want to display. 2.2.7 Save SAVE button allows the user to save a measurement. The following message shows,... -
Page 11: Menu
Contents CO-OPM-MPO24 p 11 2.3 MENU button, allows MENU you to configure the operating environment of the CO-OPM-MPO24 The menu consists of: Polarity Offset Auto Power Off Time Set Data Delete Data Format System Info Scan Display and Threshold 2.3.1 Polarity... -
Page 12: Offset
Contents CO-OPM-MPO24 p 12 2.3.2 Offset If you press the button ENTER – after selecting ‘Off Set’ , you can setup dBm value and the optical power value on the screen. Input the value pressing the number buttons. -
Page 13: Time Set
Contents CO-OPM-MPO24 p 13 2.3.4 Time Set Press the button after ENTER – selecting ‘Time Set’ , to set the date and current time. Enter date in YY/MM/DD format Enter time in HH/MM/SS format You can save the time by pressing button. -
Page 14: Data Delete
Contents CO-OPM-MPO24 p 14 2.3.5 Data Delete Press the button after ENTER – selecting ‘Delete Data’ , you can delete saved measurements. Use ▲ and ▼ to select data set to be deleted. Press the key after ENTER –... -
Page 15: Data Format
Contents CO-OPM-MPO24 p 15 2.3.6 Data Format You can delete all saved files by formatting the memory. Press the key after ENTER – ‘Data Format’ , message appears on the screen to confirm. Press the button, all ENTER –... -
Page 16: Scan Type
Contents CO-OPM-MPO24 p 16 2.3.8 Scan type This option allows the user to choose the scan type: Press & Scan (Single) or Real Time using ▲ ▼ keys, user can toggle between a single scan or continuous (real time) scan when you press the button. -
Page 17: Threshold
Contents CO-OPM-MPO24 p 17 2.3.10 Threshold This will change the baseline of the meter. ‘-30.00 dBm’ is the default setting. ENTER Press the button after – selecting ‘Threshold’ , you can set the baseline. Baseline changes can be found at the graph screen.
Need help?
Do you have a question about the CO-OPM-MPO24 and is the answer not in the manual?
Questions and answers